Learning Path 4 - Lab 1 - Exercise 1 - Deploy Microsoft Defender for Endpoint
Lab scenario
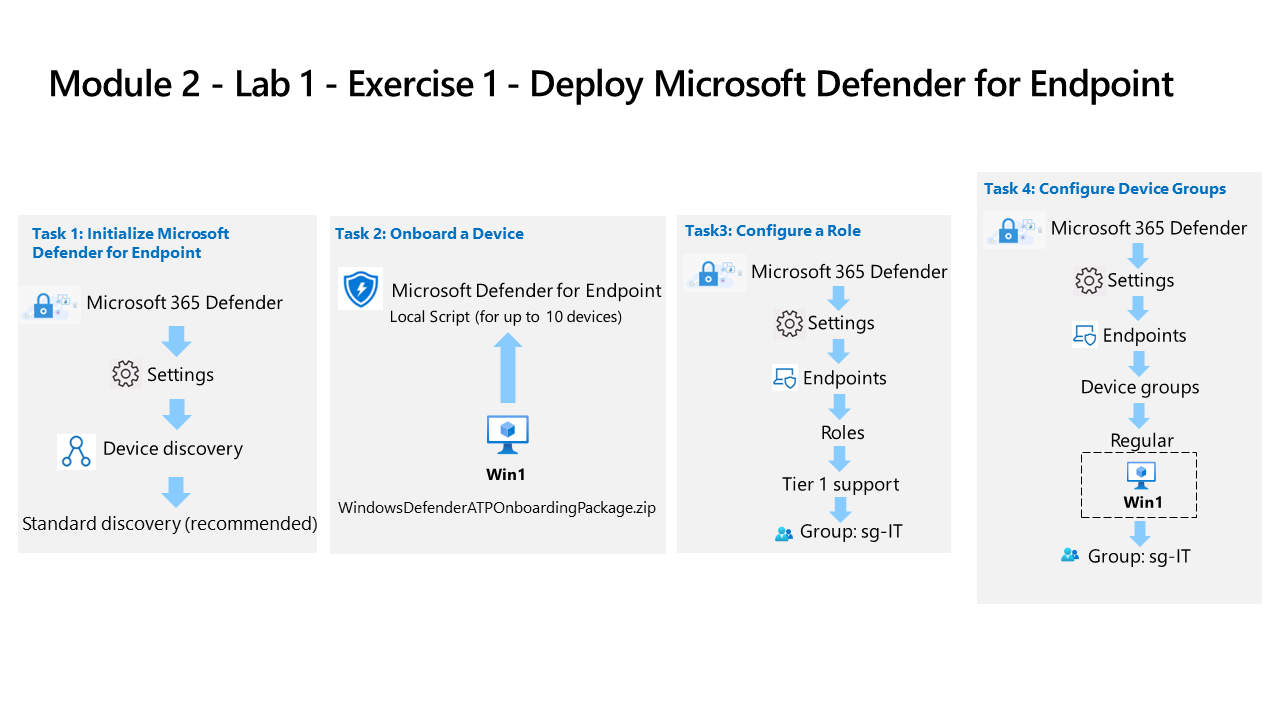
You’re a Security Operations Analyst working at a company that is implementing Microsoft Defender for Endpoint. Your manager plans to onboard a few devices to provide insight into required changes to the Security Operations (SecOps) team response procedures.
You start by initializing the Defender for Endpoint environment. Next, you onboard the initial devices for your deployment by running the onboarding script on the devices. You configure security for the environment. Lastly, you create Device groups and assign the appropriate devices.
Important: The lab Virtual Machines are used through different modules. SAVE your virtual machines. If you exit the lab without saving, you will be required to re-run some configurations again.
Note: Make sure you have successfully completed Task 3 of the first module.
Estimated time to complete this lab: 30 minutes
Task 1: Initialize Microsoft Defender for Endpoint
In this task, you’ll perform the initialization of the Microsoft Defender for Endpoint.
-
Sign in to WIN1 virtual machine as Admin using the provided credentials.
-
If you aren’t already at the Microsoft Defender XDR portal, start the Microsoft Edge browser.
-
In the Microsoft Edge browser, navigate to Microsoft Defender XDR at
https://security.microsoft.com. -
In the Sign in dialog box, copy, and paste in the tenant Email account for the admin username provided by your lab hosting provider and then select Next.
-
In the Enter password dialog box, copy, and paste in the admin’s tenant password provided by your lab hosting provider and then select Sign in.
Tip: The admin’s tenant email account and password can be found on the Resources tab.
-
On the Defender XDR portal, from the navigation menu on the left, scroll down and expand the System section and select Settings.
Note: Some versions of the portal may not have the Settings option under the System section. Settings may be grouped with Reports and Audit.
-
On the Settings page, select Device discovery.
Note: If you do not see the Device discovery option under Settings, logout by selecting the top-right circle with your account initials and select Sign out. Other options that you might want to try is to refresh the page with Ctrl+F5 or open the page InPrivate. Login again with the Tenant Email credentials.
-
In Discovery setup, make sure Standard discovery (recommended) is selected.
Hint: If you do not see the option, refresh the page.
Task 2: Onboard a Device
In this task, you’ll onboard a device to Microsoft Defender for Endpoint using the Defender deployment tool.
-
In the Defender XDR portal, from the navigation menu on the left, scroll down and expand the System section and select Settings, then select Endpoints.
-
Select Onboarding in the Device management section.
Note: You can also perform device onboarding from the Assets section of the left menu. Expand Assets and select Devices. On the Device inventory page, scroll down to Onboard devices. This takes you to the Settings > Endpoints > Onboarding page.
-
In Settings > Endpoints > Onboarding, scroll to Deploy by downloading and applying packages or files. In the Defender deployment tool section, select Onboard.
-
In the Generate the Defender deployment tool with an access key pane, enter a name and select Generate.
-
Copy the generated deployment key, and select Download deployment tool, and then select .zip.
-
Open the downloaded ZIP file from the browser download notification, or navigate to the Downloads folder.
Hint: The downloaded file should be located in
C:\Users\Admin\Downloads. -
Right-click the downloaded ZIP file, select Extract All…, verify that Show extracted files when complete is selected, and then select Extract.
-
Open the extracted folder and run DefenderDeploymentTool_Onboard_
<name>.exe (where<name>matches the name you entered). -
If the User Account Control window appears, select Yes.
-
In the Microsoft Defender deployment tool window, select Continue.
-
When prompted, paste the deployment key that you copied earlier and verify that the key is shown as Valid.
-
Select Continue to start the onboarding process.
-
Wait for the onboarding process to complete successfully, then select OK to close the deployment tool.
-
On the Your Defender deployment package and key are ready! pane, verify that the Deployment tool downloaded successfully! message appears, and then close the pane.
Task 3: Configure Roles
In this task, you’ll configure roles for use with device groups.
-
In the Microsoft Defender XDR portal navigation menu, expand the System section and select Settings, then select Microsoft Defender XDR.
-
Select Permissions and Roles under the Account section.
-
Scroll down the page and select the Go to Permissions and roles link.
-
On the Permissions and roles page, select + Create custom role.
-
On the Basics page In the Add role dialog, enter the following:
Basics setting Value Role name Tier 1 Support -
Select Next.
-
On the Permissions page, select the following permissions:
Permissions group Description Security Operations Manages day-to-day operations and responds to incidents and advisories -
In the pop-out page for Security operations, select the All read and manage permissions radio button.
-
Select Apply, and then select Next.
-
On the Assign users and data sources page, select the Create assignment button.
-
In the Add assignment dialog, enter the following:
Assignment setting Value Assignment name Tier 1 Support Employees sg-IT Data sources Leave default -
Select Add, then select Next.
-
Select Submit and then Done when finished.
Task 4: Configure Device Groups
In this task, you’ll configure device groups that allow for access control and automation configuration.
-
In the Microsoft Defender XDR portal left menu bar, expand the System section and select Settings, then select Endpoints.
-
Select Device groups under the permissions area.
-
Select + Add device group icon.
-
Enter the following information on the General tab:
General setting Value Device group name Regular Remediation level Full remediation -
Select Next.
-
On the Devices tab, for the OS condition select Windows 11 and select Next.
Note: Some lab hosting providers may still have Windows 10 images for WIN1. You can select either or both.
-
On the Preview devices tab, the Show preview button could show the WIN1 virtual machine, but most likely the data isn’t populated yet. Select Next to continue.
-
For the User access tab, select sg-IT and then select Add selected groups button. Make sure it appears under Azure AD user groups with access to this device group.
-
Select Submit and then Done when finished.
-
Device group configuration has changed. Select Apply changes to check matches and recalculate groupings.
-
You’re going to have two device groups now; the “Regular” you created and the “Ungrouped devices (default)” with the same remediation level.