Learning Path 2 - Lab 1 - Exercise 1 - Deploy Microsoft Defender for Endpoint
Lab scenario
You’re a Security Operations Analyst working at a company that is implementing Microsoft Defender for Endpoint. Your manager plans to onboard a few devices to provide insight into required changes to the Security Operations (SecOps) team response procedures.
You start by initializing the Defender for Endpoint environment. Next, you onboard the initial devices for your deployment by running the onboarding script on the devices. You configure security for the environment. Lastly, you create Device groups and assign the appropriate devices.
Important: The lab Virtual Machines are used through different modules. SAVE your virtual machines. If you exit the lab without saving, you will be required to re-run some configurations again.
Note: Make sure you have completed successfully Task 3 of the previous module.
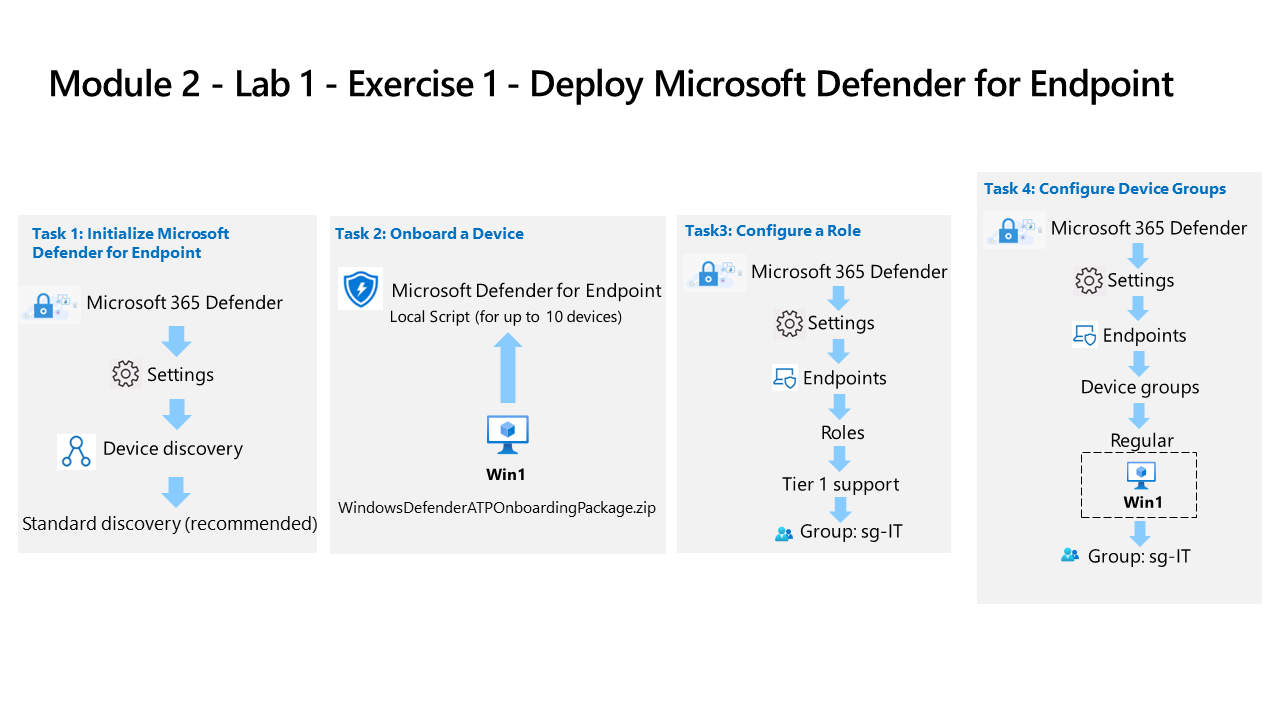
Task 1: Initialize Microsoft Defender for Endpoint
In this task, you’ll perform the initialization of the Microsoft Defender for Endpoint.
-
Sign-in to WIN1 virtual machine as Admin with the password: Pa55w.rd.
-
If you aren’t already at the Microsoft Defender XDR portal, start the Microsoft Edge browser.
-
In the Microsoft Edge browser, go to the Defender XDR portal at (https://security.microsoft.com).
-
In the Sign in dialog box, copy, and paste in the tenant Email account for the admin username provided by your lab hosting provider and then select Next.
-
In the Enter password dialog box, copy, and paste in the admin’s tenant password provided by your lab hosting provider and then select Sign in.
Tip: The admin’s tenant email account and password can be found on the Resources tab.
-
On the Defender XDR portal, from the navigation menu on the left, scroll down and expand the System section and select Settings.
Note: Some versions of the portal may not have the Settings option under the System section. Settings may be grouped with Reports and Audit.
-
On the Settings page, select Device discovery.
Note: If you do not see the Device discovery option under Settings, logout by selecting the top-right circle with your account initials and select Sign out. Other options that you might want to try is to refresh the page with Ctrl+F5 or open the page InPrivate. Login again with the Tenant Email credentials.
-
In Discovery setup, make sure Standard discovery (recommended) is selected.
Hint: If you do not see the option, refresh the page.
Task 2: Onboard a Device
In this task, you’ll onboard a device to Microsoft Defender for Endpoint using an onboarding script.
-
In the Defender XDR portal, from the navigation menu on the left, scroll down and expand the System section and select Settings, then from the Settings page select Endpoints.
-
Select Onboarding in the Device management section.
Note: You can also perform device onboarding from the Assets section of the left menu bar. Expand Assets and select Devices. On the Device Inventory page, with Computers & Mobile selected, scroll down to Onboard devices. This takes you to the Settings > Endpoints page.
-
In the “1. Onboard a device” area make sure “Local Script (for up to 10 devices)” is displayed in the Deployment method drop-down and select the Download onboarding package button.
-
Under the Downloads pop-up, highlight the “WindowsDefenderATPOnboardingPackage.zip” file with your mouse and select the folder icon Show in folder. Hint: In case you don’t see it, the file should be in the c:\users\admin\downloads directory.
Tip: If your browser blocks the download, take action in the browser to allow it. In the Microsoft Edge Browser, you may see the message, “WindowsDefenderATPOnboardingPackage.zip isn’t commonly downloaded. Make sure you trust…, select the ellipsis button (…) if needed and then select Keep. In Microsoft Edge a second pop-up appears with the message,”Make sure you trust WindowsDefenderATPOnboardingPackage.zip before you open it”, select Show more to expand the selections and select Keep anyway.
-
Right-click the downloaded zip file and select Extract All…, make sure that Show extracted files when complete is checked and select Extract.
-
Right-click on the extracted file “WindowsDefenderATPLocalOnboardingScript.cmd” and select Properties. Select the Unblock checkbox in the bottom right of the Properties windows and select OK.
-
Right-click on the extracted file “WindowsDefenderATPLocalOnboardingScript.cmd” again and choose Run as Administrator. Hint: If you encounter the Windows SmartScreen window, select on More info, and choose Run anyway.
-
When the “User Account Control” window is shown, select Yes to allow the script to run and answer Y to the question presented by the script and press Enter. When complete you should see a message in the command screen that says Successfully onboarded machine to Microsoft Defender for Endpoint.
-
Press any key to continue. This closes the Command Prompt window.
Task 3: Configure Roles
In this task, you’ll configure roles for use with device groups.
-
In the Microsoft Defender XDR portal left menu bar, expand the System section and select Settings, then select Endpoints.
Note: Some versions of the portal may not have the Settings option under the System section. Settings may be grouped with Reports and Audit.
-
Select Roles under the permissions section.
-
Select the Turn on roles button.
-
Select + Add role.
-
In the Add role dialog, enter the following:
General setting Value Role name Tier 1 Support Permissions Live Response capabilities - Advanced -
Select Next.
-
On the Assigned user groups page, type sg-IT in the Filter user groups form, and then select Add selected groups. Make sure it appears under Azure AD user groups with this role.
-
Select Submit and then Done when finished.
Note: If you receive the error “User can’t perform this action since its UserAuthEnforcementMode is Rbac and this action requires one of: RbacV2”, select OK and try again.
Task 4: Configure Device Groups
In this task, you’ll configure device groups that allow for access control and automation configuration.
-
In the Microsoft Defender XDR portal left menu bar, expand the System section and select Settings, then select Endpoints.
-
Select Device groups under the permissions area.
-
Select + Add device group icon.
-
Enter the following information on the General tab:
General setting Value Device group name Regular Remediation level Full - remediate threats automatically -
Select Next.
-
On the Devices tab, for the OS condition select Windows 10 and select Next.
Note: Some lab hosting providers may have configured Windows 11 images for WIN1. You can select either or both.
-
On the Preview devices tab, the Show preview button could show the WIN1 virtual machine, but most likely the data isn’t populated yet. Select Next to continue.
-
For the User access tab, select sg-IT and then select Add selected groups button. Make sure it appears under Azure AD user groups with access to this device group.
-
Select Submit and then Done when finished.
-
Device group configuration has changed. Select Apply changes to check matches and recalculate groupings.
-
You’re going to have two device groups now; the “Regular” you created and the “Ungrouped devices (default)” with the same remediation level.