Learning Path 1 - Lab 1 - Exercise 1 - Explore Microsoft Defender XDR
Lab scenario
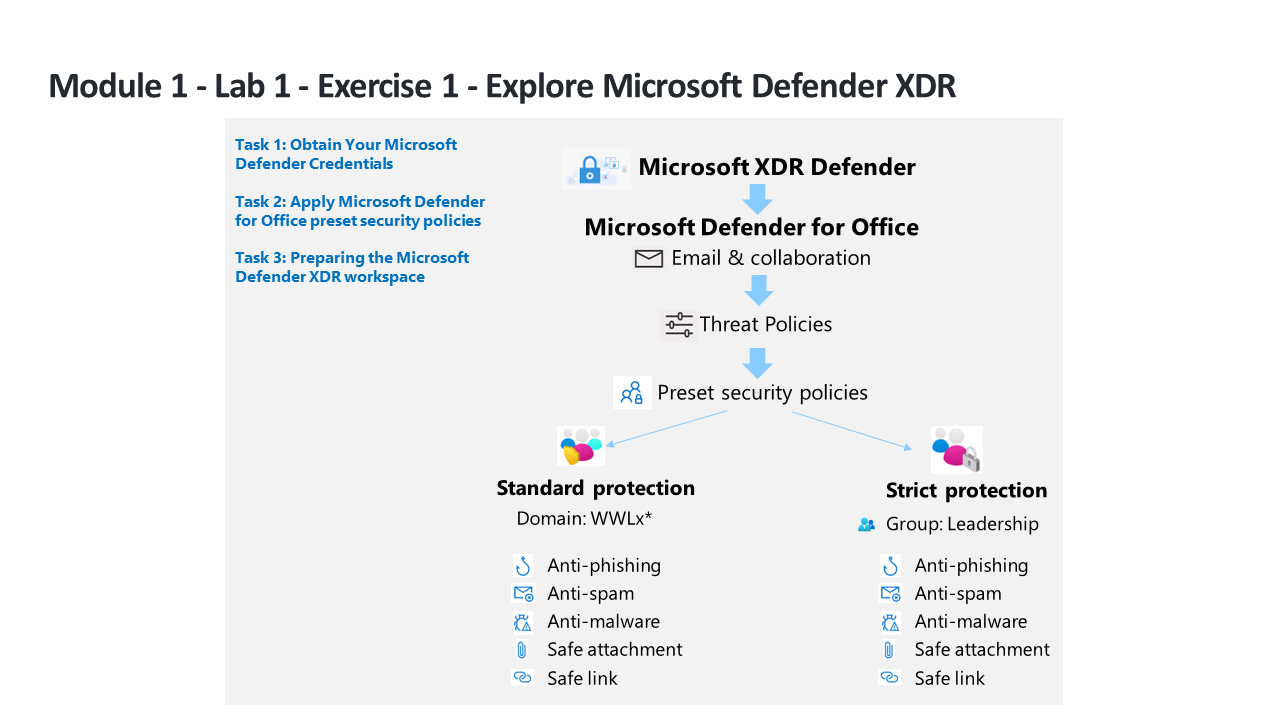
You’re a Security Operations Analyst working at a company that is implementing Microsoft Defender XDR. You start by assigning preset security policies used in Exchange Online Protection (EOP) and Microsoft Defender for Office 365.
Note: WWL Tenants - Terms of Use If you are being provided with a tenant as a part of an instructor-led training delivery, please note that the tenant is made available for the purpose of supporting the hands-on labs in the instructor-led training. Tenants should not be shared or used for purposes outside of hands-on labs. The tenant used in this course is a trial tenant and cannot be used or accessed after the class is over and are not eligible for extension. Tenants must not be converted to a paid subscription. Tenants obtained as a part of this course remain the property of Microsoft Corporation and we reserve the right to obtain access and repossess at any time.
Task 1: Obtain Your Microsoft 365 Credentials
Once you launch the lab, a free trial tenant is made available to you to access in the Microsoft virtual Lab environment. This tenant is automatically assigned a unique username and password. You must retrieve this username and password so that you can sign into Azure and Microsoft 365 within the Microsoft Virtual Lab environment.
Because this course can be offered by learning partners using any one of several Authorized Lab Hosting (ALH) providers, the actual steps involved to retrieve the tenant ID associated with your tenant may vary by lab hosting provider. Therefore, your instructor will provide you with the necessary instructions for how to retrieve this information for your course. The information that you should note for later use includes:
- Tenant suffix ID. This ID is for the onmicrosoft.com accounts that you’ll use to sign into Microsoft 365 throughout the labs. This is in the format of {username}@ZZZZZZ.onmicrosoft.com, where ZZZZZZ is your unique tenant suffix ID provided by your lab hosting provider. Record this ZZZZZZ value for later use. When any of the lab steps direct you to sign into Microsoft 365 portals, you must enter the ZZZZZZ value that you obtained here.
- Tenant password. This is the password for the admin account provided by your lab hosting provider.
Task 2: Apply Microsoft Defender for Office 365 preset security policies
In this task, you’ll assign preset security policies for Exchange Online Protection (EOP) and Microsoft Defender for Office 365 in the Microsoft 365 security portal.
-
Log in to WIN1 virtual machine as Admin with the password: Pa55w.rd.
-
Start the Microsoft Edge browser.
-
In the Microsoft Edge browser, go to the Microsoft Defender XDR portal at (https://security.microsoft.com).
-
In the Sign in dialog box, copy, and paste in the tenant Email account for the admin username provided by your lab hosting provider and then select Next.
-
In the Enter password dialog box, copy, and paste in the admin’s tenant password provided by your lab hosting provider and then select Sign in.
Note: If you receive a message “The operation could not be completed. Please try again later. If the problem persists, contact Microsoft support.” just click OK to continue.
-
If shown, close the Microsoft Defender XDR quick tour pop-up window. Hint: Later in this lab, you’ll need to wait until the Defender workspace is provisioned, you can take this time to navigate through the guided tours to learn more about Microsoft Defender XDR.
-
From the navigation menu, under Email & Collaboration area, select Policies & rules.
-
On the Policy & rules dashboard, select Threat policies.
-
On the Threat policies dashboard, select Preset Security Policies.
Note: If you receive the message “Client Error - Error when getting bip rule” select OK to continue. The error is due to the hydration status of your tenant at Office 365 which is not enabled by default.
Note: If you receive the message “Client Error - An error occurred when retrieving preset security policies. Please try again later.” select OK to continue. Refresh your browser using Ctrl+F5.
-
On the Learn about preset security policies pop-out page, select Close.
-
Under Standard protection, select Manage protection settings. Hint: If you see this option grayed out, refresh your browser using Ctrl+F5.
-
In the Apply Exchange Online Protection section, select Specific recipients and under Domains start writing your tenant’s domain name, select it, and then select Next.
Hint: Your tenant’s domain name is the same name that you have for your admin account, it might be something like WWLx######.onmicrosoft.com. Notice that this configuration applies policies for anti-spam, outbound spam filter, anti-malware, anti-phishing.
-
In the Apply Defender for Office 365 protection section, apply the same configuration as the previous step and select Next. Notice that this configuration applies policies for anti-phishing, Safe Attachments, Safe Links.
-
In the Impersonation protection section, select Next four times (4x) to continue.
-
In the Policy mode section, make sure the Turn on the policy when finished radio button is selected, and then select Next.
-
Read the content under Review and confirm your changes and select Confirm to apply the changes and then select Done to finish.
Note: If you receive the message “The URI ‘https://outlook.office365.com/psws/service.svc/AntiPhishPolicy’ is not valid for PUT operation. The URI must point to a single resource for PUT operations.” just select OK and then select Cancel to return to the main page. You will see that Standard protection is on option enabled.
-
Under Strict protection, select Manage protection settings. Hint: Strict protection is found under “Email & Collaboration - Policies & rules - Threat policies - Preset security policies”.
-
In the Apply Exchange Online Protection, select Specific recipients and under Groups start writing Leadership, select it, and then select Next. Notice that this configuration applies policies for anti-spam, outbound spam filter, anti-malware, anti-phishing.
-
In the Apply Defender for Office 365 protection section, apply the same configuration as the previous step and select Next. Notice that this configuration applies policies for anti-phishing, Safe Attachments, Safe Links.
-
In the Impersonation protection section, select Next four times (4x) to continue.
-
In the Policy mode section, make sure the Turn on the policy when finished radio button is selected, and then select Next.
-
Read the content under Review and confirm your changes and select Confirm to apply the changes and then select Done to finish.
Note: If you receive the message “The URI ‘https://outlook.office365.com/psws/service.svc/AntiPhishPolicy’ is not valid for PUT operation. The URI must point to a single resource for PUT operations.” just select OK and then select Cancel to return to the main page. You will see the Strict protection is on option enabled.
Task 3: Preparing the Microsoft Defender XDR workspace
-
On the Microsoft Defender portal, from the navigation menu, select Home from the left.
Note: You may need to scroll all the way to the menu top.
-
Scroll down the menu items to Assets and select Devices.
-
The process to deploy the Defender XDR workspace should start and you should see messages saying loading and Initializing briefly displayed at the top of the page, and then you’re going to see an image of a coffee mug and a message that reads: Hang on! We’re preparing new spaces for your data and connecting them. It takes approximately 5 minutes to finish. Leave the page open and make sure it finishes since it’s required for the next Lab.
Note: Disregard pop-up error messages saying Some of your data cannot be retrieved. If the message “Hang on! We’re preparing new spaces for your data and connecting them” does not appear, or the “Settings > Microsoft Defender XDR > Account” page opens, but you see the message Failed to load data storage location. Please try again later, select “Alert service settings” from the “General” menu.
-
When the new workspace initialization completes successfully, the Home portal page will display a Get your SIEM and XDR in one place banner. And, in Settings, the Microsoft Defender XDR General settings for Account, Email notifications, Preview Features, Alert service settings, Permissions and roles and Streaming API are now turned on.