Practice Lab 5 - Create a model-driven app
Learning Objective
In this exercise, learners will be creating a model-driven app in Power Apps using Copilot. You will define the data model, modify forms and views, and create the application.
Upon successful completion of this lab, you will:
- Build a model-driven application.
- Modify forms and views in the application to best fit your needs.
- Navigate through a model-driven application.
Scenario
Contoso Consulting is a professional services organization specializing in IT and AI consulting services. Throughout the year, they offer many different events to their customers. Some of these are trade shows style events where they have many partners come in and provide details on new products, market trends, and services. Others occur throughout the year and are quick webinars that are used to provide details about individual products.
Contoso would like to use Power Platform to build an Event Management solution that they can use to manage the different events they host throughout the year.
In this exercise you are going to build a model-driven application to manage Contoso’s events. The model-driven application will be based on an existing data model and will include Events, Event Sessions, and Session registrations.
Lab Details:
Before beginning this exercise, It is recommended that have completed:
- Lab 1 – Create a solution
- Lab 2 – Create a data model
The estimated time to complete this exercise is 20 to 30 minutes.
Task 1: Create a data model to support your new model-driven application
Contoso currently stores contact information in their Dataverse instance, so they would like to use Dataverse to keep track of courses and course registrations. You need to create the necessary tables to support the application and build a model-driven application based on that data model.
- If necessary, open a web browser and navigate to the Power Apps maker portal, and sign in using your Microsoft account credentials.
- Using the navigation on the left, select Solutions.
- Open the Event Management solution that you created earlier.
- On the Command bar select New > App > Model-driven app.
- Select the Create section.
- Name:
Contoso Event Management - Description:
Used to manage Events and Event Sessions.
- Name:
- Select the Create button.
- Select the +Add Page button, select Dataverse table.
- Select the following tables:
- Contact
- Event
- Event Session
- Session registration
-
Make sure that Show in navigation is selected.
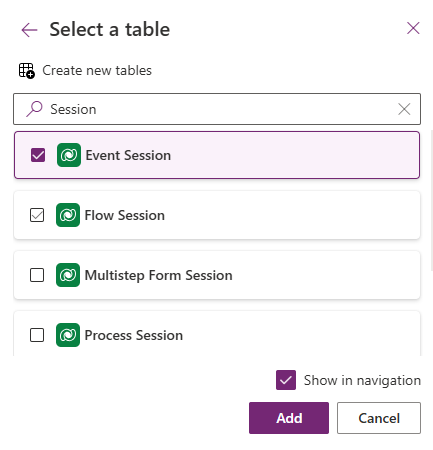
- Select the Add button.
Note: Sometimes you will get prompted to sign in while working with the designer. Select the X to cancel out of the sign in screen.
Task 2: Edit the model-driven application to fit your needs
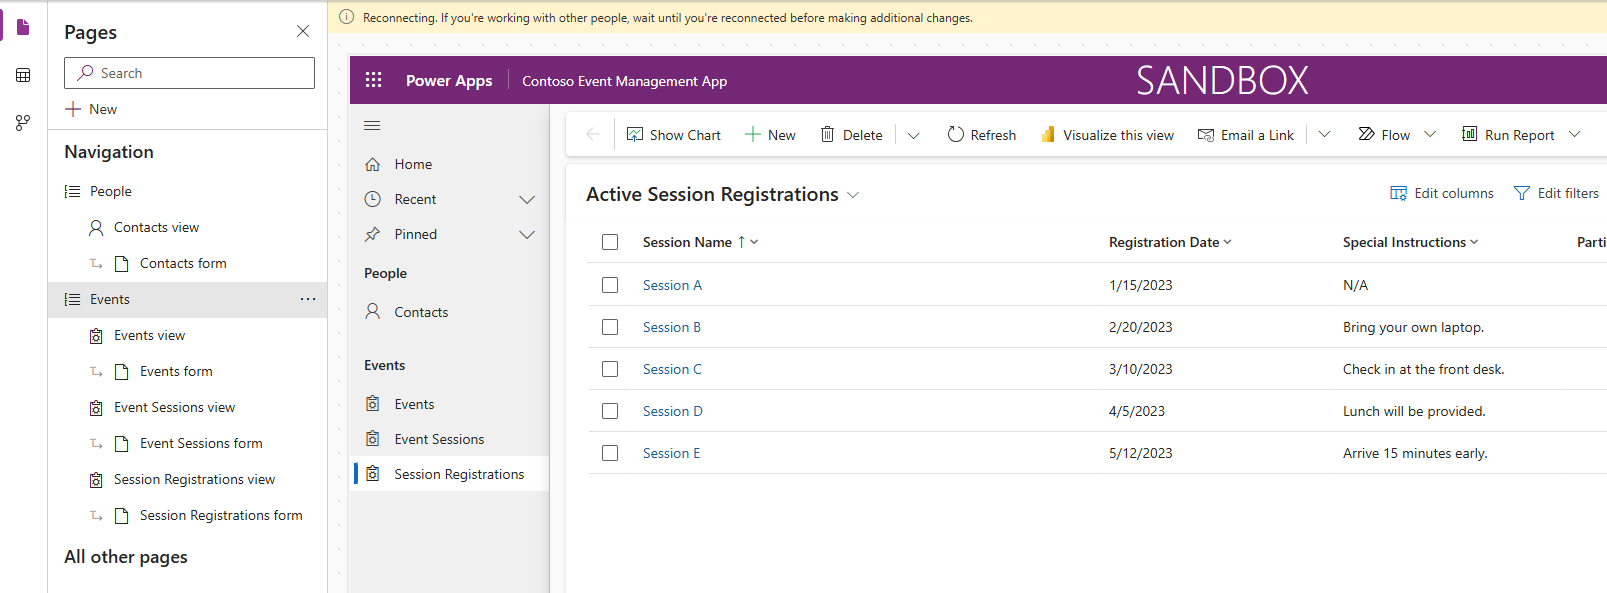
Now that the app is created, we are going to make some changes to the way the application is presented. We want to have two distinct groups; People and Events. We want to have the Contacts table in the People group, and all the Event tables in the Events group.
- Under Navigation on the left side of the screen, select New Group.
- On the right side of the application, expand the Properties panel.
-
Change the Title from New Group to
People.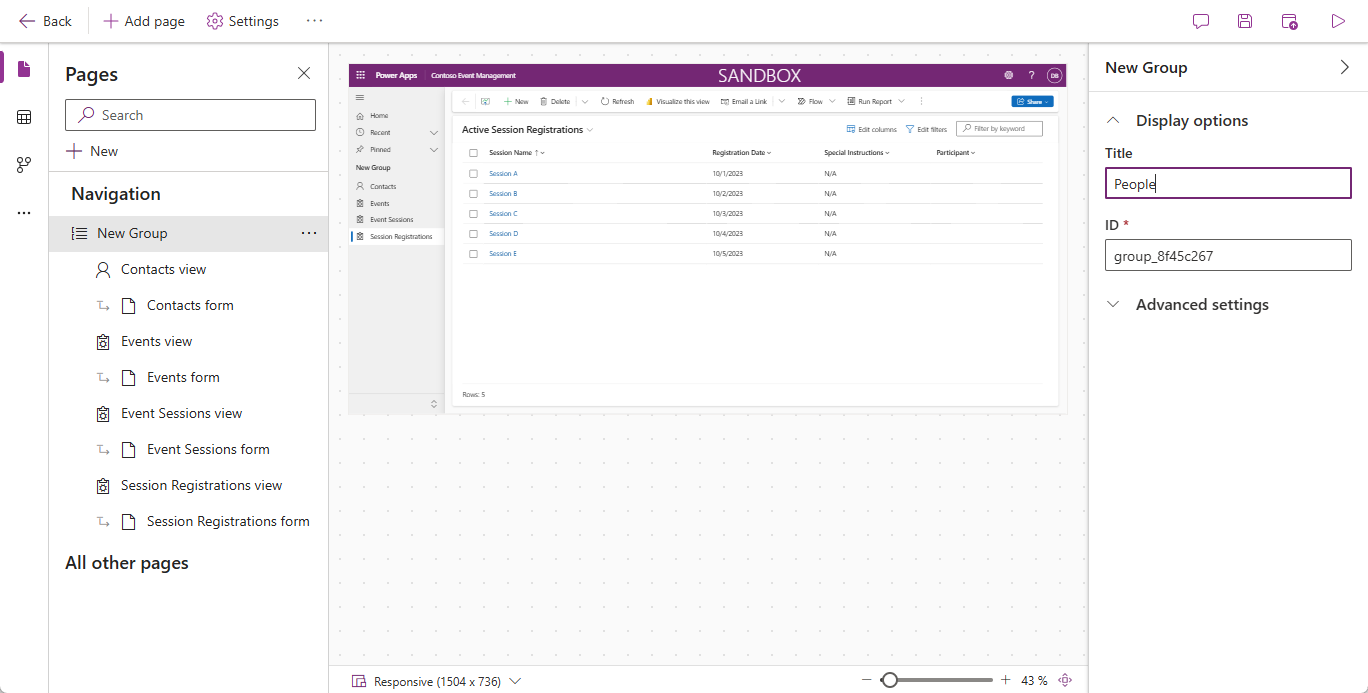
- Select the Ellipsis on the People group.
- Choose New group.
- In the Properties pane, change the name of the group from New Group to
Events. - Hover over Session Registrations view on the left, select the ellipsis, and choose Move down to move Sessions Registrations into the Events group.
- Hover over Event Sessions view on the left, select the ellipsis, and choose Move down to move Event Sessions into the Events group.
-
Hover over Events view on the left, select the ellipsis, and choose Move down to move Events into the Events group.
Your app should resemble the image:
Task 3: Edit the different forms and views in your model-driven application
The model-drive application uses forms and views to present data to users in the User interface (UI). We are going to make a few changes to those items.
- If necessary, make sure your Contoso Event Management app is open in the designer.
-
On the left side of the screen, under the People group, hover over Contacts form and select Edit.
If you are prompted to save your changes, select Save and continue.
- Under Table Columns on the left, select New table column.
- Configure the table column as follows:
- Display name:
Contact Type - Data Type: Choice
- Synce with global choice: No
- Display name:
- Set the Label of the first choice to Speaker.
- Select + New Choice and set the label to Participant.
-
Select + New Choice and set the label to Support Staff.
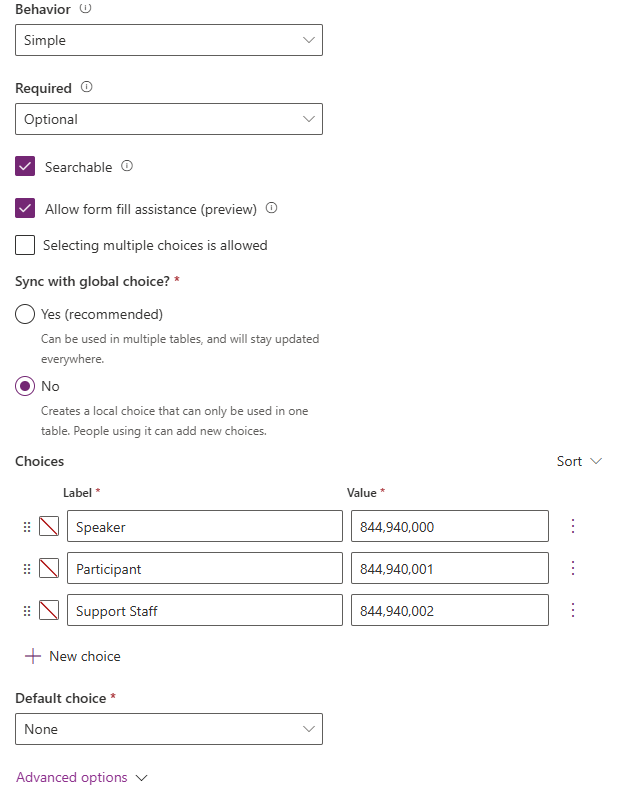
- Select the Save button.
- Using your mouse, select the New Contact text to select the form header. (A purple rectangle should appear around the header)
- Under Table Columns, in the Search field, enter Contact.
- Select the Contact Type table column you just created.
-
The Contact Type should now appear in the Header.

- On the forms Command bar, select the Save and publish button.
- Select the Back arrow button to return to the model-driven application designer
- Under Navigation on the left, hover over Contacts view, and select the Edit icon. (If prompted to save, select Save and continue.)
- If the table columns are not displayed, select + View Column.
- Search for and add the Contact Type column to the view.
- Select the Save and Publish button.
-
Select the Back arrow button to return to the model-driven applicaton designer.
Next, we are going to make necessary changes to the remaining forms.
-
Under Navigation, select Events View
Notice that there might be an EventDetails1 column. If so we are going to remove it from the view. (If you do not have it, you can skip to Task 4: Save and Publish)
-
Hover over the Events view and select the Edit button.
If prompted to Save changes, select Save and continue.
-
On the View select the arrow next to EventDetails1, and from the menu that appears, select Remove.

- Select the Save and Publish button.
- Select the Back arrow button to return to the app designer.
-
Under Navigation, hover over the Events form and select Edit.
If prompted to save changes, select Save and continue.
-
Select Event Details1 field and press the Delete key on your keyboard.
Your form should resemble the image:
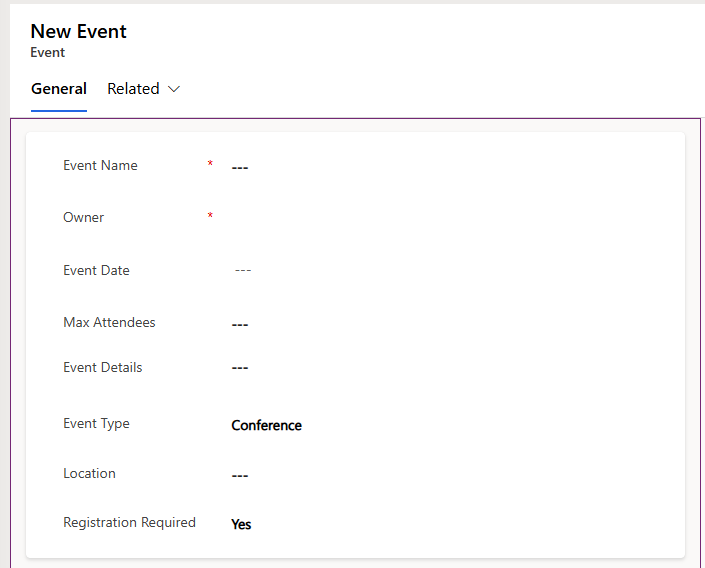
If it does not match exactly, that is fine as long as all the fields in the picture are there.
- Select the Save and publish button.
- Select the Back arrow button to return to the app designer.
Task 4: Save and Publish (If you did not have the EventDetail1 field on you form, continue here.)
-
On the Command bar of the app, select the Save and Publish button.
- Select the Back button to return to the Event Management solution.
- Select Back to solutions arrow to return to the main Power Apps maker portal.
- Select the Back arrow to return to the main Power Apps screen.
Task 5: Test your new application
Now that your model-driven application has been created, we are going to test its functionality.
First we are going to add a couple of contacts.
- Using the navigation on the left, select Apps.
- Change the apps being displayed from My apps to All.
- Hover over the Contoso Event Management application that you just created and select the Play icon.
- Using the navigation on the left, select Contacts.
- On the Command bar, select the + New button.
- In the New Contact screen, configure as follows:
- First Name:
Suzanne - Last Name:
Diaz - Job Title:
Engineer
- First Name:
- In the form header, select the down arrow next to Contact Type.
-
Set the Contact Type to Speaker.
- Select the Save button to save the contact and leave it open.
- Select the + New button.
- In the New Contact screen, configure as follows:
- First Name: Edgar
- Last Name: Swenson
- Job Title: Architect
- Email: Enter your email address (Make sure you add your email address.)
- In the form header, select the down arrow next to Contact Type.
- Set the Contact Type to Participant.
-
Select the Save & Close button.
Next, we are going to add a new event.
- Using the navigation on the left, select Events.
- On the command bar, select the + New button.
- In the New Event screen, configure as follows:
- Event Name:
Spring conference. - Event Date: Tomorrow’s date.
- Max Attendees:
500 - Event Details:
Spring conference to showcase newest products and services from our supported vendors. - Event Type: Conference
- Location:
Seattle - Registration Required: Yes/True
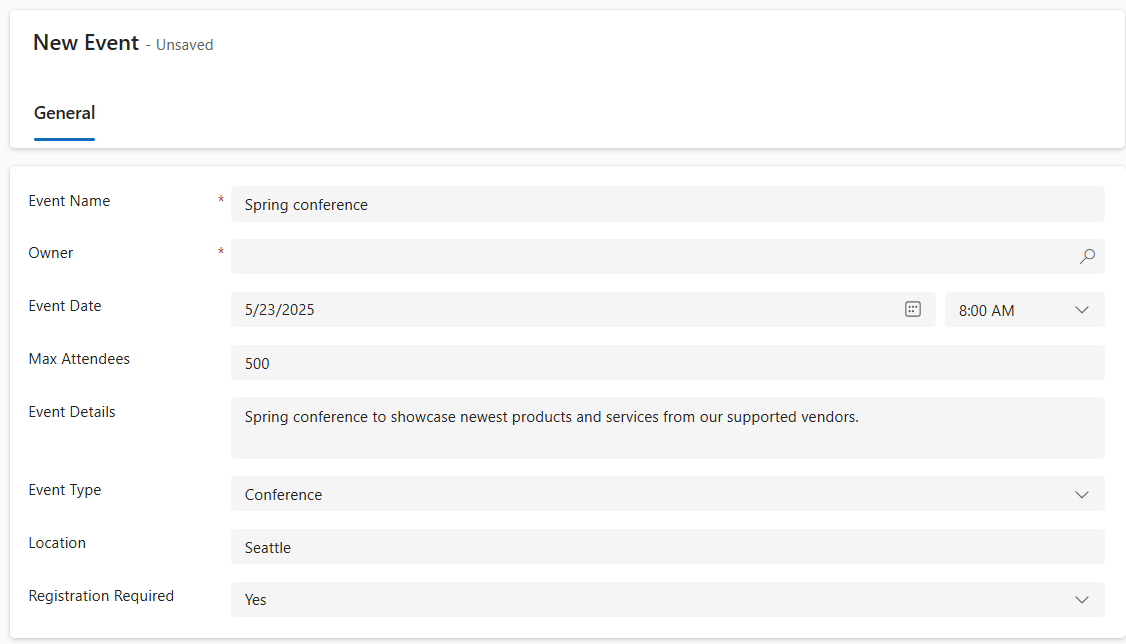
- Event Name:
-
Select the Save & Close button.
Next, we will add a new session for the Event.
- Using the navigation on the left, select Event Sessions.
- Select the + New button.
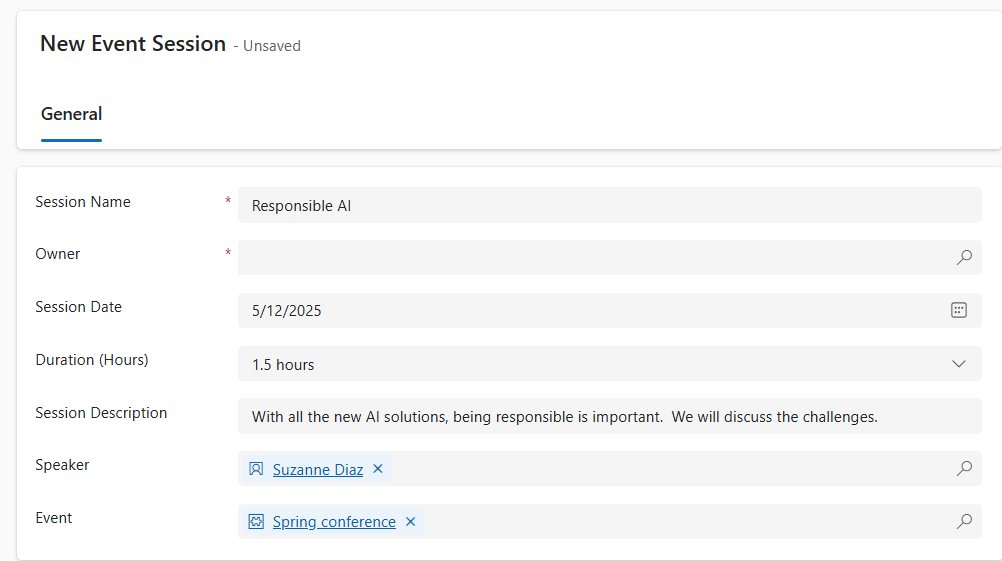
- Configure the Event Session as follows:
- Session Name:
Responsible AI - Session Date: Tomorrow’s Date
- Duration: 1.5 Hours
- Session Description:
With all the new AI solutions, being responsible is important. We will discuss the challenges. - Speaker:
Suzanne Diaz - Event:
Spring Conference
- Session Name:
-
Select the Save and close button.
Finally, we are going to create a Session Registration.
- Using the navigation on the left, select Session Registrations.
- On the Command bar, select + New.
- Complete the session registration as follows:
- Registration Name:
E, Swenson Registration. - Owner: Leave as is
- Registration Date: Todays Date
- Special Instructions:
No Gluten - Participant:
Edgar Swenson - Event Session:
Responsible AI
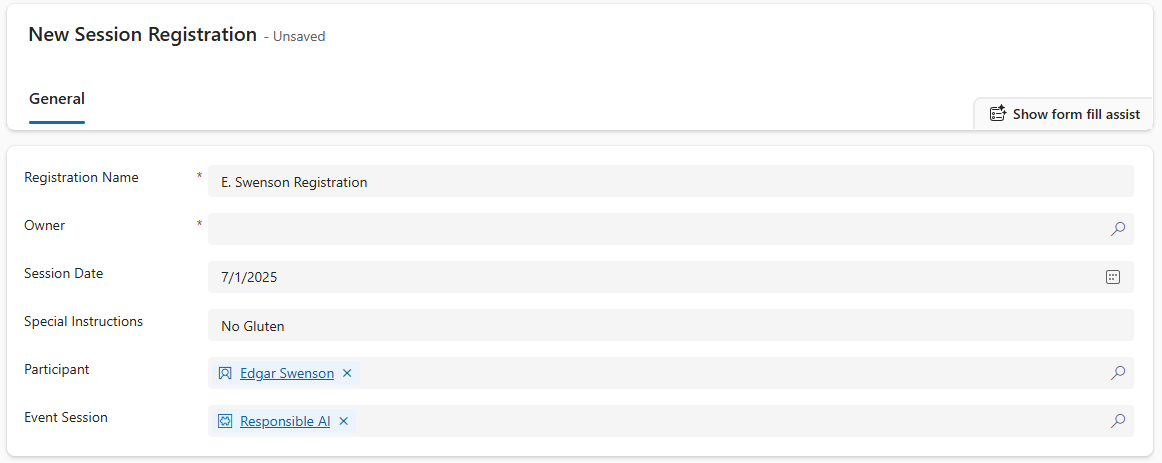
- Registration Name:
- Select the Save and Close button.