Learning Objective
In this exercise, learners will create a series of different cloud flows using Microsoft Copilot in Power Automate. You will use different creation methods such as Copilot and from scratch to become familiar with the different options available.
Upon successful completion of this exercise, you will:
- Use natural language prompts to design workflows
- Configure triggers and actions
- Test the automation for practical use.
Scenario
Contoso Consulting is a professional services organization specializing in IT and AI consulting services. Throughout the year, they offer many different events to their customers. Some of these are trade shows style events where they have many partners come in and provide details on new products, market trends, and services. Others occur throughout the year and are quick webinars that are used to provide details about individual products. Additionally, Contoso is beginning to use automated Agents to assist customers with questions.
Contoso would like to use Power Automate to build a registration confirmation flow that will send an automated email to a customer when they register for an event.
In this exercise you are going to build a series of power Automate flows based on specific criteria.
Before beginning this exercise, you must have completed the following labs:
- Lab 2 – Create a data model
- Lab 5 – Build a model-driven app
The estimated time to complete this exercise is 20 to 30 minutes.
Exercise 1: Create Session Registration notification flow
In this first exercise, you are going to be building a flow that will run automatically when a new Session Registration is created. It will get the details of the session, event, and contact who registered and send an email to this with their registration details.
Task 1: Create a flow
We want to send a registration confirmation to any newly registered users. We will create a flow that will capture details of a registration and send a confirmation email to the registered user.
-
Navigate to https://make.powerautomate.com.
-
You may need to reauthenticate, select Sign in and follow instructions, if needed.
-
Select the Dev One environment at the top right if it is not already selected. (Important, do forget to do this step).
-
In the left navigation, select + Create. (If prompted, select Get started.)
-
Select Automated cloud flow.
-
Enter
Registration Notificationfor Flow name. -
In Choose your flow’s trigger, search for
Dataverse. -
Choose the trigger When a row is added, modified, or deleted, and then select Create.
If you see an Invalid Parameters error, this is because you have not authenticated. Follow the steps below to create a connection.
- Select Change Connection.
- Select Add new.
- In the Connection name field, enter MOD Administrator. Leave the Authentication type as OAuth, and Select Sign in.
- Once signed in, move to Step 9.
-
Populate the trigger conditions for the flow:
- Select Added for Change type
- Select Session Registrations for Table name.
- Select Organization for Scope On the trigger step.
-
Rename the trigger step
When a Session Registration is added.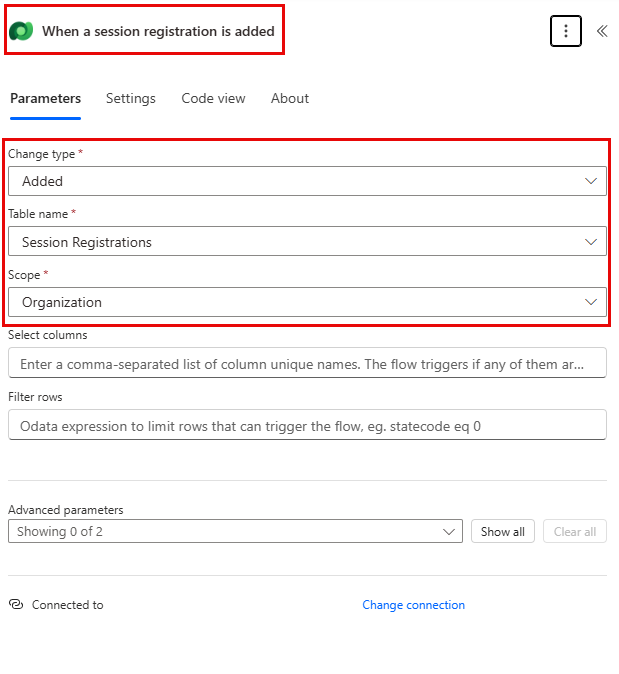
This is good practice, so you and other flow editors can understand the purpose of the step without having to dive into the details.
Task 2: Create a step to get the details of the Event Session the Registration is for.
-
Select + New step.
-
Search for Get a row by ID.
-
Select the Get a row by ID action.
-
Select Event Sessions as Table name
-
Select the Row ID field. Notice that icons appear to select Dynamic content or Expressions.
-
In the Row ID field, select Event Session (Value) from the Dynamic content list. In this step, you are looking up the Event Session for the Session Registration that was created to trigger this flow.
-
On the Get a row by ID action. Rename this action
Get the Event Session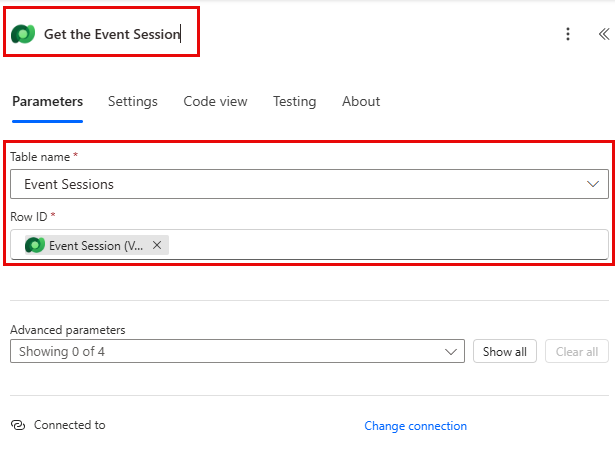
Next, we are going to get the details of the Event the session is in.
-
Under the Get Event Session step, select + Insert Action.
-
Search for Get a row by ID.
-
Select the Get a row by ID action.
-
Select Events as Table name
-
Select the Row ID field. Notice that icons appear to select Dynamic content or Expressions.
-
In the Row ID field, select Event (Value) from the Dynamic content list. In this step, you are looking up the Event for the Event Session that was captured in the previous step.
-
On the Get a row by ID action. Rename this action
Get the Event.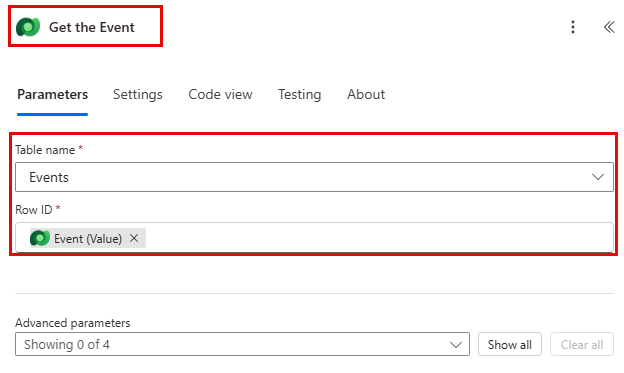
Lastly, we are going to get the details of the person registered for the session.
-
Under the Get Event Details, set select Insert new Action.
-
In the search field enter Get a row by ID.
-
Select Get a row by ID.
-
Select Contacts as Table name
-
Select the Row ID field. Notice that a window pops up to select Dynamic content or Expressions.
-
In the Row ID field, select the Participant (Value) field from the When a session registration is added trigger from the Dynamic content list.
-
Select the Get a row by ID text, and rename this action
Get Participant Details.
Task 3: Create a step to send an email to confirm session registration
-
Under the Get Participant Details step, select Insert new Action.
-
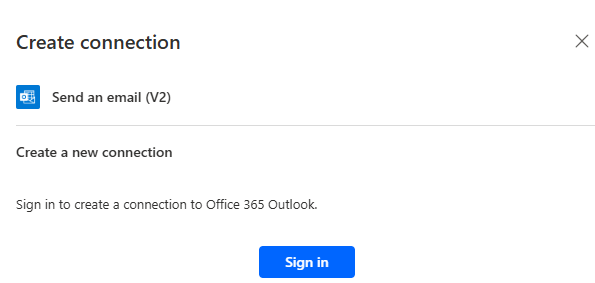
In the search field enter Send an email.
-
Select Send an email (V2).
You may be prompted to create a connection to outlook, if so select the Sign in button, and login with the Mod Administrator account.
-
Just above the To field, select the Gear icon. From the menu that appears, select Use dynamic content.
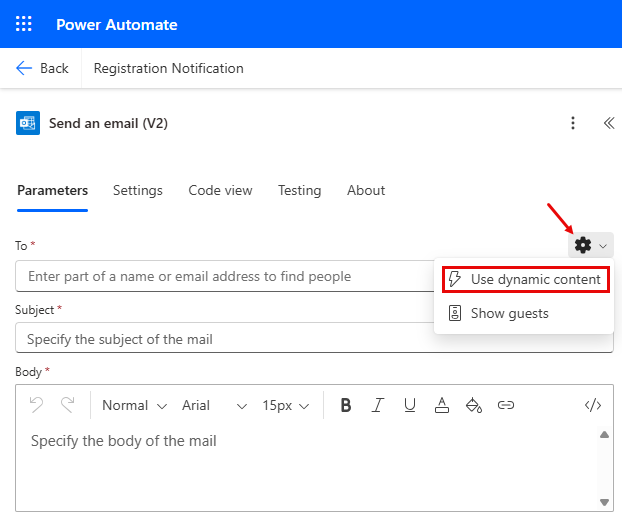
-
Using Dynamic values, in the To field, select Email under the Get Participant Details.

-
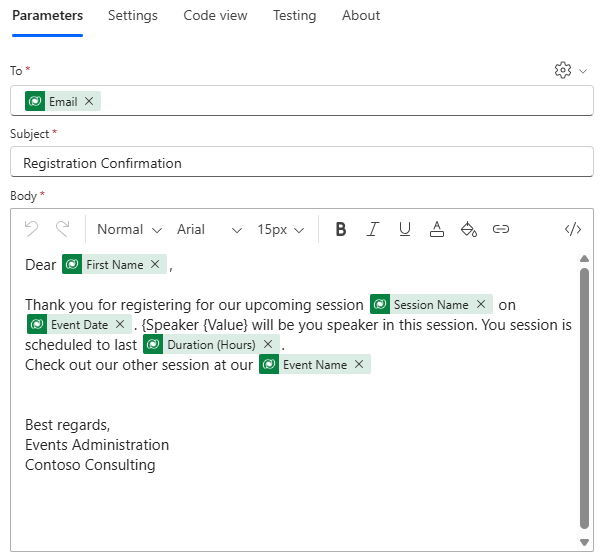
In the Subject field, make sure it says
Registration Confirmation. -
Enter the following text in Email Body:
Note: Dynamic content needs to be placed where fields are named in brackets. It is recommended to copy & paste all text first and then add dynamic content in the correct places.
Dear {First Name}, Thank you for registering for our upcoming session {Session Name} on {Event Date}. {Speaker} will be your speaker in this session. Your session is scheduled to last {Duration (Hours)}. Check out our other session at our {Event Name}.Best regards,Events AdministrationContoso ConsultingNext, we are going to replace the text in the brackets with the items outlined below.
-
Highlight the {First Name} text. Replace it with the First Name field from the Get Participant Details step.
-
Highlight the {Session Name} text. Replace it with the Session Name field from the Get Event Session step.
-
Highlight the {Event Date} text. Replace it with the Event Date field from the Get Event Details step.
-
Highlight the {Speaker} text. Replace it with the Speaker (Value) field from the Get Event Session step.
-
Highlight the {Duration (Hours)} text. Replace it with the Duration (Hours) field from the Get Event Session step.
-
Highlight the {Event Name} text. Replace it with the Event Name field from the Get Event Details step.
Your completed step should resemble the image:
-
Select Save.
Leave this flow tab open for the next task. Your flow should look like the following:
Task 4: Enter some sample data
Note: If you completed Lab 5 – Build a model-driven app, you can skip this task and move directly to Task 5.
-
Using the navigation on the left, select Apps.
-
Change the apps being displayed from My apps to All.
-
Hover the Event Management application and select the Play icon.
-
Using the navigation on the left, select Contacts.
-
On the command bar, select the + New button.
-
In the New Contact screen, configure as follows:
-
First Name: Suzanne
-
Last Name: Diaz
-
Job Title: Engineer
-
-
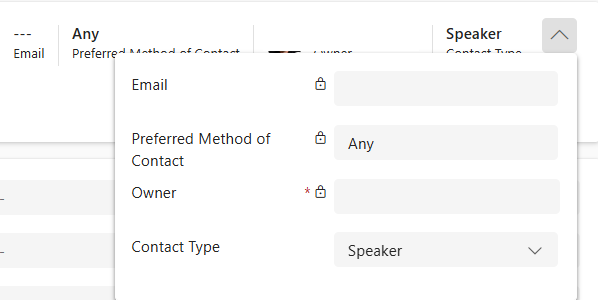
In the form header, select the down arrow next to Contact Type.
-
Set the Contact Type to Speaker.
-
Select the Save button to save the contact and leave it open.
-
Select the + New button.
-
In the New Contact screen, configure as follows:
-
First Name: Edgar
-
Last Name: Swenson
-
Job Title: Architect
-
Email: Enter your email address (IMPORTANT or your flow will not run)
-
-
In the form header, select the down arrow next to Contact Type.
-
Set the Contact Type to Participant.
-
Select the Save & Close button.
Next, we are going to add a new event.
-
Using the navigation on the left, select Events.
-
On the command bar, select the + New button.
-
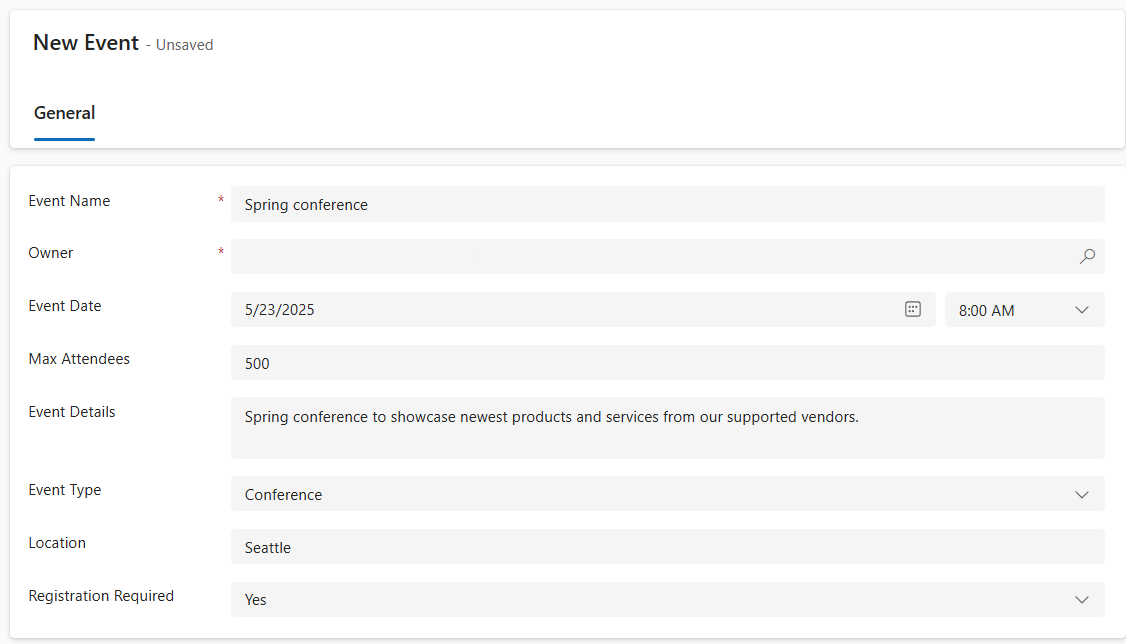
In the New Event screen, configure as follows:
-
Event Name: Spring conference.
-
Event Date: Tomorrow’s date.
-
Max Attendees: 500
-
Event Details: Spring conference to showcase newest products and services from our supported vendors.
-
Event Type: Conference
-
Location: Seattle
-
Registration Required: Yes/True
-
-
Select the Save & Close button.
Next, we will add a new session for the Event.
-
Using the navigation on the left, select Event Sessions.
-
Select the + New button.
-
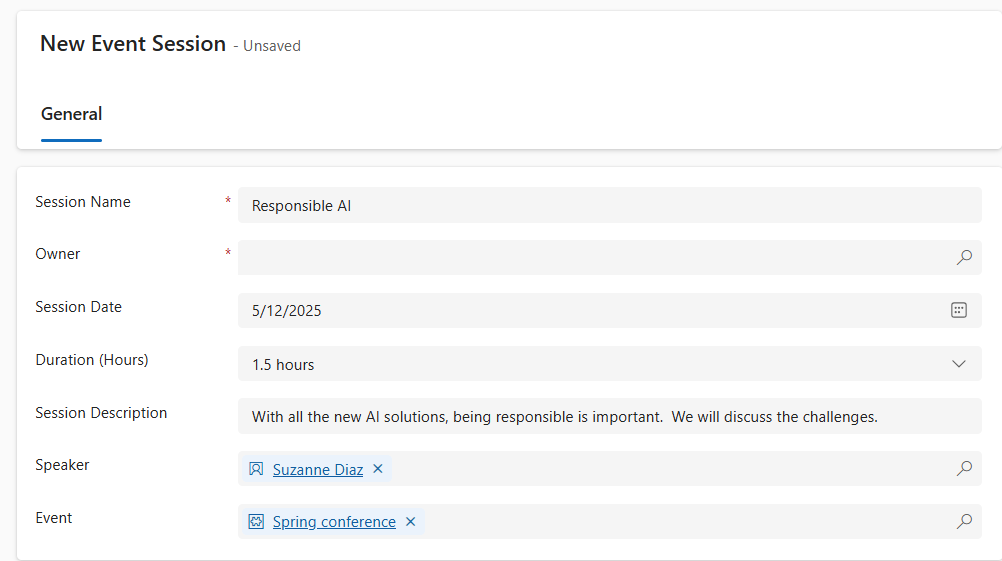
Configure the Event Session as follows:
-
Session Name: Responsible AI
-
Session Date: Tomorrow’s Date
-
Duration: 1.5 Hours
-
Session Description: With all the new AI solutions, being responsible is important. We will discuss the challenges.
-
Speaker: Suzanne Diaz
-
Event: Spring Conference
-
-
Select the Save and close button.
Task 5: Validate and test the flow
-
If necessary, open a new tab in your browser and navigate to https://make.powerapps.com.
-
Select the Dev One environment at the top right if it is not already selected.
-
Select Apps and open the Contoso Event Management App.
-
Leaving this browser tab open, navigate back to the previous tab with your flow.
-
On the command bar, select Test. Select Manually and then select Test.
-
Navigate to the browser tab with your model-driven app open.
Finally, we are going to create a Session Registration.
-
Using the navigation on the left, select Session Registrations.
-
On the Command bar, select + New.
-
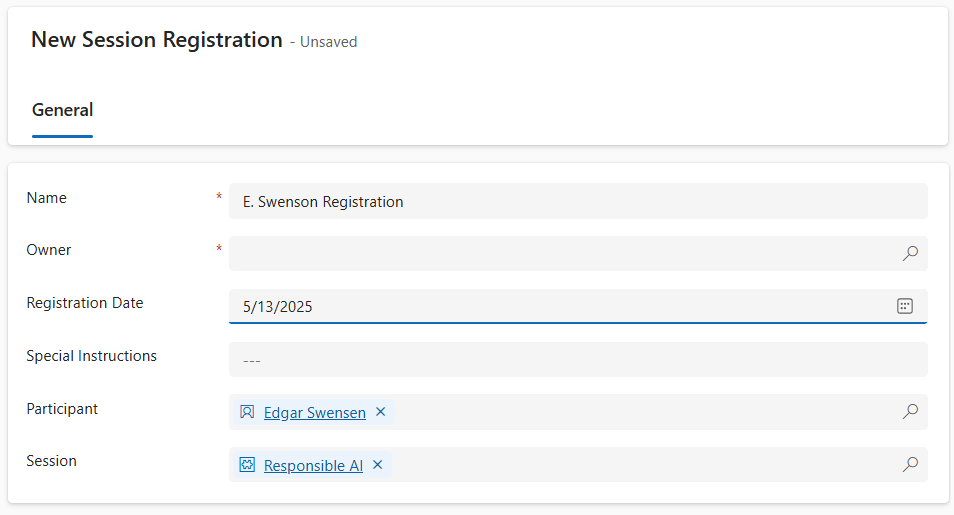
Complete the session registration as follows:
-
Name:
E, Swenson Registration. -
Registration Date: Todays Date
-
Participant:
Edgar Swenson -
Session:
Responsible AI
-
-
Select the Save and Close button.
-
Navigate to the browser tab where your Flow test is running. After a short delay, you should see the flow running. This is where you can catch any issues in the flow or confirm that it ran successfully.
After a short delay, you should see an email in your inbox.
Note: It may go to your Junk email folder.