Practice Lab 4 - Create a canvas app
Learning Objective
In this exercise, you will use Copilot to create a canvas application that employees can use for requesting and managing time off and equipment checkout requests. Once the app is created, you will use Copilot and Power Apps designer to amend the app.
Upon successful completion of this lab, you will:
- Use Copilot to aid you in creating a data model to support your app.
- Modify a canvas application.
Scenario
Contoso Consulting is a professional services organization specializing in IT and AI consulting services. They are looking to create a time off application that employees can use to request time off.
Lab Details
Before beginning this exercise, required that you have completed the following lab:
- Lab 2 – Create a data model
Important This lab uses AI to build out the components. Since AI results can vary, it’s important to note that your results may be different (but similar) to what is defined in the lab. The basic concepts outlined in the lab will be the same no matter what was created or what it was named. If the tables and columns do not match exactly, you may need to adjust to what was created for you.
The estimated time to complete this exercise is 60 to 75 minutes.
Note: If you encounter a Needs Attention error message on the table while creating a choice column with Copilot, you can create the column manually by following the steps below:
- Select View options, then choose View data. The table structure will become visible.
- Click on + New column to add a new column.
Task 1: Sign in to Power Apps and explore the interface
- Open a web browser and navigate to the Power Apps maker portal.
- Make sure you’re in the Dev One environment.
- Using the navigation on the left, select Create.
- Under Create your apps, choose Start with Copilot.
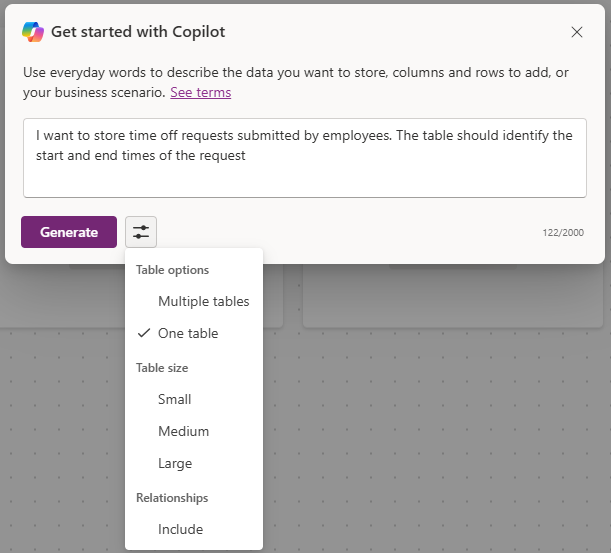
- In the Describe the tables you want copilot to build screen, type:
I want to store time off requests sent by employees. The table should identify the start and end times of the request. -
Select the Table options button. From the menu that appears, select One Table.
-
Select the Generate button.
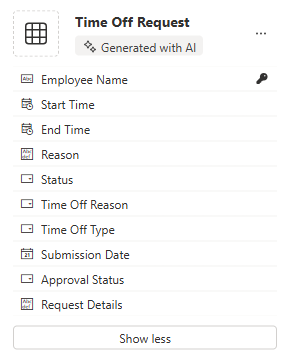
Copilot should have created a Time Off Request table. Next, we will add more columns to the table.
Note: If necessary, please add Table name to prompt.
- In the Copilot pane, enter:
Add a choice column called Time Off Reason. - In the Copilot pane, individually add the following prompts.
Add a choice column named Time off Type.Add a Date column called Submission Date.Add a choice column to the Time Off request table called Approval Status.Add a multi-line text column called Request Details.
Your time off table should resemble the image:
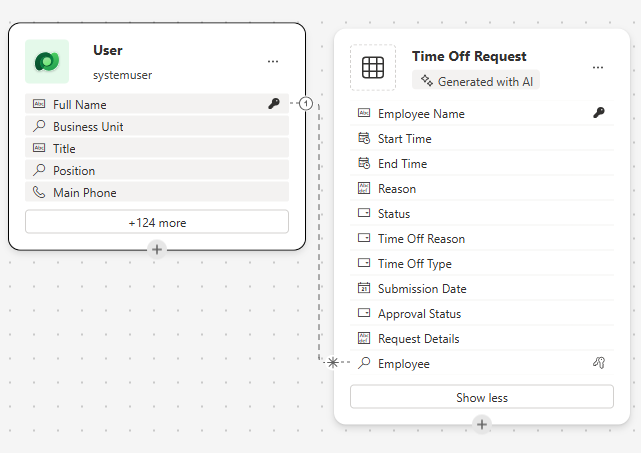
Next, we are going to add the user table to the data model so we can associate time off requests with specific users.
- On the Command bar, select + Existing table.
- Switch from Recommeded to All tables.
- In the Search field, enter User.
- Select the User table and click the Add Selected button.
- On the Command bar, select Create relationships.
-
Configure the relationship as follows:
- One: User
- Many: Time Off Request
- Display name:
Requesting Employee
-
Select Done.
Your completed data model should resemble the image:
- Select the Save and open app button.
[!NOTE] It can take several minutes for your new app to be created.
Task 2: Personalize your new app
Now that your new app has been created we are going to make some modifications to it to best fit our needs. We are going to start by making some modifications to the Welcome screen.
- With your new app open, Select the Image placeholder above the Time Off Requests text.
- From the menu that appears, select Edit > Upload.
- Choose the Time off image in the class files folder, and then select Open.
- Next, select the Image placeholder above Users.
- From the menu that appears, select Edit > Upload.
-
Choose the Employee image in the class files folder, and then select Open.
Next, we are going to adjust the size of the images to make them easier for users to read. Additionally, we are going to adjust the text that is displayed for each item.
- On the Command bar, select the Properties button. (Located just to the right of the Editing button.)
- Select the Time off image you add earlier.
-
In the Properties panel, configure the image as follows:
- Image Position: Fill
- Width: 300
- Height: 300
- Repeat the earlier step to set the Height and Width of the Employee image to 300 x 300.
- Select the text below Time Off Requests.
- In the Properties panel, select the Text field, and change the text to:
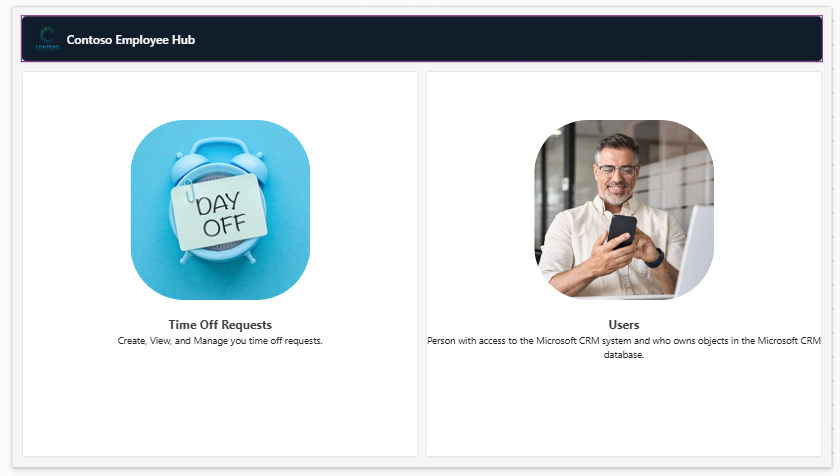
Create, View, and Manage you time off requests. - Select the Welcome Screen text in the Header.
- In the Properties pane on the right, select the Logo field.
- From the menu that appears, select Upload.
- Select the Contoso Logo from your class files and select Open.
- In the Properties panel under the Style and theme group, select the Fill color icon.
- Select the Custom tab
- Change the Hex color to:
101E2B - Make sure that you still have the Header selected, and change the Title to
Contoso Employee Hub. - On the Command bar, select the Save button to save the app.
-
In the Save screen, set the Name to
Contoso Employee Hub, and select Save.Your app will resemble the image.
- Select the Save button on the Command bar to save your app.
Task 3: Add a new screen to you app.
As you are building the app, one of your managers reaches you to you and is wondering if employees could also use this app for checking out equipment. Contoso is already storing equipment checkout information in Dataverse, so it is just a matter of making the information available in the app.
- With your app still open, expand the Copilot pane (if necessary). In Copilot, enter the following:
Add a new screen called Equipment Checkout. - Select Send.
- Select the Keep it button to accept the screen.
- A new screen called Equipment Checkout is added to your app.
- While on the Equipment Checkout screen, click With layout, and choose the Sidebar layout.
-
Expand the different containers until SideBarContainer is visible.
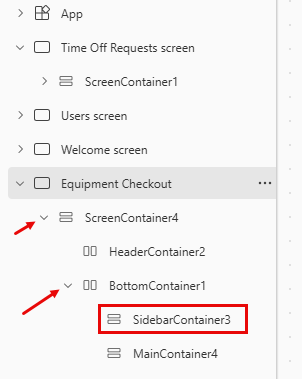
- Right-click SidebarContainer and rename to EquipContainer1.
- With the EquipContainer1 container selected, click the Open insert menu button.
- In the Search window, enter Gallery, and select Vertical gallery.
- When you are asked to supply a data source in the Search field that appears, enter Equipment, and select the Equipment table.
- In Tree View on the left side of the screen, select the Gallery1 control you just added.
- Right-click the Gallery name, choose Rename, and rename to
Equipment List. - Hover over the Equipment List gallery, on the toolbar that appears above the gallery, select Layout.
- Select the Title and subtitle layout option.
-
With the Equipment List gallery selected, in the Properties pane, configure as follows:
- Width:
360 - Flexible height: On
- Minimum height:
287
Next, we are going to add an additional container to the EquipmentContiner1 container to store a search control that we will use to filter the contents of the Equipment List gallery.
- Width:
- In Tree view, select EquipContainer1.
- Hover over the container and select the Copilot icon.
-
Enter the following text:
Insert a Horizontal container.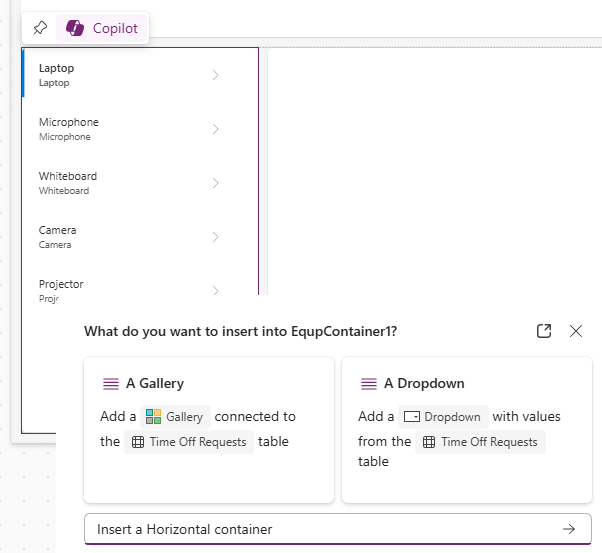
- Select the Keep it button.
- A new container will be added to the bottom of the EquipContainer1 container.
- In the Tree View, click, hold, and drag the new container, and place it above the Equipment List gallery.
- Rename the container to
EquipSearchContainer. -
With the EquipSearchContainer selected, in the Properties pane, configure as follows:
- Minimum width:
0 - Flexible height: Off
- Height:
44
- Minimum width:
- With EquipSearchContainer selected, select the Open insert menu button.
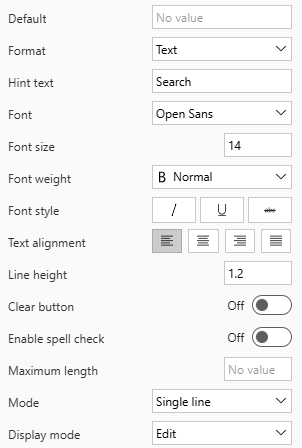
- In the Search field, enter Text, and select Text input.
- Rename the Text Input field, to
EquipSearchInput. -
With EquipSearchInput selected, in the Properties pane, configure as follows:
- Default: Blank (nothing)
- Hint text: Search
- Font: Open Sans
- Font size: 14
- Padding (The values below may already be there.)
- Top: 5
- Bottom:5
- Left: 12
- Right: 5
- Height: 44
- Flexible width: On
-
Minimum width: 0
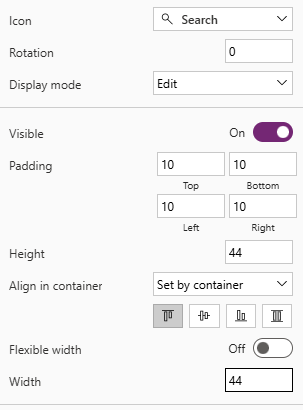
- In Tree View, select the EquipSearchContainer.
- Hover over the container, select the Copilot icon, and enter
Add a Search Icon. - Select Keep it.
[!NOTE] If Copilot happends to add the wrong icon, remove it and insert the magnifying glass manually.
-
With the Search icon selected, in the Properties pane, configure the control as follows:
- Padding
- Top: 10
- Botton: 10
- Left: 10
- Right: 10
- Height: 44
- Width: 44
Finally, we are going to configure the Equipment List gallery to populate its data based on the text entered in the search control field.
- Padding
- Select the Equipment List gallery we created earlier.
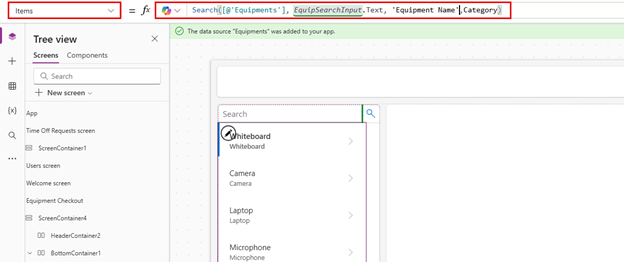
- In the Items property, enter the following formula:
Search([@'Equipments'], EquipSearchInput.Text, 'Equipment Name',Category)
- On the Command bar, select the Save button to save your app.
[!IMPORTANT] If you copied and pasted the formula into the formula bar, it is possible that the ‘’ are incorrect for Equipment and Equipment Name. If you are getting a formula error, try removing and retyping them.
Task 4: Build a container to display record operations.
When a user selects a record in the Equipment list, we want to open the record in another container to allow them to edit the selected record.
- Select the MainContainer and rename it to
DetailsContainer. - On the DetailsContainer, select the Insert button.
- In the Search filed, enter Container, and choose Vertical Container.
- Right-click and Rename the container to
RecordDetails. - On the RecordDetails container, select the Insert button.
- On the Insert menu, select Edit form.
- In the select data source screen, select Equipment. (It can take up to 30 seconds for the data to populate.)
- Right-click the form you just added and Rename it to
EquipmentForm. - In the Properties pane, select the Advanced tab and set the Item property to:
'Equipment List'.Selected(This will populate the form with the currently selected record.) -
Select the Display tab, and configure the form as follows:
- Columns: 2
- Default Mode: Edit
Now we are going to add another container that will be used to control the operations on the form.
- Make sure that you have the DetailsContainer selected.
- Select the Copilot icon that appears. Enter the following:
Insert a horizontal container. - Select Keep it.
- Right-click the container, and Rename it to
SelectedRecord1 - Using Tree view, move the SelectedRecord1 container above the RecordDetails container.
-
Configure the SelectedRecord1 container as follows:
- Minimum width: 250
- Flexible height: Off
- Height: 50
- With the SelectedRecord1container selected, select the Insert button.
- Select Text Label.
- Rename the label to
SelectedRecordTitle. -
Configure the SelectedRecordTitle as follows:
- Padding
- Top: 5
- Bottom: 5
- Left: 30
- Right: 5
- Flexible width: On
- Minimum width: 150
- Height: 40
- Padding
- Select the SelectedRecord1 container, Select the Insert button.
- In the Search field, enter Save, and select the Save icon.
-
Configure the Save button as follows:
- Height: 40
- Width: 40
-
Select the OnSelect property and enter the following formula:
SubmitForm(EquipmentForm).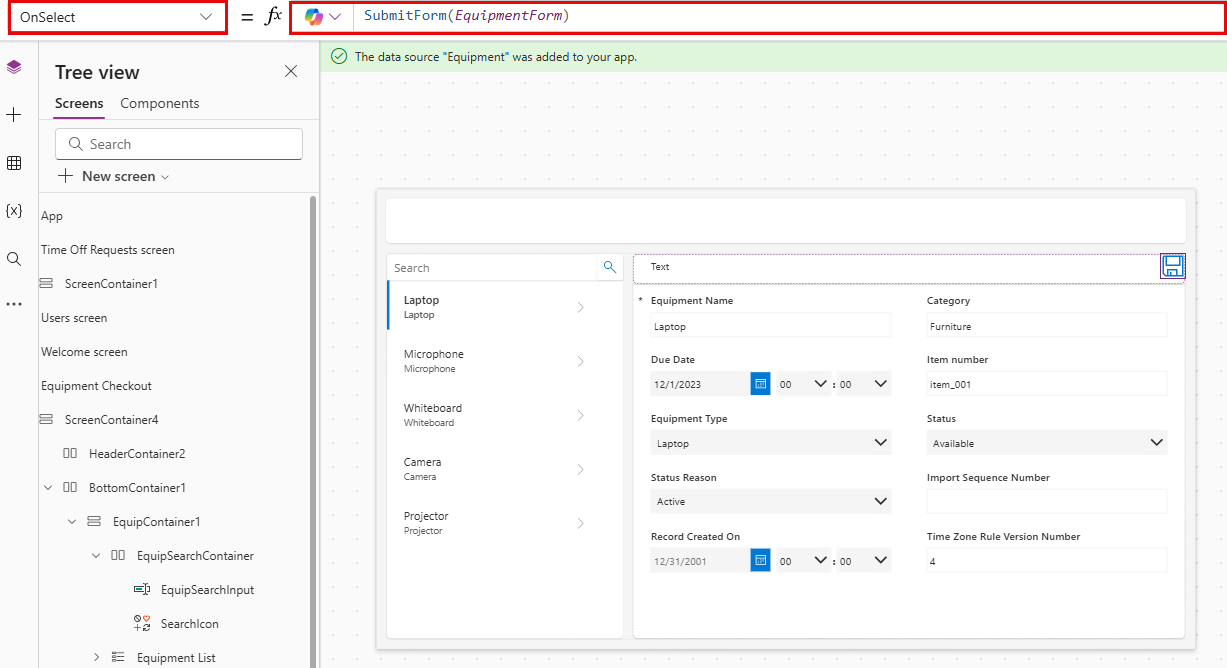
- Select the Save button on the Command bar to save your app.
Task 5: Modify the Header on the Page
The last step in creating this screen is to populate the reader container with data.
- Select the HeaderContainer at the top of the app.
- Select the Insert button.
- Select Text label.
-
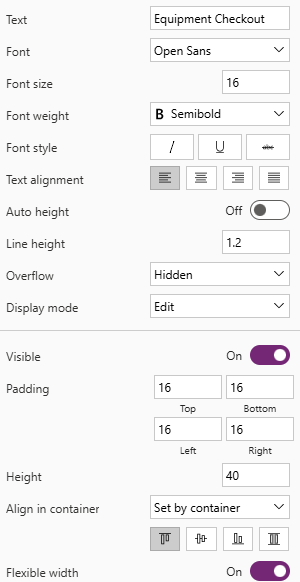
Configure the Text label control as follows:
- Text:
Equipment Checkout - Font: Open Sans
- Font Size: 16
- Font weight: Semibold
- Padding
- Top: 16
- Bottom: 16
- Left: 16
- Right: 16
- Height: 40
-
Flexible width: On
- Text:
- Select the HeaderContainer, choose Insert, and select the Home Icon.
-
Set the OnSelect property of the home button to:
Back()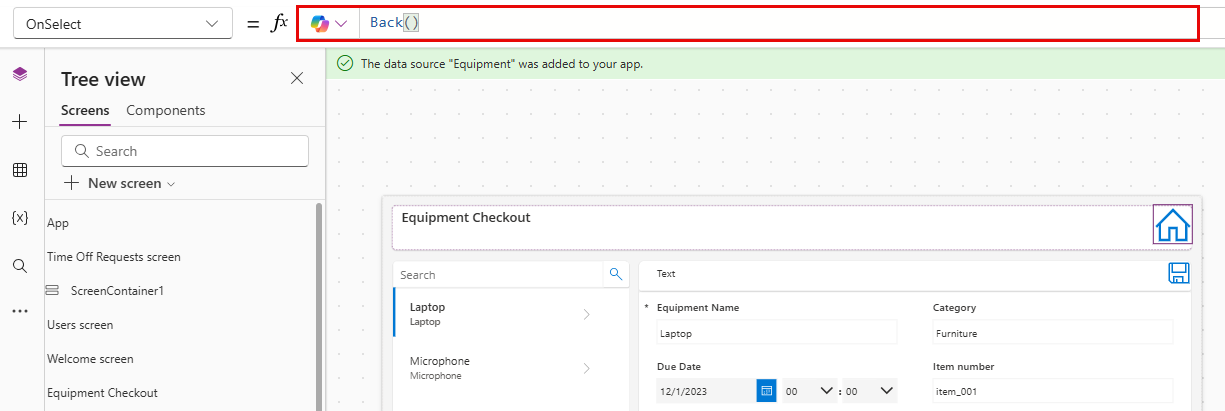
- Select the Save button on the Command bar to save your app.
Task 6: Finish configuring the Welcome screen
Upon review, we have decided that we do not need to have the ability to create users in this app, so we are going to change the Welcome Screen to allow you to access equipment checkout.
- Using Tree view, select the Welcome Screen.
- Select the Image above Users.
- From the menu that appears, select Edit, and choose Upload.
- Locate the Equipment image in your student folder and choose Open.
- Set the OnSelect property of the image to:
Navigate('Equipment Checkout') - Select the Users text and set the Text property to
Equipment. -
Select the Text below Equipment and change the Text property to:
Check out equipment and edit reservations.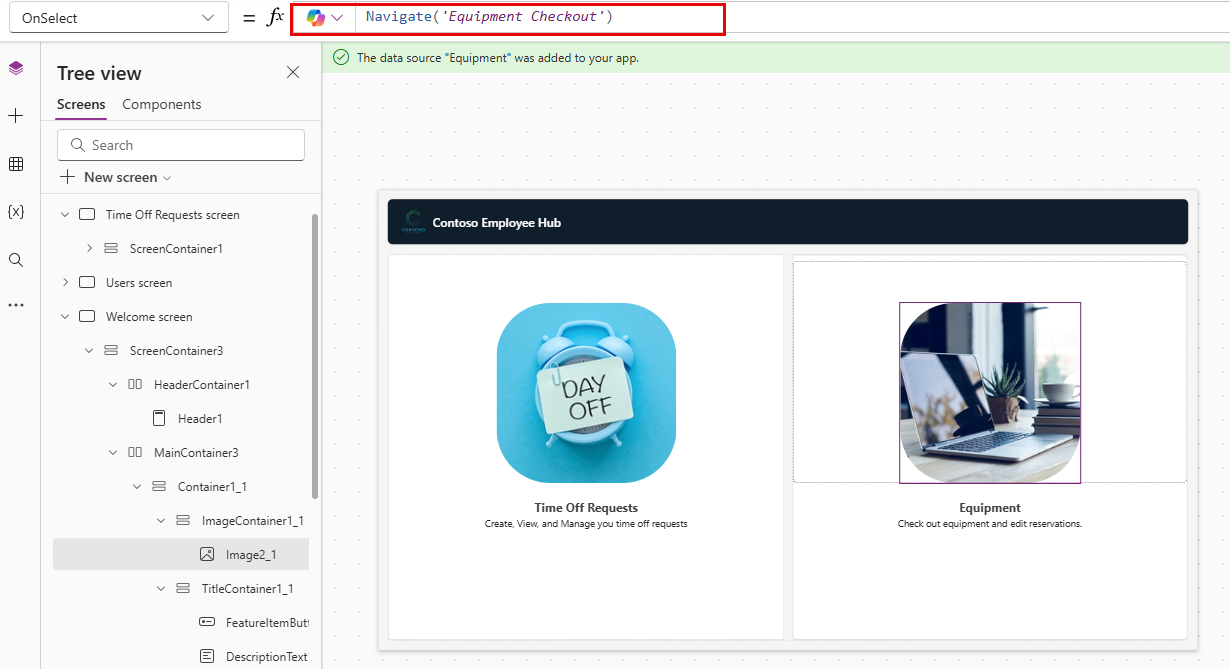
- Select the Save button on the Command bar to save your app.
Task 7: Test your application
- On the Command bar, select the Play button.
- Select the Equipment image.
- In the Search field, enter Electronics. (Notice how the list filters)
- Select the Laptop record.
- Change the Category to Furniture.
- Select the Save button.
- Notice how the category of the Laptop changes to Furniture.
- Select the Home button.
- Select the Purple X to leave Preview mode.
- Select the Save button on the Command bar to save your app.
Task 8: Save and publish the app
Goal: Save and publish the app to make it accessible across web browsers, mobile devices, or embedded platforms like SharePoint or Teams.
- In Power Apps Studio, select the Save button.
- Select the Publish button.
- Choose Publish this version.