Learning Objective
In this exercise, learners will be using Copilot to build a data model. You will provide a description of the type of tables you want to build and use the designer to make changes as needed such as adding additional columns.
Upon successful completion of this lab, you will:
- Use Copilot to assist you in creating a data model.
- Add and edit columns to tables.
Scenario
Contoso Consulting is a professional services organization specializing in IT and AI consulting services. Throughout the year, they offer many different events to their customers. Some of these are trade shows style events where they have many partners come in and provide details on new products, market trends, and services. Others occur throughout the year and are quick webinars that are used to provide details about individual products.
Contoso would like to use Power Platform to build an Event management solution that they can use to manage the different events they host throughout the year. Additionally, Contoso is looking to build out some applications to support their Employee Equipment Check Out program.
In this exercise you are going to create a data mode that will be used to store the different types of events, event registrations, and other data needed for Contoso to effectively manage their events. You are also going to create an Equipment table that will be used in their other applications.
Lab Details
Before beginning this exercise, it’s recommended that have completed:
- Lab 1 – Create a solution
Important: This lab uses AI to build out the components. Since AI results can vary, it’s important to note that you results may be different (but similar) to what is defined in the lab. The basic concepts outlined in the lab will be the same no matter what was created or what it was named. If the tables and columns do not match exactly, you may need to adjust to what was created for you.
Lab Timing
The estimated time to complete this exercise is 30 to 45 minutes.
Note: In the previous lab, we created an Event management solution and set it as the preferred solution in this environment. For that reason, we do not need to go directly to the solution to create our data model. The items we create will automatically be added to the solution.
Note: If you encounter a Needs Attention error message on the table while creating a choice column with Copilot, you can create the column manually by following the steps below:
- Select View options, then choose View data. The table structure will become visible.
- Click on + New column to add a new column.
Task 1: Create a data model
Contoso currently stores donor contact information in their Dataverse instance. They would like to use Dataverse to track the grants they are applying for and donations that they are receiving. You need to create the necessary tables to support the future application needs of Contoso.
- If necessary, open a web browser and navigate to the Power Apps maker portal, and Sign in using your Microsoft account credentials.
- While on the Power Apps home screen, using the navigation on the left, select Tables.
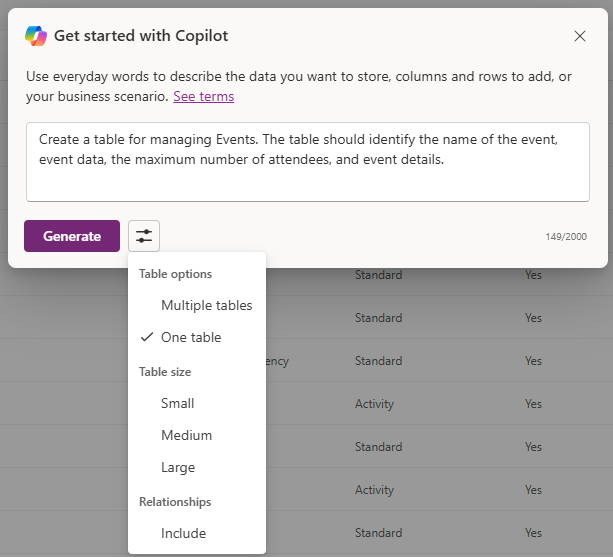
- Under Tables, select Get started with Copilot.
- In the Describe the tables you want copilot to build screen, enter: “Create a table for managing events. The table should identify the name of the event, event data, location, the maximum number of attendees, and event details.”
- Next to the Generate button, select Table Settings, and configure as follows:
- Table options: One table
- Do NOT include relationships.
-
Select the Generate button.
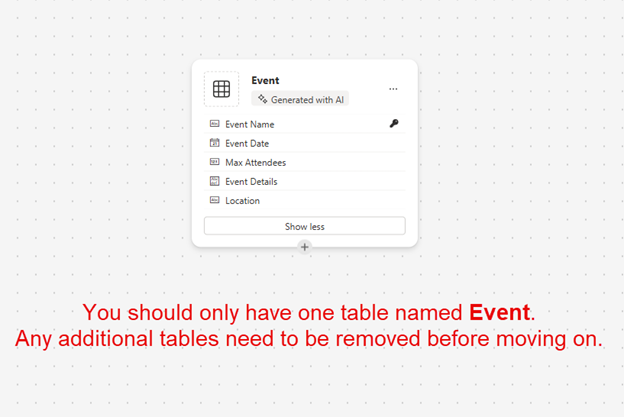
Important: Copilot should only create ONE table called Events. If more were created, you need to DELETE them by telling Copilot the name of the table to delete. Failure to remove any extra tables will impact the next step.
Edit the data model with Copilot
Now that we have created the table, we are going to add some additional columns to it. We will start by adding an event type column. Additionally, Contacts will attend our events. We want to add the existing Contact table to the data model and associate it with Event Registrations later.
- In the What would you like to do next? field, enter:
Add a choice column named Event Type to Event table. -
Add another column by entering the following text:
Add a choice column named Registration Required to Event table.
Important: Your event table does not have to match the above image exactly, but it should have at least the following columns:
- Event Name
- Event Date
- Max Attendees
- Location
- Event type
- Registration Required.
If you do not have all the above-mentioned columns, use Copilot to add them to the data model.
Next, let’s add the Contact table to the data model.
- In the Command bar at the top, select + Existing table.
-
In the Search field, enter Contact, and choose Add Selected.
Depending on the type of event, there might be one or more sessions. To manage the different sessions, we need to define what the session is and the event with which it is associated. Next we will use Copilot to create an Event Sessions table.
-
In the What would you like to do next? field, enter:
Add a new table called Event Session.Copilot will likely create two tables, Event Session and Event Speaker. Since our Contacts will be speakers, we are going to remove the Event Speaker table.
- If necessary, in the What would you like to do next? field, enter:
Remove the Event Speaker table. -
In What would you like to do next?, enter the following text:
Add a new text column to the Event Session table called Session Description.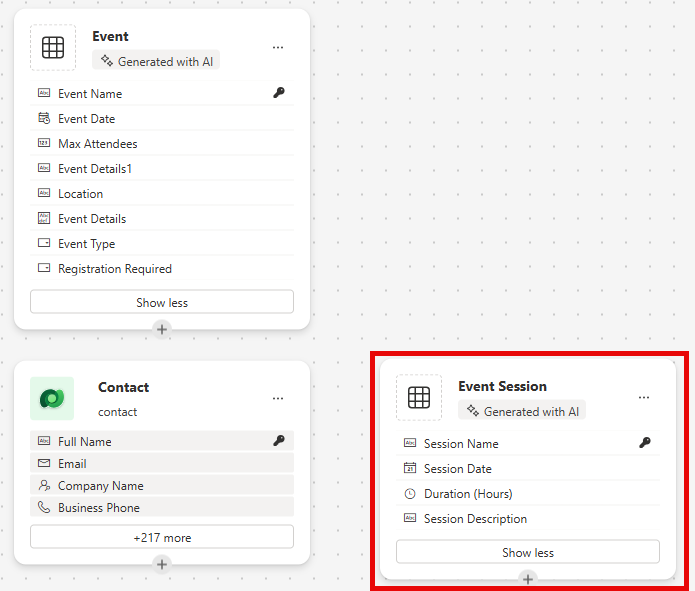
Next, we are going to add one last table called Session Registrations. This table will be used to manage the individuals who register for specific sessions.
-
In What would you like to do next?, enter the following text:
Add a new table called Session Registrations.Copilot will likely create two tables, Session Registration, Session, or Participant (or something else). Since our Contacts can be participants, we are going to remove the Participant table. If any other tables (such as Session or something else) other than Session Registration were created, remove them.
-
If necessary, in What would you like to do next?, enter the following text:
Remove the Participant table.Sometimes a Participant Name column will be added to the session registration table. We need to remove it as it can cause problems later when we try to save the data model. (We are going to replace it with a different participant column later.)
-
If necessary, in What would you like to do next?, enter the following text:
Remove the Participant Name column from the Session Registration table. -
If you now have a Primary Column field, enter the following text:
Rename the Primary Column to Registration Name in Session Registration table. -
In What would you like to do next?, enter the following text:
Add a text column to the Session registration table called Special Instructions.Your completed Session Registration table should look similar to the image below:
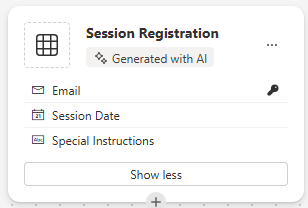
Important While yours does not need to match exactly, it is important that you do not have a column named Participant, and that you have at least the following:
- Registration Name
- Session Date
- Special Instructions
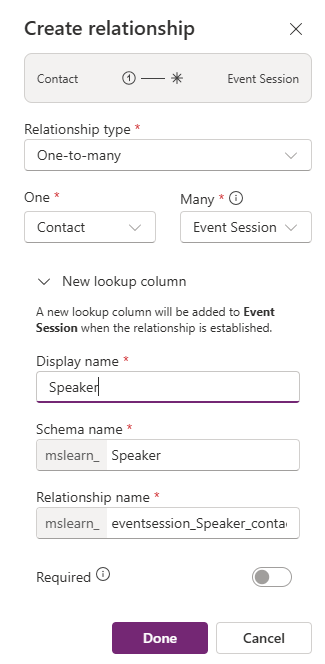
Now we are going to create relationships between our different tables. Since Contact records can be speakers in sessions, we are going to create a relationship between the Contact and Event Session tables.
- On the Command bar, select Create relationships.
- Configure the relationship as follows:
- Relationship Type: One-to-many
- One: Contact
- Many: Event Session
- Display name:
Speaker
-
Select Done.
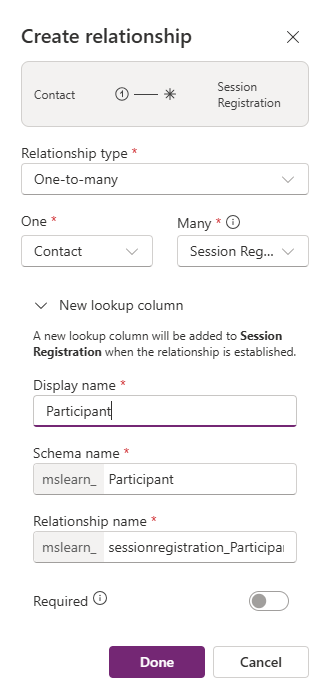
Since contacts can be registered for sessions in sessions, we are going to create a relationship between the Contact and Session Registration tables.
- On the Command bar, select Create relationships.
- Configure the relationship as follows:
- Relationship Type: One-to-many
- One: Contact
- Many: Session Registration
- Display name:
Participant
-
Select Done.
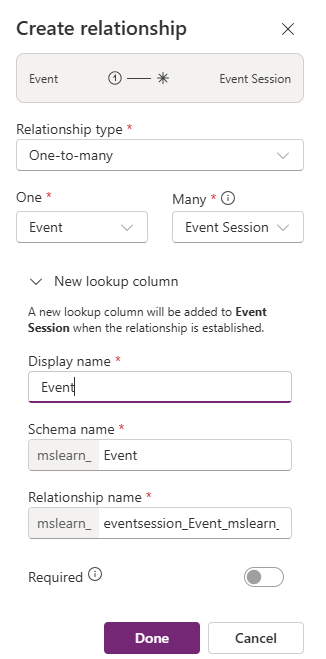
A single event can have multiple sessions associated with it, so we are going to create a relationship between the Event and Event Session tables.
- On the Command bar, select Create relationships.
- Configure the relationship as follows:
- Relationship Type: One-to-many
- One: Event
- Many: Event Session
- Display name:
Event
-
Select Done.
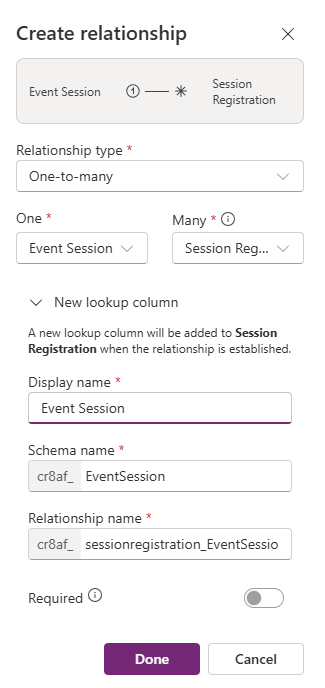
Finally, Participants register for Event Sessions, so we will need to create a relationship between the Event Sessions and Session Registrations tables.
- On the Command bar, select Create relationships.
- Configure the relationship as follows:
- Relationship Type: One-to-many
- One: Event Session
- Many: Session Registrations
- Display name:
Event Session
-
Select Done.
Your newly created data model should resemble the image:
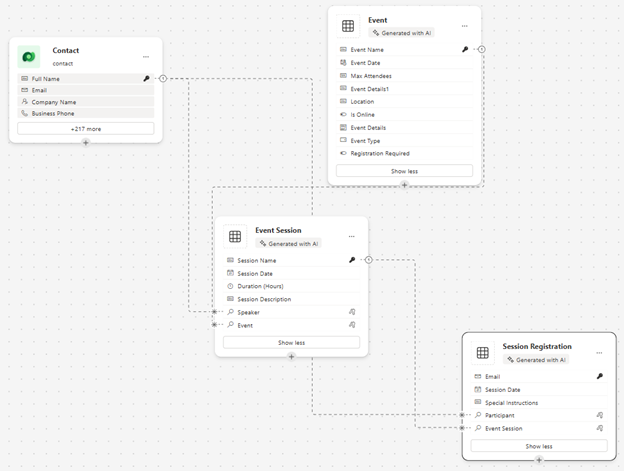
- Select Save and exit.
Task 2: Edit tables and columns directly
Copilot is a wonderful way to create tables and columns very quickly. However, there may be times when you need to make modifications to tables and columns directly. For example, in this task we are going to update some existing columns, as well keep track of how many participants are registered for a specific session.
- If necessary, open a web browser and navigate to the Power Apps maker portal, and Sign in using your Microsoft account credentials.
- Using the navigation on the left, select Tables.
- In the Search field, enter Event.
- Open the Event table.
- Under the Schema heading, select Columns.
- Locate and open the Event Type column.
- Replace the Labels with the following:
- Conference
- Trade Show
- Webinar
- Lunch and Learn
- Launch
-
Set the Default choice to None.

-
Select the Save button. (If the column fails to save, the first time, try again.)
Next we will add a new column to the Event Session table to track the total number of session registrations.
- Using the navigation on the left, select Tables to leave the Event table.
- In the Search field, enter Event.
- Open the Event Session table.
- Under the Schema heading select Columns.
- On the command bar, select the New column button.
- Configure the new column as follows:
- Display name:
Total Registrations - Data type: Whole Number
- Behavior: Rollup
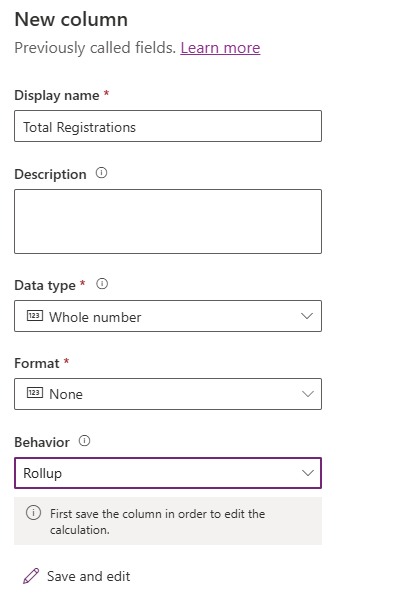
- Display name:
-
Select Save and edit.
Important: If you have your pop-up blocker turned on, you may need to turn it off for the roll-up field to display.
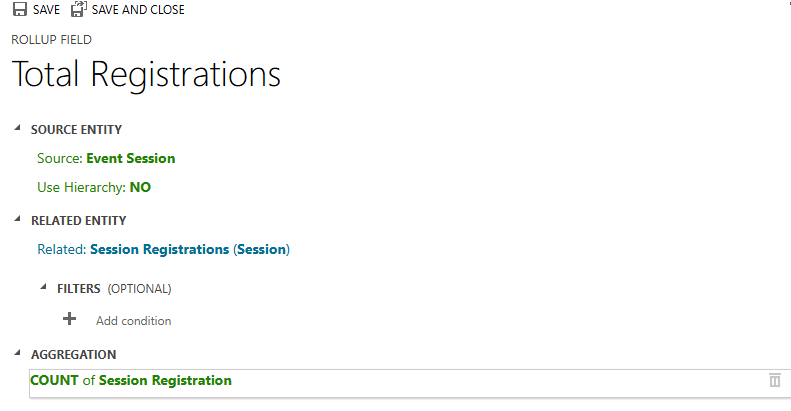
- Configure the Rollup Column as follows:
- Under Related Entity, select Add related entity.
- Choose the Session Registration table.
- Select the Save your changes button (Check mark)
- Under Aggregation, select Add aggregation.
- Under Aggregate Function, choose Count.
- For Aggregated Related Entity Field, select Session Registration.
- Select the Save your changes button (Check mark)
-
Select the Save and close button.
You have now successfully created the data model that will be used to support the event management application.
Task 3: Create an equipment table
In addition to managing events, Contoso has an employee checkout program. Next, we will create the table to store the equipment.
- Using the navigation on the left, select Tables.
- Under Tables, select Get started with Copilot.
- In the Describe the tables you want Copilot to build screen, enter:
Create a table for checking out equipment. The table should include the Equipment Name, Due Date, and Item number. - Next to the Generate button, select Table Settings, and configure as follows:
- Table options: One table
- Do NOT include relationships.
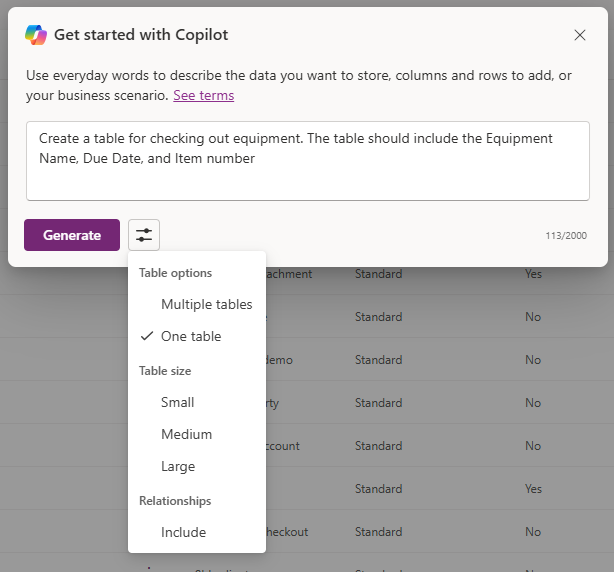
-
Select the Generate button.
Important: Copilot should only create one table called Checkout Equipment. If more were created, you can delete them, by telling Copilot the name of the table to delete.
Edit the data model with Copilot
Now that we have created the table, we are going to add some additional columns to it. We will start by adding an event type column. Additionally, Contacts will attend our events. We want to add the existing Contact table to the data model and associate it with Event Registrations later.
- In the What would you like to do next? field, enter:
Rename the table to Equipment. - In the What would you like to do next? field, enter:
Add a choice column named Equipment type. - Add another column by entering the following text:
Add a text column named Category. -
Add another column by entering the following text:
Add a text column named Status.Your completed table should resemble the image below:
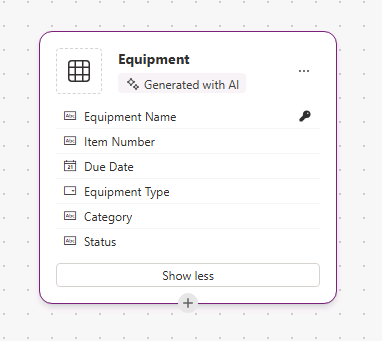
- If your table includes extra columns, remove those columns by entering
Delete the [column name] column. - Once your table matches the image, select Save and exit.
Task 4: Modify the Equipment table directly
- If necessary, open a web browser and navigate to the Power Apps maker portal, and Sign in using your Microsoft account credentials.
- Using the navigation on the left, select Tables.
- In the Search field, enter Equipment.
- Open the Equipment table.
- Under the Schema heading, select Columns.
- Locate and open the Equipment Type column.
- If necessary, replace the Labels with the following:
- Electronics
- Furniture
- Tools
- Accessories
-
Set the Default choice to None.
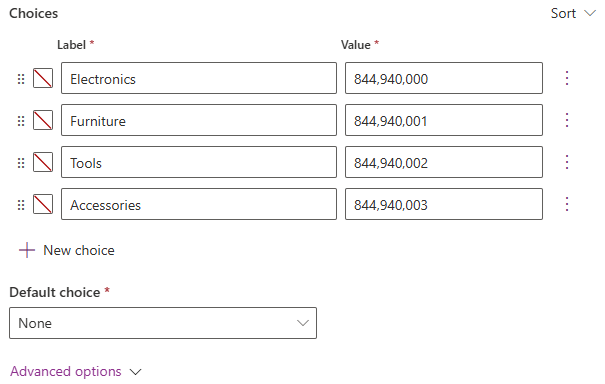
- Select the Save button. (If the column fails to save, the first time, try again.)
Congratulations, you have successfully created a data model in Microsoft Dataverse.