Practice Lab 4 - Configure forms and views
Scenario
In this lab, you will configure forms and views for a model-driven app.
Contoso Real Estate wants to track two key elements:
- Real estate property listings
- Who is scheduled for showings of real estate properties
What you will learn
- How to configure table forms
- How to configure table views
High-level lab steps
- Configure the Real Estate Property and Showing main form
- Configure tabs and sections
- Add columns to forms
- Add a subgrid
- Create a new forms
- Associate security roles with forms
- Configure Real Estate Property and Showing views
- Filter views
- Configure Quick Find view
Prerequisites
- Must have completed Lab 2: Data model
Detailed steps
Exercise 1 - Real Estate Property main form
In this exercise, you will modify the main form for the Real Estate Property table.
Task 1.1 – Main form layout and columns
-
Navigate to the Power Apps Maker portal
https://make.powerapps.com -
Make sure you are in the Dev One environment.
-
Select Solutions.
-
Open the Property listings solution.
-
Select the Real Estate Property table.
-
Under Data experiences, select Forms.
-
Select the Information form where the Form type is Main, select the Commands menu (…), and select Edit > Edit in new tab.
-
Select Tree view on the left-hand side of the form designer.
-
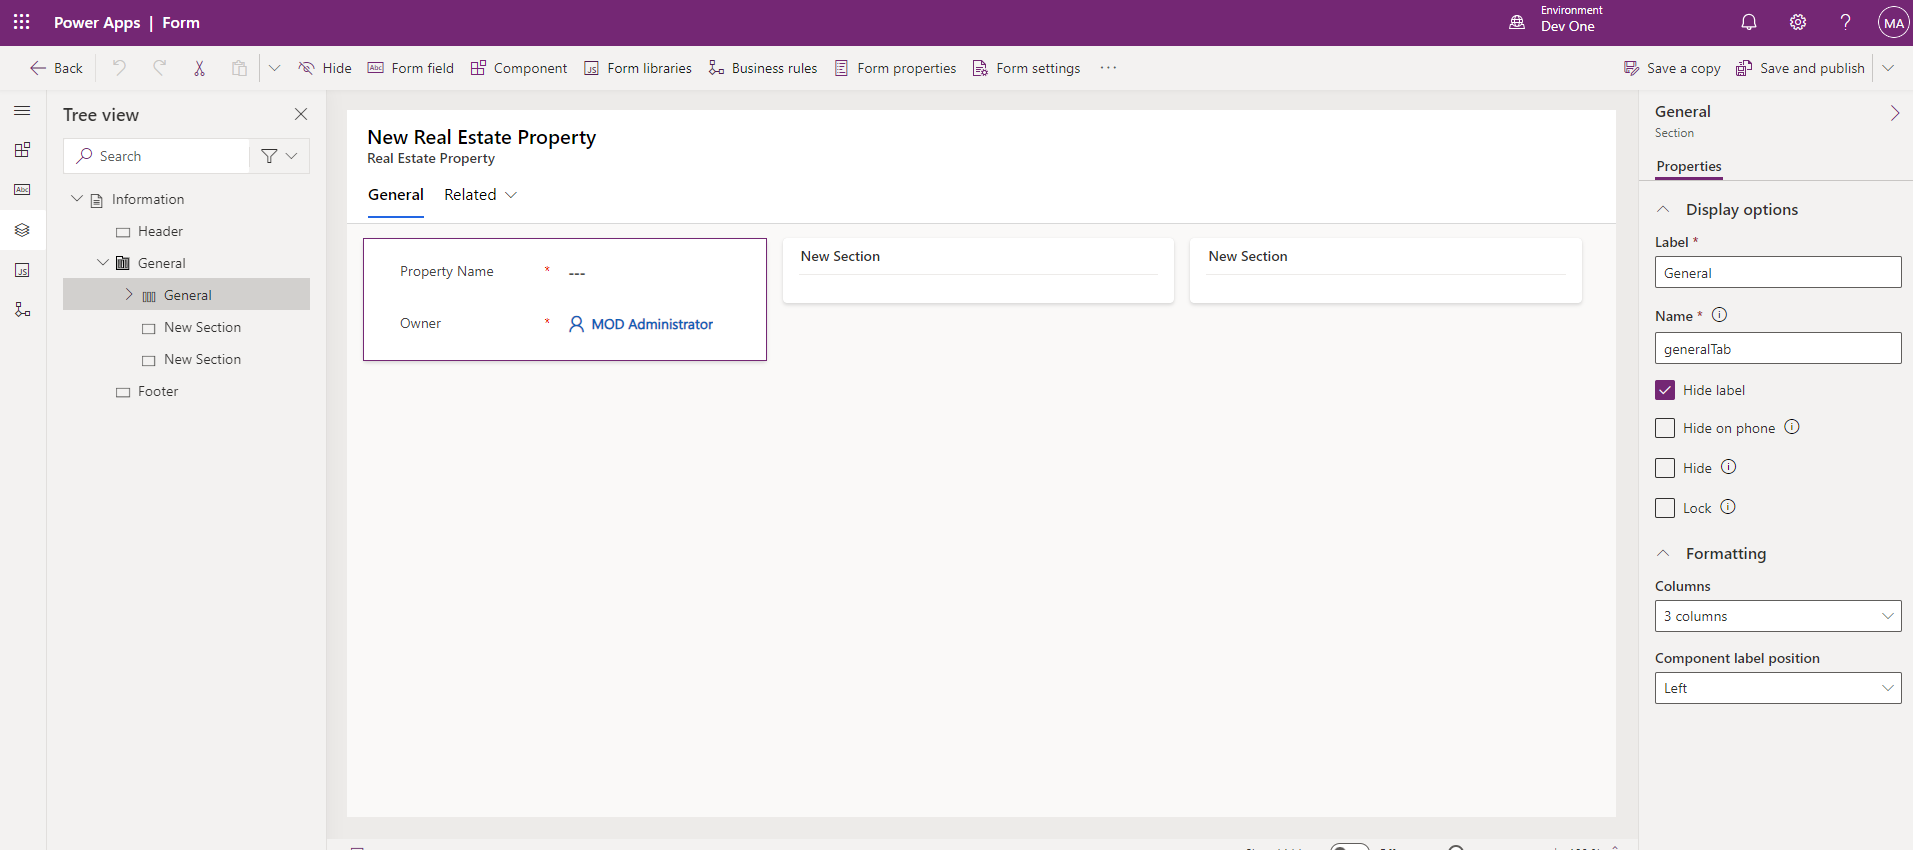
Select the General tab.
-
Enter
generalTabfor Name. -
In the Properties pane on the right-hand side, select 3 columns in the Layout drop-down.
-
In the Tree view, expand the General tab. Select the first section and enter
generalSectionfor Name. -
Select the second section and enter
Timelinefor Label andtimelineSectionfor Name. -
Select the third section and enter
Relatedfor Label andrelatedSectionfor Name. -
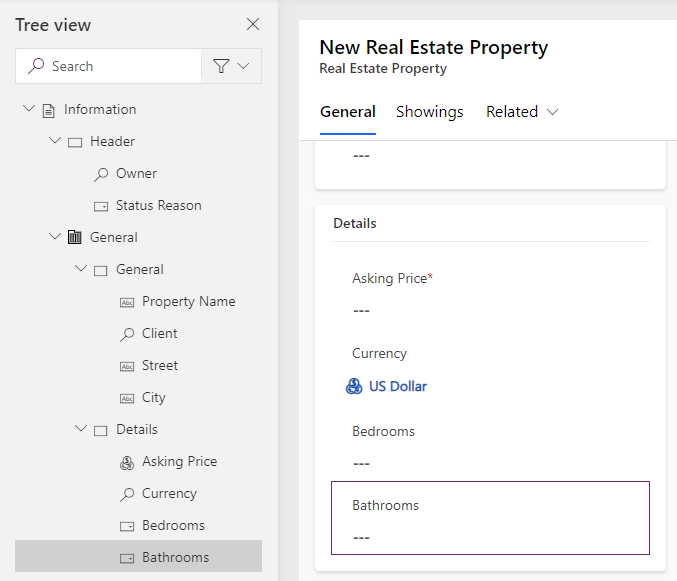
Drag the Owner field into the Header area.

-
Select Table columns from the left navigation in the form designer.
-
Drag the Status Reason column into the Header area.
-
Select the first section.
-
Drag the Client column below the Property Name field.
-
Select the Street column to add to the form below Client.
-
Select the City column to add to the form below Street.
-
Select Components from the left navigation in the form designer.
-
Select the 1-column section control to add it to the form below the General section.
-
Enter
Detailsfor Label anddetailsSectionfor Name. -
Select Table columns from the left navigation in the form designer.
-
Select the Asking Price column to add to the Details section.
-
Select the Currency column to add to the form below Asking Price.
-
Select the Bedrooms column to add to the form below Currency.
-
Select the Bathrooms column to add to the form below Bedrooms.
Task 1.2 – Add Timeline control
-
Select Tree view from the left navigation in the form designer.
-
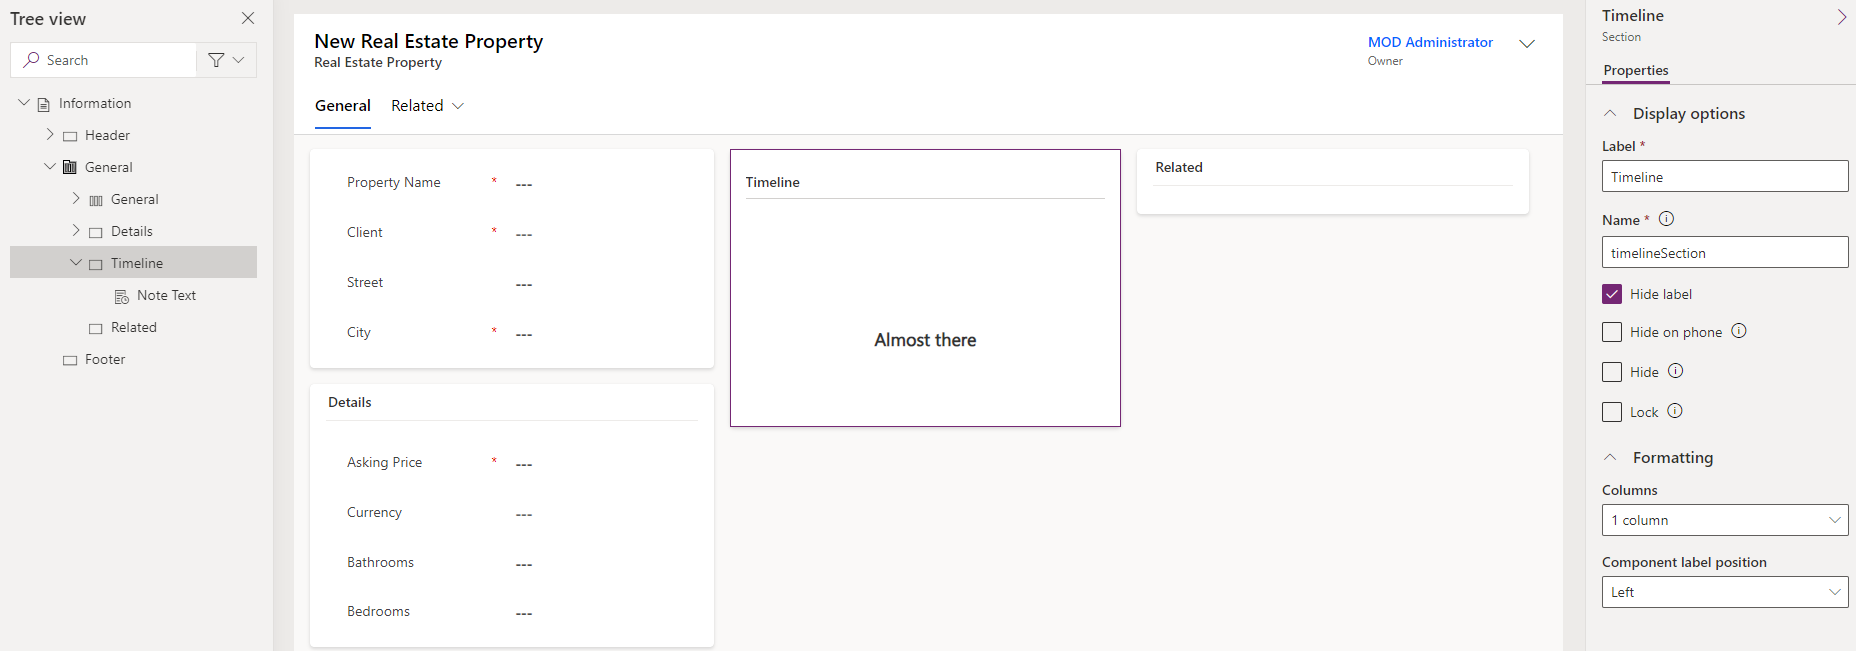
Select the Timeline section.
-
Select Components from the left navigation in the form designer.
-
Expand Display.
-
Select the Timeline control to add it to the Timeline section.
-
Select Tree view from the left navigation in the form designer, expand General tab, and select the Timeline section.
-
In the Properties pane on the right side, check the Hide label box.
-
In the Tree view, select the Note Text control for the Timeline.
-
In the Properties pane on the right side, select Social Activity, uncheck the Enable box, and select Done.
-
In the Properties pane on the right side, select Date Created in the Sort activities by drop-down.
Task 1.3 – Add Quick View control
-
Select Tree view on the left-hand side of the form designer.
-
Select the Related section.
-
Select Components on the left navigation of the form designer.
-
Expand Display.
-
Select the Quick View control to add it to the Related section.
-
Select Client for Lookup and account contact card for Contact and select Done.
Task 1.4 – Add Tab
-
Select Components on the left navigation of the form designer.
-
Select the 1-column tab control to add it to the form.
-
Enter
Showingsfor Label andshowingTabfor Name. -
Select Tree view on the left side of the form designer, expand Showings tab, and select the New Section section.
-
Enter
Showingsfor Label andshowingSectionfor Name. -
Select Components on the left navigation of the form designer.
-
Expand Grid.
-
Select the Subgrid control to add it to the Showings section.
-
Select Show related records.
-
Select Showings (Real Estate Property) for Table and Active Showings for Default view and select Done.
-
Enter
Showingsfor Label andshowingsSGfor Name. -
Select Hide label.
-
Select Save and publish.
-
Close the form designer.
-
Select Done.
Exercise 2 - Showing main form
In this exercise, you will modify the main form for the Showing table.
Task 2.1 – Main form layout and columns
-
Navigate to the Power Apps Maker portal
https://make.powerapps.com -
Make sure you are in the Dev One environment.
-
Select Solutions.
-
Open the Property listings solution.
-
Select the Showing table.
-
Under Data experiences, select Forms.
-
Select the Information form where the Form type is Main, select the Commands menu (…), and select Edit > Edit in new tab.
-
Drag the Owner field into the Header area.
-
Select Table columns from the left navigation in the form designer.
-
Drag the Real Estate Property column below the Name field.
-
Select the Shown to column to add to the form below Real Estate Property.
-
Select the Shown by column to add to the form below Shown to.
-
Select the Showing Date column to add to the form below Shown by.
-
Select the Level of Interest column to add to the form below Showing Date.
-
Select the Comments column to add to the form below Level of Interest.
-
In the Properties pane on the right-hand side, increase Form field height to 3 rows.
-
Select Save and publish.
-
Close the form designer.
-
Select Done.
Exercise 3 - Multiple forms
In this exercise, you will create a new form and restrict access with a security role.
Task 3.1 – Security role
-
Navigate to the Power Apps Maker portal
https://make.powerapps.com -
Make sure you are in the Dev One environment.
-
Select Solutions.
-
Open the Property listings solution.
-
Select + New, select Security, and select Security role.
-
Enter
Property adminfor Role Name. -
Select the Root Business Unit and select Save.
-
Enter
cre_in Search by table name in the upper-right of the page. -
Select Show all tables in the drop-down on the left-hand side of the page.
-
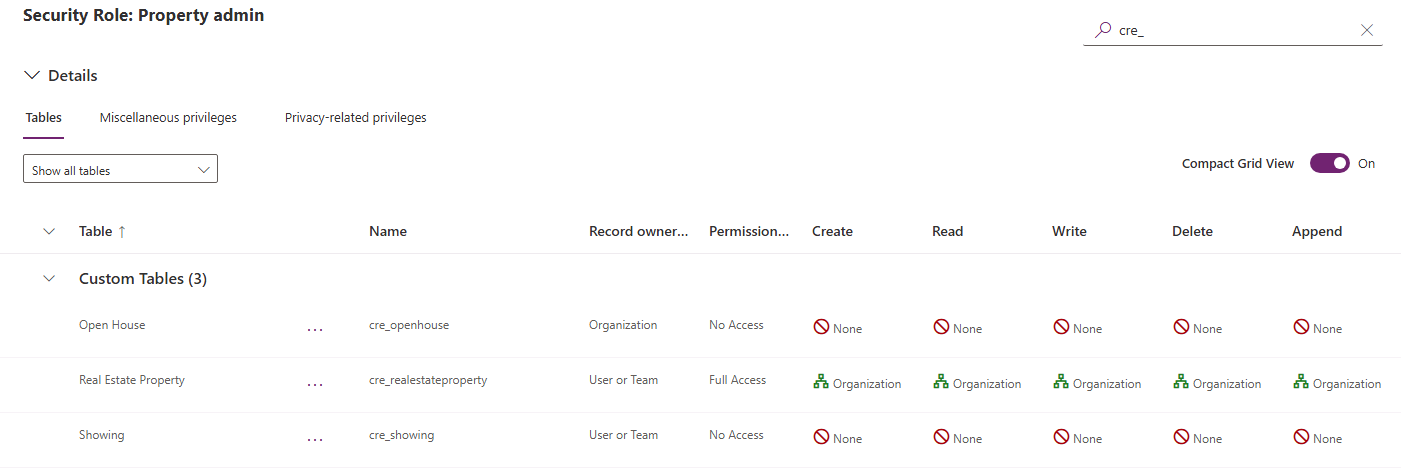
Select the Real Estate Property table.
-
Select the Commands menu (…), and select Permission Settings.
-
Select Full Access to change the access level on all privileges to Organization.
-
Select Save.
-
Select the Showing table.
-
Select the Commands menu (…), and select Permission Settings.
-
Select Full Access to change the access level on all privileges to Organization.
-
Select Save.
-
Select the Open House table.
-
Select the Commands menu (…), and select Permission Settings.
-
Select Full Access to change the access level on all privileges to Organization.
-
Select Save.
-
Select <- Back.
Task 3.2 – Copy form
-
Select the Showing table.
-
Under Data experiences, select Forms.
-
Select the Information form where the Form type is Main, select the Commands menu (…), and select Edit > Edit in new tab.
-
Select Level of Interest and in the Properties pane, select Read-only.
-
Select Comments and in the Properties pane, select Read-only.
-
Select Save a copy.
-
Enter
Showing admin formfor Display Name and select Save.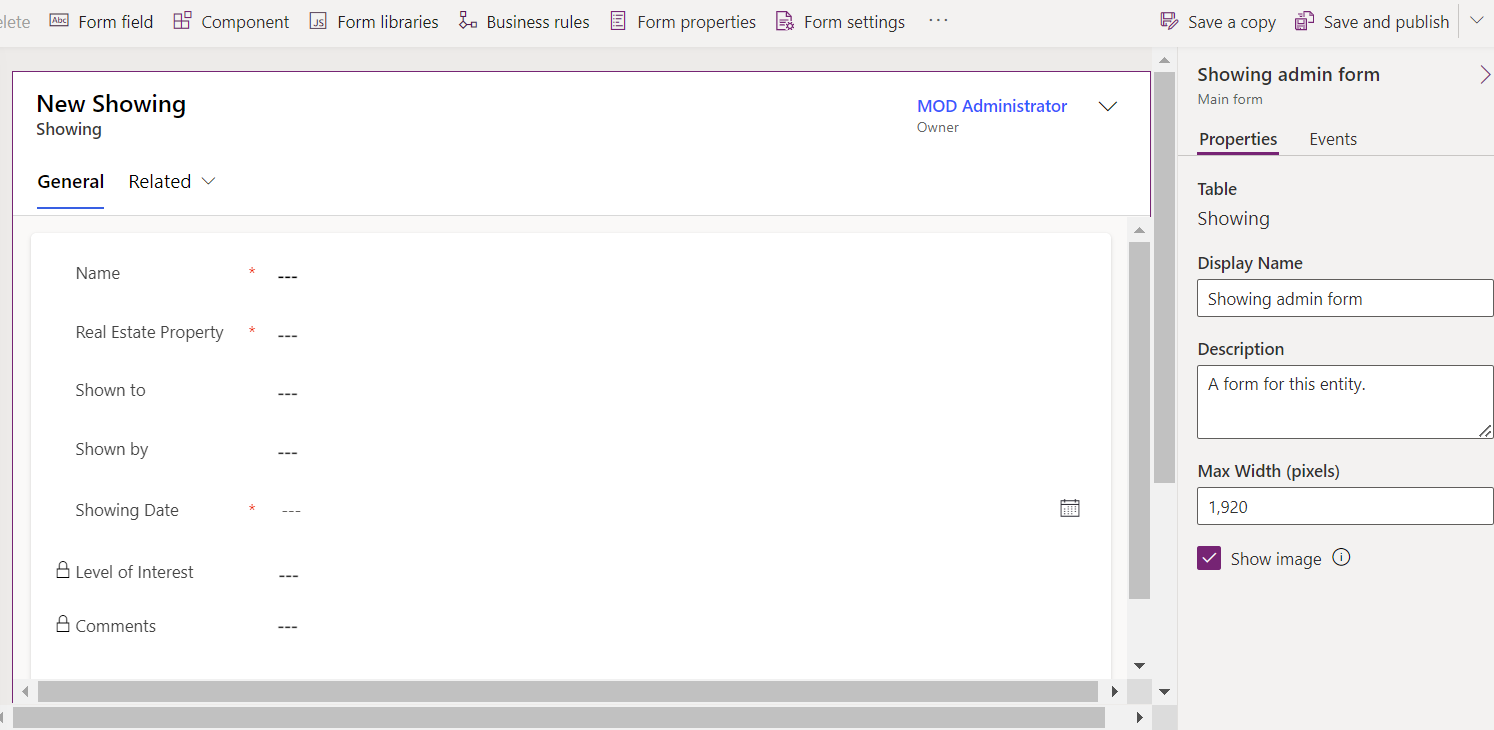
-
Select Form settings.
-
Select the Property admin security role.
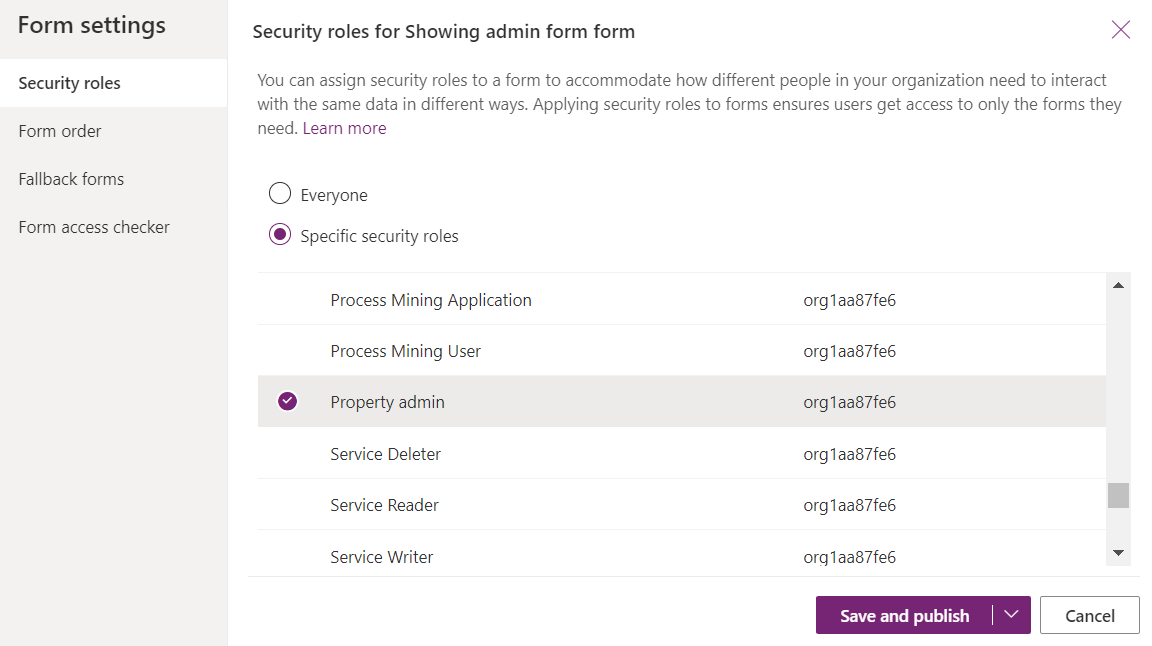
-
Select Save and publish.
-
Close the form designer.
-
Select Done.
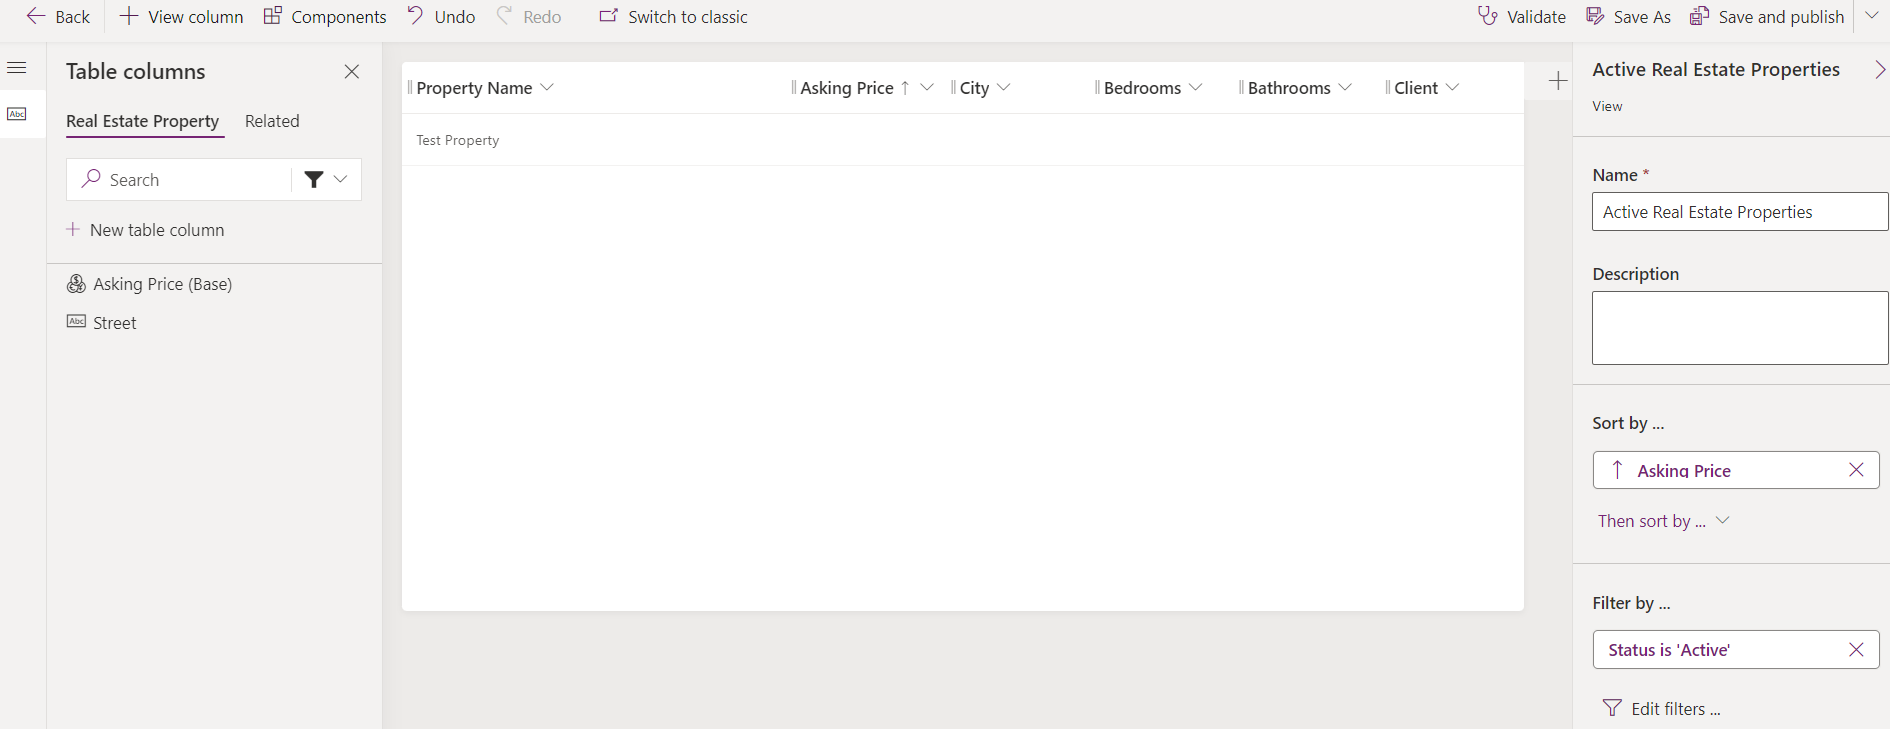
Exercise 4 - Real Estate Property views
In this exercise, you will modify the views for the Real Estate Property table.
Task 4.1 – Real Estate Property Public view
-
Navigate to the Power Apps Maker portal
https://make.powerapps.com -
Make sure you are in the Dev One environment.
-
Select Solutions.
-
Open the Property listings solution.
-
Select the Real Estate Property table.
-
Under Data experiences, select Views.
-
Select the Active Real Estate Properties view, select the Commands menu (…), and select Edit > Edit in new tab.
-
Select the caret next to the Created On column and select Remove.
-
Select the Asking Price column to add to the view.
-
Select the City column to add to the view.
-
Select the Bedrooms column to add to the view.
-
Select the Bathrooms column to add to the view.
-
Select the Client column to add to the view.
-
In the Properties pane, remove Property Name under Sort by.
-
In the Properties pane, select Sort by and select Asking Price.
-
Select Save and publish.
-
Close the view designer.
-
Select Done.
Task 4.2 – Real Estate Property Quick Find view
-
Select the Quick Find Active Real Estate Properties view, select the Commands menu (…), and select Edit > Edit in new tab.
-
Select the caret next to the Created On column and select Remove.
-
In the Quick Find Active Real Estate Properties pane on the right, select Edit find table columns under Find by.
-
Choose the following columns and select Apply.
- City
- Client
- Property Name
-
Select Save and publish.
-
Close the view designer.
-
Select Done.
Exercise 5 - Showing views
In this exercise, you will modify the views for the Showing table.
Task 5.1 – Showing Public view
-
Navigate to the Power Apps Maker portal
https://make.powerapps.com -
Make sure you are in the Dev One environment.
-
Select Solutions.
-
Open the Property listings solution.
-
Select the Showing table.
-
Under Data experiences, select Views.
-
Select the Active Showings view, select the Commands menu (…), and select Edit > Edit in new tab.
-
Select the caret next to the Created On column and select Remove.
-
Select the Real Estate Property column to add to the view.
-
Select the Showing Date column to add to the view.
-
Select the Shown to column to add to the view.
-
Select the Level of Interest column to add to the view.
-
Select the Related tab.
-
Expand Real Estate Property.
-
Select the Asking Price column to add to the view.
-
In the Properties pane, remove Name under Sort by.
-
In the Properties pane, select Sort by and select Showing Date.
-
On the Save and publish drop-down menu, select Save only.
Task 5.2 – New Showing view
-
Select Save As.
-
Enter
High Interest showingsfor Name. -
Select Save.
-
Select the caret next to the Level of Interest column and select Filter by.
-
Select Equals and choose Very High and High.
-
Select Apply.
-
Select Save and publish.
-
Close the view designer.
-
Select Done.