Practice Lab 2 - Data model
Scenario
In this lab, you will create Dataverse tables, columns, and relationships.
Contoso Real Estate wants to track two key elements:
- Real estate property listings
- Who is scheduled for showings of real estate properties
What you will learn
- How to create tables in Dataverse
- How to add columns to Dataverse tables
- How to create relationships between tables
High-level lab steps
- Create tables
- Create columns
- Create relationships
Prerequisites
- Must have completed Lab 1: Publisher and solution
Detailed steps
Exercise 1 - Create tables
In this exercise, you will create and add tables to the solution.
Task 1.1 – Create Real Estate Property table
-
Navigate to the Power Apps Maker portal
https://make.powerapps.com -
Make sure you are in the Dev One environment.
-
Select Solutions.
-
Open the Property listings solution.
-
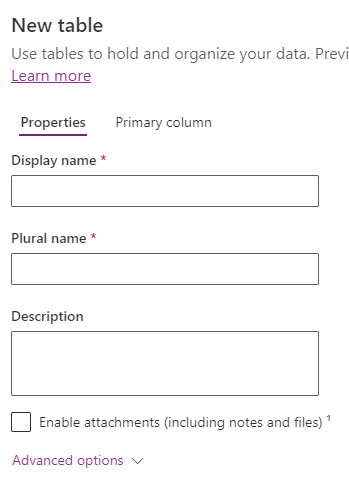
Select + New > Table > Table (advanced properties).
-
Enter
Real Estate Propertyfor Display name. The plural name will be automatically populated. -
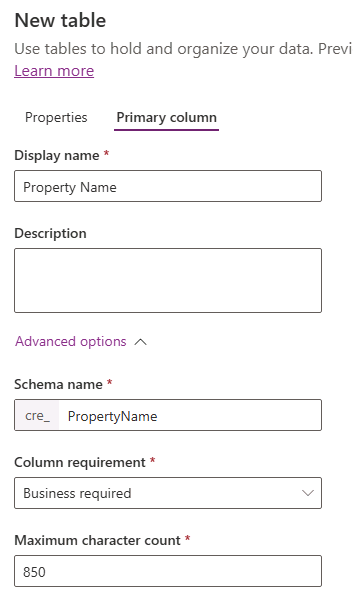
Select the Primary column tab.
-
Enter
Property Namefor Display name. -
Expand Advanced options, review the available options but don’t change anything here.
-
Select the Properties tab.
-
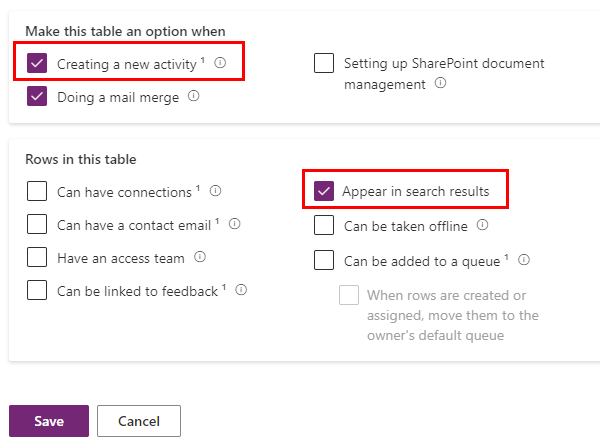
Expand Advanced options.
-
Check Creating a new activity.
-
Check Appear in search results.
-
Select Save.
-
Select Properties.

-
Check Enable attachments and select Save.
Task 1.2 – Create Showing table
-
In the Objects pane, select All.
-
Select + New > Table > Table (advanced properties).
-
Enter
Showingfor Display name. The plural name will be automatically populated. -
Expand Advanced options.
-
Check Appear in search results.
-
Select Save.
Task 1.3 – Create Open House table
-
In the Objects pane, select All.
-
Select + New > Table > Table (advanced properties).
-
Enter
Open Housefor Display name. The plural name will be automatically populated. -
Expand Advanced options.
-
Select Organization for Record ownership.
-
Select Save.
Task 1.4 – Add contact table
-
In the Objects pane, select All.
-
Select Add existing and choose Table.
-
Select the Contact table.
-
Select Next.
-
Select Add.
Exercise 2 - Create columns
In this exercise, you will create columns to the tables to the solution.
Task 2.1 – Create Real Estate Property columns
-
Navigate to the Power Apps Maker portal
https://make.powerapps.com -
Make sure you are in the Dev One environment.
-
Select Solutions.
-
Open the Property listings solution.
-
Select the Real Estate Property table.
-
Under Schema, select Columns.
-
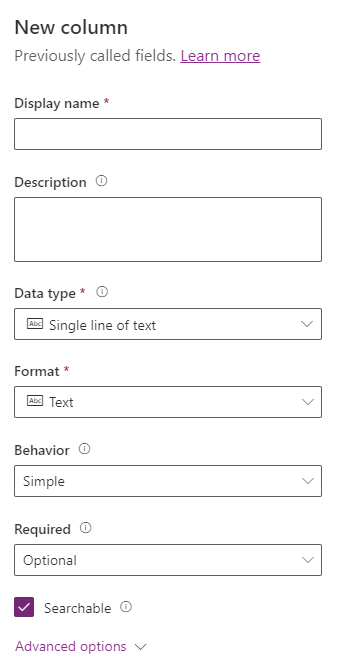
Select + New column.
-
Enter
Asking Pricefor Display name. -
Select Currency in the Data type drop-down.
-
In the Required drop-down, select Business required.
-
Select Save.
-
Select + New column.
-
Enter
Streetfor Display name. -
In the Required drop-down, select Business required.
-
Select Save.
-
Select + New column.
-
Enter
Cityfor Display name. -
In the Required drop-down, select Business required.
-
Select Save.
-
Select + New column.
-
Enter
Bedroomsfor Display name. -
Select Choice in the Data type drop-down and select Choice again.
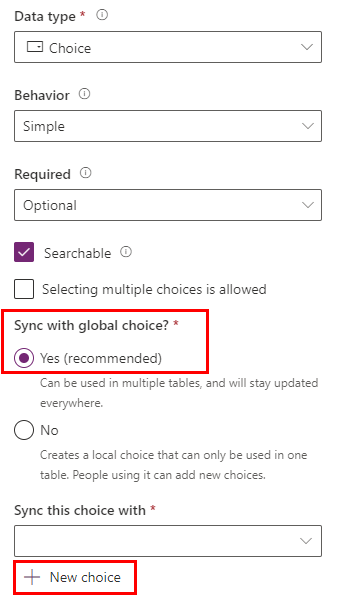
-
Select Yes for Sync with global choice.
-
Select + New choice.
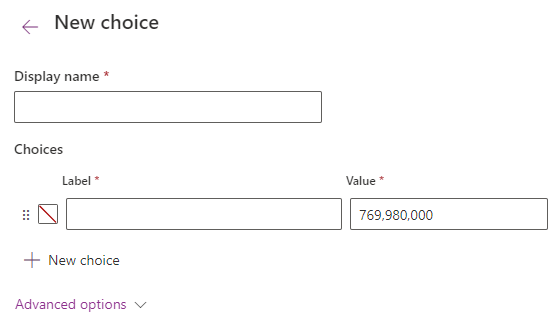
-
Enter
Number of Roomsfor Display name. -
Enter
1for Label and1for Value. -
Select + New choice and Enter
2for Label and2for Value. -
Select + New choice and Enter
3for Label and3for Value. -
Select + New choice and Enter
4for Label and4for Value. -
Select + New choice and Enter
5for Label and5for Value.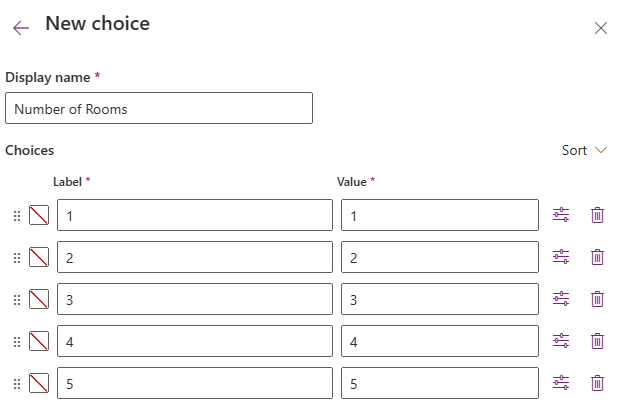
-
Select Save.
-
In Sync this choice with select Number of Rooms.
-
Select Save.
-
Select + New column.
-
Enter
Bathroomsfor Display name. -
Select Choice in the Data type drop-down and select Choice again.
-
In Sync this choice with select Number of Rooms.
-
Select Save.
Task 2.2 – Create Showing columns
-
In the Objects pane, select All.
-
Select the Showing table.
-
Under Schema, select Columns.
-
Select + New column.
-
Enter
Showing Datefor Display name. -
Select Date and time in the Data type drop-down.
-
Select Date only in the Format drop-down.
-
In the Required drop-down, select Business required.
-
Select Save.
-
Select + New column.
-
Enter
Commentsfor Display name. -
Select Text in the Data type drop-down and then under Multiple lines of text, select Plain text.
-
Select Save.
-
Select + New column.
-
Enter
Level of Interestfor Display name. -
Select Choice in the Data type drop-down and select Choice again.
-
Select No for Sync with global choice.
-
Enter
Very Highfor Label. -
Select + New choice and Enter
Highfor Label. -
Select + New choice and Enter
Mediumfor Label. -
Select + New choice and Enter
Lowfor Label. -
Select + New choice and Enter
No interestfor Label. -
Select Save.
-
Select + New column.
-
Enter
Shown byfor Display name. -
Select Lookup in the Data type drop-down and select Lookup again.
-
In the Related table drop-down, select User.
-
Select Save.
Task 2.3 – Create Open House columns
-
In the Objects pane, select All.
-
Select the Open House table.
-
Under Schema, select Columns.
-
Select + New column.
-
Enter
Open House Datefor Display name. -
Select Date and time in the Data type drop-down.
-
Select Date only in the Format drop-down.
-
In the Required drop-down, select Business required.
-
Select Save.
Exercise 3 - Create relationships
In this exercise, you will create relationships between the tables to the solution.
Task 3.1 – Real Estate Property to Contact relationship
-
Navigate to the Power Apps Maker portal
https://make.powerapps.com -
Make sure you are in the Dev One environment.
-
Select Solutions.
-
Open the Property listings solution.
-
Select the Real Estate Property table.
-
Under Schema, select Relationships.
-
Select + New relationship and then select Many-to-one.
-
In the Related (One) Table drop-down select Contact.
-
Enter
Clientfor Lookup column display name. -
In the Lookup column requirement drop-down, select Business Required.
-
Select Done.
Task 3.2 – Real Estate Property to Showing relationship
-
Select + New relationship and then select One-to-many.
-
In the Related (Many) Table drop-down select Showing.
-
In the Lookup column requirement drop-down, select Business Required.
-
Select Done.
Task 3.3 – Real Estate Property to Open House relationship
-
Select + New relationship and then select One-to-many.
-
In the Related (Many) Table drop-down select Open House.
-
In the Lookup column requirement drop-down, select Business Required.
-
Expand General.
-
Enter
realestateproperty_openhousefor Relationship name. -
Select Done.
Task 3.4 – Showing to Contact relationship
-
In the Objects pane, select All.
-
Select the Showing table.
-
Under Schema, select Relationships.
-
Select + New relationship and then select Many-to-one.
-
In the Related (One) Table drop-down select Contact.
-
Enter
Shown tofor Lookup column display name. -
Select Done.