Practice Lab 9 – Power Apps Component Framework
Scenario
In this lab you will develop a custom component control using the Power Apps Component Framework (PCF). This component will be used to visualize the permit inspection history timeline. As you build the component, you will see how to use prescriptive interfaces of the framework to interact with the hosting form data. To speed things up we will use a community timeline library to render the visualization. When you build such controls, you can either follow the same procedure or use popular frameworks like React or Vue to completely control the visualization that the component will render.
High-level lab steps
As part of building this component, you will complete the following steps:
- Use the Power Apps CLI to initialize the new component
- Build the component logic using Typescript
- Publish the component for use on forms
- Configure the permit form to use the component
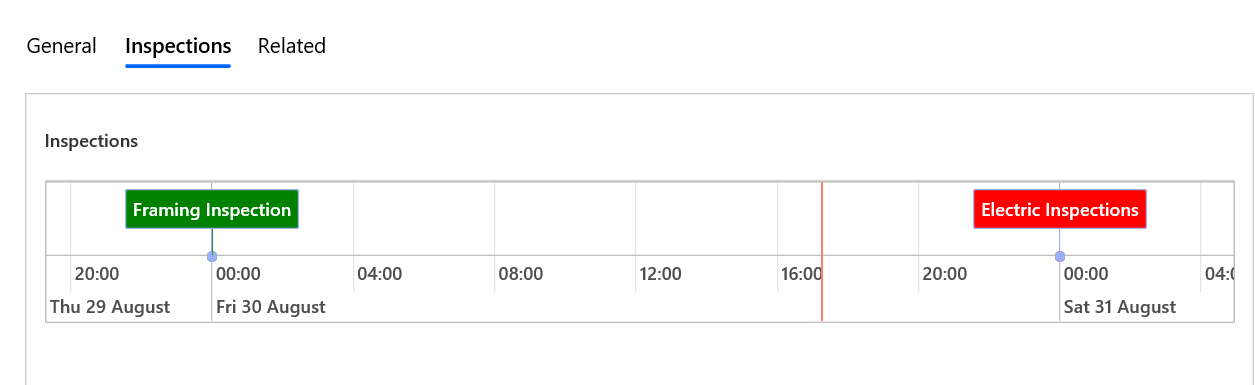
This is what the component will look like when it is completed.
Things to consider before you begin
- What are the advantages of using a Power Apps Component Framework component over an embedded Power Apps canvas app?
- Remember to continue working in your DEVELOPMENT environment. We’ll move everything to production soon.
Starter solution
A starter solution file for this lab can be found in the C:\Labfiles\L09\Starter folder.
Completed solution
Completed solution files for this lab can be found in the C:\Labfiles\L09\Completed folder.
Resources
Complete source code files for this lab can be found in the C:\Labfiles\L09\Resources folder.
[!IMPORTANT] You should have installed .NET 4.6.2 and Power Apps CLI in an earlier lab. If you have not completed the steps in the Power Platform Tools lab, you must complete those before starting this lab.
Exercise 1: Create the PCF Control
Objective: In this exercise, you will create a Power Apps Components Framework control using the Power Apps CLI.
Task 1.1: Node.js
-
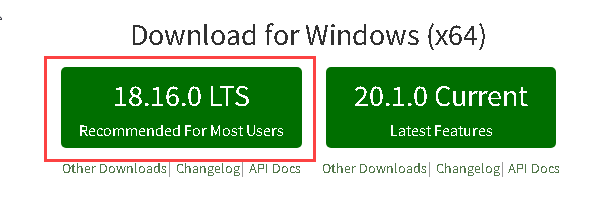
Install Node.js
-
Navigate to Node JS
-
Select the latest LTS version.
-
Open the downloaded file.
-
Follow the steps in setup wizard to complete installing Node.js.
-
Task 1.2: Setup code component project
-
Start the developer command prompt tool.
-
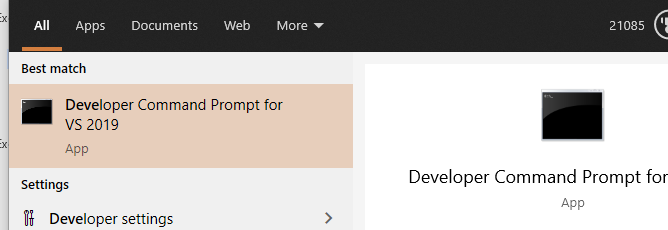
Launch the Developer Command Prompt from the start menu.
-
-
Create a folder named named pcfTimelineControl for the code component.
-
Run the following commands.
cd C:\LabFiles\L09
mkdir pcfTimelineControl
cd pcfTimelineControl
mkdir src
cd src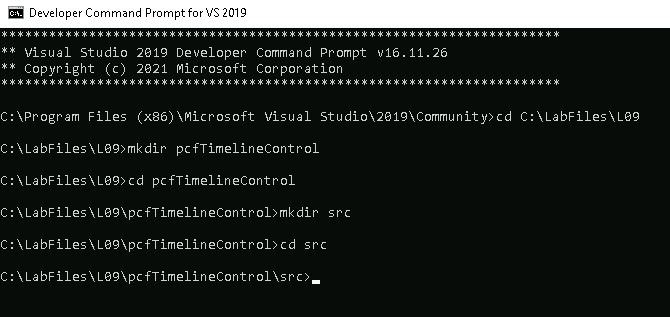
-
-
Create a solution project for a pcf dataset component named timelinecontrol.
-
Initialize the component. This command will create a set of files that will implement a dataset component. You will customize these files as we continue.
pac pcf init --name timelinecontrol --namespace contoso --template dataset -
Install dependencies by running npm install command in the Terminal
npm install -
Wait for the dependencies installation to complete.
-
-
Review the generated resources.
-
Open the src folder in Visual Studio Code.
code . -
Visual Studio Code should start, and it should open the src folder.
-
Expand the timelinecontrol folder.
-
Open the ControlManifest.Input xml file and examine it.

-
Open the Index.ts file and examine it.
-
Expand the generated folder.
-
Open the ManifestTypes.d.ts file and examine it.
-
-
Open CLI in Visual Studio Code
-
In Visual Studio Code, select Terminal and select New Terminal.

[!NOTE] If Terminal is not visible in the menu, you can open it by selecting View -> Terminal.
-
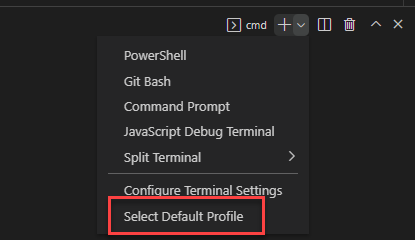
If cmd isn’t your Default Shell, select the arrow and then select Select Default Profile.
-
Select Command Prompt.

-
Select New Terminal.
-
The cmd terminal should now open.
-
-
Run the Build command and review the out folder.
-
Run npm build in the terminal.
npm run build[!NOTE] if you experience an error, try to modify the .eslintrc.json file and change the rules as follows and re-run npm run build.
"rules": { "no-unused-vars": "off", "no-undef" : "off" } -
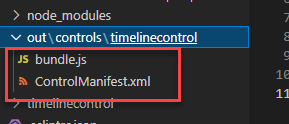
You should now be able to see the out folder. Expand the folder and review its content.
-
-
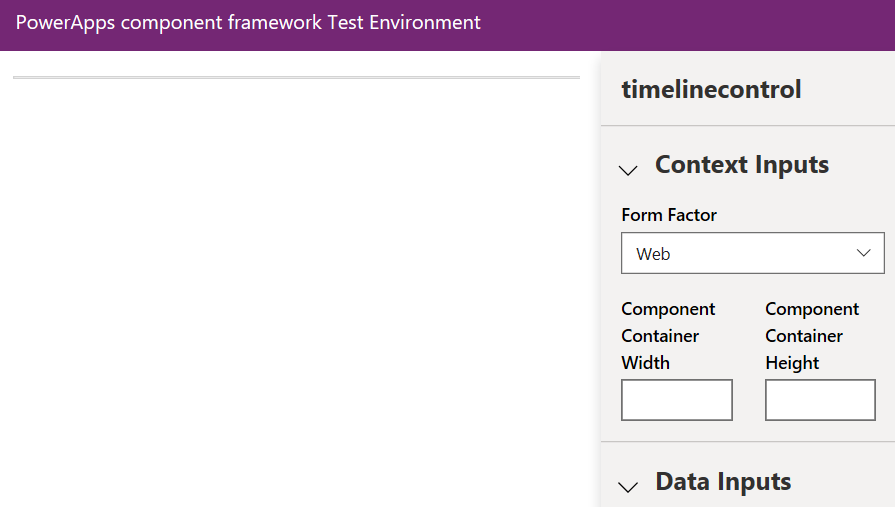
Start the test harness.
-
Run npm start in the terminal.
npm start -
Select Allow access in the Windows Defender Firewall prompt.
-
This should open the Test Environment in a browser window.
-
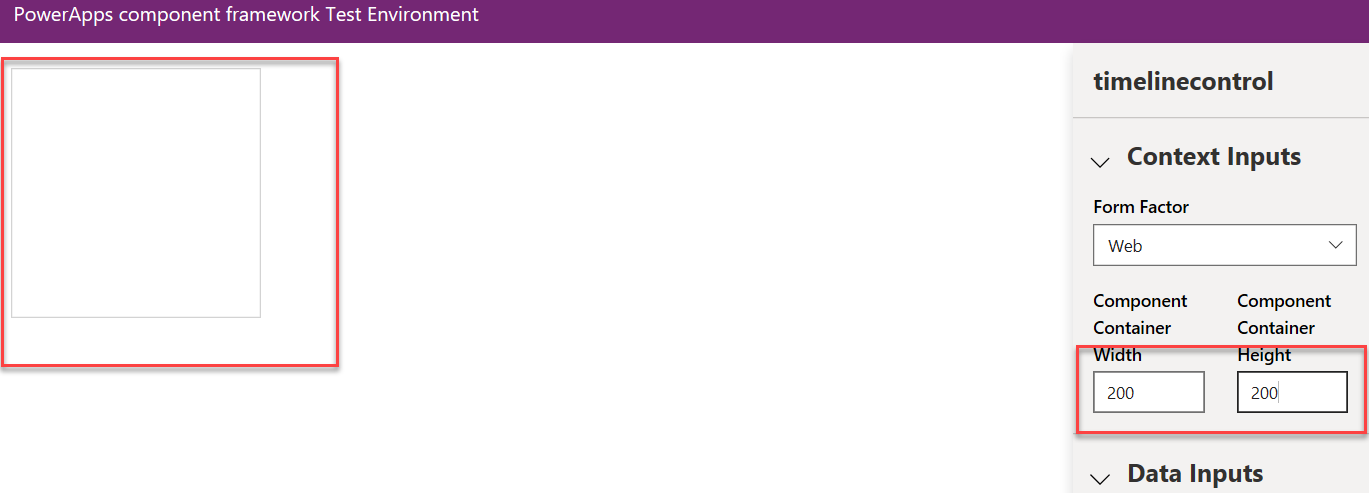
The Component container size should change if you provide Width and Height.
-
-
Stop the test harness
-
Close the Test Environment browser window or tab.
-
In Visual Studio Code, click on the Terminal and press the [CONTROL] key and c.
-
Type y and [ENTER].

-
Task 1.3: Setup solution
-
Create a new solution folder in the parent of the src folder pcfTimelineControl.
-
Change directory to the pcfTimelineControl folder.
cd .. -
You should now be in the pcfTimelineControl directory.
-
Create a new folder with the name solution.
mkdir pcfSolution -
Switch to the pcfSolution directory.
cd pcfSolution -
You should now be in the pcfSolution directory.
-
-
Create solution project and add reference of the src folder where the component is located to the solution. This configuration will be used when you are done with your development and ready to publish your component for others to use.
-
Create solution project with name and prefix contoso.
pac solution init --publisher-name contoso --publisher-prefix contoso -
Add component location to the solution. This creates a reference to include your component when the solution build command is run.
pac solution add-reference --path ..\src -
The project reference should be added successfully.

-
Edit the pcfSolution.cdsproj file by entering
code .in the Terminal window to start Visual Studio Code in the pcfSolution folder. -
Add the following tag to the PropertyGroup.
<OutputPath>bin\debug</OutputPath>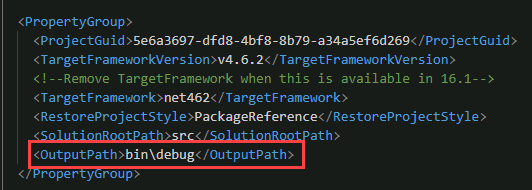
-
Select File and Save All.
-
Select File and Close Window.
-
-
Build the solution
-
Make sure you are still in the pcfSolution folder.
-
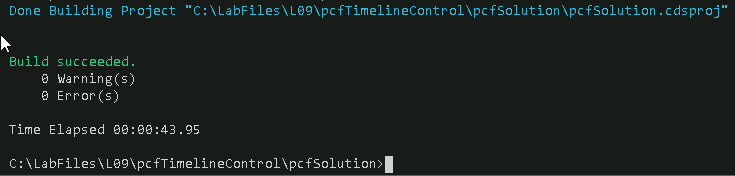
Build the project by running the command below.
msbuild /t:build /restore -
The build should succeed.
[!NOTE] If you get the response where msbuild is not recognized as an internal or external command. This means that you ran a normal command prompt instead of Visual Studio’s developer command prompt.
-
Task 1.4: Build the Basic Timeline
-
Change to the src folder.
-
Run the following command in the Visual Studio Code Terminal window.
cd ..\src
-
-
Add css file.
-
Select the timelinecontrol folder and then select New Folder.
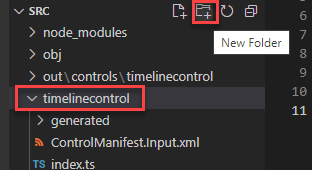
-
Enter
cssand press [ENTER]. -
Select the css folder you created and then select New File.
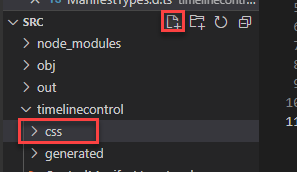
-
Enter
timelinecontrol.cssand Press [ENTER].
-
-
Add the css file as a resource.
-
Open the ControlManifest.Input.xml file.
-
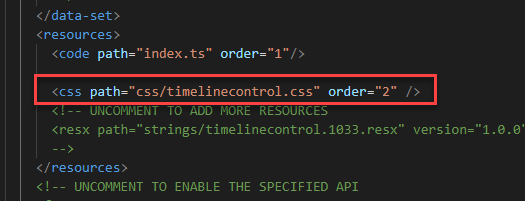
Locate the resources sub element and uncomment the css tag, change the Order to 2.
-
-
Change the data-set name.
-
Locate sampleDataSet tag and change the name property to
timelineDataSet.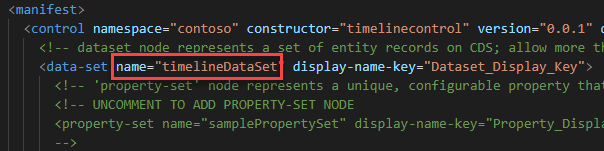
-
-
Install vis-timeline css npm package.
-
Run the following command in the Visual Studio Code Terminal window and wait form the packages to be added.
npm install vis-timeline -
Run the following command in the Visual Studio Code Terminal window and wait form the packages to be added..
npm install moment -
Run the following command in the Visual Studio Code Terminal window and wait form the packages to be added..
npm install vis-data
-
-
Add the vis-timeline css as a resource.
-
Open the ControlManifest.Input.xml file.
-
Add the vis-timeline css inside the resources tag.
<css path="..\node_modules\vis-timeline\dist\vis-timeline-graph2d.min.css" order="1" />
-
-
Add timeline element and visual properties to the Index.ts file.
-
Open the Index.ts file.
-
Add the properties below, inside the export class timelinecontrol function.
private _timelineElm: HTMLDivElement;
private _timelineVis : any;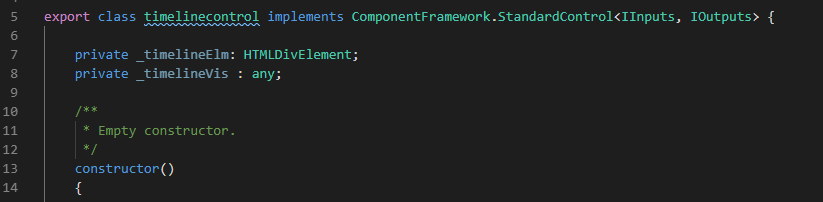
-
Add the below constant after the import lines on the top.
const vis = require('vis-timeline');
-
-
Build the timeline element as div and add it to container element as a child.
-
Locate the init function.
-
Add the code below to the init function.
this._timelineElm = document.createElement("div");
container.appendChild(this._timelineElm);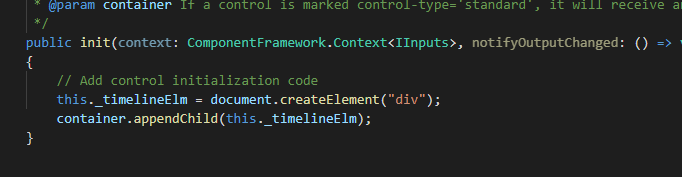
-
-
Create a function that will render the timeline.
-
Add the function below to the bottom of the class.
private renderTimeline(): void {
    // Create a DataSet (allows two way data-binding)
    var items = [
        { id: 1, content: 'item 1', start: '2023-08-20' },
        { id: 2, content: 'item 2', start: '2023-08-14' },
        { id: 3, content: 'item 3', start: '2023-08-18' },
        { id: 4, content: 'item 4', start: '2023-08-16', end: '2020-08-19' },
        { id: 5, content: 'item 5', start: '2023-08-25' },
        { id: 6, content: 'item 6', start: '2023-08-27', type: 'point' }
    ];
    // Configuration for the Timeline
    var options = {};
    // Create a Timeline
    var timeline = new vis.Timeline(this._timelineElm, items, options);
}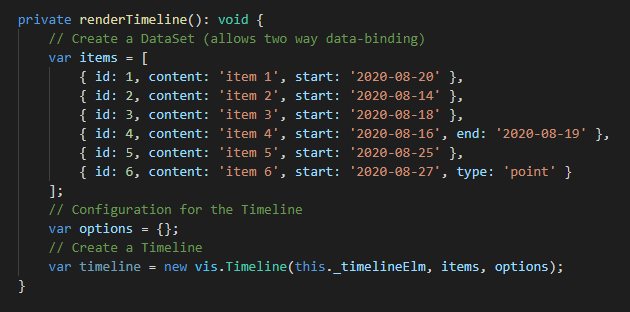
-
-
Call the renderTimeline function from the updateView function.
-
Locate the updateView function.
-
Add the code below inside the updateView function.
this.renderTimeline();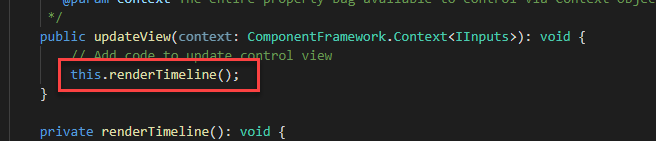
-
Select File and then select Save All.
-
-
Build and start
-
Run the following command in the Visual Studio Code Terminal window.
npm run build -
The build should succeed.
-
Start the test harness. This command will keep the test environment running and auto update when you change the component.
npm start watch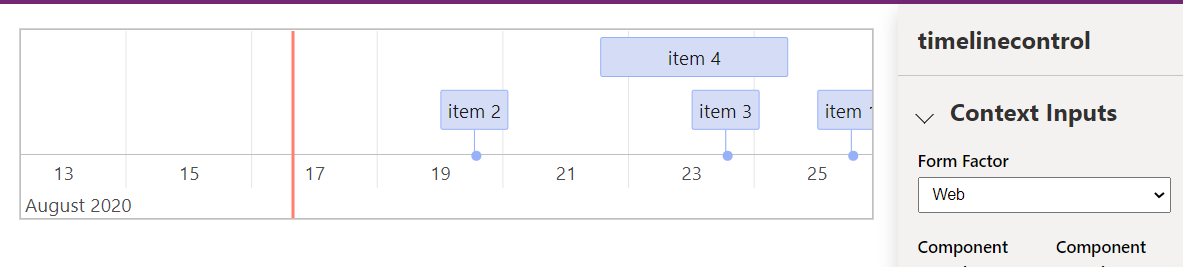
-
Do not close the test environment.
-
Task 1.5: Tailor for Inspection Data
In this task, you will switch from using the hard-coded array of data to using a file loaded into the test harness.
-
Create test data csv file
- Select the src folder and then select New File.
-
Name the new file
testdata.csv. -
Add the data below inside the testdata.csv file and Save it.
  contoso_permitid,contoso_name,contoso_scheduleddate,statuscode
  123,Electrical:Rough Inspection:Passed,8/1/2023,Passed
  124,Electrical:Rough Inspection:Passed,8/5/2023,Passed
  125,Plumbing:Rough Inspection:Failed,8/8/2023,Failed
  126,Plumbing:Rough Inspection:Passed,8/10/2023,Passed
-
Create Timeline Data class
-
Open the index.ts file.
-
Paste the code below at the top of the file after the type DataSet line.
class TimelineData {
    id: string;
    content: string;
    start: string;
    className: string;

    constructor(id: string, content: string, start: string, className: string) {
       this.id = id;
       this.content = content;
       this.start = start;
       this.className = className;
    }
}
-
Add the timeline data array property inside the export class timelinecontrol function and below the _timelineElm definition.
private _timelineData : TimelineData[] = [];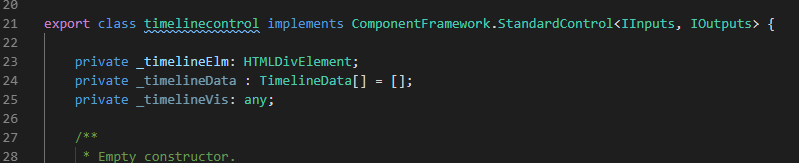
-
-
Add a method that will create the timeline data.
-
Add the method below after the renderTimeline method at the bottom of the class.
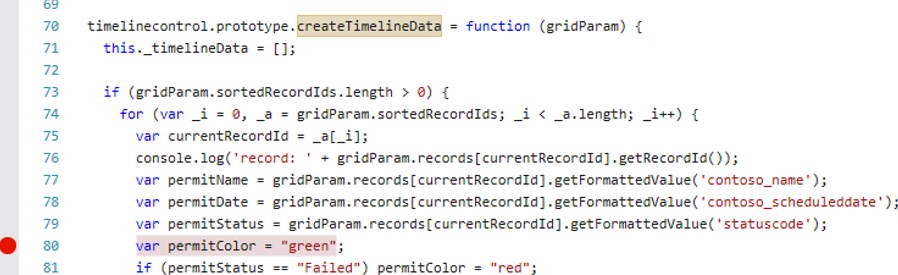
private createTimelineData(gridParam: DataSet) {
    this._timelineData = [];
    if (gridParam.sortedRecordIds.length > 0) {
        for (let currentRecordId of gridParam.sortedRecordIds) {

            console.log('record: ' + gridParam.records[currentRecordId].getRecordId());

            var permitName = gridParam.records[currentRecordId].getFormattedValue('contoso_name')
            var permitDate = gridParam.records[currentRecordId].getFormattedValue('contoso_scheduleddate')
            var permitStatus = gridParam.records[currentRecordId].getFormattedValue('statuscode')
            var permitColor = "green";
            if (permitStatus == "Failed")
                permitColor = "red";
            else if (permitStatus == "Canceled")
                permitColor = "yellow";

            console.log('name:' + permitName + ' date:' + permitDate);


            if (permitName != null)
                this._timelineData.push(new TimelineData(currentRecordId, permitName, permitDate, permitColor));
        }
    }
    else {
        //handle no data
    }
}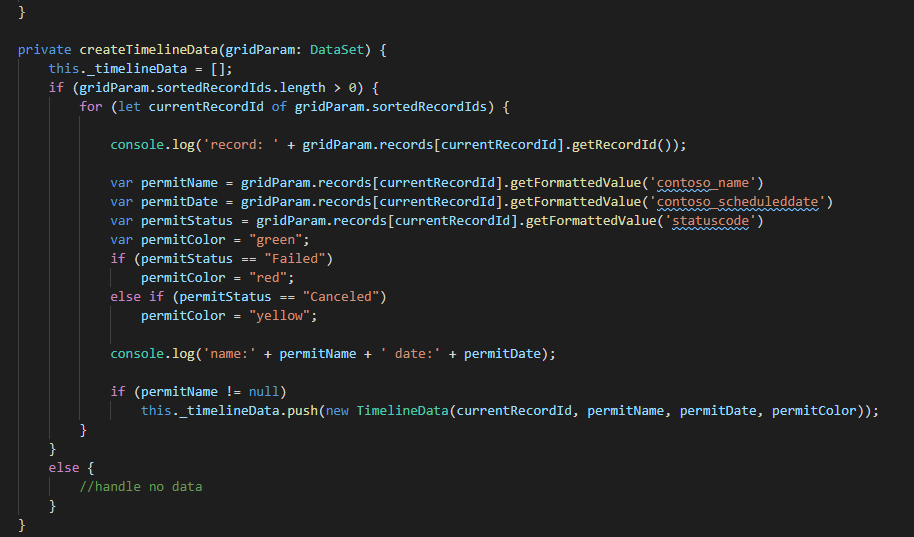
-
-
Call the createTimelineData method from the updateView method.
-
Go to the updateView method.
-
Replace the code inside the updateView method with the code below.
if (!context.parameters.timelineDataSet.loading) {
    // Get sorted columns on View
    this.createTimelineData(context.parameters.timelineDataSet);
    this.renderTimeline();
}
-
-
Replace the hardcoded items with the csv data.
-
Locate the renderTimeline function.
-
Replace the hardcoded items with code below.
var items = this._timelineData;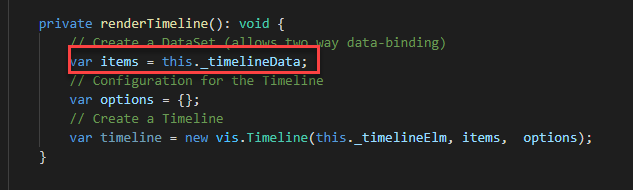
-
-
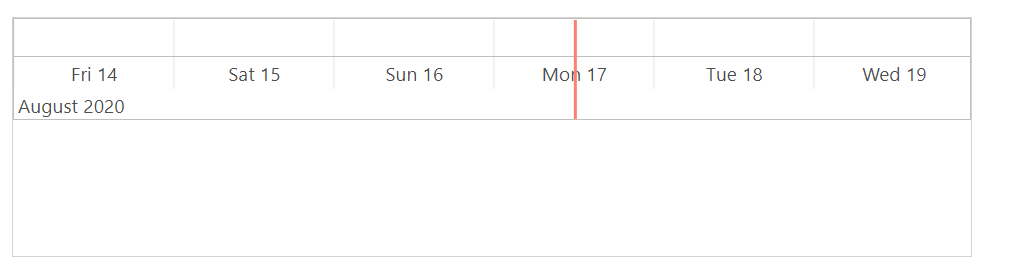
Make sure the test environment shows your changes and test the timeline control with the test data.
-
Select File and then Save All.
-
The test harness should still be running. If it is not running run npm start watch command.
-
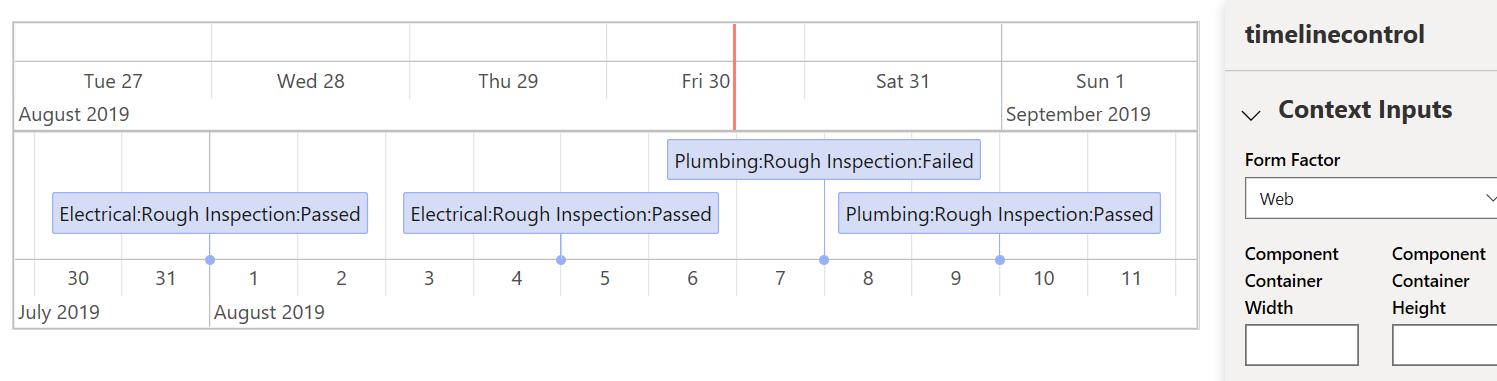
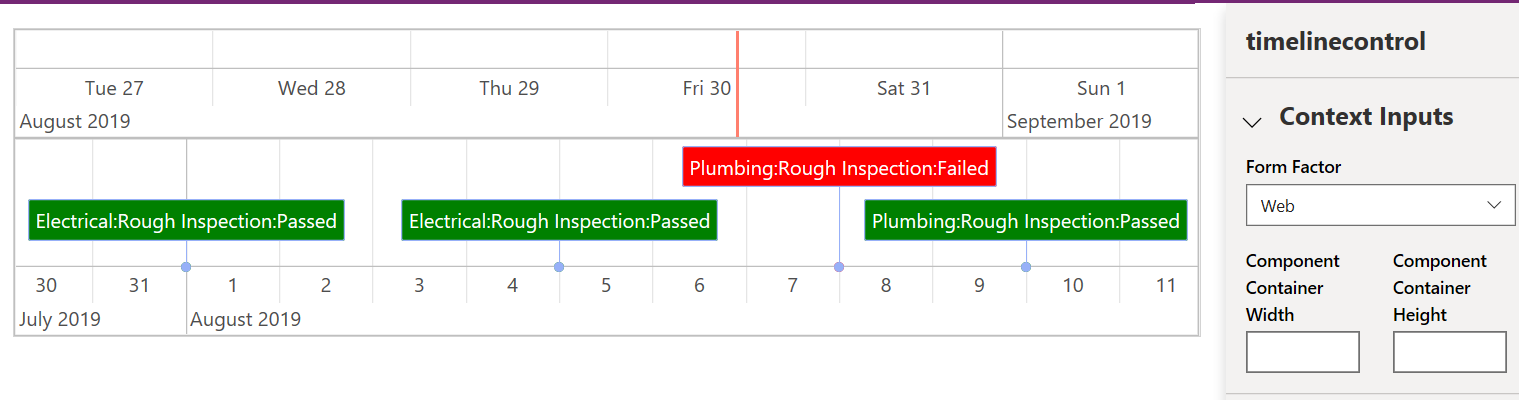
Go to the test environment and make sure it looks like the image below.
-
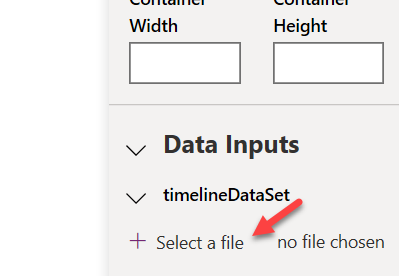
Select + Select a file.
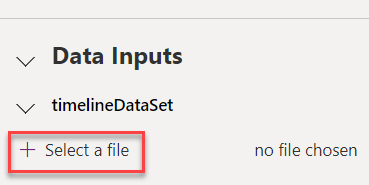
-
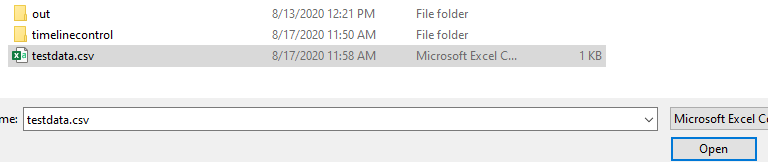
Select the testdata.csv and then select Open.
-
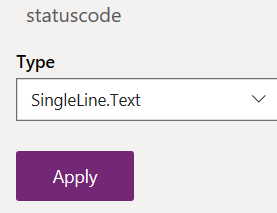
Select Apply.
-
The timeline control should now show the test data.
-
Do not close the test environment.
-
Task 1.6: Change Color for Items
In this task, you will use the css resource you configured to change the color of the items on the timeline.
-
Add red and green styles to the timelinecontrol.css file
-
In Visual Studio Code, expand d the css folder and open the timelinecontrol.css file.
-
Add the style below to the timelinecontrol.css file and save your changes.
.red{
    background:red;
    color:white;
    }
.green{
    background:green;
    color:white;
           }
.yellow{
    background:yellow;
    color:black;
    }
-
Select File and then select Save All.
-
-
Check the test environment, load the test data and make sure it shows your changes.
-
Go to the Test Environment.
-
Select + Select a file.
-
Select the testdata.csv and then select Open.
-
Select Apply.
-
The timeline control should now show the test data.
-
Close the test environment browser tab.
-
-
Stop the test.
-
Go back to Visual Studio Code.
-
Click on the Terminal and press the [CONTROL] key and c.
-
Type y and [ENTER].
-
Exercise 2: Publish to Microsoft Dataverse
Objective: In this exercise, you will publish the timeline control to your Microsoft Dataverse and add it to the Permit main form.
Task 2.1: Setup and Publish
-
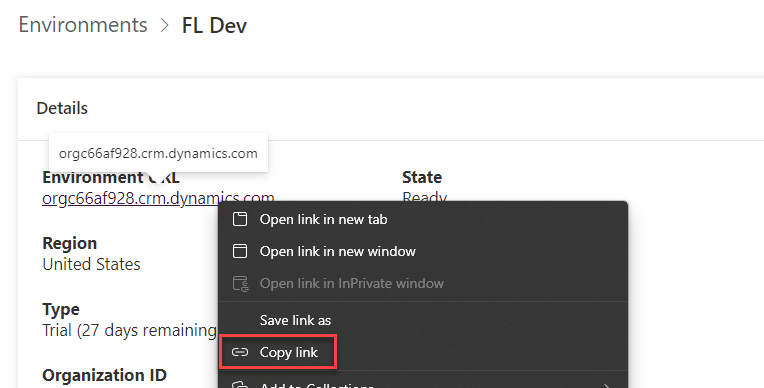
Get your environment URL.
- Navigate to Power Platform admin center and select environments.
- Locate and open your Development environment.
-
Right click and copy the Environment URL.
-
Authenticate.
-
Go back to Visual Studio Code.
-
Make sure you are still in the src directory.
-
Run the command below. Replace <Environment URL> with the URL you copied.
pac auth create --url <Environment URL> -
Sign in with your tenant credentials.
-
-
Build the solution.
-
Change directory to the pcfSolution folder.
cd ..\pcfSolution -
Build the project by running the command below.
msbuild /t:build /restore
-
-
Import the solution into your org and publish.
-
Run the command below and wait for the publishing to complete.
pac solution import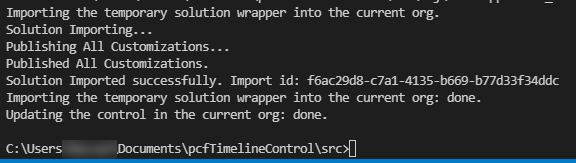
-
Task 2.2: Add Timeline Control to the Permit Form
-
Open the Permit Management solution.
- Navigate to Power Apps maker portal
- Select your Development environment.
- Select Solutions.
- Open the Permit Management solution.
-
Add the PCF component to the solution.
-
Select +Add existing and then More and Developer and Custom control.
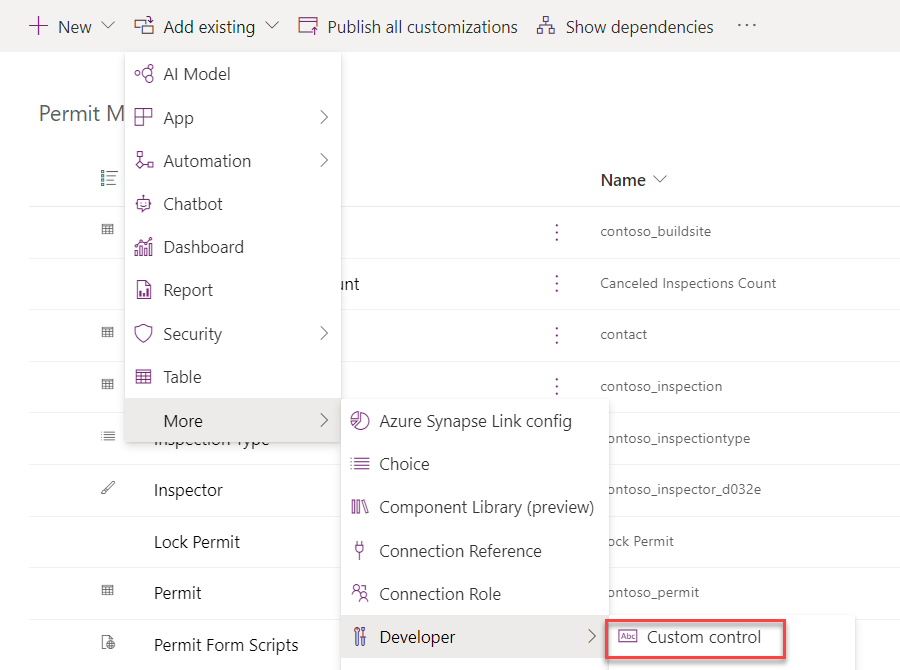
-
Select contoso_contoso_timelinecontrol.
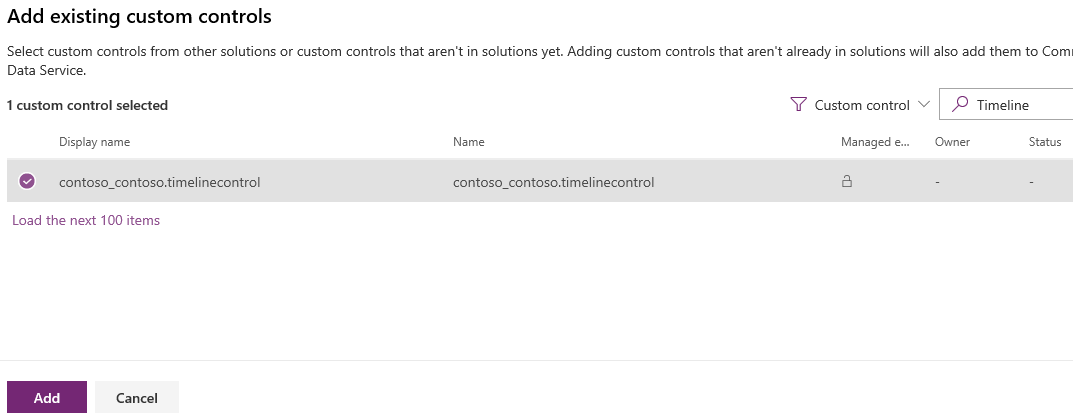
-
Select Add.
-
-
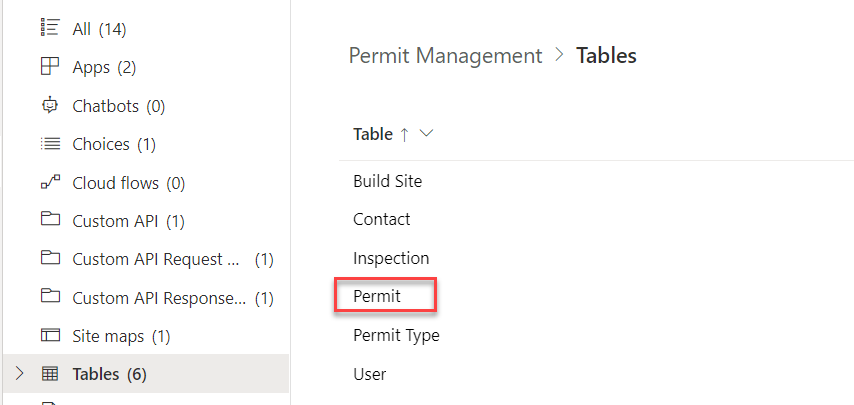
Open the Permit Main form.
-
Select Tables and open the Permit table.
-
Under Data experiences, select Forms.
-
Open the Main form.
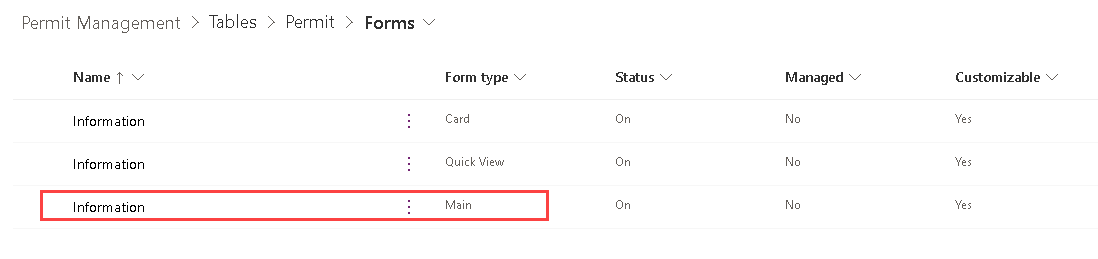
-
Select the ellipsis (…) for the Main form, select Edit and select Edit in new tab.
-
-
Add Timeline control to the form.
-
Select the Components tab.
-
Select Get more components.
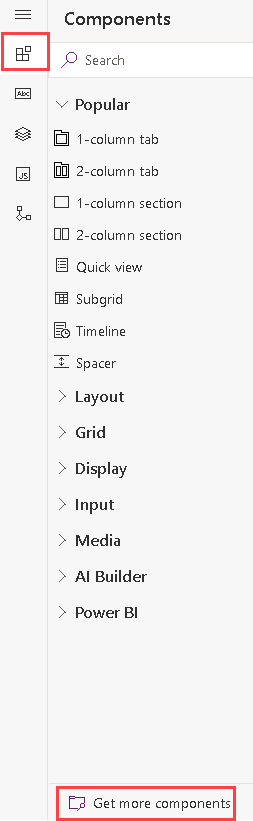
-
Select timelinecontrol and select Add.
-
-
Add Timeline control to the form.
-
Locate the Inspections tab.
-
Click on the Inspections sub-grid.
-
In the Properties pane, scroll down and expand Components.
-
Select + Component.
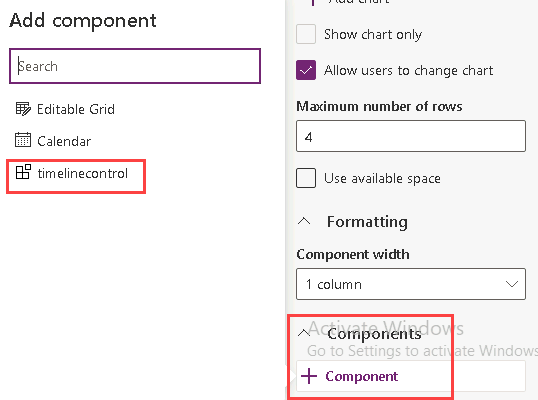
-
Select timelinecontrol.
-
Select Done.
-
Select Save and publish.
-
Close the form editor.
-
Select Done.
-
-
View inspection records
- Navigate to the Power Apps maker portal.
- Make sure you are in the Development environment.
- Select Apps.
- Select the Permit Management app, select the ellipsis (…) and select Play.
- Select Inspections.
- Select Edit columns.
- Select + Add columns.
- Select Permit.
- Select Status Reason.
- Select Close.
- Select Apply.
- All inspections should be set to Pending.
-
Create test data
-
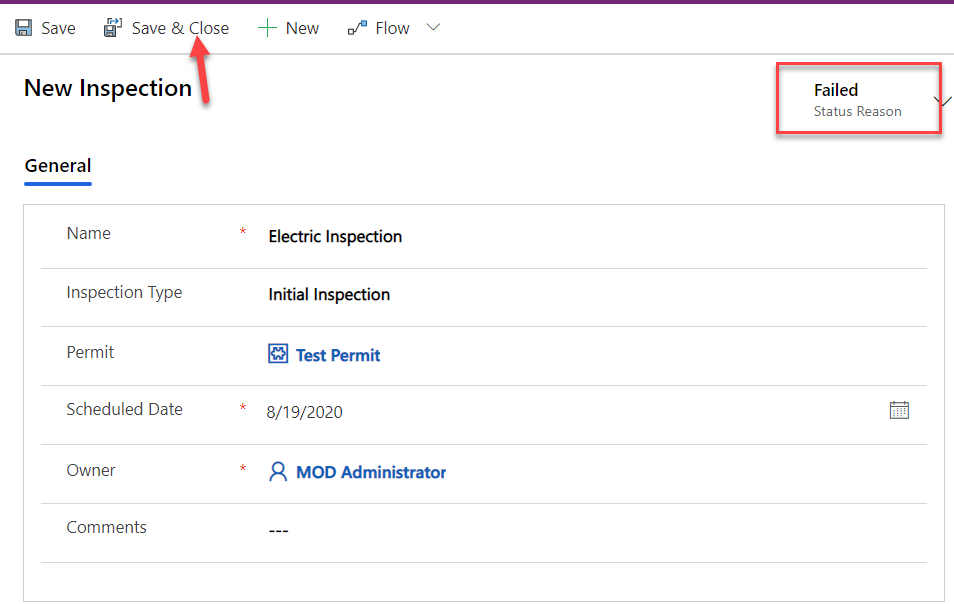
Open the Framing Inspection record.
-
Change the Status Reason to Passed.
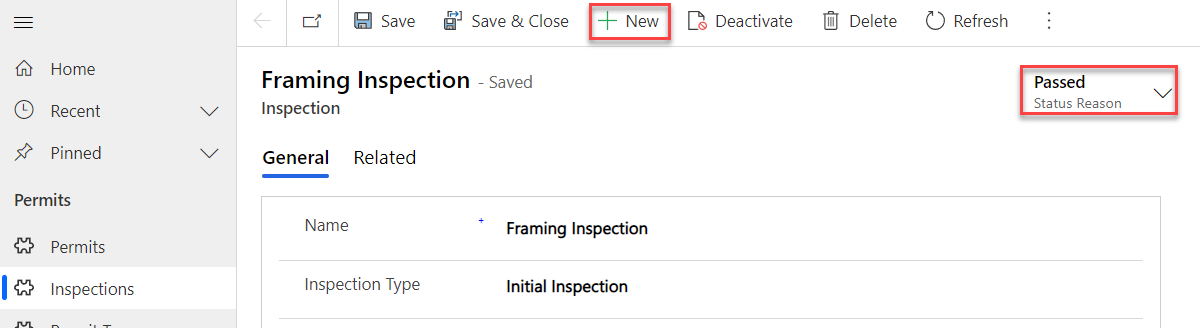
-
Select Save & Close.
-
Open the Electric Inspection record.
-
Change the Status Reason to Failed.
-
Select Save & Close.
-
Open the Mechanical Inspection record.
-
Change the Status Reason to New Request.
-
You should have four inspections for Test Permit; one Passed, one Failed, one New Request, and one Pending.

-
-
Test the control
-
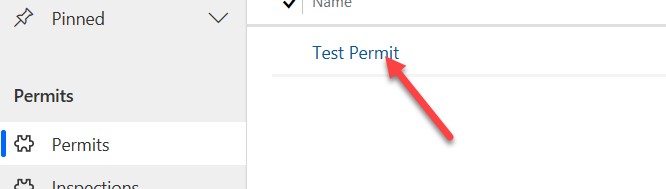
Select Permits.
-
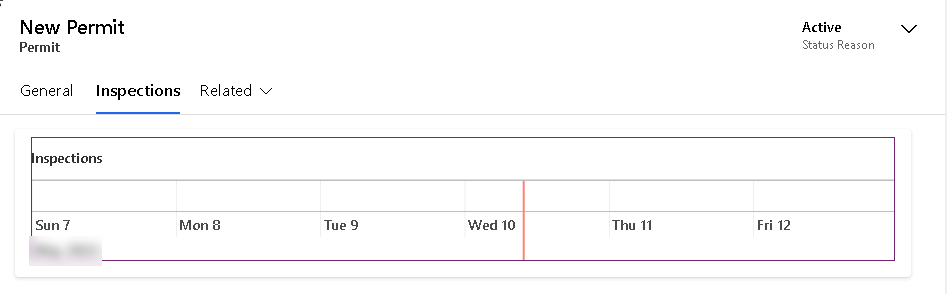
Open the Test Permit record.
-
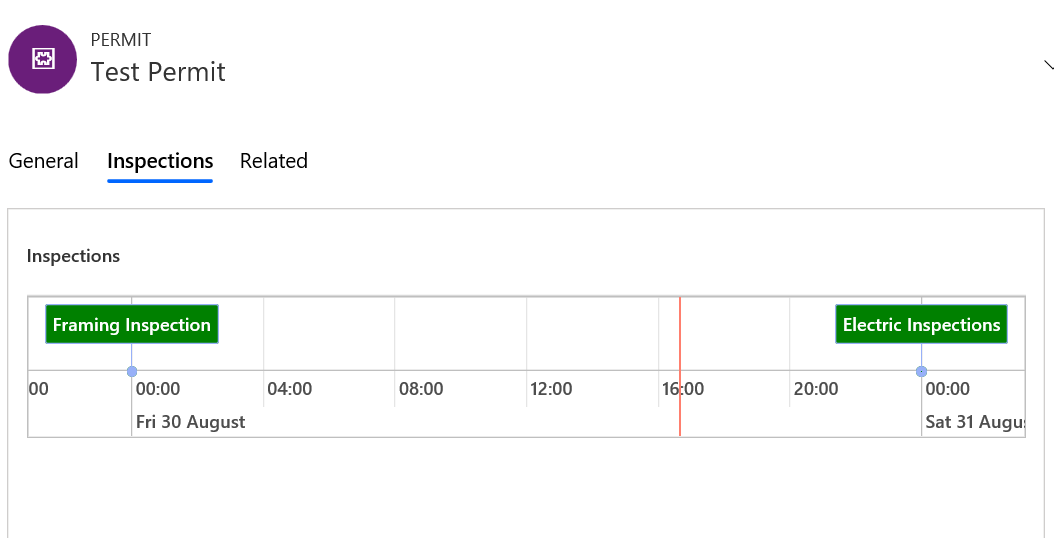
Select the Inspections tab.
-
The control should show the four inspections, but the color will not match the status reason colors.
-
Task 2.3: Debug
-
Start Dev Tools and add breakpoint.
-
Press F12 or Ctrl+Shift+I or right click and select Inspect.
-
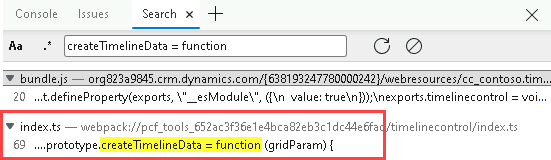
Press Ctrl + Shift + F to open Search in Dev Tools.
-
Search for createTimelineData = function.
-
Click on the createTimelineData function. This will open index.ts in DevTools.
-
Add a breakpoint on the permitColor =”green” line.
-
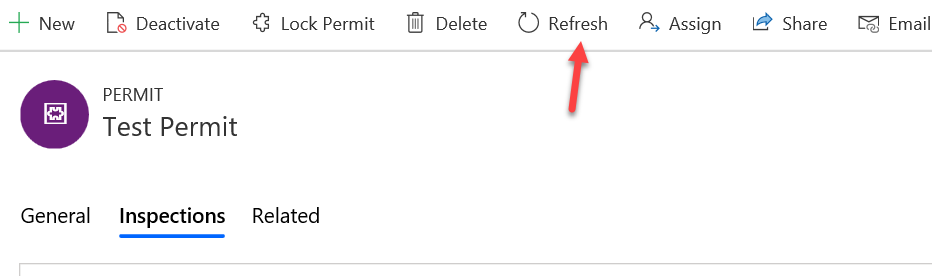
Go back to the Permit Management application and click Refresh.
-
Select the Inspections tab again.
-
Execution should break.
-
Hover over the permitStatus, the permitStatus is null because Status Reason is not included in the View used by the subgrid.

-
Press F5 to continue.
-
Close Dev Tools.
-
Task 2.4: Add Status Reason to Inspections view
-
Open the Permit Management solution.
- Navigate to the Power Apps maker portal
https://make.powerapps.com - Select your Development environment.
- Select Solutions.
- Open the Permit Management solution.
- Navigate to the Power Apps maker portal
-
Edit the Inspections view.
-
Expand Tables.
-
Select the Inspection table.
-
Under Data experiences, select Views.
-
Select the Active Inspections view.
-
Select the ellipsis (…) for the Active Inspections view, select Edit > Edit in new tab.
-
Drag the Status Reason column and drop it after the Scheduled Date column.
-
Select Save and publish and wait for the publishing to complete.
-
Close the view editor tab.
-
Select Done.
-
-
Test your changes
-
Go back to the Permit Management app and refresh the browser.

-
Select the Inspections tab. The timeline control should now show the correct colors.

-
Exercise 3: Export and import solution
Objective: In this exercise, you will export the solution you created in the development environment and import it to the production environment.
Task 3.1: Export solution
-
Export managed solution.
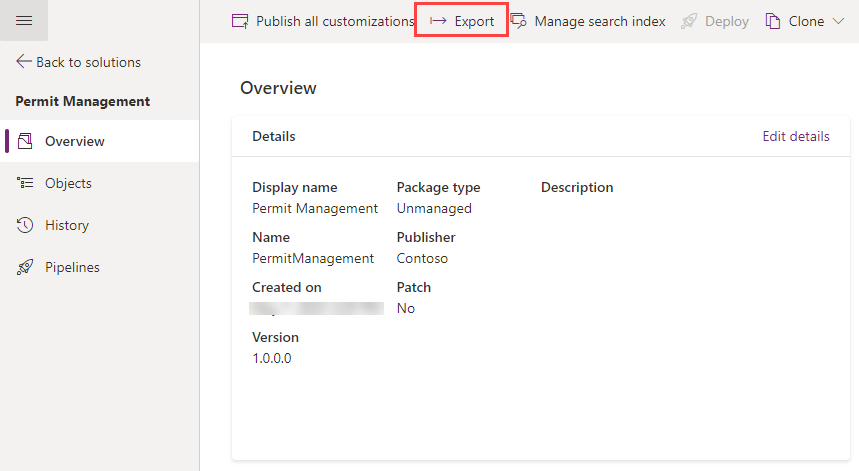
- Select the Overview tab in the solution.
-
Select Export.
-
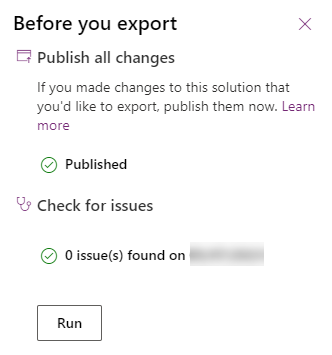
Select Publish and wait for the publishing to complete.
- Select Next.
- Set the version number to
1.0.0.9. -
Select Managed.
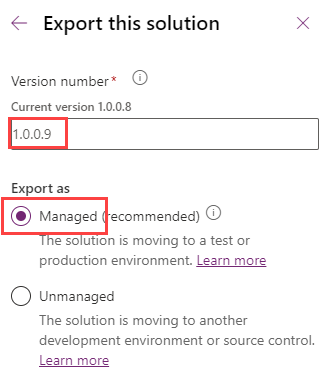
-
Select Export.

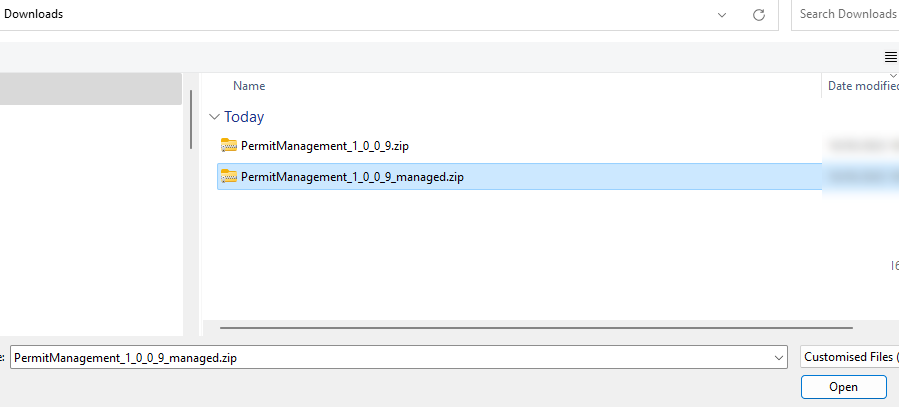
- Click Download to download the managed solution on your machine.
-
Export unmanaged solution.
- Select Export again.
- Select Next.
- Edit the version number to match the Managed solution you just exported i.e.,
1.0.0.9. - Select Unmanaged.
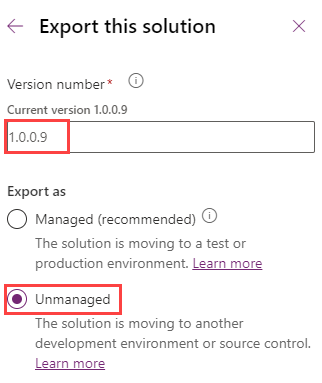
- Select Export.
- Click Download to download the unmanaged solution on your machine.
Task 3.2: Import solution
-
Import the Permit Management solution.
- Sign in to Power Apps maker portal
- Select your Production environment.
-
Import solution.
- Select Solutions.
- Select Import solution.
- Select Browse.
-
Select the Managed solution file you exported in the previous task and then select Open.
-
Select Next.
-
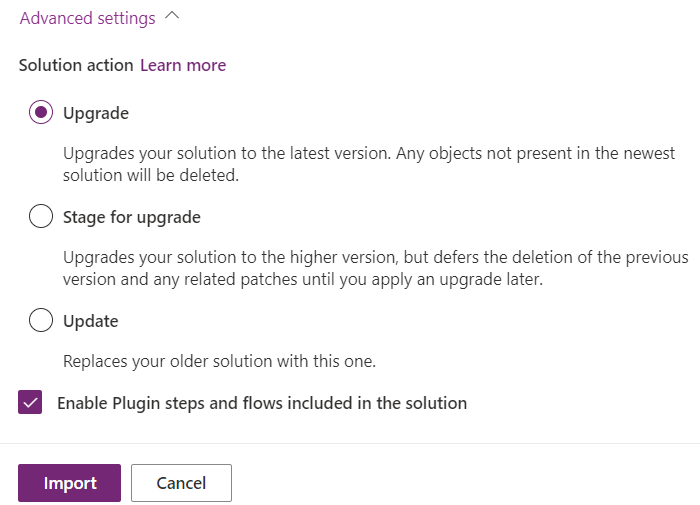
Expand Advanced settings and make sure Upgrade is selected.
-
Select Next.
-
In the Connections pane, select Select a connection and select +New connection.
-
Select Create and sign in with your tenant credentials.
-
Close the Connections browser tab.
-
Select Refresh.
- Select Import and wait the import to complete.