Practice Lab 7 - Power Platform APIs
Scenario
As we continue to build our solution, we will now perform basic operations with the Dataverse APIs.
High-level lab steps
We will use the following APIs
- Organization Service
Things to consider before you begin
- What endpoints do you need?
- Which IDE(s) do you require?
Starter solution
A starter solution file for this lab can be found in the C:\Labfiles\L07\Starter folder.
Completed solution
Completed solution files for this lab can be found in the C:\Labfiles\L07\Completed folder.
Resources
Complete code files for this lab can be found in the C:\Labfiles\L07\Resources folder.
Exercise 1: Organization Service
Objective: In this exercise, you will use the Organization Service to access data in Dataverse.
Task 1.1: Organization Service endpoint
-
Open the Permit Management solution.
- Navigate to the
https://make.powerapps.com - Make sure you are in the Development environment.
- Select Apps.
- Select the Permit Management app, select the ellipsis (…) and select Play.
-
Copy the Dataverse URL before main.aspx excluding final /.

- Navigate to the
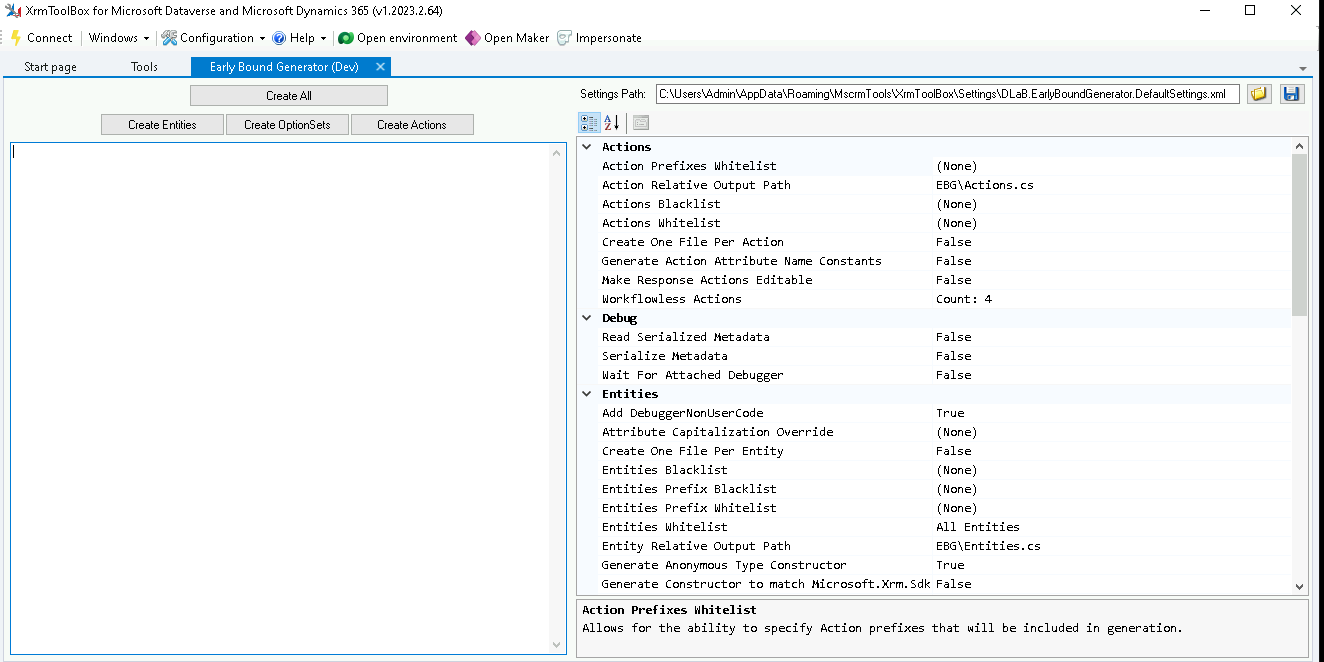
Task 1.2: Early-bound classes
- Launch XrmToolBox.
- Select the Tools tab in XRMToolBox.
- Search for
earlyand select Early Bound Generator. - Select Yes to connect to an organization.
-
Select your Dev connection and select OK.
-
Configure early bound options
-
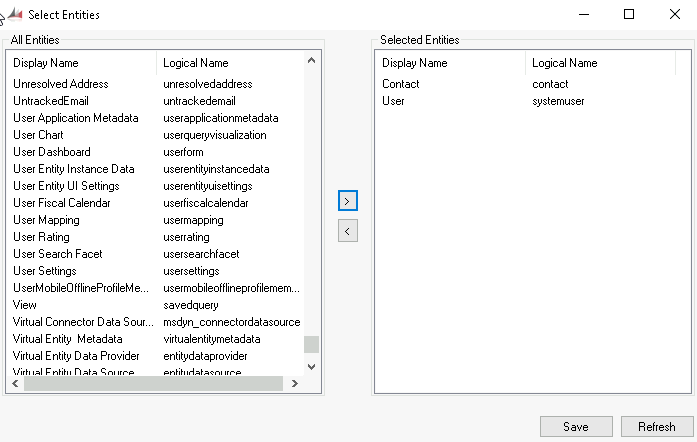
Under Entities, select the ellipsis next to Entities Whitelist and add Contact and User.
- Select Save.
- Under Entities, select the ellipsis (…) next to Entities Prefix Whitelist.
- Enter
contosoand select OK.
-
-
Generate early bound classes
- Select Create Entities.
- Select Office 365 for Deployment Type.
- Check Display list of available organizations.
- Check Show Advanced.
- Enter your tenant credentials.
- Select Login.
- Select your Development environment and select Login.
- Wait for CrmSvcUtil to complete.
-
Generate choice enums
- Select Create OptionSets.
- Select Office 365 for Deployment Type.
- Check Display list of available organizations.
- Check Show Advanced.
- Enter your tenant credentials.
- Select Login.
- Select your Development environment and select Login.
- Wait for CrmSvcUtil to complete.
-
Verify files have been generated
-
Open Windows Explorer and change to the C:\Users\Admin\AppData\Roaming\MscrmTools\XrmToolBox\Settings\EBG folder. You should see Entities.cs and OptionSets.cs class files.

-
Task 1.3: Create Console app
[!NOTE] The virtual machine used in the lab environment has Visual Studio 2019 Community Edition installed. The labs are have been verified against this version of Visual Studio. If you are using a different version or edition of Visual Studio, the steps may differ.
-
Start Visual Studio
-
Launch Visual Studio 2019.
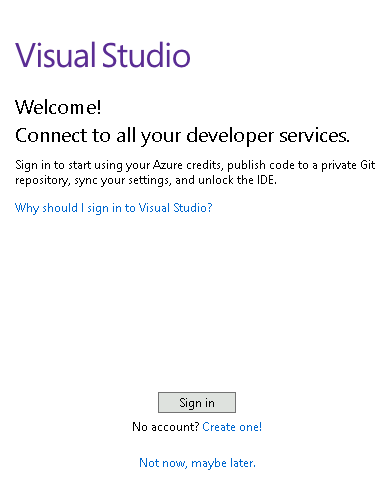
- Select Sign in and use your Tenant credentials.
- Select Start Visual Studio.
-
-
Create a new .NET console app project.
- Select Create a new project.
-
Search for
console.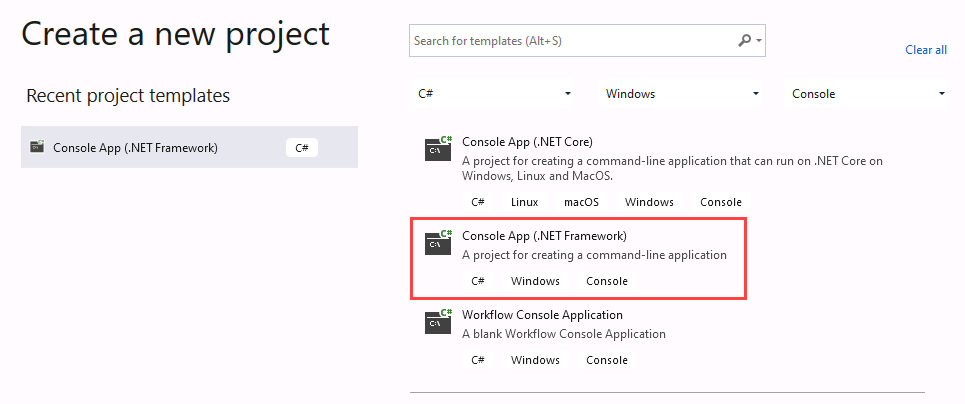
- Select Console App (.NET Framework).
- Select Next.
- Enter
Permit consolefor Project Name. - Change the location to C:\LabFiles\L07.
-
Select .NET Framework 4.7.2.
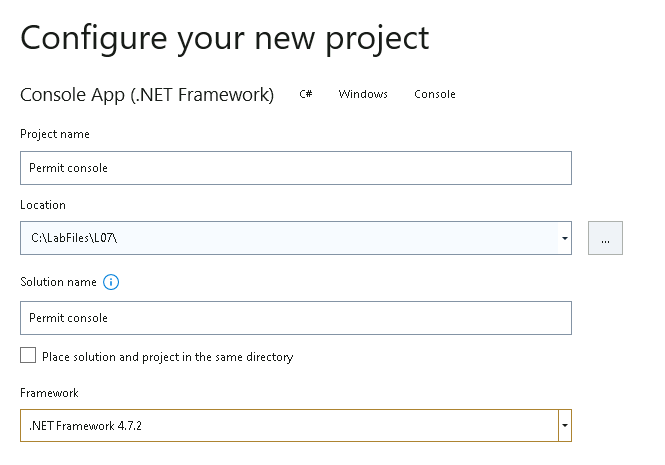
- Select Create.
-
Add Dataverse assemblies.
- In Solution Explorer, right-click the Permit console project and select Manage NuGet Packages….
- Select the Browse tab.
- Search for
CrmSdkand select the Microsoft.CrmSdk.CoreAssessmblies NuGet package. - Select Install.
- Select OK.
- Select I Accept.
- Search for
CrmSdkand select the Microsoft.CrmSdk.XrmTooling.CoreAssembly NuGet package. - Select Install.
- Select OK.
- Select I Accept.
- Close the NuGet: Permit console tab.
-
Replace the using statements at the top of Program.cs with the following.
using System;
using System.ServiceModel;
using Microsoft.Crm.Sdk.Messages;
using Microsoft.Xrm.Sdk;
using Microsoft.Xrm.Sdk.Metadata;
using Microsoft.Xrm.Sdk.Query;
using Microsoft.Xrm.Tooling.Connector;
[!IMPORTANT] When copying and pasting code into Visual Studio in the Virtual Machine, Intellisense may add or replace code. You should open Notepad and paste into Notepad first, and then copy and paste into Visual Studio.
-
Remove the Program class in Program.cs.
-
Replace the code in Program.cs with the following code.
class Program { static public void Main(string[] args) { Console.Title = "PL400.Permit.Console"; Console.WriteLine("Permit console : Start"); string userName = "admin@M365x99999999.onmicrosoft.com"; string password = "password"; string url = "https://orgNNNNNNNN.crm.dynamics.com"; string connectionString = "AuthType=OAuth;Username=" + userName + ";Password='" + password + "';Url=" + url + ";AppId=51f81489-12ee-4a9e-aaae-a2591f45987d;RedirectUri=app://58145B91-0C36-4500-8554-080854F2AC97;LoginPrompt=Auto"; try { Console.WriteLine("Connect using XRM Tooling"); CrmServiceClient crmSvc = new CrmServiceClient(connectionString); if (crmSvc.IsReady) Console.WriteLine("Connected"); else { throw new Exception("Failed to connect"); } Console.WriteLine("Version={0}", crmSvc.ConnectedOrgVersion); Console.WriteLine("Organization={0}", crmSvc.ConnectedOrgUniqueName); Console.WriteLine("Retrieve current user"); Guid currentuserid = ((WhoAmIResponse)crmSvc.Execute(new WhoAmIRequest())).UserId; Entity systemUser = (Entity)crmSvc.Retrieve("systemuser", currentuserid, new ColumnSet(new string[] { "firstname", "lastname" })); Console.WriteLine("Logged on user is {0} {1}.", systemUser["firstname"], systemUser["lastname"]); // Data Operations Console.WriteLine("Permit console : End"); // Pause the console so it does not close. Console.WriteLine("Press the <Enter> key to exit."); Console.ReadLine(); } catch (FaultException<Microsoft.Xrm.Sdk.OrganizationServiceFault> ex) { Console.WriteLine("Error: {0}", ex.Message); } catch (System.Exception ex) { Console.WriteLine("Error: {0}", ex.Message); } } } -
Add your tenant credentials in the connection string.
[!NOTE] If there is a semi-colon in your password add single quotes around the whole password.
-
Add your Dataverse URL to the connection string.
[!NOTE] The Dataverse URL should be similar to https://orgNNNaNNNN.crm.dynamics.com
[!IMPORTANT] The URL should not have the / character as the end.
-
Build the project.
- Select the Save icon.
- In Solution Explorer, right-click the Permit console project and select Build.
- The Build should succeed with 0 errors.
-
Run the app.
- Select the Start icon.
-
The output will look similar to the following:
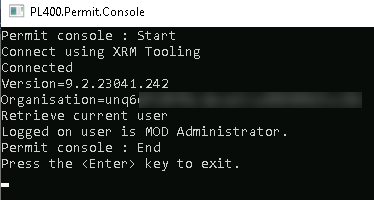
- Press the Enter key.
- Select File and Exit.
Task 1.4: Data operations
-
Start Visual Studio.
- Launch Visual Studio 2019.
- Select Permit console.sln under Open recent.
-
Add early bound classes.
- In Solution Explorer, right-click the Permit console project and select Add, and then select Existing Item.
- Browse to C:\Users\Admin\AppData\Roaming\MscrmTools\XrmToolBox\Settings\EBG.
- Select
Entities.csand select Add. - In Solution Explorer, right-click the Permit console project and select Add, and then select Existing Item.
- Browse to C:\Users\Admin\AppData\Roaming\MscrmTools\XrmToolBox\Settings\EBG.
- Select
OptionSets.csand select Add.
-
Add using statement at the top of Program.cs.
using CrmEarlyBound; -
Create permit.
-
In program.cs, add the following code under the Data Operations comment.
Console.WriteLine("Create permit");
contoso_Permit newPermit = new contoso_Permit();
newPermit.contoso_Name = "Organization Service Permit";
newPermit.contoso_NewSize = 1000;
newPermit.contoso_StartDate = DateTime.Now;
Guid permitid = crmSvc.Create(newPermit);
Console.WriteLine("Permit={0}", permitid.ToString());
-
-
List inspections.
-
In program.cs, add the following code under the Data Operations comment.
Console.WriteLine("Retrieving inspections");
QueryExpression inspectionsQuery = new QueryExpression
{
    EntityName = contoso_Inspection.EntityLogicalName,
    ColumnSet = new ColumnSet(false)
};
inspectionsQuery.ColumnSet.AddColumn("contoso_permit");
inspectionsQuery.ColumnSet.AddColumn("contoso_name");
inspectionsQuery.Criteria.AddCondition("statuscode", ConditionOperator.Equal, (int)contoso_Inspection_StatusCode.Pending);
inspectionsQuery.Distinct = true;
EntityCollection inspections = crmSvc.RetrieveMultiple(inspectionsQuery);
Console.WriteLine("Number of Pending Inspections=" + inspections.Entities.Count.ToString());
foreach (contoso_Inspection inspection in inspections.Entities)
{
    EntityReference permit = inspection.contoso_Permit;
    Console.WriteLine("Inspection {0} {1} {2}", permit.Id.ToString(), permit.Name, inspection.contoso_Name);
}
-
-
Build the project.
- Select the Save icon.
- In Solution Explorer, right-click the Permit console project and select Build.
- The Build should succeed with 0 errors.
-
Run the app.
- Select the Start icon.
-
The output will look similar to the following:
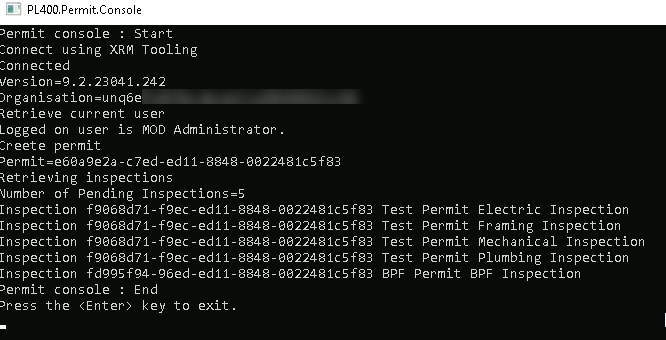
- Press the Enter key.
- Select File and Exit.