Practice Lab 5 - Power Automate
Scenario
As we continue to build our solution, we will now create Power Automate cloud flows to process inspection data.
High-level lab steps
We will create cloud flows to
- Reset all inspections to Pending.
- Clear comments from the canvas app.
Things to consider before you begin
- Which triggers should you use?
- How to you use choice columns in expressions and actions?
Starter solution
A starter solution file for this lab can be found in the C:\Labfiles\L05\Starter folder.
Completed solution
Completed solution files for this lab can be found in the C:\Labfiles\L05\Completed folder.
Exercise 1: Create a scheduled cloud flow
Objective: In this exercise, you will create a cloud flow that resets all inspections to Pending.
Task 1.1: Create scheduled flow
-
Open the Permit Management solution.
- Navigate to the Power Apps maker portal
- Select your Development environment.
- Select Solutions.
- Open the Permit Management solution.
-
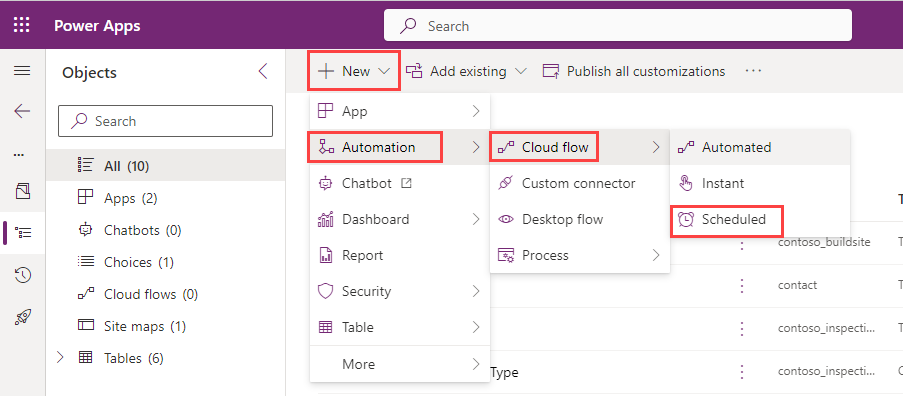
Create a scheduled cloud flow.
-
Select + New and then select Automation > Cloud flow > Scheduled.
- On the Welcome to Power Automate popup, select Get started.
- Enter
Reset Inspectionsfor Flow name. -
Change the Repeat every drop-down to Month.
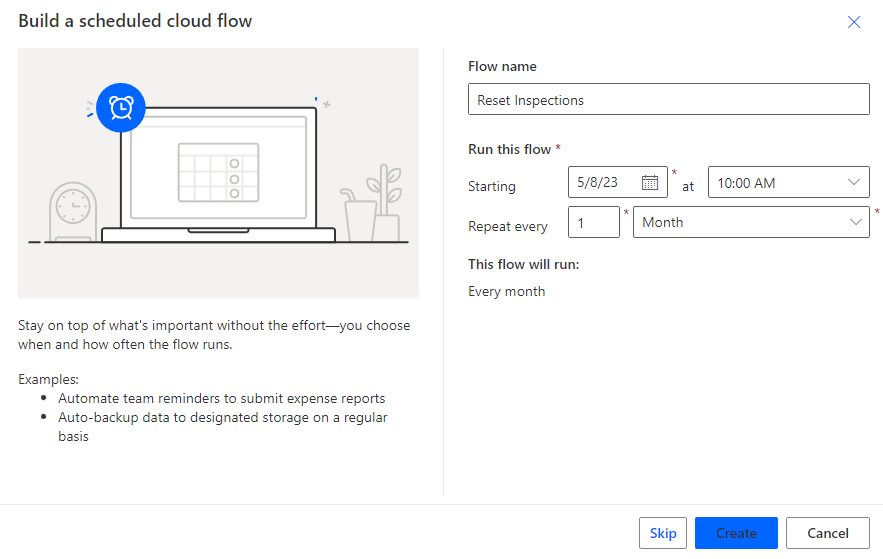
- Select Create.
-
-
Add query step.
- Select + New step.
- Search for
Dataverseand select the Microsoft Dataverse connector. -
Select the List rows action.

-
Rename the List rows step to
Inspectionsby selecting the ellipses … on the flow step and selecting Rename.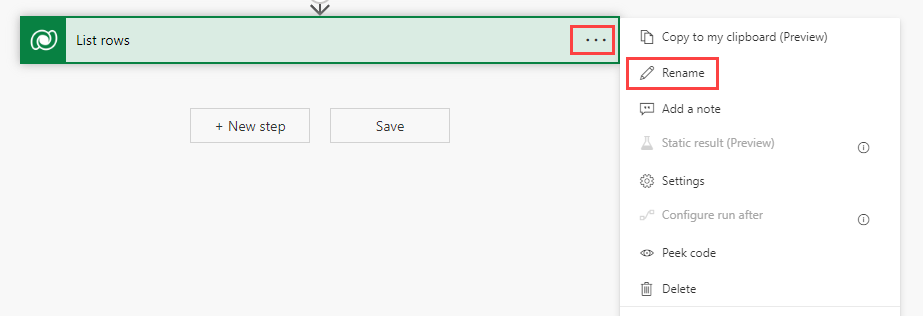
- Select Inspections for Table name.
- Select Show advanced options.
-
In Filter rows, enter the OData query
statuscode ne 330650001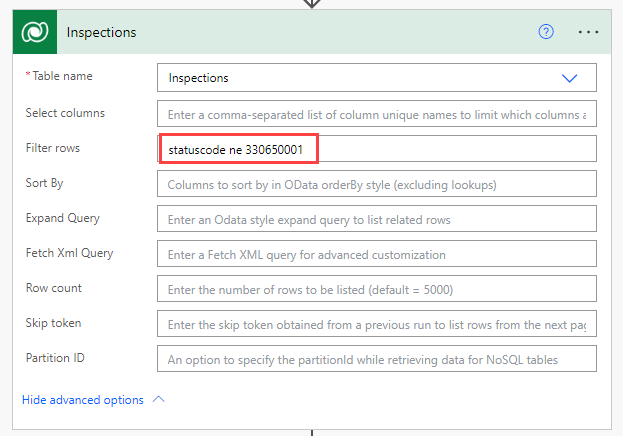
[!IMPORTANT] 330650001 is the value of the Pending status reason on the Inspection table. You should verify that this is the correct value for your environment.
-
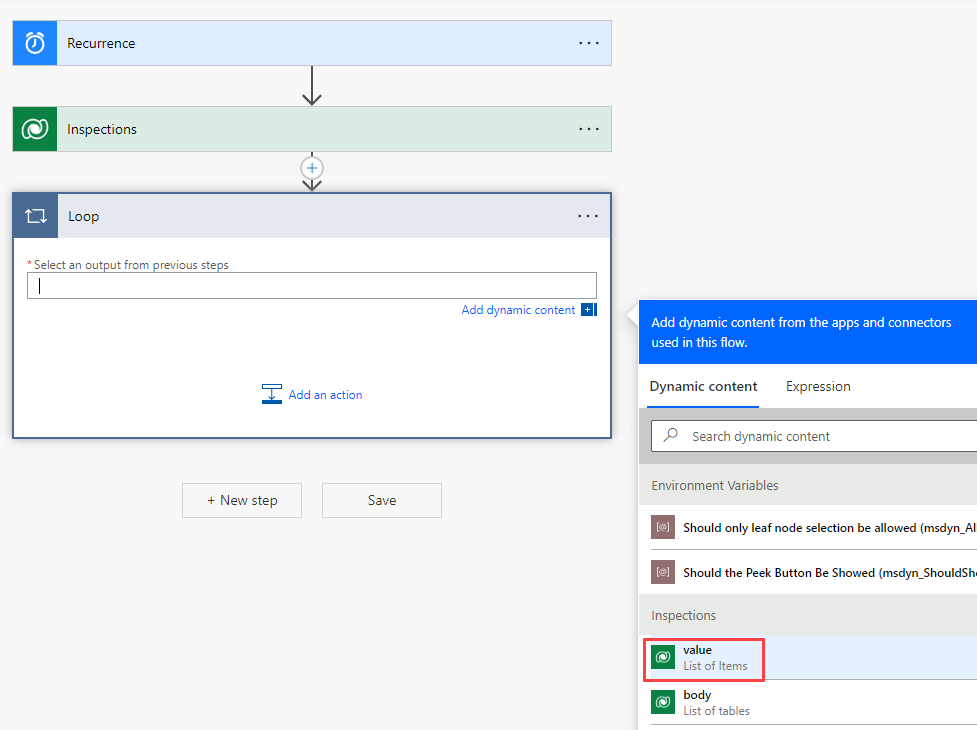
Add loop step.
- Select + New step.
- Select the Control connector.
- Select the Apply to each action.
- Rename the step to
Loop. - Click in Select an output from previous steps.
-
Using Dynamic content, select value.
-
Add Update row step within the loop.
- Select + Add an action.
- Search for
Dataverseand select the Microsoft Dataverse connector. - Select the Update a row action.
- Rename the step to
Update Inspection. - Select Inspections for Table name.
- Click in Row ID.
-
Using Dynamic content, select Inspection.
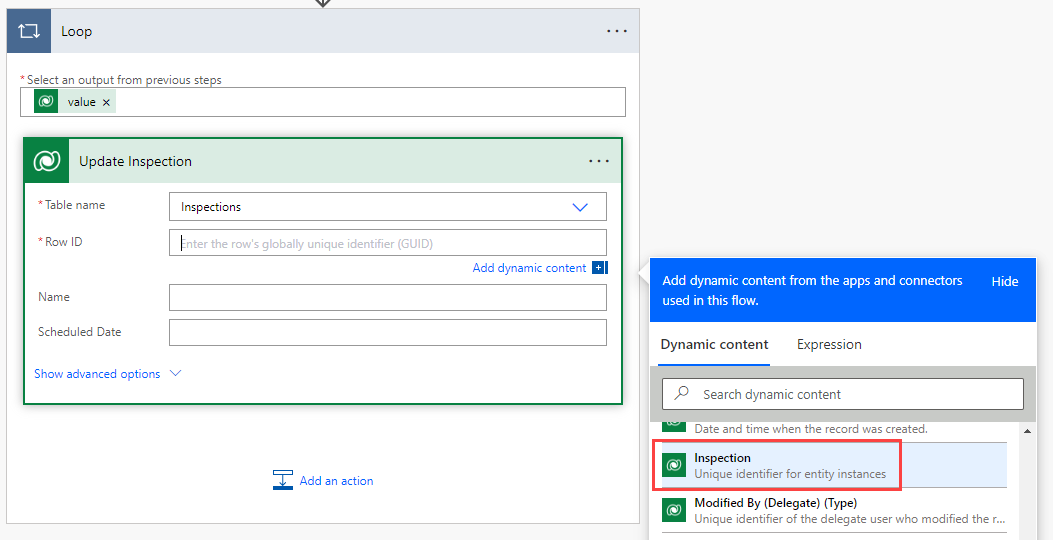
- Select Show advanced options.
-
In Status Reason, select Pending.
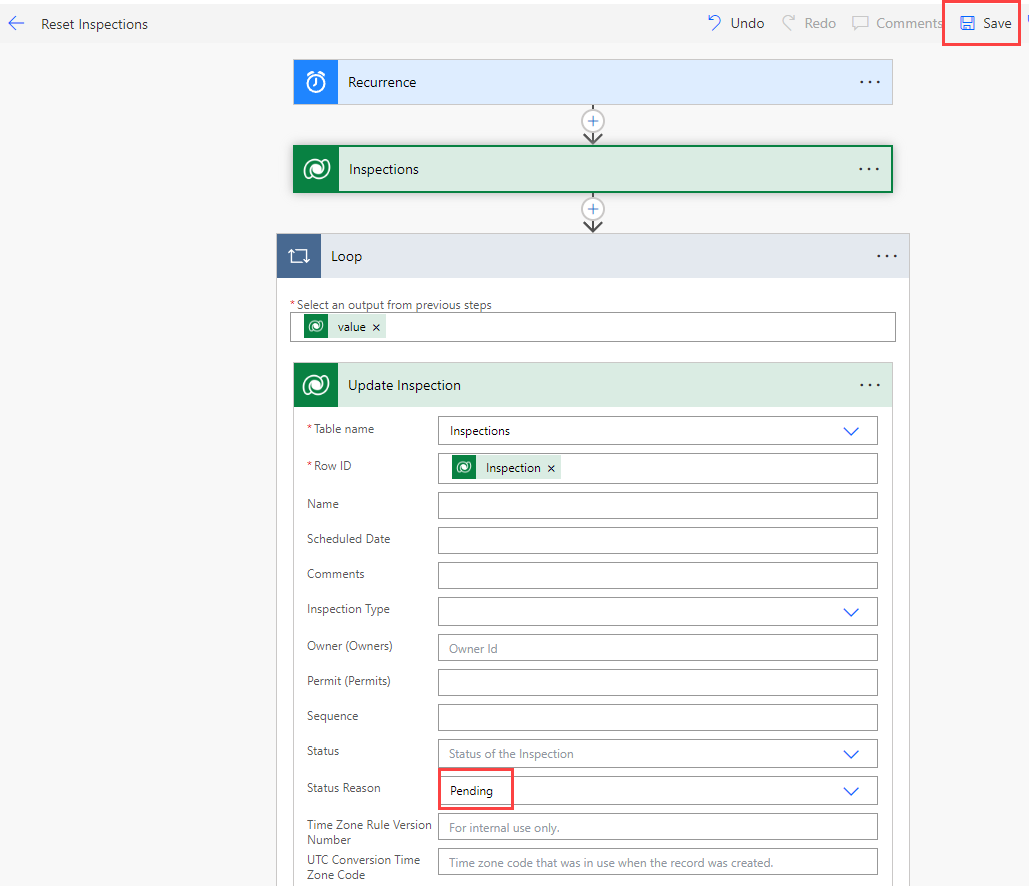
- Select Save.
Task 1.2: Run flow

- Select Test.
- Select Manually.
- Select Test.
- Select Run flow.
- Select Done.
- Select the <- icon.
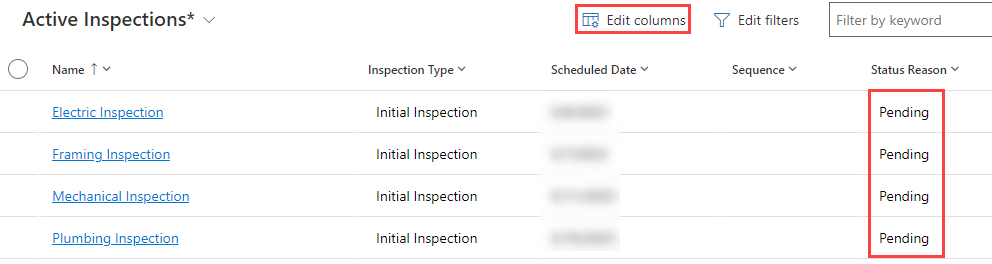
Task 1.3: Verify flow run
-
View inspection records
- Navigate to the Power Apps maker portal
- Select your Development environment.
- Make sure you are in the Development environment.
- Select Apps.
- Select the Permit Management app, select the ellipses … and select Play.
- Select Inspections.
- Select Edit columns.
- Select + Add columns.
- Select Status Reason.
- Select Close.
- Select Apply.
- All inspections should be set to Pending.
Exercise 2: Create an instant cloud flow
Objective: In this exercise, you will create a cloud flow that is run from a canvas app.
Task 2.1: Create instant flow
-
Open the Permit Management solution.
- Navigate to the Power Apps maker portal
- Select your Development environment.
- Select Solutions.
- Open the Permit Management solution.
-
Create an instant cloud flow.
- Select + New and then select Automation > Cloud flow > Instant.
- Enter
ClearInspectionCommentsfor Flow name. -
Select the PowerApps (V2) trigger.
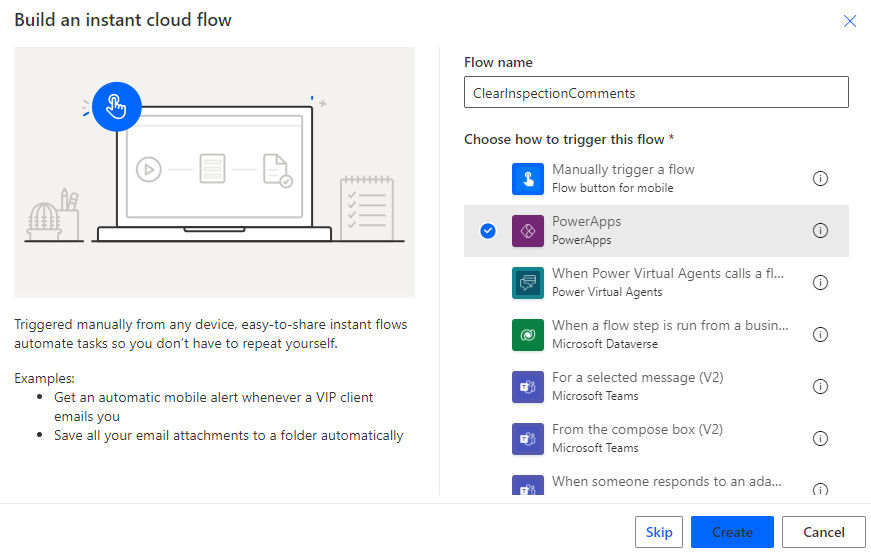
- Select Create.
-
Add Input.
- Select and expand the Power Apps trigger.
- Select + Add an input.
- Select Text.
- Click in Input and enter
InspectionID. -
Click in Please enter your input and enter
GUID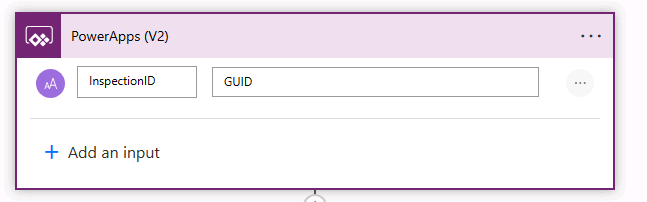
-
Add Update row step.
- Select + New step.
- Search for
Dataverseand select the Microsoft Dataverse connector. - Select the Update a row action.
- Rename the step to
CancelComments. - Select Inspections for Table name.
- Click in Row ID.
-
Using Dynamic content, select InspectionID.
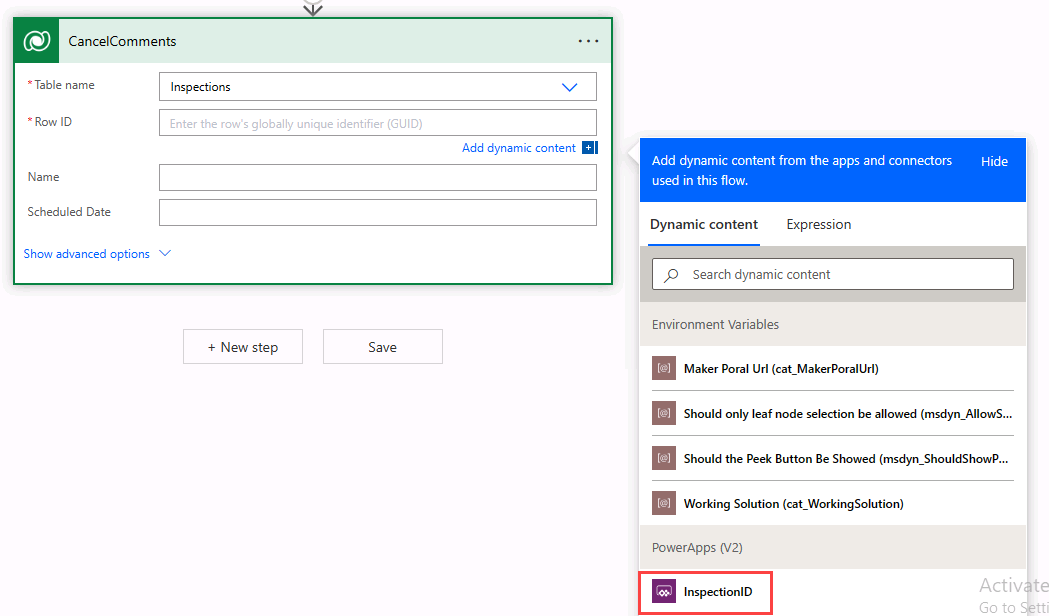
- Select Show advanced options.
- Click in Comments.
- Select the Expression tab.
-
Enter
null.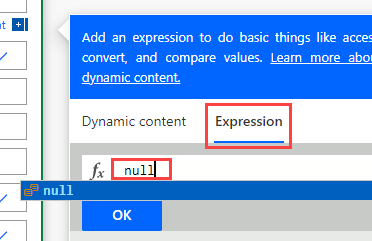
- Select OK.
-
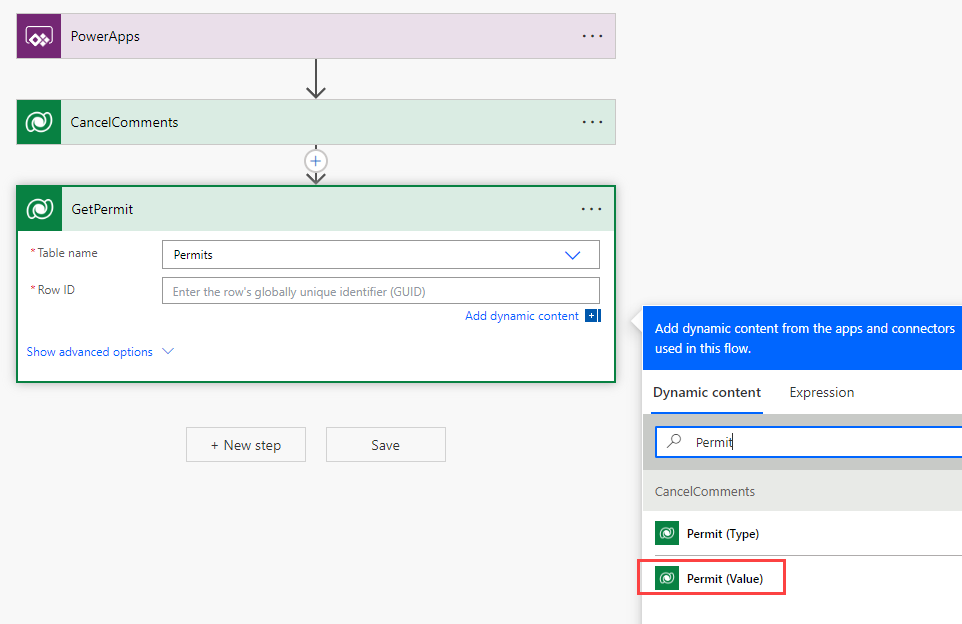
Add Retrieve Permit step.
- Select + New step.
- Search for
Dataverseand select the Microsoft Dataverse connector. - Select the Get a row by ID action.
- Rename the step to
GetPermit. - Select Permits for Table name.
- Click in Row ID.
-
Using Dynamic content, select Permit (Value).
-
Add Respond to PowerApps step.
- Select + New step.
- Search for
PowerAppsand select the PowerApps connector. - Select the Respond to a PowerApp or flow action.
- Select + Add an output.
- Select Date.
- Click in Enter title and enter
startdate. - Click in Enter a value to respond.
-
Using Dynamic content, search for
startand select Start Date.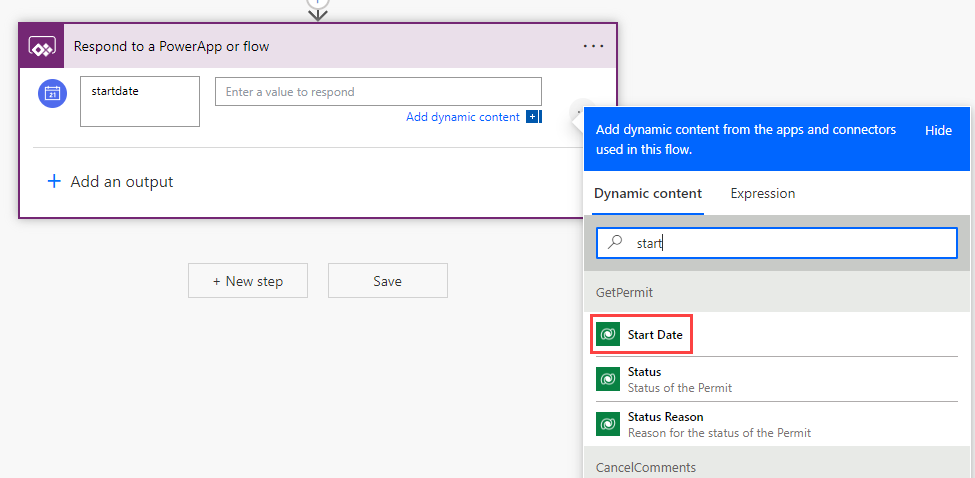
- Select Save.
- Select the <- icon.
Task 2.2: Call instant flow from the canvas app
-
Open the Permit Management solution.
- Navigate to the Power Apps maker portal
- Select your Development environment.
- Select Solutions.
- Open the Permit Management solution.
-
Edit the Inspector canvas app.
- Select Apps in the Permit Management solution.
- Select the ellipses … next to Inspector app and select Edit in new tab.
-
Add the instant cloud flow to the app.
-
Select the Power Automate tab.
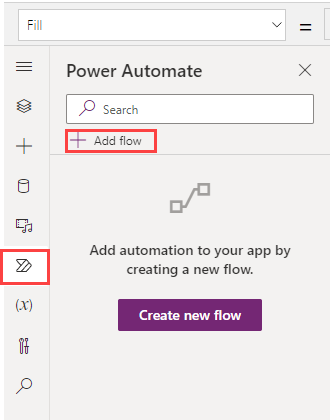
- Select + Add flow.
- Select ClearInspectionComments.
-
-
Add cancel comments button to the details screen.
- Select the Tree view tab.
- Select the Details Screen in the Tree view. Make sure that you have selected the screen and not selected the form.
- Select the + Insert tab and select Button.
- Drag the button next to the failed button.
- Select the Tree view tab.
- Rename the button to
Clear Button. -
Change the Text value of the button to
"Clear Comments".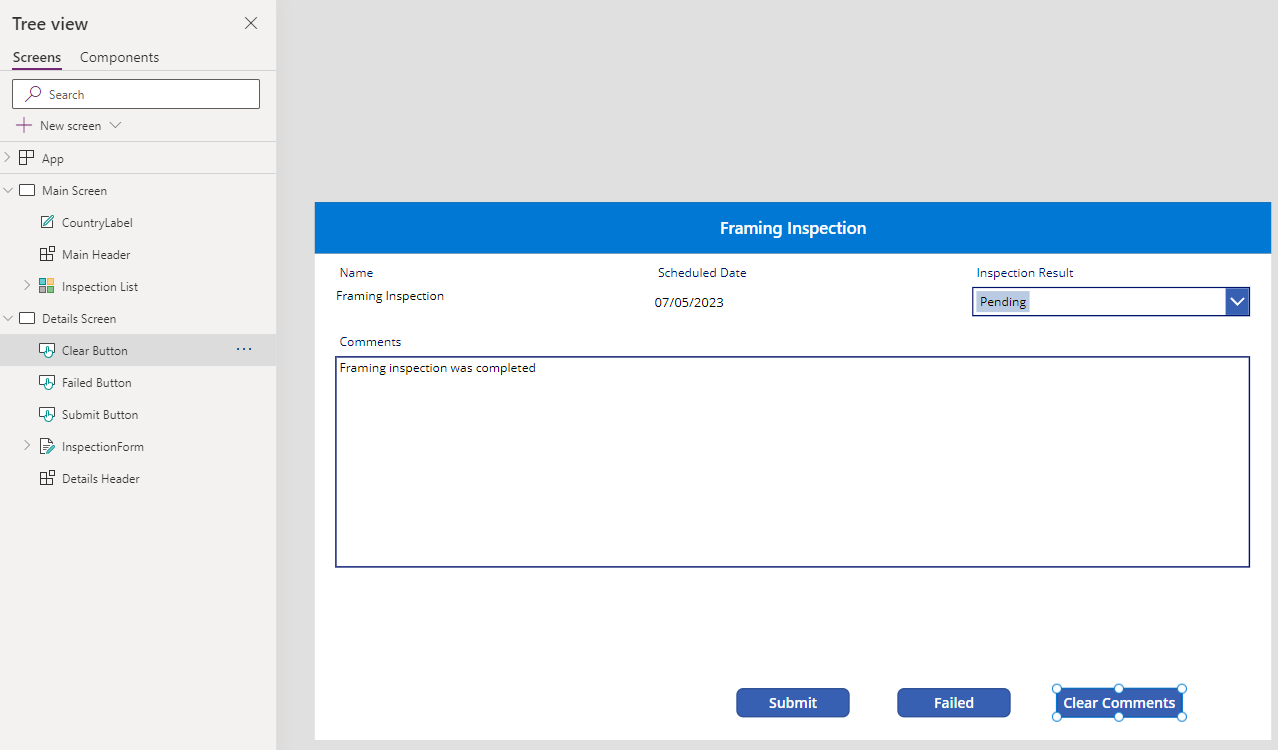
-
Run the cloud flow.
- Select the Clear Button in the Tree view.
- In the property selector, select OnSelect.
-
Change the OnSelect property to the formula below.
Set(ScheduledDate, ClearInspectionComments.Run('Inspection List'.Selected.Inspection).startdate);Refresh(Inspections);
-
Add Text label.
- Select the + Insert tab.
- Select Text label.
- Drag the label to the top right of the screen.
- Select the Tree view tab.
- Rename Label1 to
PermitStartLabelby double clicking on the control in the Tree view tab. - Change the Color property of the PermitStartLabel label to
Color.White. -
Change the Text property of the PermitStartLabel to the formula below.
ScheduledDate
-
Save the app.
Task 2.3: Test the app
-
Start the application.
- Select the Main Screen and select Preview the app.
- The application should load and show at least one inspection.
- Select the Framing Inspection record.
- Select the Clear Comments button.
- The inspection should be updated and the comments will be cleared.
- Close preview mode.
-
Save and publish the app.
- Select the Publish icon.
- Select Publish this version.
- Select the <- Back icon.
- Select Leave.
Exercise 3: Business process flow (Optional)
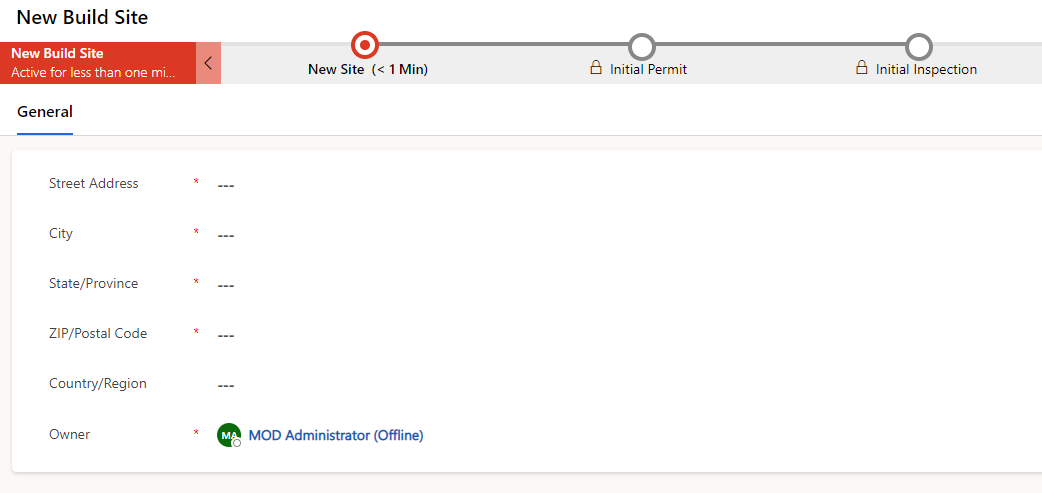
Objective: In this optional exercise, you will create a business process flow for the Build Site table with the following stages and steps:
- Stage 1: New Site with data steps for Street Address, City, State, Postal Code, Country
- Stage 2: Initial Permit on Permit table with data steps Build Site, Name, Contact, Start Date, Permit Type
- Stage 3: Initial Inspection on Inspection Table with data steps Permit, Name, Inspection Type, Scheduled Date
[!NOTE] All data steps should be required
Task 3.1: Create business process flow for Build Site
-
Open the Permit Management solution.
- Navigate to the Power Apps maker portal
- Select your Development environment.
- Select Solutions.
- Open the Permit Management solution.
-
Create a business process flow.
- Select + New and then select Automation > Process > Business process flow.
- Enter
New Build Sitefor Display name. - Enter
newbuildsitefor Name. -
Select Build Site for Table.
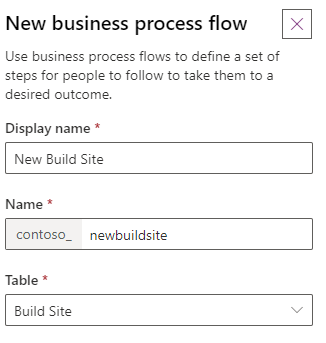
- Select Create.
-
Add stages.
- Select the first stage.
- Enter
New Sitefor Display Name. - Select Apply.
- Select the Components tab.
- Drag the Stage component and drop it onto the + icon to the right of the first stage.
- Select the second stage.
- Enter
Initial Permitfor Display Name. - Select Permit for Entity.
- Select Apply.
- Select the + Add button in the command bar.
- Select Add Stage.
- Select the + icon to the right of the second stage.
- Select the third stage.
- Enter
Initial Inspectionfor Display Name. - Select Inspection for Entity.
-
Select Apply.

-
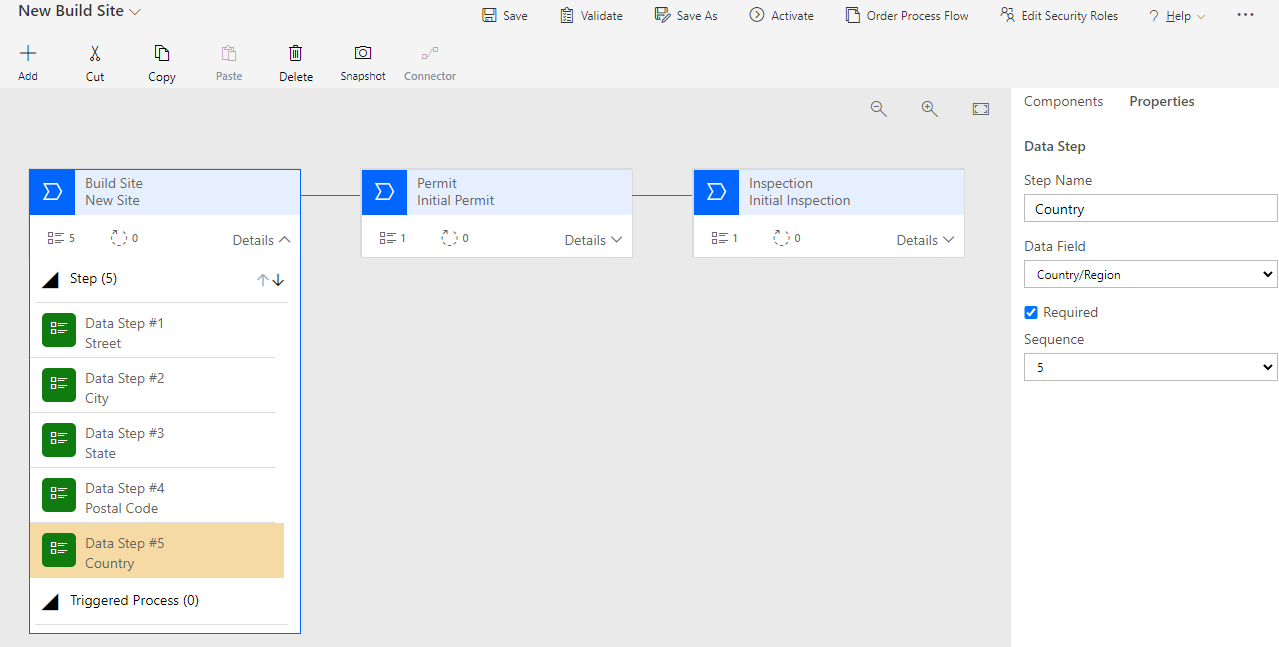
Configure Build Site stage.
- Select the first stage.
- Expand Details.
- Select the + Add button in the command bar.
- Select Add Data Step.
- Select the + icon under the existing data step.
-
Repeat adding steps until there are five data steps on the stage.
- Select Data Step #1.
- Select Street Address for Data Field.
- Enter
Streetfor Step Name. - Check Required.
- Select Apply.
- Select Data Step #2.
- Select City for Data Field.
- Check Required.
- Select Apply.
- Select Data Step #3.
- Select State/Province for Data Field.
- Enter
Statefor Step Name. - Check Required.
- Select Apply.
- Select Data Step #4.
- Select ZIP/Postal Code for Data Field.
- Enter
Postal Codefor Step Name. - Check Required.
- Select Apply.
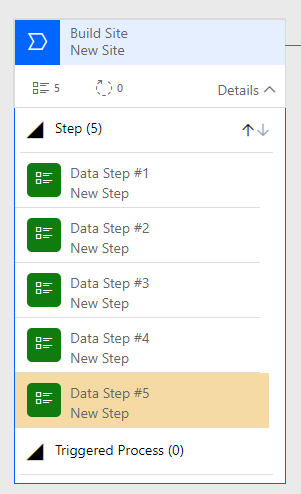
- Select Data Step #5.
- Select Country/Region for Data Field.
- Enter
Countryfor Step Name. - Check Required.
-
Select Apply.
-
Configure Initial Permit stage.
- Select the second stage.
- Expand Details.
- Select the + Add button in the command bar.
- Select Add Data Step.
- Select the + icon under the existing data step.
-
Repeat adding steps until there are five data steps on the stage.
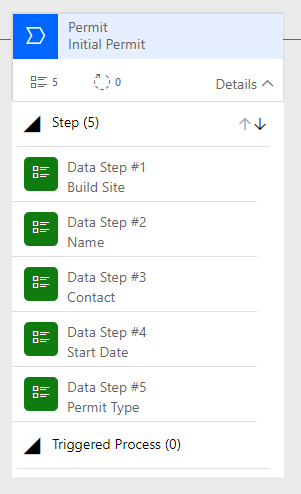
- Select Data Step #1.
- Select Build Site for Data Field.
- Check Required.
- Select Apply.
- Select Data Step #2.
- Select Name for Data Field.
- Check Required.
- Select Apply.
- Select Data Step #3.
- Select Contact for Data Field.
- Check Required.
- Select Apply.
- Select Data Step #4.
- Select Start Date for Data Field.
- Check Required.
- Select Apply.
- Select Data Step #5.
- Select Permit Type for Data Field.
- Check Required.
-
Select Apply.
-
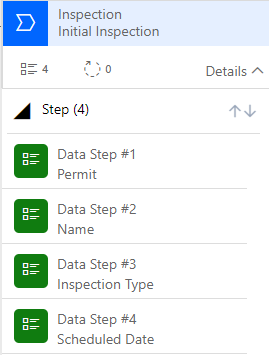
Configure Initial Inspection stage.
- Select the third stage.
- Expand Details.
- Select the Components tab.
- Drag the Data Step component and drop it onto the + icon under the existing data step.
- Select the Components tab.
- Drag the Data Step component and drop it onto the + icon under the existing data step.
- Select the Components tab.
- Drag the Data Step component and drop it onto the + icon under the existing data step.
-
There should be four data steps on the stage.
- Select Data Step #1.
- Select Permit for Data Field.
- Check Required.
- Select Apply.
- Select Data Step #2.
- Select Name for Data Field.
- Check Required.
- Select Apply.
- Select Data Step #3.
- Select Inspection Type for Data Field.
- Check Required.
- Select Apply.
- Select Data Step #4.
- Select Scheduled Date for Data Field.
- Check Required.
-
Select Apply.
-
Save the business process flow.

- Select Save.
- Select Validate. Validation should be successful.
- Select Activate.
- Select Activate.
- Close the business process flow editor.
- Select Done.
-
Add business process flow table to the solution.
[!IMPORTANT] You need to add the Business process flow table to the solution.
- Select Add existing and select Table.
- Search for
buildand select the New Build Site table. - Select Next.
- Check Include all objects.
- Select Add.
Task 3.2: Test the business process flow
-
Create a Build Site.
- Navigate to the Power Apps maker portal
- Select your Development environment.
- Select Apps and play the Permit Management app.
- Select Build Sites.
-
Select + New.
- Select the New Site stage in the business process flow.
- Enter
Streetfor Street. - Enter
Cityfor City. - Enter
Statefor State. - Enter
ZIPfor Postal Code. - Select Save.
- Select the New Site stage in the business process flow.
-
Select Next Stage. You should see the error Country: Required fields must be filled in.
[!NOTE] If the Next Stage button is not shown, refresh your browser.
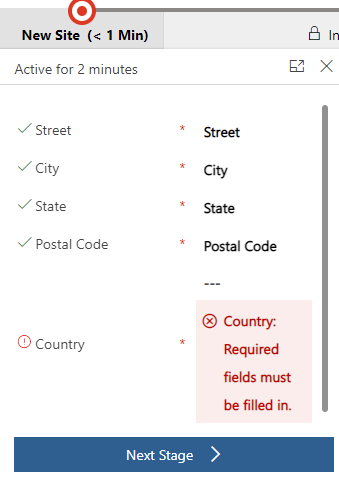
- Enter
Countryfor Country.
-
Transition to Permit stage.
- Select Next Stage.
- Select + Create.
- Select the Initial Permit stage in the business process flow.
- Enter
BPF Permitfor Name. - Select John Doe for Contact.
- Select today’s date for Start Date.
- Select New Construction for Permit Type.
- Select Save.
-
Transition to Inspection stage.
- Select the Initial Permit stage in the business process flow.
- Select Next Stage.
- Select + Create.
- Select the Initial Inspection stage in the business process flow.
- Enter
BPF Inspectionfor Name. - Select Initial Inspection for Inspection Type.
- Select tomorrow’s date for Scheduled Date.
- Select Save.