Lab 08.1: Test & deploy
In this lab you will complete solution configuration by adding security roles for the users. Then you will verify, test, and deploy the solution in the production environment.
What you will learn
- How to deploy a solution to another environment
High-level lab steps
-
Exercise 1 – Export and import solution
-
Exercise 2 – Create security roles for users
-
Company 311 User – read all on Building, user owned on Problem Reports
-
Company 311 Admin – All access for Buildings, Departments, Problem Reports
-
Associate Company 311 Admin role with model-driven app
-
Prerequisites
Must have completed the following labs:
-
02.1: Data model
-
02.2: Work with forms and views
-
02.3: Compose a model-driven app
-
02.4: Import data
Detailed steps
Exercise 1: Import export
In this exercise, you will export the company 311 solution and import it into a new environment.
Task 1: Export solution
-
Navigate to the
https://make.powerapps.comand make sure you are in the correct environment. -
Select Solutions, and open the Company 311 solution.
-
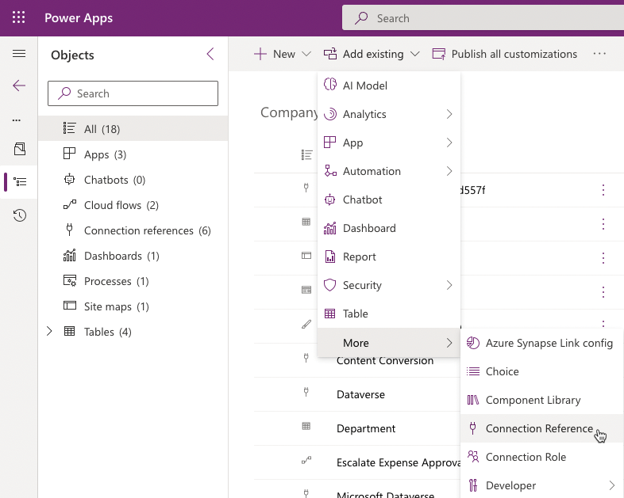
Select + Add existing, select More, then select Connection Reference.
-
Select all of the connection references and select Add.
-
Select + Add existing, select More, then select Component Library.
-
Select the Shared Components A connection library and select Add.
-
Select Publish all customizations and wait for the publishing to complete.
-
Navigate back to the Solutions list.
-
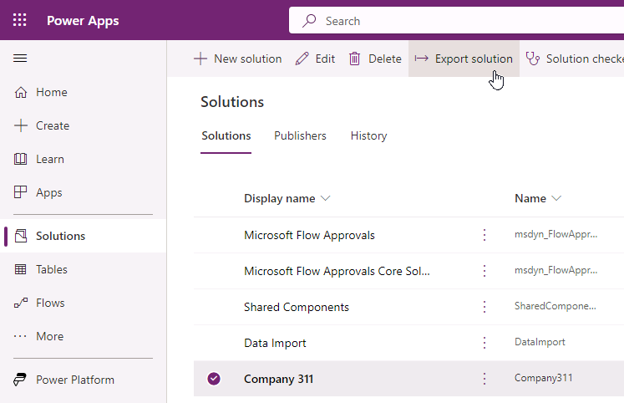
Select the Company 311 solution and select Export Solution from the toolbar.
-
Select Next.
-
Select Managed and select Export. Wait for the solution to be packaged and exported.
-
When it has exported successfully, select Download to save the solution to your computer.
-
Select Export solution again.
-
Select Next.
-
Select Unmanaged, change the version to match the managed solution version and select Export.
-
You should have the Managed and Unmanaged versions of the solution exported and downloaded.
Task 2: Create new environment and import solution
-
Navigate to the Power Platform admin center,
https://aka.ms/ppac -
Using the navigation on the left, select Environments.
-
Select New.
-
Name the New Environment
Prod -
Set the Type to Developer.
-
Select Next.
-
Select Save.
-
Navigate to the Power Apps maker portal
https://make.powerapps.comand select the environment you just created. -
Select Solutions and select Import solution.
-
Select Browse.
-
Select the managed solution you exported and select Open.
-
Select Next.
-
Select Next again.
-
Select Import and wait for the import to complete.
-
Select Publish all customizations and wait for the publishing to complete.
-
Open the Company 311 solution you just imported.
-
Review the components in solution.
-
Select Apps and make sure you have both the Canvas and Model-driven apps.
-
Open the Company 311 Admin application.
-
The application should load without issues.
-
Close the Company 311 Admin application browser window or tab.
-
Open the Company 311 Phone application.
-
The application should load without issues.
-
Close the Company 311 Phone App browser window or tab.
Exercise 2: Create security roles
In this exercise, you will create security roles for users.
Task 1: Create security roles
-
Navigate to the Power Apps maker portal,
https://make.powerapps.comand make sure you are in the correct environment. -
Select Solutions and open the Company 311 solution.
-
Select + New > Security and select Security Role.
-
Enter Company 311 User for Role Name and select the Custom Entities tab.
-
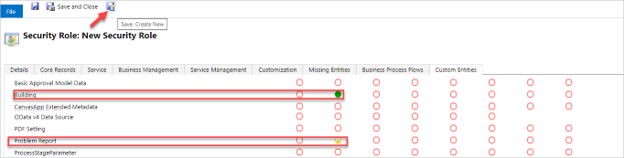
Set the read privilege of the Building table to Organization.
-
Set the read privilege of the Problem Report table to User.
-
The read privileges for the Building and Problem Report Tables should now look like the image below. Select Save Create New.
-
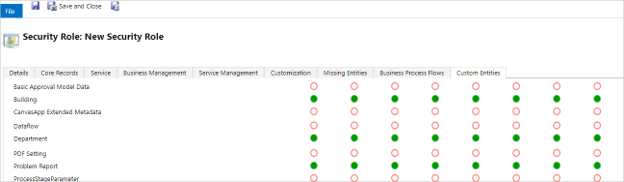
Enter Company 311 Admin for Role Name and select the Custom Entities tab.
-
Set all privileges of the Building, Department, and Problem Reports tables to Organization.
-
Select the Customization tab.
-
Set all privileges for Model-driven app.

-
Select Save and Close.
-
Select Done on the pop-up.
-
Select All from the Objects pane.
-
Select Publish all customizations and wait for the publishing to complete.