Lab 04.4: Create business process flows and business rules
In this lab you will enhance the data model and improve the app behavior by adding a business process flow and a business rule.
What you will learn
-
How to identify stages in a Business Process Flow (BPF)
-
How to create and use a BPF
-
How to use a business rule to implement logic
High-level lab steps
-
Exercise 1 – Create BPF lifecycle of problem report
-
Route
-
Fix
-
Resolved
-
-
Exercise 2 – Business rule to not allow close without resolution
Prerequisites
Must have completed the following labs:
-
02.1: Data model
-
04.1: Work with forms and views
-
04.2: Compose a model-driven app
-
04.3: Import data
Detailed steps
Exercise 1: Create business process flow
In this exercise, you will create a business process flow for the problem report table.
Task 1: Create business process flow
In this task, you will create a business process flow for the Problem Report table.
-
Navigate to the Power Apps maker portal page and make sure you are in the correct environment.
-
Select Solutions and open the Company 311 solution.
-
Select + New > Automation > Process > Business process flow.

-
In the New business process flow panel, enter
Problem resolution processfor Display name, select Problem Report for Table, and select Create. -
Open the Problem resolution process business process flow created in the previous step. Select the New stage, go to the Properties pane, change the Display Name to
Routeand select Apply. -
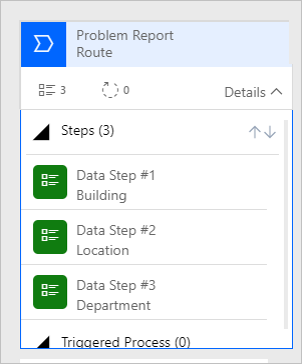
Expand Details of the Route stage.
-
Select Data Step #1, go to the Properties pane, select Building for Data Field, and select Apply.
-
Select + Add and select Add Data Step.
-
Select the + option to add the data step below the Building data step.
-
Select the new data step, go to the Properties pane, select Location for Data Field, and select Apply.
-
Select + Add again and select Add Data Step.
-
Select the + option to add the data step below the Location data step.
-
Select the new data step, go to the Properties pane, select Department for Data Field, and select Apply.
-
The Route stage should now match the image below.
-
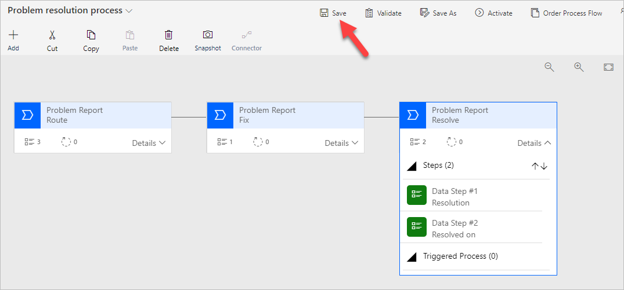
Select + Add and select Add Stage.
-
Add the new stage after the Route stage.
-
Select the stage, go to the Properties pane, enter
Fixfor Display Name, and select Apply. -
Expand Details of the Fix stage.
-
Select Data Step #1 of the Fix stage.
-
Go to the Properties pane, select Assign to for Data Field and select Apply.
-
Select + Add and select Add Stage.
-
Add the new stage after the Fix stage.
-
Select the new stage, go to the Properties pane, enter
Resolvefor Display Name and select Apply. -
Expand Details of the Resolve stage.
-
Select Data Step #1 of the Resolve stage.
-
Go to the Properties pane, select Resolution for Data Field and select Apply.
-
Select + Add and select Add Data Step.
-
Add the new data step below the Resolution data step.
-
Select the new data step, go to the Properties pane, select Resolved On for Data Field and select Apply.
-
The Business process flow should resemble the image below. Select Save.
-
Select the icon at the top to Activate Business Process Flow.
-
To confirm, select Activate on the pop-up.
-
Confirm that ‘Status: Active’ shows at the bottom left of the Business Process Flow canvas.
-
Close the process editor browser tab.
-
Select Done.
Exercise 2: Create business rule
In this exercise, you will create a business rule that will block the completion of problems without resolution.
Task 1: Create business rule
-
Navigate to the Power Apps maker portal page and make sure you are in the correct environment.
-
Select Solutions and open the Company 311 solution.
-
Locate and open the Problem Report Table.
-
Select + New and under Customizations, select Business rule.
-
Make sure the Scope is set to Entity in the selector in the right corner of the screen.
-
Select the Show details chevron located next to Problem Report: New business rule title at the top.

-
Change Business rule name to
Completion ruleand select the Hide details chevron.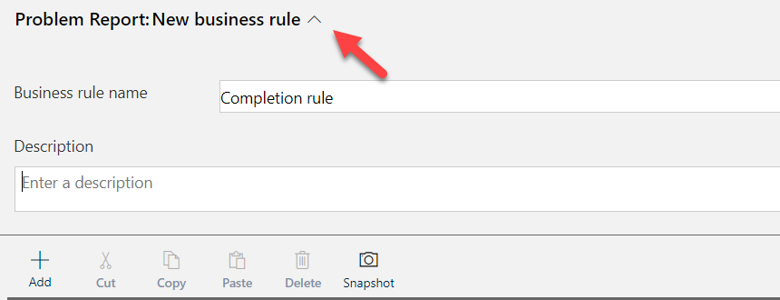
-
Select the New Condition in the Business Rule editor canvas.
-
Go to the Properties pane and change the Display Name to
Resolution required -
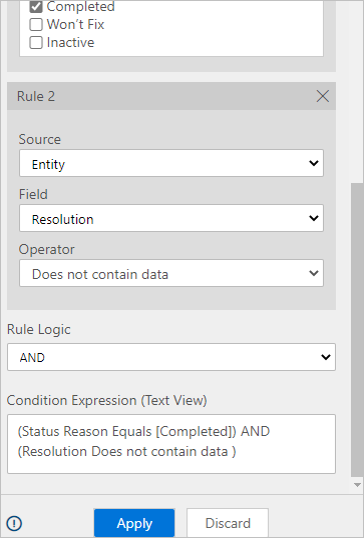
Scroll down the Rules section, select Status Reason for Field, select Equals for Operator, select Value for Type, select Completed for Value, and select Apply.
-
Next to Rules in the Properties pane, select + New.
-
Scroll down to Rule 2, select Resolution for Field, select Does not contain data for Operator, make sure AND is selected for Rule Logic, and select Apply.
-
Select + Add.
-
Select Add Show Error Message.
-
Add the action on the true path of the condition, indicated by the checkmark.
-
Select the new action, go to the Properties pane, enter Show message for Display Name, select Status Reason for Field, enter
The Problem must have a resolution before it can be closed.for the Error Message, and select Apply. -
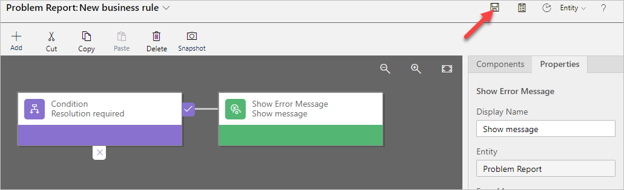
The business rule should now look like the image below. Select Save.
-
Select Activate.
-
To confirm, select Activate on the pop-up.
-
Confirm activation. The Activate button will change to Deactivate and it will show Activated in the bottom left of the Business Rule canvas.
-
Close the process editor browser window or tab.
-
Select Done.
-
Select + New and under Customizations, select Business rule.
-
Make sure the Scope is set to Entity in the selector in the right corner of the screen.
-
Select the Show details chevron located next to New business rule title on the same row as the scope.
-
Change Business rule name to Resolved on rule and select the Hide details chevron.
-
Select the Condition.
-
Go to the Properties pane and change the Display Name to Resolved on Required
-
Scroll down the Rules section, select Resolution for Field, select Contains Data for Operator, and select Apply.
-
Select + Add.
-
Select Add Set Business Required.
-
Add the action on the true path of the condition, indicated by the tick.
-
Select the new action, go to the Properties pane, enter Make Required for Display Name, select Resolved On for Field, Select Business Required, and select Apply.
-
Select + Add.
-
Select Add Set Business Required.
-
Add the action on the false path of the condition, indicated by the tick.
-
Select the new action, go to the Properties pane, enter
Make Not Requiredfor Display Name, select Resolved On for Field, Select Not Business Required, and select Apply. -
Select Save the rule.
-
Select Activate the rule.
-
To confirm, select Activate on the pop-up.
-
Confirm activation. The Activate button will change to Deactivate and it will show Activated in the bottom left of the Business Rule canvas.
-
Close the process editor browser window or tab.
-
Select Done.
-
Select All in the Objects navigation tree.
-
Select Publish all customizations and wait for the publishing to complete.
Exercise 3: Test processes
In this exercise, you will test the business process flow and the business rules you created.
Task 1: Test processes
-
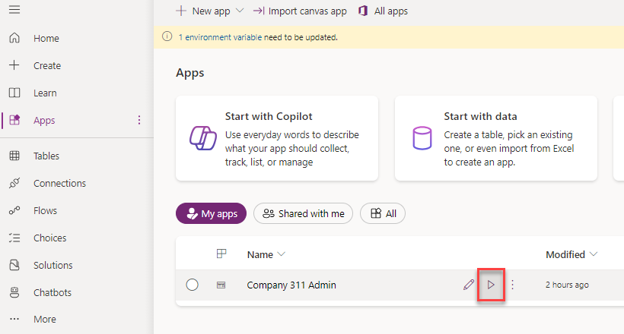
Navigate to the Power Apps maker portal page and make sure you are in the correct environment.
-
Select Apps and play the Company 311 Admin application.
-
Select Problem Reports and select + New.
-
You should see the business process flow stages. Enter
Dark parking lotfor Title, select London Paddington for Building, enterThere are no lights at the north end of the parking lotfor Details, and select Save. -
Your business process flow should appear (you may need to refresh). Select the Route stage.
-
Enter
North-endfor Location, select Maintenance for Department and select the Next Stage button.NOTE
If the Next Stage button is not visible, then refresh the page.
-
Select a user for Assign to and select Next Stage.
-
Select an appropriate date and time for the Resolved on and leave the Resolution value empty.
-
Scroll down to the Resolution details section and select Completed for Status Reason. You should see the business rule error message defined earlier.
-
Enter
Installed lights on the North-end of the parking lotfor Resolution. The error message should go away. -
Select Save to save the Problem Report.