Lab 04.3: Import data
In this lab you will be inputting data into your Dataverse tables, refining some views, and importing data using a Power Automate flow.
What you will learn
- Import data and refine views
- Import solutions
High-level lab steps
- Input data and refine views
- Import Problem Report rows using a Power Automate flow
Detailed steps
Exercise 1: Input data
In this exercise, you will input data to the Dataverse tables.
Task 1: Input data
-
Navigate to
https://make.powerapps.comand make sure you are in the correct environment. -
Select Apps and play the Company 311 Admin application created in the previous exercise.
-
Select Manage Problems at the bottom left and change the area to Settings.
-
Using the navigation on the left, choose Departments and select the + New button.
-
Enter
Information Technologyfor Name and select Save. -
Select Buildings under the Taxonomy group.
-
Select + New.
-
Enter
San Francisco Main Campusfor Name and select Save & Close. -
Select + New again.
-
Enter
London Paddingtonfor Name and select Save & Close. You should now have two Building rows.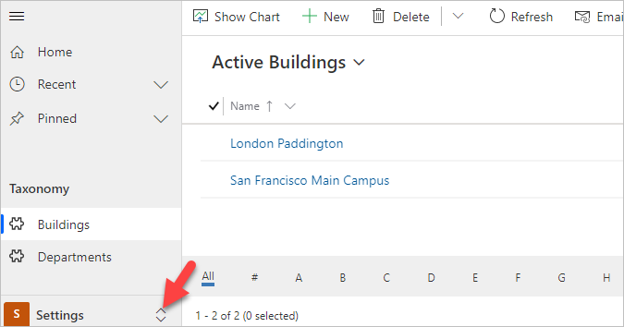
-
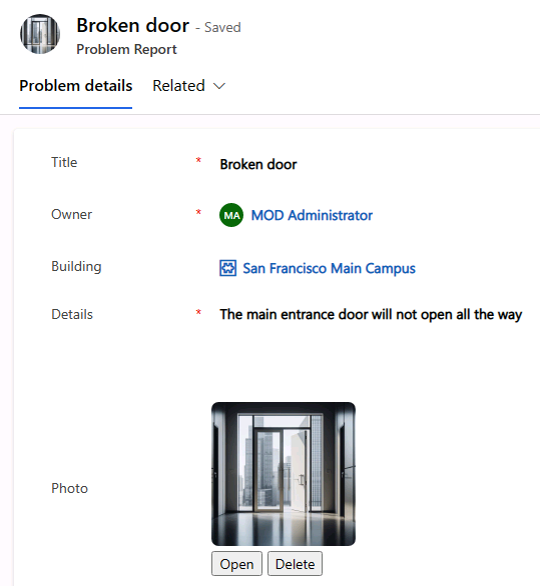
Use the area selector to navigate from Settings to Manage Problems.
-
Select + New.
-
Enter
Broken doorfor Title, select San Francisco Main Campus for Building, enterThe main entrance door will not open all the wayfor Details, and select Save.NOTE
You cannot save images before creating the row in the database. Select Save and then you may upload a picture.
-
Select Open file on the Photo field.
-
Select an image from your device. The sample image displayed below can be found here.
TIP
The example image file can be found here:
F:\Instructions\Labs\02-4\Resources\door.png -
The image should now display on the form.
-
Select Save & Close.
Exercise 2: Import data
In this exercise, you will import sample data into the environment. Rows are imported by a Power Automate cloud flow that you will first import using a solution.
Task 1: Import solution
-
Navigate to the Power Apps maker portal
https://make.powerapps.comand make sure you are in the correct environment. -
Select Solutions and select Import solution from the command bar.
-
Select Browse.
-
Select the DataImport.zip solution file located in the Lab Resources folder and select Open.
TIP
The solution file can be found here:
F:\Instructions\Labs\02-4\Resources\DataImport.zip -
Select Next.
-
Select Next again.
-
Select Continue, if necessary.
-
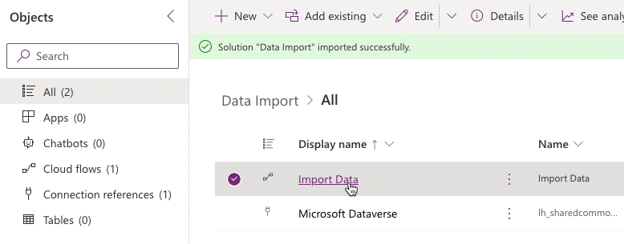
After the connections show a green tick, select Import and wait for the notification banner ‘Solution “Data Import” imported successfully’ to appear.
-
Select Publish all customizations and wait for the publishing to complete.
Task 2: Review and run flow
-
Open the Data Import solution you imported.
-
Select the Import Data flow.
-
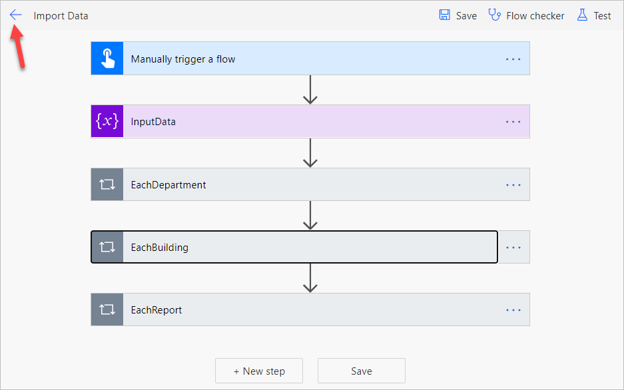
Select Edit from the Command Bar.
-
If necessary, dismiss the welcome prompt by selecting Get started.
-
Expand the InputData step.
-
Review the JSON text in the Value field. This is the data that will be imported into your environment. Note: The image data is encoded as Base-64 text.
-
Expand the EachDepartment for each control.
-
Expand and review the Upsert Department step.
-
Expand and review the rest of the steps.
-
Select Save to save the flow.
-
Select the 🡠 back button to go back to the previous page.
-
Open the Import Data flow details page again and select Run.
TIP
If the Run option is disabled, make sure the flow has been enabled by selecting Turn on.
-
Select Run flow.
-
Select Done.
-
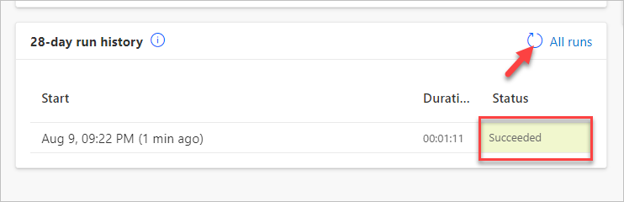
Wait for the flow run to complete. Select the Refresh Flow runs button to check if the flow run completes successfully.
Task 3: Review imported data
-
Navigate to the Power Apps maker portal
https://make.powerapps.comand make sure you are in the correct environment. -
Select Apps and play the Company 311 Admin model-driven application.
-
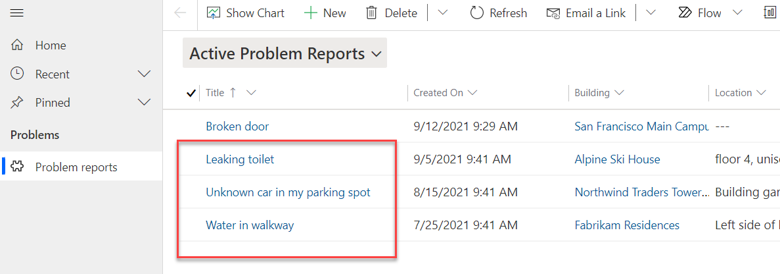
The app should open with the Active Problem Reports view. You should see new rows of data.
NOTE
Because the input status reason is picked randomly, some of the imported problem report rows may have the status reason of Completed, Won’t Fix, or Inactive. Select the Resolved Problems view to find these rows.
-
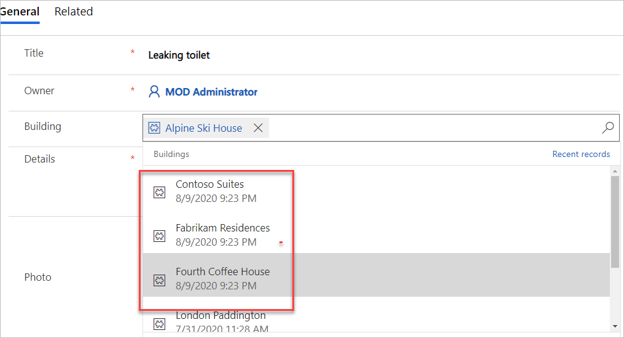
Open one of the Problem Report Rows.
-
Select the Search icon of the Building lookup and verify that building rows were imported.
-
Scroll down and select the Department lookup.
-
Make sure the Department rows got imported.