Lab 02.1: Data modeling
In this lab you will be implementing the data model for the solution.
What you will learn
- Create Tables, Columns, and Lookups
High-level lab steps
-
Exercise 1 – Create publisher and solution
-
Exercise 2 – Implement the data model
-
Data Model
-
Building
-
Department
-
Problem Report
-
-
Detailed steps
Exercise 1: Create publisher and solution
In this exercise, you will create a custom solution publisher and a solution. This solution will be used in all the labs for this course to keep all the components together.
Task 1: Create publisher and solution
-
Navigate to the
https://make.powerapps.comand make sure you are in the Dev One environment. -
From the left navigation pane, select Solutions and then select + New solution.
-
For Display name, enter
Company 311 -
Select + New publisher, under the Publisher field.
-
Enter
Lamna Healthcarefor Display name,lamnahealthcarefor Name,lhfor Prefix,88186for Choice value prefix, and select Save. -
Select Lamna Healthcare (lamnahealthcare) from the Publisher dropdown menu.
-
Select Create.

Exercise 2: Implement data model
In this exercise, you will create Tables, Columns, and the Relationships you identified when you designed the data model for the Company 311 app.
Task 1: Create Tables
-
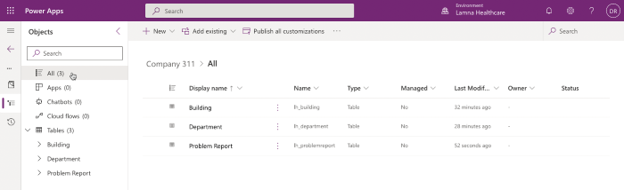
In the Power Apps maker portal page, make sure you are in the correct environment. Select Solutions and open the Company 311 solution you created in Exercise 1.
-
Select + New > Table > Table.
-
Enter
Buildingfor Display name and select Save.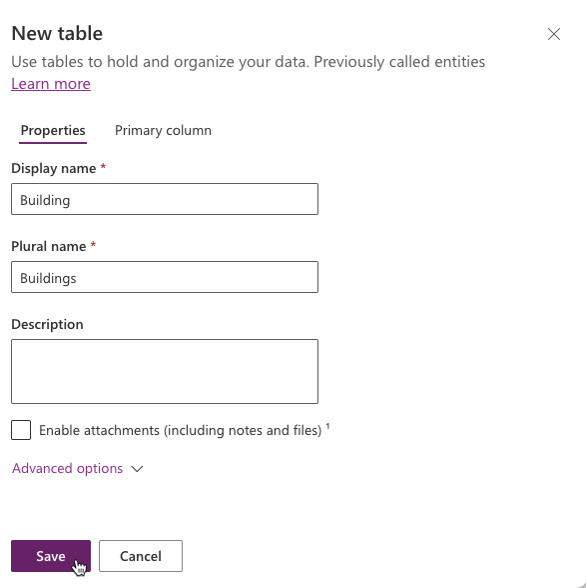
-
Select All from the tree view, in the Objects pane to display all solution objects and subcomponents.
-
Select + New > Table > Table again.
-
Enter
Departmentfor Display name and select Save. -
Select All from the tree view, in the Objects pane to display all solution objects and subcomponents.
-
Select + New > Table > Table one more time.
-
Enter
Problem Reportfor Display name. -
Select the Primary column tab, enter
Titlefor Display name. -
Select the Properties tab, expand Advanced options, then scroll to the Rows in this table section.
-
Check the Can be added to a queue checkbox and select Save.
NOTE
Enabling queues for Problem Report table allows rows to be associated with one or more queues to help facilitate routing problem reports to the different departments. Once this option is enabled, it can’t be turned off.
-
Select All from the tree view in the Objects pane. The tables you created should now be visible in the list view and in the tree navigation.
Task 2: Add Columns
In this task, you will add Columns to the Problem Report Table.
-
Navigate to the Power Apps maker portal page and make sure you are in the correct environment.
-
Select Solutions and open the Company 311 solution you created in exercise 1.
-
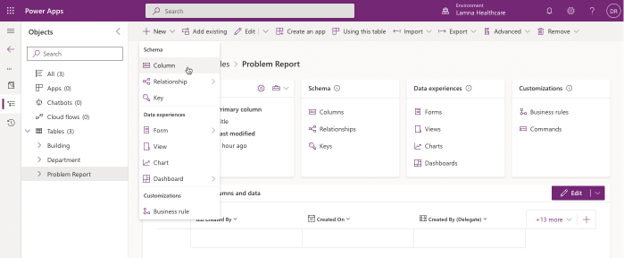
Select the Problem Report table.
-
There are many ways to add a new column to the table. For this lab, select + New, then select Column from the Schema group.
-
Enter
Locationfor Display name. Select Text > Single line of text > Plain text for Data type. -
Expand the Advanced options section, change Maximum character count to
150, then select Save.
-
Select + New > Column from the top menu.
-
Enter
Detailsfor Display name, select Text > Multiple lines of text > Plain Text for Data type, make the Column Business required, and select Save. -
Select + New > Column again.
-
Enter
Photofor Display name, select File > Image for Data type, and select Save. -
Select + New > Column.
-
Enter
Resolutionfor Display name, select Text > Multiple lines of text > Plain Text for Data type, and select Save. -
Select + New > Column.
-
Enter
Resolved Onfor Display name, select Date and time for Data type, and select Save. -
Select + New > Column.
-
Enter
Estimated Costfor Display name, select Currency for Data type, and select Save. -
Select All from the tree view in the Objects pane.
-
Select Publish all customizations from the command bar and wait for the publishing to complete.
IMPORTANT
Do not navigate away from this page until all customizations have been published successfully.
Task 3: Edit Status Reason Choice
In this task, you will edit the Status Reason column of the Problem Report table.
-
Make sure you are in the Company 311 solution.
-
In the Objects navigation tree expand Tables, expand Problem Report, select Columns. Locate and select the Status Reason column.
-
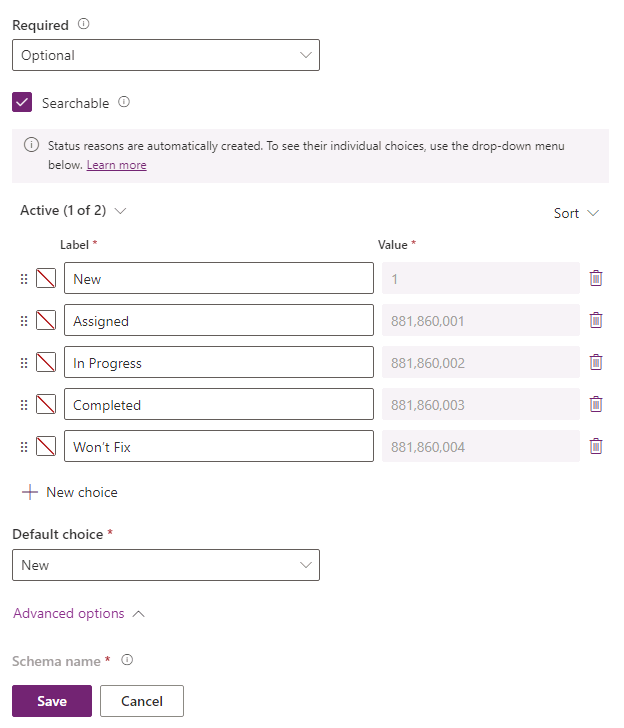
Change the existing label for the Active option to
New -
Select + New choice and enter
Assignedfor Label. -
Select + New choice and enter
In Progressfor Label. -
Select + New choice and enter
Completedfor Label. -
Select + New choice and enter
Won’t Fixfor Label. -
You should now have 5 options. Verify the Default choice is set as New and select Save.
-
Select All from the tree view in the Objects pane.
-
Select Publish all customizations and wait for the publishing to complete.
Task 4: Lookups
In this task, you will create lookups to create many-to-one relationships between the Problem Report table and the Building and Department tables.
-
In the Objects navigation tree expand Tables, select and expand the Problem Report table.
-
Select + New > Column.
-
Enter
Departmentfor Display name, select Lookup for Data type, set the Related Table toDepartmentand select Save. -
Select + New > Column again.
-
Enter
Assign tofor Display name, select Lookup for Data type, set the Related table toUser, and select Save. -
Select + New > Column again.
-
Enter
Buildingfor Display name, select Lookup for Data type, set the Related table toBuildingand select Save.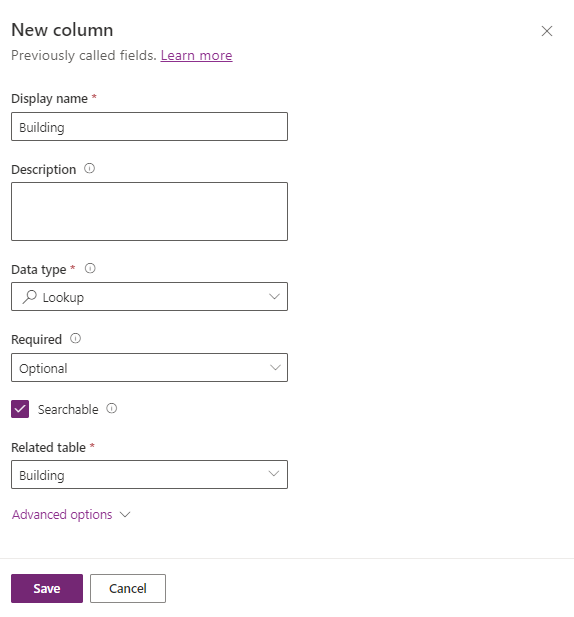
-
Select All from the tree view in the Objects pane.
-
Select Publish all customizations and wait for the publishing to complete.