Lab 4: Create a trigger-based journey
In this lab, you will learn how to:
- Create a journey based on a trigger
- Define exit criteria for the segment
Task 1: Create a trigger-based journey
-
Navigate to the Real-time journeys work area.
-
Under Engagement, select Journeys.
-
Click +New journey in the command bar.
-
Select Skip and create from blank.
-
In Name the journey, enter Welcome Journey.
-
In Choose journey type, select Trigger-based.
-
In Choose a trigger, search for and select Contact Created.
-
Click Create.
-
From the Journey Settings on the right, in the Entry section, select Add Condition.
-
In the Attribute Drop-down menu, select Contact created > Contact (Contact) > Account (Account) > Account Name.
-
Change the operator to Does not Equal.
-
Set the value to Humongous Insurance. The condition should read Account Name Does not Equal Humongous Insurance.
-
Configure the rest of the items in the Entry section as follows:
- In the Repeat section, select Immediately.
- In the Time zone section, choose your time zone.
- In Start, select today, 15 minutes from now.
- In End, select tomorrow.
Task 2: Define the journey goal
Next, we can identify the specific goal of the Customer Journey. Goals help to identify what the end point of the journey is. These can be things like driving a purchase or engaging with customers. Providing a goal for the journey ensures that the journey is stopped once your objective has been met.
For this journey, we are looking for a specific percentage of the people we are engaging with to click on a link that is in an email that we send them.
-
From the Journey settings on the right, navigate to the Goal section.
-
In The goal of this journey is, select Send a general notification.
-
In The goal is met when field, select A person clicked on at least one link.
-
In The number of people needed, enter 50. Leave the Percent option selected.
Task 3: Define a frequency cap for the journey
Contoso wants to ensure that they are not overwhelming their customers with commercial messages. To ensure that this does not happen, they want to apply a frequency cap to this journey.
-
From the Journey settings on the right, navigate to the Other Settings section.
-
Under Frequency cap, make sure that Apply frequency cap to this journey – skip commercial messages if cap is reached is selected.
-
Under Maximum frequency across journeys, select Go to frequency cap settings. A new window will open.
-
On the command bar, select +New Setting.
-
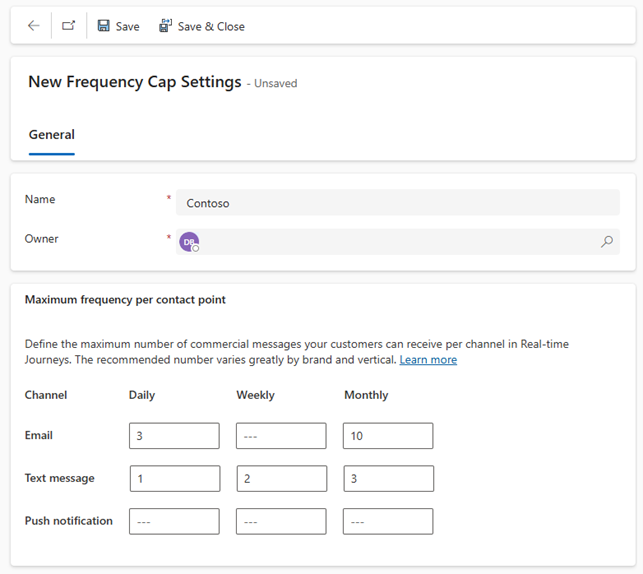
In the Name field, enter Contoso.
-
In the Maximum frequency per contact point section, configure based on the image below:
-
Select Save & Close to save and close your new Frequency Cap settings.
-
Return to the window that contains your Welcome Journey. Save the journey and refresh your browser.
-
From the Journey settings on the right, navigate to the Other Settings section again.
-
Notice that the Contoso Frequency cap is now applied to this Journey.
Task 4: Build out the trigger-based journey
Now that we have defined the necessary journey criteria, the next step is to build out the actual journey steps.
-
In the journey designer, click the plus icon (+) under the Contact Created tile.
-
Select Attribute Branch (Branch based on a specific value).
-
In Display name on the right, enter New Business Customer.
-
Select Branch 1 and in Choose an attribute, Search for Description (description) under Contact.
-
Change the value from Equals to Contains.
-
In Value, enter Business.
-
Click the plus icon (+) under Branch 1.
-
Select Email: Send an email.
-
In Select email, choose Welcome Email 1.
-
Click the plus icon (+) under the Send an email tile.
-
Select Wait for Trigger.
-
To configure the If/then branch, in the If/then branch panel on the right, under Wait for, Choose a branch condition type select The previous message gets an interaction.
-
In Choose an interaction, select Email Link Clicked.
-
In What’s the time limit?, enter 10 minutes.
-
Back on the Journey diagram, to specify the link clicked, select create branches.
-
Select the attribute Email Link Clicked.
-
In Branch 1, select the call-to-action button from the email.
-
In the Yes path, click the plus icon (+).
-
Select Send an email.
-
In Select email, choose Welcome Email 2.
-
In the corresponding No path, click the plus icon (+).
-
Select Send an email.
-
In Select email, choose Welcome Email 3.
-
Save the journey.
-
Review the journey. Make any final changes.
-
Click Publish. Wait for the journey to publish.