Change Record
| Version | Date | Change |
|---|---|---|
| 1.1 | 19 Dec 2023 | Tested against 10.0.37 |
| 1.0 | 29 Sep 2023 | Initial release |
Objective
If you need to export or import records from a table, you can create a data entity and use the Data management framework to transfer the data. There are business processes where you may require sending data from two different data entities together, which have header-line relationships, like sales header and sales line, purchase header and purchase line etc.
In this lab, we will create a composite data entity using two entities which have header-line relationships like color group and color. After the creation of the composite entity, we will use this entity to export data in the XML format.
Exercise 1: Create model and project
-
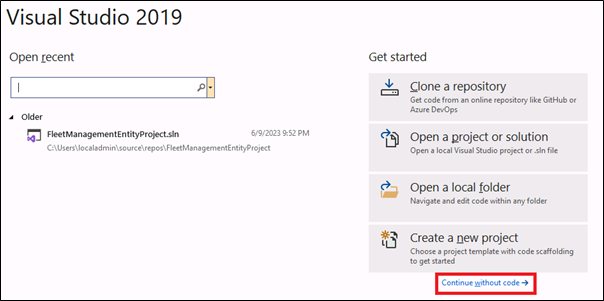
Run Visual Studio 2019 from the desktop.
-
Select Continue without code in the popped-up dialog Visual Studio 2019.
 Note: You can check if there is already a model created named MB500Model. If not, please continue from step 13 to step 18. If the model is already present, execute step 3 to step 11.
 -
Navigate to Extensions > Dynamics 365 > Model Management > Update model parameters.
-
Select Model name MB-500 lab exercise.
-
Select the Next button.
-
In the Select referenced packages dialog, select the following packages:
- ApplicationFoundation
- ApplicationPlatform
- ApplicationSuite
- Retail
-
Select the Next button until the dialog is closed.
-
Open Solution Explorer.
-
Right click on the solution SlnMb500Lab.
-
Select Add > New project. The template will be Finance Operations
-
Type PrjMb500Lab-4 as the name of the new project.
- Resume with Exercise 2.<hr>
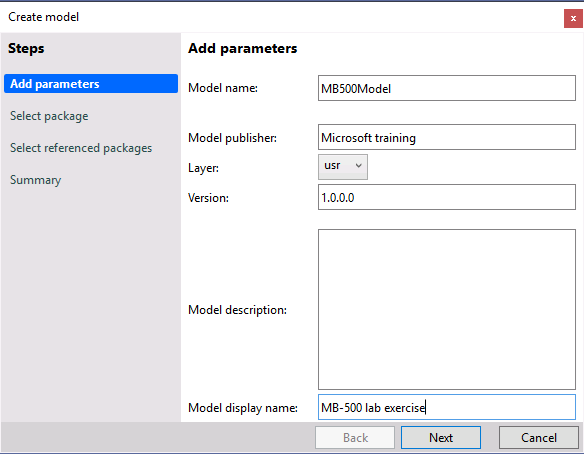
- Select Extensions > Dynamics 365 > Model management > Create model and enter the following information to create a new model, then select Next:
-
Model name: MB500Model
-
Model publisher: Microsoft training
-
Layer: usr
-
Version: 1.0.0.0
-
Model display name: MB-500 lab exercise
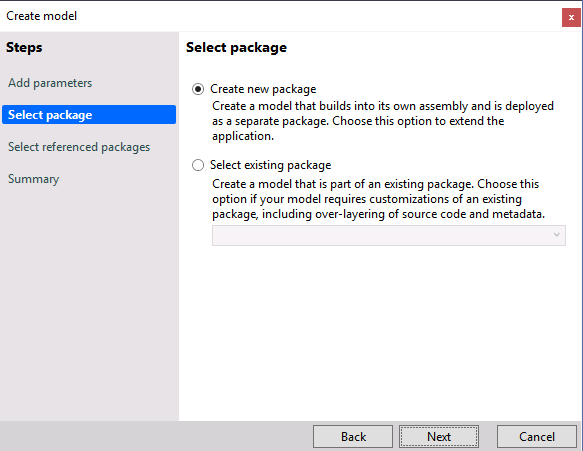
- Select Create new package followed by the Next button.
- Select the following referenced packages followed by the Next button:
-
ApplicationFoundation
-
ApplicationPlatform
-
ApplicationSuite
-
Retail
-
In the Summary step, check Create new project and select the Next button.
-
In the Configure your new project dialog, type PrjMb500Lab-4 and SlnMb500Lab in the Project name and Solution name fields respectively, then select Create.
-
The new solution and project will appear in Solution Explorer.
Exercise 2: Working with Data models
Task 1: Create a new data entity from table RetailColorGroupTable
Note: In this task, we will create a data entity for the Color group header table.
-
In the (View > ) Application Explorer, select the RetailColorGroupTable table under Data Model.
-
Right click on the RetailColorGroupTable table and select View Designer to open in the Element designer pane.
-
Right click on the root node of the RetailColorGroupTable table in the Element designer pane.
-
Select Addins > Create data entity.
-
A Microsoft Visual Studio dialog will appear stating that the data entity, staging table and security artifacts are already created and added to the project, so go ahead and select the OK button.
i. A new folder Data Entities will be created in the Solution Explorer under the project PrjMB500Lab-4.
ii. In the Data Entities folder, a new element RetailColorGroupTableEntity will also be created.
iii. A new folder Tables will be created in the Solution Explorer under the project PrjMB500Lab-4.
    also be created.

v. A new folder **Security Privileges** will be created in the **Solution
    Explorer** under the project *PrjMB500Lab-4*.

vi. In the **Security Privileges** folder, two new elements
    *RetailColorGroupTableEntityMaintain* and *RetailColorGroupTableEntityView*
    will also be created.
Task 2: Create a new data entity from table RetailColorGroupTrans
Note: In this task, we will create a data entity for the Color group line table. Also, we add a relation with the data entity created for the Color group header table.
-
In the (View > ) Application Explorer, select RetailColorGroupTrans table under Data Model.
-
Right click on RetailColorGroupTrans table and select View Designer to open in in the Element designer pane.
-
Right click on the root node of RetailColorGroupTrans table in the Element designer pane.
-
Select Addins > Create data entity.
-
A Microsoft Visual Studio dialog will appear stating that the data entity, staging table and security artifacts are already created and added to the project, so select the OK button.
i. In the Data Entities folder, a new element RetailColorGroupTransEntity will be created.
ii. In the Tables folder, a new element RetailColorGroupTransStaging will be created.
iii. In the Security Privileges folder, two new elements will be created. RetailColorGroupTransEntityMaintain and RetailColorGroupTransEntityView
-
Right click on the Relations node of the data entity RetailColorGroupTransEntity and create a new relation.
-
Navigate to the Properties pane of the newly created relation and enter the following:
-
Related Data Entity: RetailColorGroupTableEntity
-
Name: RetailColorGroupTableEntity
-
Cardinality: ZeroMore
-
Related Data Entity Cardinality: ZeroOne
-
Relationship Type: Association
-
-
Right click on the Relation RetailColorGroupTableEntity and create a new Normal relation.
-
Navigate to the Properties pane of the newly created Normal relation and enter the following:
-
Field: colorGroup
-
Related Field: colorGroup
-
-
The relation will look like:
RetailColorGroupTransEntity.colorGroup == RetailColorGroupTableEntity.colorGroup
Task 3: Working with staging table RetailColorGroupTableStaging
Note: In this task, we will create two columns in the staging table, which will be used to define runtime relationships during the target data movement.
-
In the Solution Explorer, locate table RetailColorGroupTableStaging under the Tables folder in the project PrjMB500Lab-4.
-
Open the table RetailColorGroupTableStaging in the Element designer.
-
Right click on the Fields node and add two integer fields named RowId and ParentRowId.
-
No need to change the other default properties of the newly created fields.
Task 4: Working with staging table RetailColorGroupTransStaging
Note: In this task, we will create two columns in the staging table, which will be used to define runtime relationships during the target data movement. We will also create a relation with the Color group staging table.
-
In the Solution Explorer, locate table RetailColorGroupTransStaging under the Tables folder in the project PrjMB500Lab-4.
-
Open the table RetailColorGroupTransStaging in the Element designer.
-
Right click on the Fields node and add two integer fields named RowId and ParentRowId.
-
No need to change the other default properties of the newly created fields.
-
Right click the Relations node of the table RetailColorGroupTransStaging and create a new relation.
-
Navigate to the Properties pane of the newly created relation and enter the following:
-
Related Table: RetailColorGroupTableStaging
-
Name: RetailColorGroupTableStaging
-
Cardinality: ZeroMore
-
Related Table Cardinality: ZeroOne
-
Relationship Type: Association
-
On Delete: Cascade
-
-
Right click on the Relation RetailColorGroupTableStaging and create three new Normal relations.
-
Navigate to the Properties pane of the first Normal relation and enter the following:
-
Field: colorGroup
-
Related Field: colorGroup
-
-
Navigate to the Properties pane of the second Normal relation and enter the following:
-
Field: DefinitionGroup
-
Related Field: DefinitionGroup
-
-
Navigate to the Properties pane of the third Normal relation and enter the following:
-
Field: ExecutionId
-
Related Field: ExecutionId
-
-
-
The relations will look like:
RetailColorGroupTransStaging.colorGroup == RetailColorGroupTableStaging.colorGroup RetailColorGroupTransStaging.DefinitionGroup == RetailColorGroupTableStaging.DefinitionGroup RetailColorGroupTransStaging.ExecutionId == RetailColorGroupTableStaging. ExecutionId
Task 5: Create a new Composite Entity – MBColorGroupCompositeEntity
Note: In this task, we will create the composite entity, that will combine both the above created entities in a single element.
-
In the Solution Explorer right click on the project PrjMB500Lab-4.
-
Select Add > New Item.
-
Under Dynamics 365 Items, select Data Model and select Composite Data Entity.
-
In the Name field type MBColorGroupCompositeEntity and select the Add button.
-
A new folder AxCompositeDataEntityView will be created in the Solution Explorer under the project PrjMB500Lab-4.
-
In the AxCompositeDataEntityView folder, a new element MBColorGroupCompositeEntity will also be created.
-
Open the MBColorGroupCompositeEntity composite data entity in the Element designer pane.
-
Navigate to the Properties pane of the MBColorGroupCompositeEntity composite data entity and change the Label to Color Group Composite Entity.
-
Right click on the root node and select New Root Data Entity Reference.
-
Select the newly created node DataEntityViewReferenceRoot1 and navigate to the Properties pane.
-
Change both the properties Data Entity and Name to RetailColorGroupTableEntity.
-
Right click on the node RetailColorGroupTableEntity and select New Embedded Data Entity Reference.
-
Select the newly created node DataEntityViewReferenceEmbedded1 and navigate to the Properties pane.
-
Enter the properties as follows:
-
Data Entity: RetailColorGroupTransEntity
-
Name: RetailColorGroupTransEntity
-
Relation: RetailColorGroupTableEntity
-
Testing
-
In the Solution Explorer right click on the project PrjMB500Lab-4.
-
Select Build.
-
Once the build is successful, navigate to the finance and operations apps page on your browser and refresh the page.
-
Select legal entity USMF.
-
Navigate to Workspaces > Data Management.
-
Select the tile Framework parameters.
-
Select the Refresh entity list button under the tab page Entity settings.
-
Navigate back to the Data Management workspace and select the Data entities tile.
-
Check the Entity column to see if the Color Group Composite Entity is updated in the list of entities.
-
Once updated, navigate back to the Data Management workspace, and select the Export tile.
-
In the Group name field, enter Color group export.
-
Select the Add entity button under the Selected entities fastTab.
-
In the Entity name field, select Color Group Composite Entity, the newly created composite entity.
-
In the Target data format field, select XML-Element and select the Add button.
-
Once it’s added, close the Add entity dialog by selecting the Close button.
-
In the action pane, select the Save button.
-
Select the Export now button, under Export options in the action pane.
-
The Execution summary page will appear with a “Checked” image in the Execution summary::Export fastTab.
-
Select the Download file button under the Entity processing status fastTab.
-
Download the Color group export-Color Group Composite Entity.xml file and open it.
-
You will find that the records from the tables RetailColorGroupTable and RetailColorGroupTrans will appear in the XML file.