MB-500: Microsoft Dynamics 365: Finance and Operations Apps Developer
Change Record
| Version | Date | Change |
|---|---|---|
| 1.1 | 18 Dec 2023 | Tested against 10.0.37 |
| 1.0 | 29 Sep 2023 | Initial release |
Objective
This lab consists of several exercises.
The first is basic setup in Visual Studio in order to prepare to code.
In the second exercise, we will create a new module named Training management. In this module, we will have a few submenus like Common, Periodic tasks and Setup. We will include the existing Course interface under the Common submenu. Under the Periodic tasks, we will display the total number of courses available. Under the Setup submenu, we will include some of the existing course-related setup pages, like Course type, Course location etc.
In the third, optional, part of the lab, we will create a new workspace with three sections: tile, list and link. In the fourth exercise, we will insert a new tile in the workspace to count the number of open trainings. In the fifth exercise, we will insert a grid in the workspace to display the courses in the workspace.
Exercise 1: Create model and project
-
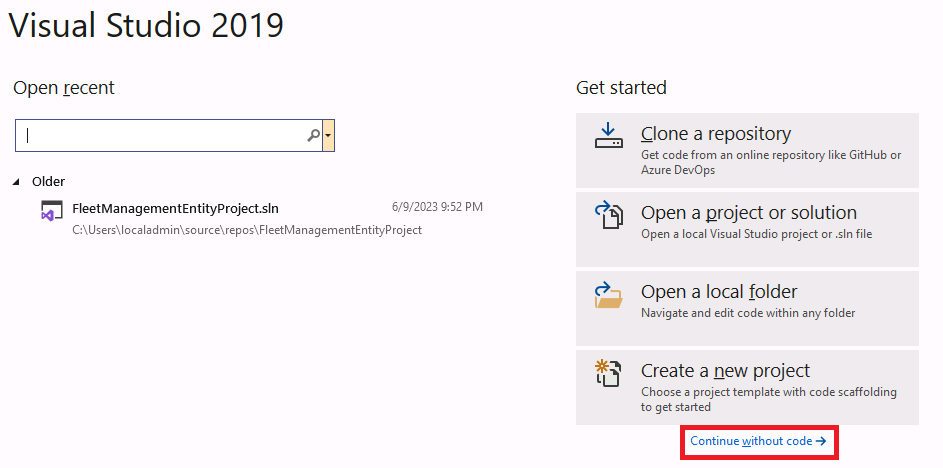
Run Visual Studio 2019 from the desktop.
-
Select Continue without code in the popped-up dialog Visual Studio 2019.
-
Select Extensions > Dynamics 365 > Model management > Create model and enter the following information to create a new model, then select Next:
-
Model name: MB500Model
-
Model publisher: Microsoft training
-
Layer: usr
-
Version: 1.0.0.0
-
Model display name: MB-500 lab exercise

-
-
Select Create new package followed by the Next button.

-
Select the following referenced packages followed by the Next button:
-
ApplicationFoundation
-
ApplicationPlatform
-
PersonnelManagement
-
-
In the Summary step, check Create new project and select the Next button.
-
In the Configure your new project dialog, type PrjMb500Lab-1 and SlnMb500Lab in the Project name and Solution name fields respectively, then select Create.
-
The new solution and project will appear in Solution Explorer.
Exercise 2: Create a new module
Task 1: Create a new label file
Note: It is a good practice to create a label file in case you need multilingual support for your implementation.
-
In the Solution Explorer right click on the project PrjMB500Lab-1.
-
Select Add > New Item.
-
Under Dynamics 365 Items, select Labels And Resources and select Label File.
-
In the Name field type MBLabelFile and select the Add button.
-
Select the Next button in the popped up Label file Wizard (this might take a moment).
-
Among the list of languages, highlight en-US in the Selected languages list and select the Next button.
-
In the Summary step, select the Next button.
-
A new folder Label Files will be created in the Solution Explorer under the project PrjMB500Lab-1. (Close any add an item popup that may occur.)
-
In the Label Files folder, a new label file MBLabelFile_en-US will also be created with the single language option MBLabelFile.en-US.label.txt.
Note: You can right click on MBLabelFile_en-US and select Add new Languages to add additional languages in the label file. -
Open MBLabelFile_en-US in the Element designer pane and add the following labels by selecting the New button, then Save All:
| Label ID | Label | Description |
|---|---|---|
| MB001 | Training Management | Module name |
| MB002 | Training | Training list interface |
| MB003 | Training type | Training type interface |
| MB004 | Training location | Training location interface |
| MB005 | Total number of trainings: %1 | Training count class |
| MB006 | Training count | Training count function |
| MB007 | Analytics | Training workspace tab page |
| MB008 | Open trainings | Tile description in workspace |
Task 2: Extend existing display menu items
Note: In this task, we will not create new tables and forms to be displayed in the new module. We will use some forms related to the Course tables and display them in the Training management module. We will change the label of some of the menu items from Course to Training, those will be displayed from the Training management module
-
Extend display menu item HRMCourseListPage:
-
In the (View > ) Application Explorer, select the HRMCourseListPage display menu item under User Interface.
-
Right-click on HRMCourseListPage and select Create extension.
-
A new folder Display Menu Item Extensions will be created in the Solution Explorer under the project PrjMB500Lab-1.
-
A new element HRMCourseListPage.MB500Model will be created in the Display Menu Item Extensions folder.
-
Open HRMCourseListPage.MB500Model in the Element designer pane and right click on it to select the Properties option.
-
Locate the Label property and select the three dots (…) next to the Label property.
-
The label search option will open, where you select Match exactly in the Find option and search for Training. (You can also type Training in the label field and then hit the ellilpsis, and select MB002.)
-
Select Label ID MB002 in the results and select the Paste label button at the bottom.
-
The Label property should be updated with @MBLabelFile:MB002.
-
-
Extend display menu item HcmCourseType:
-
In the Application Explorer, select the HcmCourseType display menu item. Hint: This is HCM, not HRM.
-
Right-click on HcmCourseType and select Create extension.
-
A new element HcmCourseType.MB500Model will be created in the Display Menu Item Extensions folder.
-
Open HcmCourseType.MB500Model in the Element designer pane and right click on it to select the Properties option.
-
Locate the Label property and select the three dots (…) next to the Label property.
-
Label search option will open, where you select Match exactly in the Find option and search for Training type.
-
Highlight Label ID MB003 and select Paste label button at the bottom.
-
The Label property should be updated with @MBLabelFile:MB003.
-
-
Extend display menu item HRMCourseLocation:
-
In the Application Explorer, select the HRMCourseLocation display menu item.
-
Right-click on HRMCourseLocation and select Create extension.
-
A new element HRMCourseLocation.MB500Model will be created in the Display Menu Item Extensions folder.
-
Open HRMCourseLocation.MB500Model in the Element designer pane and right click on it to select the Properties option.
-
Locate the Label property and select the three dots (…) next to the Label property.
-
Label search option will open, where you select Match exactly in the Find option and search for Training location.
-
Locate Label ID MB004 and select Paste label button at the bottom.
-
The Label property should be updated with @MBLabelFile:MB004.
-
4. Save all.
Task 3: Create a class
Note: In this task, we will write a simple method to count the total number of records in the Course table
-
In the Solution Explorer right click on the project PrjMB500Lab-1.
-
Select Add > New Item.
-
Under Dynamics 365 Items, select Code and select Runnable Class (Job).
-
In the Name field type MBTrainingCount and select the Add button.
-
A new folder Classes will be created in the Solution Explorer under the project PrjMB500Lab-1.
-
In the Classes folder, a new class MBTrainingCount will also be created.
-
Open MBTrainingCount class in the Code editor pane and replace the existing main() method (3 lines) with this code, then Save:
public static void main(Args _args) { HRMCoursetable courseTable; //Define a variable of type HRMCourseTable table, which can hold record set select count(RecId) from courseTable; //X++ based Select statement, which can read data directly from database and hold the data in the variable courseTable. This particular query can fetch the total count of records in the HRMCourseTable table. Info(strFmt("@MBLabelFile:MB005", int2Str(courseTable.RecId))); //Info() is a standard function that can display messages in the finance and operations apps page. The input of this function should be a string. strFmt() is a string function, which is used when constant string value is concatenated with variable values to form a complete string-based statement. By using int2Str() function, we convert the integer value to string, as already mentioned, input parameter of the Info() function is string only. } -
Save all.
Task 4: Create an action menu item
Note: An action menu item is required to call a runnable class from a menu. This action item will call the runnable class we created above.
-
In the Solution Explorer right click on the project PrjMB500Lab-1.
-
Select Add > New Item.
-
Under Dynamics 365 Items, select User Interface and select Action Menu Item.
-
In the Name field type MBTrainingCount and select the Add button.
-
A new folder Action Menu Items will be created in the Solution Explorer under the project PrjMB500Lab-1.
-
In the Action Menu Items folder, a new menu MBTrainingCount will also be created.
-
Open MBTrainingCount menu in the Element designer pane and right click on it to select the Properties option.
-
For Object Type, select Class.
-
For Object, select MBTrainingCount.
-
Locate the Label property and select the three dots (…) next to the Label property.
-
Label search option will open, where you select Match exactly in the Find option and search for Training count.
-
Locate Label ID MB006, highlight it, and select Paste label button at the bottom.
-
The Label property should be updated with @MBLabelFile:MB006.
-
Save all.
Task 5: Create a new menu
Note: In this task, we will create the menus and submenus of the new module. We will also connect the menu items with the submenus in this section
-
In the Solution Explorer right click on the project PrjMB500Lab-1.
-
Select Add > New Item.
-
Under Dynamics 365 Items, select User Interface and select Menu.
-
In the Name field type MBTraining and select the Add button.
-
A new folder Menus will be created in the Solution Explorer under the project PrjMB500Lab-1.
-
In the Menus folder, a new menu MBTraining will also be created.
-
Open the MBTraining menu in the Element designer pane and right click on it to select the Properties option.
-
Locate the Label property and select the three dots (…) next to the Label property.
-
Label search option will open, where you select Match exactly in the Find option and search for Training management.
-
Select Label ID MB001 and select Paste label button at the bottom.
-
The Label property should be updated with @MBLabelFile:MB001.
-
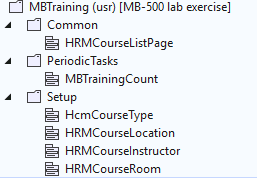
Right-click the MBTraining menu in the Element designer and select the New > Submenu option to create the following Submenus. Each Submenu will have one or more menu items as children. You can drag the menu items from Application explorer and drop them on the respective submenus.
-
Submenu Name: Common
Label: Common (@SYS26806)
Add Display menu item:
- HRMCourseListPage
-
Submenu Name: PeriodicTasks
Label: Periodic tasks (@SYS76406)
Add Action menu item:
- MBTrainingCount
-
Submenu Name: Setup
Label: Setup (@SYS12687)
Add Display menu items:
-
HCMCourseType
-
HRMCourseLocation
-
HRMCourseInstructor
-
HRMCourseRoom
-
-
Note: The MBTraining menu should consist of a Common submenu with one form, a PeriodicTasks submenu with one form, and a Setup submenu with four forms.
- Save all.
Task 6: Extend an existing menu
Note: This section helps to connect the new module with the existing list of modules available in the finance and operations apps.
-
In the Application Explorer’s User Interface, select the menu MainMenu.
-
Right-click on MainMenu and select Create extension.
-
A new folder Menu Extensions will be created in the Solution Explorer under the project PrjMB500Lab-1.
-
A new element MainMenu.MB500Model will be created in the Menu Extensions folder.
-
Open MainMenu.MB500Model in the Element designer pane and right click on it to create a Menu reference under New.
-
Select the newly created Menu reference and navigate to the Properties option by right clicking on it.
-
Select MBTraining in both Name and Menu Name property of the newly created Menu item reference.
-
Save all.
Task 7: Test
-
In the Solution Explorer right click on the project PrjMB500Lab-1.
-
Select Build.
-
Once the build is successful, navigate to the finance and operations apps page on your browser and refresh the page.
-
Select legal entity USMF.
-
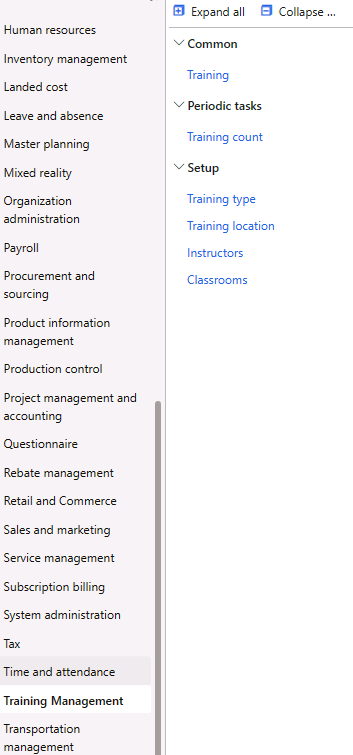
After refreshing, you should be able to see a new module named “Training management” in the left pane.
-
The module should have three sub menus: Common, Periodic tasks and Setup.
-
Select Training count under the Periodic tasks submenu. You should get an info message “Total number of trainings: 9”.
Optional exercise 3: Create and set up a new workspace
Task 1: Create a new workspace
Note: We will create a workspace to display focused training data, where we will create three sections: tile, list and link. In this section we will add few links in the workspace that will take you to the respective course related setup page.
-
In the Solution Explorer right click on the project PrjMB500Lab-1.
-
Select Add > New Item.
-
Under Dynamics 365 Items, select User Interface and select Form.
-
In the Name field type MBTrainingWorkspace and select the Add button.
-
A new folder Forms will be created in the Solution Explorer under the project PrjMB500Lab-1.
-
In the Forms folder, a new form MBTrainingWorkspace will also be created.
-
Open the MBTrainingWorkspace form in the Element designer pane.
-
Right-click on Design node and Apply pattern Workspace Tabbed.
-
Navigate to the properties of the Design node and change the caption to Training management (Label ID: MB001).
-
Right-click on the Design node and insert a new Tab.
-
Rename the tab to TrainingWorkspace.
-
Insert two New tab pages on the tab TrainingWorkspace: Summary and Analytics with the same captions in the properties (Label IDs: @SYS15560 and @MBLabelFile:MB007 consecutively).
-
Navigate to the properties of the Analytics tab page and change the Hide if Empty property to No.
Note: In this task, we will not add any content in the Analytics tab page. The No value in the Hide if Empty property will ensure the Analytics tab page will be displayed even if it is empty. -
Insert a new tab under the Summary tab page and rename the tab to PanoramaBody.
-
Navigate to the property pane of the PanoramaBody tab and change the following properties:
-
Extended Style: tab_simpleFastTab
-
Style: FastTabs
-
Allow Edit: No
-
Right-click on the PanoramaBody tab and insert three tab pages as follows:
-
Name: SummaryTileSection
Apply pattern Section Tiles
Caption (property): Summary (Label ID: @SYS15560)
Fast Tab Expanded (property): Yes
Hide If Empty (property): No
-
Name: TabbedListSection
Apply pattern Section Tabbed List
Caption (property): Training (Label ID: @MBLabelFile:MB002)
Extended Style: workspace_tileLayout
Fast Tab Expanded (property): Yes
Hide If Empty (property): No
-
Name: LinkSection
Apply pattern Section Related Links
Caption (property): Link (Label ID: @SYS57785)
Extended Style: workspace_tileLayout
Fast Tab Expanded (property): Yes
-
-
Under the LinkSection tab page, insert a Group named TrainingSetupLinks with the following property:
- Caption: Setup (Label ID: @SYS12687)
-
Under the TrainingSetupLinks group, insert two New Menu Item Buttons
-
Name: CourseType (Menu Item Name (property): HcmCourseType)
-
Name: CourseLocation (Menu Item Name (property): HRMCourseLocation)
-
-
Task 2: Create a new Resource
Note: In this section, we will create a resource containing an image that will be designed for the workspace.
-
In the Solution Explorer right click on the project PrjMB500Lab-1.
-
Select Add > New Item.
-
Under Dynamics 365 Items, select Labels And Resources and select Resource.
-
In the Name field type MBTraining and select the Add button.
-
A pop up will appear asking to Select a Resource file. Select Training.png from your lab resources, or download it from https://aka.ms/mb500labresources
-
A new folder Resources will be created in the Solution Explorer under the project PrjMB500Lab-1.
-
In the Resources folder, a new resource MBTraining will also be created.
Task 3: Create a new Display menu item
-
In the Solution Explorer right click on the project PrjMB500Lab-1.
-
Select Add > New Item.
-
Under Dynamics 365 Items, select User Interface and select Display Menu Item.
-
In the Name field type MBTrainingManagement and select the Add button.
-
A new folder Display Menu Items will be created in the Solution Explorer under the project PrjMB500Lab-1.
-
In the Display Menu Items folder, a new display menu item MBTrainingManagement will also be created.
-
Open MBTrainingManagement display menu item in the Element designer pane and navigate to the properties pane and update the following:
-
Label: Training management (Label ID: MBLabelFile:MB001)
-
Object: MBTrainingWorkspace
-
Subscriber access level: Unset
-
Task 4: Create a new Tile
-
In the Solution Explorer right click on the project PrjMB500Lab-1.
-
Select Add > New Item.
-
Under Dynamics 365 Items, select User Interface and select Tile.
-
In the Name field type MBTrainingWorkspace and select the Add button.
-
A new folder Tiles will be created in the Solution Explorer under the project PrjMB5.00Lab.
-
In the Tiles folder, a new tile MBTrainingWorkspace will also be created.
-
Open the MBTrainingWorkspace tile in the Element designer pane and navigate to the properties pane and update the following:
-
Size: Wide
-
Image location: AOTResource
-
Menu Item Name: MBTrainingManagement
-
Normal Image: MBTraining
-
Tile display: BackgroundImage
-
Task 5: Modify the existing training menu
Note: In the existing menu created for the Training management module, we will create a new submenu to display the workspace. The menu items and tiles created in the earlier sections, are required for that only.
-
In the Solution Explorer, select MBTraining under the Menus folder. Edit it in the Designer pane by double-clicking it.
-
Right-click on MBTraining and create a new Submenu Workspace by selecting New > Submenu with the same label Workspace (Label ID: @SYS121871).
-
Position Workspace as the first submenu before Common (Hint: Use Alt-arrow to move elements).
-
Right-click on the Workspace submenu and insert a new Menu Element Tile named MBTrainingWorkspace.
-
Select MBTrainingWorkspace in the Tile property of the Menu Element Tile.
Task 6: Extend an existing menu
Note: In this section, we will extend the standard menu named navpanemenu. This is required to include the newly created workspace in the landing page of finance and operations apps.
-
In the Application Explorer, select the (User Interface > ) menu navpanemenu.
-
Right-click on navpanemenu and select Create extension.
-
A new element navpanemenu.MB500Model will be created in the Menu Extensions folder.
-
Open navpanemenu.MB500Model in the Element designer pane and right click on it to create a Menu Element Tile under New.
-
Select the newly created Menu Element Tile and navigate to the Properties option by right clicking on it.
-
Select MBTrainingWorkspace in both Name and Tile property of the newly created Menu Element Tile.
Task 7: Test
-
In the Solution Explorer right click on the project PrjMB500Lab-1.
-
Select Build.
-
Once the build is successful, navigate to the finance and operations apps page on your browser and refresh the page.
-
Select legal entity USMF.
-
After refreshing, you should be able to see the new workspace Training management in the landing page with the image you selected.
-
You should also be able to access the Training management workspace from Module > Training management > Workspace.
-
Within the new workspace, there will be two tab pages: Summary and Analytics.
-
The Analytics tab page is empty.
-
In the Summary tab page, there should be three sections: Summary, Training and Link.
-
In the Link section, under the SETUP group, there should be links to two forms: Training type and Training location.
Optional exercise 4: Add a tile in the Summary Tile Section
Note: This is an optional exercise. In this exercise you will add a tile to the summary tile section. The tile will contain the count of open courses. On selecting the tile, you will navigate to the course page that will display only the open courses.
Task 1: Create a new Query
-
In the Solution Explorer right click on the project PrjMB500Lab-1.
-
Select Add > New Item.
-
Under Dynamics 365 Items, select Data Model and select Query.
-
In the Name field type MBTraining_Open and select the Add button.
-
A new folder Simple Queries will be created in the Solution Explorer under the project PrjMB500Lab-1.
-
In the Simple Queries folder, a new query MBTraining_Open will also be created.
-
Open MBTraining_Open query in the Element designer pane.
-
From the Application explorer, select the table HRMCourseTable in the Data Model and drag on the Data Sources node of the MBTraining_Open query.
-
Change the Dynamic Fields property of the HRMCourseTable data source to Yes.
-
Add the field status under the Ranges node of the HRMCourseTable data source.
-
Change the Value property of the status field included in the Ranges node to Open.
Task 2: Create a new Display Menu Item
-
In the Solution Explorer right click on the project PrjMB500Lab-1.
-
Select Add > New Item.
-
Under Dynamics 365 Items, select User Interface and select Display Menu Item.
-
In the Name field type MBTraining_Open and select the Add button.
-
In the Display Menu Items folder, a new display menu item MBTraining_Open will also be created.
-
Open the MBTraining_Open display menu item in the Element designer pane and navigate to the properties pane and update the following:
-
Label: Open trainings (Label ID: MBLabelFile:MB008)
-
Form View Option: Grid
-
Object: HRMCourseTable
-
Query: MBTraining_Open
-
Subscriber access level: Unset
-
Task 3: Create a new Tile
-
In the Solution Explorer right click on the project PrjMB500Lab-1.
-
Select Add > New Item.
-
Under Dynamics 365 Items, select User Interface and select Tile.
-
In the Name field type MBOpenTrainingTile and select the Add button.
-
In the Tiles folder, a new tile MBOpenTrainingTile will also be created.
-
Open MBOpenTrainingTile tile in the Element designer pane and navigate to the properties pane and update following:
-
Label: Open trainings (Label ID: @MBLabelFile: MB008)
-
Menu Item Name: MBTraining_Open
-
Type: Count [This will show the number of open trainings on the tile itself]
-
Task 4: Modify the form MBTrainingWorkspace
-
In the Solution Explorer, select MBTrainingWorkspace under the Forms folder.
-
Navigate to Design > TrainingWorkspace (tab) > Summary (tab page) > PanoramaBody (tab) > SummaryTileSection (tab page).
-
Insert a new Tile Button under the SummaryTileSection tab page with the following properties:
-
Name: OpenTrainingTile
-
Tile: MBOpenTrainingTile
-
Task 5: Test
-
In the Solution Explorer right click on the project PrjMB500Lab-1.
-
Select Build.
-
When the build is successful, navigate to the finance and operations apps page on your browser and refresh the page.
-
Select the legal entity USMF.
-
Open the Training management workspace.
-
You will find a tile under the Summary section of the Summary tab page. (The count may not be visible yet but it will be after the next step.)
-
The tile will take you to the Course page displaying only the Open courses.
Optional exercise 5: Add a list in the Tabbed List Section
Note: This is an optional lab. In this lab, you will display the list of courses in the tabbed list section of the workspace.
Task 1: Create a new Form
-
In the Solution Explorer right click on the project PrjMB500Lab-1.
-
Select Add > New Item.
-
Under Dynamics 365 Items, select User Interface and select Form.
-
In the Name field type MBTrainingFormPart and select the Add button.
-
In the Forms folder, a new form MBTrainingFormPart will also be created.
-
Open MBTrainingFormPart form in the Element designer pane.
-
From the Application explorer, select the table HRMCourseTable in the Data Model and drag it onto the Data Sources node of the MBTrainingFormPart form.
-
Change the Insert If Empty property of the HRMCourseTable data source to No.
Note: The Yes value in the Insert If Empty property of data source makes sure, if the table does not have any records, the system will create a blank record when the page is opened. The workspace is for display only. We do not need to create a record in the workspace, so the value of this property is set to No. This will ensure, if the table does not have any data, the system will not create a blank record to be displayed on the page. -
Select the Design node of the MBTrainingFormPart form and Apply pattern Form Part Section List.
-
Under the Design node, insert a Grid with a name of Grid.
-
Select the following fields from the HRMCourseTable Data Source and drag them over the newly created Grid:
-
hrmCourseId
-
CourseType
-
description
-
StartDateTime
-
EndDateTime
-
Task 2: Create a new Display Menu Item
-
In the Solution Explorer right click on the project PrjMB500Lab-1.
-
Select Add > New Item.
-
Under Dynamics 365 Items, select User Interface and select Display Menu Item.
-
In the Name field type MBTrainingFormPart and select the Add button.
-
In the Display Menu Items folder, a new display menu item MBTrainingFormPart will also be created.
-
Open MBTrainingFormPart display menu item in the Element designer pane and navigate to the properties pane and update the following:
- Object: MBTrainingFormPart
Task 3: Modify the form MBTrainingWorkspace
-
In the Solution Explorer, select MBTrainingWorkspace under the Forms folder.
-
Navigate to Design > TrainingWorkspace (tab) > Summary (tab page) > PanoramaBody (tab) > TabbedListSection (tab page).
-
Under tab page TabbedListSection, insert a new tab named TabbedList.
-
Under the tab TabbedList, insert a new tab page named Training with the caption Training (Label ID: \@MBLabelFile:MB002).
-
Under the tab page Training, insert a new Form Part with the following properties:
-
Name: TrainingFormPart
-
MenuItemName: MBTrainingFormPart
-
Run Mode: Local
-
Task 4: Test
-
In the Solution Explorer right click on the project PrjMB500Lab-1.
-
Select Build.
-
When the build completes, navigate to the finance and operations apps page on your browser and refresh the page.
-
Select legal entity USMF.
-
Open the Training management workspace.
-
You will find the Training tab page under the Training section of the Summary tab page, which displays all the Courses.