MB-500: Microsoft Dynamics 365: Finance and Operations Apps Developer
Lab 5: Import data using Data Management
Change Record
| Version | Date | Change |
|---|---|---|
| 1.0 | 23 Aug 2024 | Initial release |
| 1.1 | 10 Dec 2024 | Workaround for expired certificate |
| 1.2 | 15 Jan 2025 | Added business scenario |
| 1.3 | 19 Feb 2025 | Added The Why |
| 1.4 | 21 Aug 2025 | App version has been updated to 10.0.41 |
| 1.5 | 14 Oct 2025 | Instruction cleanup |
| 1.6 | 09 Feb 2026 | Clarifying instruction cleanup |
The Why
Effective data management is the backbone of any successful business operation, ensuring that data is accurate, accessible, and actionable. This hands-on lab will teach you how to manage data within Microsoft Dynamics 365 Finance and Operations, a critical skill for maintaining data integrity and supporting business intelligence efforts. By mastering these techniques, you’ll be able to streamline data processes, enhance data quality, and provide valuable insights that drive informed decision-making. This practical knowledge will empower you to handle complex data management tasks with confidence, ultimately contributing to the efficiency and success of your organization.
Business scenario
Business Scenario: Imagine you’re a Dynamics 365 finance and operations apps administrator for a manufacturing company. You’re facing challenges in managing your ever-growing data volume, including limited storage capacity, data inconsistency, and compliance risks.
How can the Hands-on Exercise Help? The hands-on exercise you linked provides a step-by-step guide on how to use the data management tools to address these challenges. By following the exercise, you’ll learn how to effectively manage your data, optimizing storage usage, improving data quality, and mitigating compliance risks. This will ensure the continued smooth operation of your system and provide a reliable foundation for data-driven decision-making within your manufacturing company.
Objective
This lab consists of several exercises.
Requirements are a working development virtual machine (VM) with access to the finance and operations apps and Microsoft Office Excel.
In the first exercise, you’ll prepare to use Data Management by:
-
Refreshing the entity list.
-
Validating the working directory and access for service accounts.
-
Setting the Ignore error to yes to enable data to import with errors to a staging table.
-
Setting the Create error file to yes.
-
Setting Remove duplicates to yes to allow duplicates to import to a staging table, but not to have them updated in the table.
In the second exercise, you’ll prepare templates for the Data Management framework, and then in the third exercise, you’ll import an Excel sheet with data, which requires an Excel sheet with correct column names.
Exercise 1: Prepare Data Management parameters
Note: If you get a “Your connection isn’t private” error on browser opening, then select the Advanced link, select to Continue, then wait 2-3 minutes.
To prepare for configuration of Data Management parameters:
-
In the user interface, select the Data management workspace, and then select the Framework parameters.
-
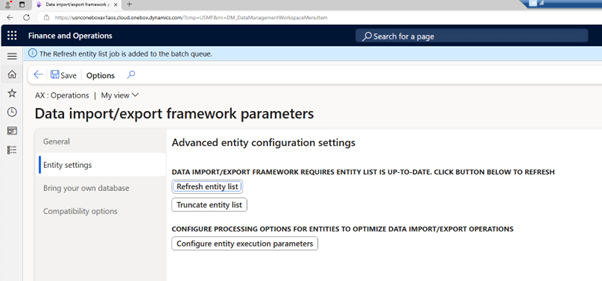
Select the Entity settings tab, and then select Refresh entity list to refresh data entities in the system. Notice that data entities are now updated in the background as an asynchronous job. Get this started, as it takes several minutes.
-
In the Framework parameters, navigate to the General tab, and then in the Shared working directory group, enter c:\temp\dixf for the path.
-
Select Validate to confirm that the service account has access to the folder, and then configure the following parameters on the General tab, then Save:
-
Ignore error: Yes
-
Create error file (if available): Yes
-
Remove duplicates: Yes
-
Exercise 2: Prepare templates for Data Management
To prepare your templates to use Data Management:
-
In the Navigation pane, select Workspaces, select Data management, and then select the Templates tile.
-
Select the Load default templates action pane item.
-
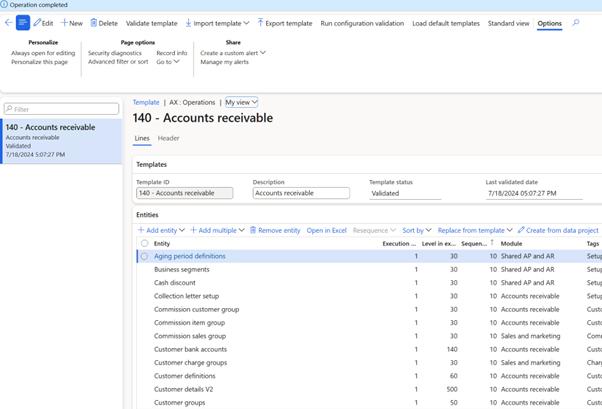
Find and select 140 – Accounts receivable, select Load selected, and then wait for the 140 – Accounts receivable template to load. When it completes you will see entities in the Entities list. (If you don’t, then the entity list has probably not refreshed yet.)
-
In the Entities list, Select all, and then navigate to Customer groups, and clear the Customer groups entity selection.
-
Navigate to Sales order pools, clear the Sales order pools entity selection, and then select Remove entity at the entity list action bar. This will remove all entities except for Customer groups and Sales order pools.
-
Select Yes for the Are you sure you want to delete all marked records option, and then verify that only Customer groups and Sales order pools entities remain:

Exercise 3: Create an import project
To create an import project:
-
In the Navigation pane, select Workspaces, and then select Data Management.
-
Select the Export tile to create an Excel sheet that provides the correct naming for columns.
-
Enter Group and pool in the Group name field, and then enter Customer group and order pools in the Description field.
-
In Selected entities, select Add template, and then in the Copy from template field, select the 140 – Account receivable template which you created in Exercise 2.
-
In the Target data format field, select EXCEL, and then select OK.
-
In the upper action pane, select Export now (rather than Export) and wait to see the Execution summary. (Make sure you select Export now to run it in interactive mode.)

-
Under Entity processing status, select Download file for Sales order pools.
-
For Entity procession status, select Download file for Customer groups.
-
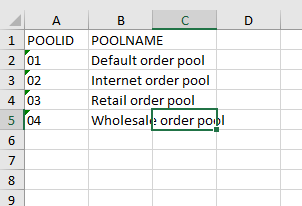
Open File Explorer on your VM, and then open the Excel file for Sales order pools. You can Close the Microsoft Office Activation Wizard if it appears and Enable Editing.
-
Right-click column A to open the context menu, select Format Cells, and select OK.
-
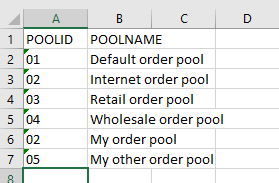
For row 6, enter ‘02 for the POOLID column.
-
For row 6, enter My order pool in the POOLNAME column.
-
For row 7, enter ‘05 in the POOLID column.
-
For row 7, enter My other order pool in the POOLNAME column
-
Close Excel and select Save when prompted.
-
Go back to Microsoft Edge and the finance and operations apps, and in the Navigation pane, select Workspaces and Data management.
-
Select the Import tile, and then enter Import Group and Pool in the Group name field.
-
Enter Import Customer group and order pools in the Description field.
-
In Selected entities, select Add file, and then in Source data format, select EXCEL.
-
In Entity name, select Sales order pools, and then select Upload and add.
-
Navigate to the Downloads folder, and then select the Excel file for Sales order pools.
-
When the screen refreshes, select Customer groups in Entity name, and then select Upload and add.
-
Navigate to the Downloads folder, and then select the Excel file for Customer groups.
-
Select Close, and then select Import now from the action pane, and wait for the import to finish.

-
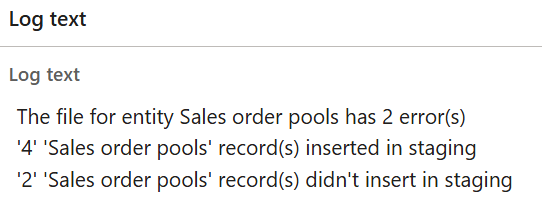
Select View execution log in the action pane, and then verify in the log text that two records didn’t add. This is because of a duplicate.
-
Open File Explorer on your VM, navigate to the Downloads folder, and then open the Excel file for Sales order pools.
-
On row 6, enter ‘06 for the POOLID.
-
Close Excel, and then select Save when prompted.
-
Go back to Microsoft Edge and the finance and operations apps, and in the navigation pane, select Workspaces, and then select Data management.
-
Select the Import Group and Pool Data project, select Remove Entity for removing Sales order pools data entity from the list, and then select Add file.
-
The source data format is EXCEL.
-
In Entity name, select Sales order pools, and then select Upload and add.
-
Navigate to the Downloads folder, and then select the Excel file for Sales order pools.
-
Select Close, and the updated Excel file will be ready to import.
-
Select Import now, and then wait for the import to finish.
-
The Execution Status should change to Succeeded.
-
Select View execution log, and then verify that there are no errors.