MB-500: Microsoft Dynamics 365: Finance and Operations Apps Developer
Lab 2: Create a data entity with a computed column
Change Record
| Version | Date | Change |
|---|---|---|
| 1.0 | 23 Aug 2024 | Initial release |
| 1.1 | 10 Dec 2024 | Workaround for expired certificate |
| 1.2 | 15 Jan 2025 | Added business scenario |
| 1.3 | 19 Feb 2025 | Added The Why |
| 1.4 | 21 Aug 2025 | App version has been updated to 10.0.41 |
| 1.5 | 14 Oct 2025 | Instruction cleanup |
| 1.6 | 09 Feb 2026 | Clarifying instruction cleanup |
The Why
Creating data entities with computed columns is a crucial skill for any developer working with Microsoft Dynamics 365 Finance and Operations. This hands-on lab will teach you how to enhance data models by adding computed columns, enabling more efficient data processing and reporting. By mastering this technique, you’ll be able to streamline data operations, improve system performance, and provide more insightful analytics. This practical knowledge will empower you to develop robust solutions that meet the complex data needs of modern businesses, ultimately contributing to more effective and efficient operations.
Business scenario
Business Scenario: Imagine you’re a developer working on Microsoft Dynamics 365 finance and operations apps. You’re tasked with creating a data entity to store customer information, including a calculated field for the customer’s balance. This data entity will be used to provide customer data to other applications or reports.
How can the Hands-on Exercise Help? The hands-on exercise provides a step-by-step guide on how to create a data entity with a computed column. By following the exercise, you’ll learn how to create a custom data entity that meets your specific business needs and provides valuable customer data to other applications or reports.
Objective
This lab consists of several exercises.
Requirements include:
-
A working development virtual machine (VM) with access to the finance and operations apps and Microsoft Visual Studio.
-
A module and an existing solution for development.
In the first exercise, you’ll create a data entity for a customer with the following fields:
-
Customer account
-
Customer group
-
Name
-
Credit limit
-
Balance (calculated field)
In the second exercise, you’ll test the data entity in SQL Server Management Studio and as OData in an internet browser.
Exercise 1: Create a data entity
Note: If you get a “Your connection isn’t private” error on browser opening, then select the Advanced link, select to Continue, then wait 2-3 minutes.
To create a data entity:
-
Open Visual Studio on your VM, and then create the solution you want to work with:
-
On Visual Studio 2022, select Continue without code
- Select Extensions > Dynamics 365 > Model Management > Create
Model
If ‘Feedback on Finance and Operations(Dynamics 365)’ screen pops up, click on ‘Not Now’.
-
On Create model:
-
For Add parameters, enter these values and then select Next:
-
Model name: MB-500Lab2
-
Model publisher: Microsoft
-
-
For Select package, Create new package
-
For Select referenced packages, ensure the following are selected:
-
ApplicationFoundation
-
ApplicationPlatform
-
ApplicationSuite
-
ContactPerson
-
Directory
-
-
Select Next until Configure your new project
-
-
On Configure your new project, enter these values, then select Create:
-
Project name: DataEntityComputedColumn
-
Solution name: MB500Lab2Sln
If your environment is in Dark mode, we suggest you change it to improve readability. Navigate to Tools > Options > Environment > General, and select your preferred Color Theme.
-
-
-
Right-click the DataEntityComputedColumn project to open the context menu and select Add > New Item.
-
Navigate to FinanceOperations > Dynamics 365 Items > Data Model.
-
Select Data Entity, and then enter MyDataEntityComputedColumn in Name and select Add.
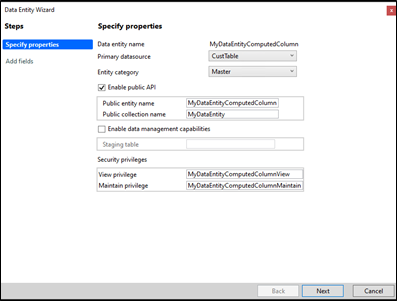
The Data Entity Wizard opens.
-
Select CustTable in Primary datasource, and then select Master in Entity category.
-
Select the checkbox next to Enable public API, and then enter MyDataEntityComputedColumn in Public entity name.
-
Enter MyDataEntity in Public collection name, and then clear the Enable data management capabilities checkbox, as you don’t want to create a staging table.
-
Keep Security privileges as defaulted, and then select Next.
Please wait while the Add Fields page loads.This process may take a short while.
-
The Add fields page appears in the Data Entity Wizard, and you should clear the Select all checkbox
-
Find and select the AccountNum field, the CreditMax field, the CustGroup field, and select Add virtual field.
-
Find the empty virtual field, usually at the bottom, and then enter Name in Data entity field name.
-
Keep String in Data type, and then enter:
-
CustName in EDT type name
-
Name in Label Id
-
Customer name in Help Text Id
-
Select Add virtual field, and then find the empty virtual field at the bottom of the field list.
-
Enter Balance in Data entity field name, and then Real in Data type and leave the EDT type name blank.
-
Enter Balance in Label Id, and then enter Customer balance in Help Text Id.
-
Select Next, and the data entity MyDataEntityComputedColumn is added to the DataEntityComputedColumn project.
-
In Solution Explorer (typically on the right), double click the MyDataEntityComputedColumn data entity in your project to open it in the designer, right-click the Methods node to open the context menu, select New Method, and then add this code under existing methods in the public class, which retrieves a customer’s name, in the public class:
private static server str custName()
    {
        SysDictTable dictTableDirPartyTable = new SysDictTable(tableNum(DirPartyTable));

        return strFmt(@'SELECT %2 FROM %1
                          WHERE %1.%3 = %5
                          AND %1.%4 = %6',
            dictTableDirPartyTable.name(DbBackend::Sql),
            dictTableDirPartyTable.fieldName(fieldNum(DirPartyTable, Name), DbBackend::Sql),
            dictTableDirPartyTable.fieldName(fieldNum(DirPartyTable, RecId), DbBackend::Sql),
            dictTableDirPartyTable.fieldName(fieldNum(DirPartyTable, Partition), DbBackend::Sql),
            SysComputedColumn::returnField(tablestr(MyDataEntityComputedColumn),
                                           dataEntityDataSourceStr(MyDataEntityComputedColumn, CustTable),
                                           fieldstr(CustTable, Party)),
            SysComputedColumn::returnField(tablestr(MyDataEntityComputedColumn),
                                           dataEntityDataSourceStr(MyDataEntityComputedColumn, CustTable),
                                           fieldstr(CustTable, Partition)));
    }
The method custName() dynamically builds a SQL SELECT statement to retrieve the Name field from the DirPartyTable based on specific filtering conditions. This method generates a SQL query string that retrieves the Name field from the DirPartyTable based on matching RecId and Partition values from the CustTable data source in your data entity.
- Now paste in this code, which calculates a customer’s balance, after that method and still within the public class:
private static server str balanceMST()
    {
        SysDictTable dictTableCustTrans = new SysDictTable(tableNum(CustTrans));

        return strFmt(
            @'SELECT COALESCE(SUM(%11), 0) FROM %1 AS CUSTTRANSSUM
                WHERE CUSTTRANSSUM.%2 = %6
                AND CUSTTRANSSUM.%3 >= %7
                AND CUSTTRANSSUM.%3 <= %8
                AND CUSTTRANSSUM.%4 = %9
                AND CUSTTRANSSUM.%5 = %10',
             dictTableCustTrans.name(DbBackend::Sql),
             dictTableCustTrans.fieldName(fieldNum(CustTrans, AccountNum), DbBackend::Sql),
             dictTableCustTrans.fieldName(fieldNum(CustTrans, TransDate), DbBackend::Sql),
             dictTableCustTrans.fieldName(fieldNum(CustTrans, DataAreaId), DbBackend::Sql),
             dictTableCustTrans.fieldName(fieldNum(CustTrans, Partition), DbBackend::Sql),
             SysComputedColumn::returnField(tablestr(MyDataEntityComputedColumn),
                                            dataEntityDataSourceStr(MyDataEntityComputedColumn, CustTable),
                                            fieldstr(CustTable, AccountNum)),
             SysComputedColumn::returnLiteral(dateNull()),
             SysComputedColumn::returnLiteral(dateMax()),
             SysComputedColumn::returnField(tablestr(MyDataEntityComputedColumn),
                                            dataEntityDataSourceStr(MyDataEntityComputedColumn, CustTable),
                                            fieldstr(CustTable, DataAreaId)),
             SysComputedColumn::returnField(tablestr(MyDataEntityComputedColumn),
                                            dataEntityDataSourceStr(MyDataEntityComputedColumn, CustTable),
                                            fieldstr(CustTable, Partition)),
             dictTableCustTrans.fieldName(fieldNum(CustTrans, AmountMST), DbBackend::Sql));
    }
The balanceMST() method dynamically builds a SQL SELECT statement that calculates the sum of the AmountMST field from the CustTrans table. It filters the results based on several conditions: matching AccountNum, TransDate within a range, and matching DataAreaId and Partition values—all sourced from the CustTable data source in your data entity.
-
Select Save All, and then close the code editor.
-
Navigate to, and expand, the Fields node at the data entity, and then select the Name virtual field, and then configure the following properties:
-
Is Computed Field: Yes
-
DataEntityView Method: custName
-
Extended Data Type: CustName
- Select the Balance virtual field, and then configure the following properties:
-
Is Computed Field: Yes
-
DataEntityView Method: balanceMST
-
Extended Data Type: AmountMST
-
Select Save All, and then go to the DataEntityComputedColumn project in Solution Explorer.
-
Right-click the project to open the context menu and select Build. If the build fails on a “The ‘BuildTask’ task returned false but did not log an error.” then retry the build.
Exercise 2: Test a data entity in SQL Server Management Studio
To test your new data entity in SQL Server Management Studio:
-
Open Microsoft SQL Server Management Studio in your VM and connect to the Database Engine with Windows Authentication.
-
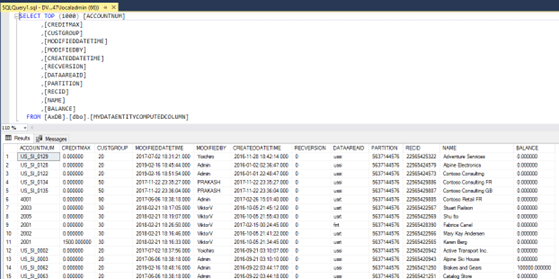
In Object Explorer, navigate to Databases and AxDB, and then expand the AxDB and Views nodes.
-
Navigate to view dbo.MYDATAENTITYCOMPUTEDCOLUMN, and then right-click it to open the context menu, and select the Select Top 1000 Rows item:

-
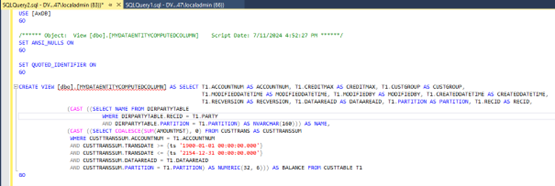
Right-click the dbo.MYDATAENTITYCOMPUTEDCOLUMN view in the Object Explorer to open the context menu, and then select Script View as > CREATE To > New Query Editor Window

-
Review the code for creating a data entity view.
-
Note the computed columns.
-
Open Microsoft Edge in your VM and set your default legal entity: navigate to your Dynamics 365 home page. If you’ve built code since you’ve opened the user interface, you will have lost your connection and need to refresh. Select the gear and User Options, navigate to the Preferences tab, and set the Startup Company to USMF Contoso Entertainment System USA.
-
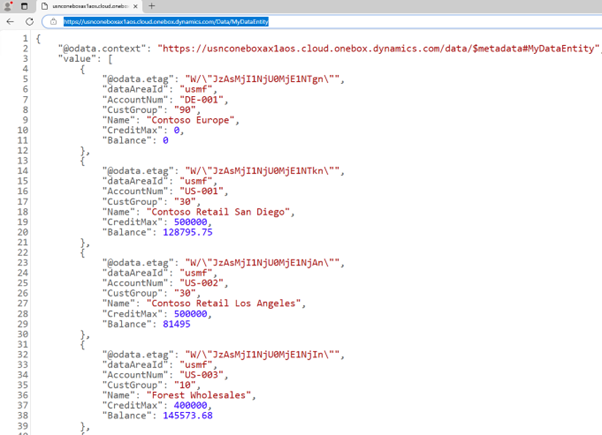
Enter the following URL in the browser address field: https://usnconeboxax1aos.cloud.onebox.dynamics.com/Data/MyDataEntity
-
On some older versions, you may need to enter: https://usnconeboxax1aos.cloud.onebox.dynamics.com/Data/MyDataEntityData
The data entity will display in OData format in the browser. Select Pretty-print if desired.

You have now created a data entity which can be used to integrate with external systems, and you have made it more useful by adding computed columns.