Exercise 03: Access storage for an Azure Linux virtual machine
Lab requirements
This lab requires an Azure subscription. Your subscription type may affect the availability of features in this lab. You may change the region, but the steps were tested using the (US) East region.
Estimated timing: 45 minutes
Lab scenario
You have been asked to explore how virtual machines can use Azure storage. You want to explore using Azure file shares and Blobs. You want to add and mount a data disk on the virtual machine. Lastly, you want to explore how to transfer data from Azure to the virtual machine with azcopy.
Job skills
- Skill 1: Create a virtual machine and add a data disk (CLI).
- Skill 2: Access an Azure file share from the virtual machine.
- Skill 2: Copy a file from Azure blob storage to the virtual machine data disk.
Azure Virtual Machines Architecture Diagram
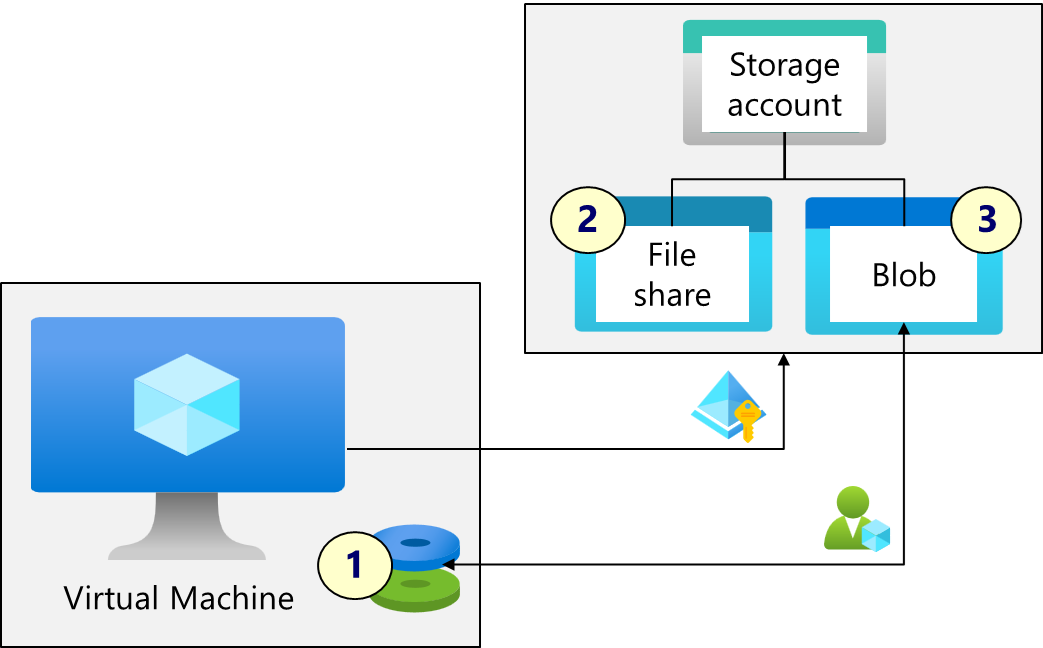
Skill 1: Create a virtual machine and add a data disk.
In this task, you will create and configure a virtual machine using the Cloud Shell and the Azure CLI. You will then use the add a data disk and partition and mount the data disk.
Configure the Cloud Shell
-
Sign in to the Azure portal -
https://portal.azure.com. -
Cancel the Welcome to Microsoft Azure splash screen.
-
Select the Cloud Shell icon in the top right of the Azure Portal.

The Cloud Shell is an interactive, authenticated, browser-accessible terminal for managing Azure resources. It provides the flexibility of choosing the shell experience that best suits the way you work, either Bash or PowerShell.
-
When prompted to select either Bash or PowerShell, select Bash.
Did you know? If you mostly work with Linux systems, Bash (CLI) feels more familiar. If you mostly work with Windows systems, Azure PowerShell feels more familiar.
-
Select No storage account required and select your Subscription.
-
Click Apply and wait while a terminal is created.
-
This lab will use the Azure CLI so check out the documentation for virtual machines.
az vm --help
Create a virtual machine and add a data disk using the CLI
-
If you have multiple subscriptions, run the following command to ensure you are using the correct subscription. Replace
<id>with your subscription ID.az account set --subscription <id> -
Use the CLI to create a new virtual machine named vm3 in the (US) East region. Notice SSH key file are stored in the /home directory.
az vm create --name vm3 --resource-group rg1 --image Ubuntu2204 --size Standard_D2s_v3 --admin-username adminuser --generate-ssh-keys --location eastusThis is a very simple implemention of the az vm create command.
-
After the machine deploys, ensure the powerState is VM running. Make a note of the publicIpAddress. In a later step, you will need the public IP address and SSH key file to connect to the virtual machine.
-
Use az vm disk to add a 4 GB data disk to the virtual machine.
az vm disk attach --resource-group rg1 --vm-name vm3 --name Disk1 --new --size-gb 4 -
Verify the data disk was created. This command will also show the operating system disk information.
az disk list --resource-group rg1 --output tableYour next steps will need to be performed on the virtual machine.
Connect to the virtual machine and configure the data disk
-
To format and mount the data disk you will need to connect to the virtual machine. Substitute your public IP address. When prompted, confirm you want to connect. When successfully connected, the prompt will change to adminuser@vm3.
ssh -i ~/.ssh/id_rsa.pem adminuser@public_ip_addressThe following steps are based on the format and mount the disk documentation.
-
Retrieve information about the virtual machine storage. Make a note of the name of your new 4 GB disk. For example, sdc.
lsblk -o NAME,SIZE,MOUNTPOINT -
Use parted to partition the disk. If necessary, change sdc to your disk name.
sudo parted /dev/sdc --script mklabel gpt mkpart xfspart xfs 0% 100%; -
Use partprobe to inform the operating system of partition table changes. If necessary, change sdc to your disk name.
sudo partprobe /dev/sdc -
Use mkfs to build the Linux file system. If necessary, change sdc to your disk name. Use the
-fflag to force format.sudo mkfs.xfs -f /dev/sdc1 -
Make a directory
sudo mkdir /datadrive -
Mount the data disk to the directory.
sudo mount /dev/sdc1 /datadrive -
Verify the disk now has a mount point.
df -
Verify there are no files on the data disk.
ls /datadrive -
Minimize the Cloud Shell, but don’t close the connection. In the next task, you will continue working in the virtual machine.
Check your learning.
- Can you access and configure the Cloud Shell?
- Can you create a virtual machine using the CLI?
- Can you add a data disk to a virtual machine (portal or CLI)?
- Can you partition and mount a data disk, so it is usable?
Skill 2: Access an Azure file share from the virtual machine
In this task, you will create a storage account and file share. You will then give the virtual machine access to the file share and connect to the file share.
Create and configure a storage account
-
Switch to the portal.
-
Search for and select
Storage accounts.An Azure storage account contains all of your Azure Storage data objects: blobs, files, queues, and tables. The storage account provides a unique namespace for your data that’s accessible from anywhere in the world over HTTP or HTTPS.
-
Select + Create and on the Basics tab specify the following settings.
Setting Value Subscription your Azure subscription Resource group RG1 (create new if necessary) Storage account name any globally unique name between 3 and 24 characters in length consisting of letters and digits Region (US) East Performance Standard (notice the Premium option) Redundancy Geo-redundant storage (notice the other options) Make read access to data in the event of regional availability Check the box Did you notice a Network Watcher resource group? This is because we took the defaults when we created the virtual machine.
-
Select Review + Create and then Create.
-
Wait for the deployment to finish, then select Go to resource.
Create and configure a file share
-
In the Data storage section, click Classic file shares.
Azure Files offers fully managed file shares in the cloud that are accessible via the industry standard Server Message Block (SMB) protocol, Network File System (NFS) protocol, and Azure Files REST API.
-
Select New classic file share and on the Basics tab give the file share a name,
share1. -
On the Backup tab, ensure Enable backup is not checked.
You will configure backups in another lab.
-
Select Review + create, and then Create. Wait for the file share to deploy.
-
Select Upload and Browse for files.
-
Select a file and then click Upload.
If you have downloaded the lab files, there is a
filedoc.txtfile for you to use. -
Select Browse left menu, to ensure your file was uploaded.
-
Select Connect.
The portal provides scripts to help connect from Windows, Linux, and macOS.
-
Switch to the Linux tab and select Show script.
-
Copy to the clipboard (icon bottom right in the script).
Give the virtual machine authentication to the storage account
-
Your virtual machine must be able to authenticate to the storage account.
-
In the portal, locate your virtual machine (vm3).
-
In the Security settings, select Identity.
-
On the System assigned tab, toggle the Status to On.
A system-assigned managed identity is an identity created and managed by Azure for a specific service instance. The managed identity allows the resource to access other Azure resources without storing credentials.
-
Save your changes and select Yes to Enable system assigned managed identity.
Run the connect script on the virtual machine and test the file share.
-
Switch to the Cloud Shell and your virtual machine connection.
-
Create a connection script using the vi editor. If you prefer you may use another editor.
vi script.sh -
Right click and Paste as plain text. Your connection script should display. Review the script.
-
Type :wq to write and quit. Enter to exit the editor.
-
Run the script.
sh script.sh -
Verify you are able to access the file share. The file you uploaded should be listed.
ls /media/share1 -
Copy the file share file to the virtual machine data disk.
sudo cp /media/share1/* /datadrive -
Verify the file share was copied to the data disk.
ls /datadrive -
Minimize the Cloud Shell, but don’t close the connection. In the next task, you will continue working on the virtual machine.
Check your learning
- Can you create a storage account in the portal (not part of the credential)?
- Can you create a file share and upload a file in the portal (not part of the credential)?
- Can you use the portal to get a script to connect a virtual machine to the file share?
- Can you assign a managed identity to the virtual machine so it can access a resource, like a storage account?
- Can you run a script to mount the file share from the virtual machine?
Skill 3: Copy a file from Azure blob storage to the virtual machine data disk
In this task, you will create a blob container. You will assign an Azure role to storage account. Lastly, you will use azcopy to transfer files to the virtual machine.
Create a blob storage container with test file
-
Switch to the portal and your storage account.
-
In the Data storage section, click Containers.
Azure blob storage is an object storage solution optimized for storing massive amounts of unstructured data. Blob storage is organized into containers.
-
Click Add container and Create a container with the following settings:
Setting Value Name dataAnonymous access level Leave the value as Private (it may be locked if anonymous access is disabled) -
Select your data container and then click Upload.
-
Browse for files. Select a file then click Upload.
If you have downloaded the lab files, there is a
blobimage.pngfile for you to use. -
Select your uploaded file and copy the URL.
Assign the virtual machine the Storage Blob Data Contributor role to the storage account
-
In the portal, search for and select vm3.
-
In the Security settings, select Identity.
-
Select Azure role assignments.
Azure RBAC helps you manage who has access to Azure resources. There are many Azure roles that can be assigned, or you can create a custom set of permissions.
-
Select Add role assignment (Preview) and provide the managed identity access to the storage account file share. Both read and write capability is required. Save your changes.
Setting Value Scope Storage Subscription your Azure subscription Resource select your storage account Role Storage Blob Data Contributor There are many storage roles , including roles specifically for the storage account and for Blob storage. The Storage Blob Data Contributor role provides read, write, and delete on Azure storage containers and blobs.
Use AzCopy to transfer files
-
Return to the Cloud Shell and ensure you are still connected to vm3.
-
Download AzCopy and extract the file.
AzCopy is a command-line tool that moves data into and out of Azure Storage.
wget https://aka.ms/downloadazcopy-v10-linuxsudo tar xzf downloadazcopy-v10-linux -
Make folder for azcopy and copy the executable to that directory.
sudo mkdir /opt/azcopysudo cp ./azcopy_linux_amd64_*/azcopy /opt/azcopy/ -
Run this command to login azcopy as the virtual machine managed identity. Ensure there is a succeeded response.
sudo /opt/azcopy/azcopy login --identity -
If needed, grant write permissions to the data drive directory before copying files.
sudo chmod 777 /datadrive -
Copy from Azure blob storage to the new virtual machine data drive. Substitute the blob file URL you copied from the portal.
sudo /opt/azcopy/azcopy copy "urlblob" /datadrive -
Verify the file you uploaded to blob storage has been copied to the /datadrive.
ls /datadrive
Check your learning
- Can you use requirements to identify the best Azure storage role to use?
- Can you add a role assignment to a resource, like a virtual machine?
- Can you install the AzCopy utility on a virtual machine?
- Can you login with AzCopy and the managed identity?
- Can you use AzCopy to transfer files between a virtual machine and an Azure storage account?
Learn more with self-paced training
-
Configure storage accounts. Learn about Azure storage accounts. This includes storage account types and replication strategies.
-
Configure Azure files. Learn how to configure Azure file shares.
-
Add and size disks in Azure virtual machines. Understand and create the different types of disk storage available to Azure virtual machines (VMs). This includes adding a data disk and resizing a data disk.
-
Implement access management for Azure resources. Explore how to use built-in Azure roles, managed identities, and RBAC-policy to control access to Azure resources. Identity is the key to secure solutions.
Key takeaways
Congratulations on completing the exercise. Here are the main takeaways:
- An Azure storage account contains non-relational data including blobs and files.
- Azure file shares are accessible with the SMB protocol, NFS protocol, and Azure Files REST API.
- Azure virtual machine data disks are block-level storage volumes.
- Azure blob storage is optimized for storing massive amounts of unstructured data, like images and videos.
- AzCopy is a utility to transfer data from virtual machines to Azure storage accounts.