Exercise 01: Configure an Azure Linux virtual machine
Lab requirements
This lab requires an Azure subscription. Your subscription type may affect the availability of features in this lab. You may change the region, but the steps were tested using the (US) East region.
Estimated timing: 45 minutes
Lab scenario
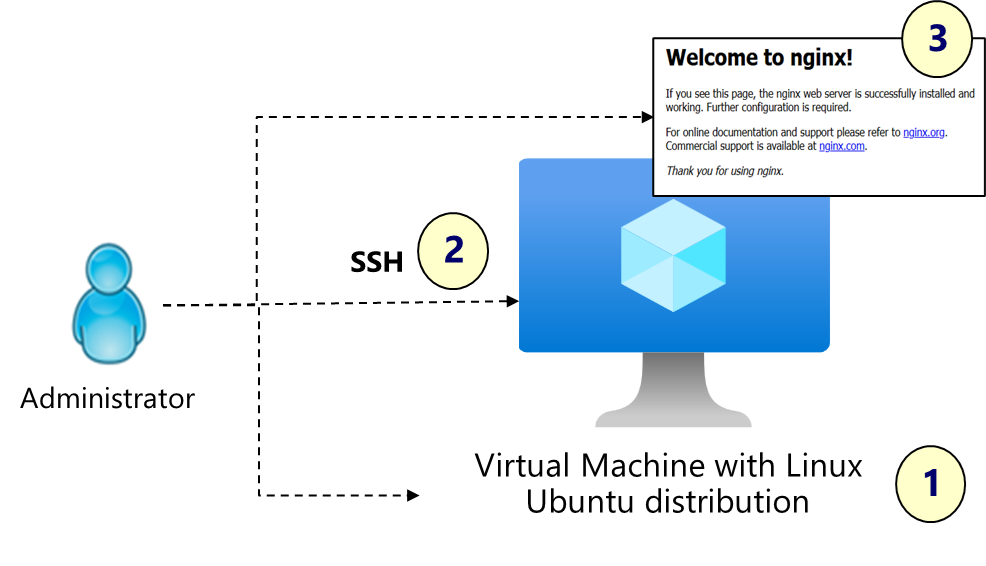
You have been asked to create a web server for a new ecommerce website. You want to explore how to create Linux virtual machines using the Azure portal. You are also interested in using SSH to securely connect to the virtual machine. Lastly, you want to install the latest OS updates and the Nginx web server.
Job skills
- Skill 1: Use the Azure portal to create a virtual machine.
- Skill 2: Connect to the virtual machine and install OS updates.
- Skill 3: Install the Nginx web service and test to ensure it is working.
Azure Virtual Machines Architecture Diagram
Skill 1: Use the Azure portal to create a virtual machine
In this task, you will create and deploy a Linux virtual machine using the portal.
-
Sign in to the Azure portal -
https://portal.azure.com.In this first lab you will use the Azure portal to create the virtual machine. This will give you a good overview of the configuration settings. In a later lab you will use the Azure CLI to create a virtual machine.
-
Cancel the Welcome to Microsoft Azure splash screen.
-
Use the top search box to search for and select
Virtual machines. -
Click + Create, and then select in the drop-down Virtual machine. Notice your other choices.
-
On the Basics tab, continue completing the configuration:
Use the Informational icons to learn about each parameter. If a value isn’t specified, use the default value.
Setting Value Subscription the name of your Azure subscription Resource group RG1 (If necessary, click Create new) Virtual machine names VM1Region (US) East US Availability options No infrastructure redundancy required Security type Standard (review your other choices) Image Ubuntu Server 24.04 LTS - x64 Gen2 (use the drop-down to view other options) Size Standard_D2s_v3 (use See all sizes to view the CPU and memory) Authentication type SSH public key (notice you could use a password) Username adminuserSSH public key source Generate new key pair (notice your choices to use an existing key) SSH Key Type RSA SSH Format Key pair name VM1_keyPublic inbound ports None Did you know virtual machine sizes are categorized into different families and types, each optimized for specific purposes. For example, compute optimized VM sizes have a high CPU-to-memory ratio. Good for medium traffic web servers, network appliances, batch processes, and application servers.
-
Click Next: Disks > , specify the following settings (leave others with their default values):
Setting Value OS disk size Image default (30 GiB) OS disk type Premium SSD (locally redundant storage Delete with VM checked (default) Enable Ultra Disk compatibility Unchecked Notice you can add a data disk to the virtual machine. We will do this in a later exercise.
-
Click Next: Networking > and make a few changes.
Setting Value Delete public IP and NIC when VM is deleted Checked Load balancing options None -
Click Next: Management > and check the following settings (leave others with their default values):
Setting Value Enable auto-shutdown unchecked Patch orchestration options Image default Patch orchestration options allow you to control how patches will be applied to your virtual machine.
-
Click Next: Monitoring > and specify the following settings (leave others with their default values):
Setting Value Boot diagnostics Disable We will review monitoring in another exercise.
-
Click Next: Advanced > and notice the Custom data textbox. This is where you would pass a cloud-init script, configuration file, or other data into the virtual machine while it is being provisioned. Do not make any changes.
-
Click Review + Create.
-
After the validation passes, click Create.
-
When prompted, select Download private key and create resource.
If you receive a message, Can not download private key, just click the download button again.
-
Wait for the deployment to complete, then select Go to resource. This will take a couple of minutes.
-
From the Overview blade, ensure the virtual machine Status is Running.
Check your learning.
- Can you access the Azure portal?
- Can you use the Azure portal to create a Linux virtual machine?
- Can you select the correct the Linux image and virtual machine size?
Skill 2: Connect to the virtual machine and install OS updates
In this task, you will use SSH to connect to the virtual machine. Connecting will require network traffic to port 22 to be allowed. Once connected, you will check for and update the operating system.
-
Continue in the portal on the virtual machine page.
-
On the Overview tab, in the top menu, select Connect and Connect in the drop-down.
-
Select More ways to connect to display the possible connection methods.
-
Review your choices, then select Native SSH.
-
Read the steps on connecting with SSH. Notice that port 22 is not configured to allow access with SSH. This must be corrected before continuing. Close the Native SSH page.
-
In the Networking section, select Network settings. Notice the Network Security Group (NSG) rules.
A Network Security Group (NSG) acts as a virtual firewall for controlling inbound and outbound traffic to Azure resources. By default, inbound access is allowed from other virtual machines in the virtual network and from load balancers. All other inbound traffic is denied.
-
Select Create port rule and then Inbound port rule.
-
In the Service drop-down, select SSH, then Add the rule.
The Nginx web service that you will be installing needs port 80. Repeat the above step to add another inbound port rule for service HTTP.
-
Check your work and ensure you have two new inbound port rules to allow port 22 and port 80.
-
In the Connect menu (left side) select Connect. Confirm port 22 access is now configured (check mark). It may take a minute for the rule to deploy, if necessary, refresh the page.
-
Make a note of the public IP address. You will need this to connect to the virtual machine. Close the Native SSH page.
-
Open a CMD window so you can run the SSH connection string.
We are using a key pair, but you could also provide a user and password.
-
At the prompt, connect to the virtual machine using SSH. Be sure to include the correct path to the key and the virtual machine’s public_ip_address. Example of key location: c:\users\admin\downloads\VM1_key.pem. When prompted, type yes to connect.
ssh -i 'c:\users\admin\downloads\VM1_key.pem' adminuser@public_ip_address -
Ensure the command is successful and the prompt changes to adminuser@VM1.
-
Fetch the list of available OS updates and install updates. When prompted, type yes to continue. Each command must complete successfully.
sudo apt updatesudo apt upgrade -
Stay connected to the virtual machine, leave the CMD window open, and continue to the next task.
Check your learning.
- Can you configure network security group inbound port rules?
- Can you connect to a Linux virtual machine with native SSH?
- Can you install OS updates on a Linux virtual machine?
Skill 3: Install the Nginx web service and test to ensure it is working
In this task, you will install the Nginx web service.
-
Continue working at the CMD prompt. Run these commands one at a time. Ensure each command completes successfully.
-
Install the Nginx service. When prompted indicate Y to continue the install.
sudo apt install nginx -
Start the Nginx service.
sudo systemctl start nginx -
Configure Nginx to launch on boot. This is optional but good practice.
sudo systemctl enable nginx -
Check to ensure the Nginx service is active (running).
service nginx status -
Launch the Nginx welcome page. Be sure to substitute your virtual machine public IP address. You can also open the Nginx default page in a browser,
http://public_ip_address.curl -m 80 public_ip_address
If the home page times out, check to ensure there is an inbound security rule to allow port 80.
Check your learning.
- Can you install software, like Nginx, on a Linux virtual machine?
Learn more with self-paced training
- Introduction to Azure Virtual Machines. Learn about the decisions you make before creating a virtual machine, the options to create and manage the VM, and the extensions and services you use to manage your VM.
- Provisioning a Linux virtual machine in Microsoft Azure. Learn how to deploy a Linux virtual machine with different tools.
Key takeaways
Congratulations on completing the exercise. Here are the main takeaways:
- Azure virtual machines are on-demand, scalable computing resources.
- Configuring Azure virtual machines includes choosing an operating system, size, storage and networking settings. You can create a basic virtual machine by accepting the defaults.
- There are several ways to connect to a Linux virtual machine including SSH and Password.
- To use SSH the virtual machine must have a public IP address and port 22 must be open.
- Network Security Group rules let you allow or deny inbound and outbound port connections. For example, port 22 for SSH and port 80 for Nginx.