Explore Azure Stream Analytics
In this exercise you’ll provision an Azure Stream Analytics job in your Azure subscription, and use it to process a stream of realtime data.
This lab will take approximately 20 minutes to complete.
Before you start
You’ll need an Azure subscription in which you have administrative-level access.
Create Azure resources
-
Sign into your Azure subscription in the Azure portal, using your Azure subscription credentials.
-
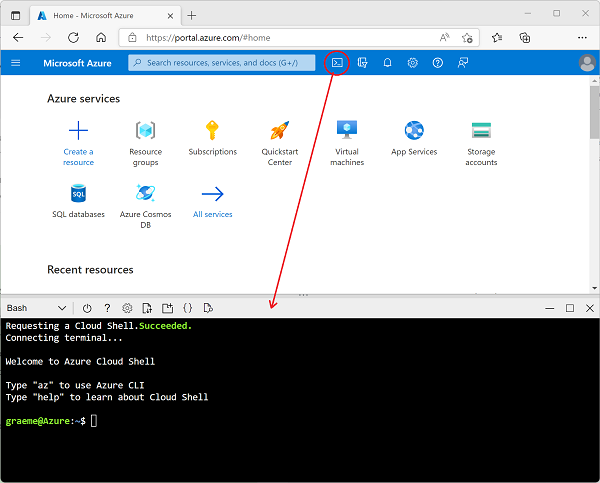
Use the [>_] button to the right of the search bar at the top of the page to create a new Cloud Shell in the Azure portal, selecting a Bash environment and creating storage if prompted. The cloud shell provides a command line interface in a pane at the bottom of the Azure portal, as shown here:
-
In the Azure Cloud Shell, enter the following command to download the files you’ll need for this exercise.
git clone https://github.com/MicrosoftLearning/DP-900T00A-Azure-Data-Fundamentals dp-900 -
Wait for the command to complete, and then enter the following command to change the current directory to the folder containing the files for this exercise.
cd dp-900/streaming -
Enter the following command to run a script that creates the Azure resources you will need in this exercise.
bash setup.shIgnore any warning messages about future changes and experimental features.
Wait as the script runs and performs the following actions:
- Installs the Azure CLI extensions needed to create resources (you can ignore any warnings about experimental extensions)
- Identifies the Azure resource group provided for this exercise.
- Creates an Azure IoT Hub resource, which will be used to receive a stream of data from a simulated device.
- Creates a Azure Storage Account, which will be used to store processed data.
- Creates a Azure Stream Analytics job, which will process the incoming device data in real-time, and write the results to the storage account.
Explore the Azure resources
- In the Azure portal, on the home page, select Resource groups to see the resource groups in your subscription. This should include the learnxxxxxxxxxxxxxxxxx… resource group identified by the setup script.
- Select the learnxxxxxxxxxxxxxxxxx… resource group, and review the resources it contains, which should include:
- An IoT Hub named iothubxxxxxxxxxxxxx, which is used to receive incoming device data.
- A Storage account named storexxxxxxxxxxxx, to which the data processing results will be written.
- A Stream Analytics job named streamxxxxxxxxxxxxx, which will be used to process streaming data.
If all three of these resources are not listed, click the ↻ Refresh button until they appear.
- Select the streamxxxxxxxxxxxxx Stream Analytics job and view the information on its Overview page, noting the following details:
- The job has one input named iotinput, and one output named bloboutput. These reference the IoT Hub and Storage account created by the setup script.
- The job has a query, which reads data from the iotinput input, and aggregates it by counting the number of messages processed every 10 seconds; writing the results to the bloboutput output.
Use the resources to analyze streaming data
- At the top of the Overview page for the Stream Analytics job, select the ▷ Start button, and then in the Start job pane, select Start to start the job.
- Wait for a notification that the streaming job started successfully.
-
Switch back to the Azure Cloud Shell, and enter the following command to simulate a device that sends data to the IoT Hub.
bash iotdevice.sh -
Wait for the simulation to start, which will be indicated by output like this:
Device simulation in progress: 6%|# | 7/120 [00:08<02:21, 1.26s/it] - While the simulation is running, back in the Azure portal, return to the page for the learnxxxxxxxxxxxxxxxxx… resource group, and select the storexxxxxxxxxxxx storage account.
- In the pane on the left of the storage account blade, select the Containers tab.
- Open the data container.
- In the data container, navigate through the folder hierarchy, which includes a folder for the current year, with subfolders for the month, day, and hour.
- In the folder for the hour, note the file that has been created, which should have a name similar to 0_xxxxxxxxxxxxxxxx.json.
-
On the … menu for the file (to the right of the file details), select View/edit, and review the contents of the file; which should consist of a JSON record for each 10 second period, showing the number of messages received from IoT devices, like this:
{"starttime":"2021-10-23T01:02:13.2221657Z","endtime":"2021-10-23T01:02:23.2221657Z","device":"iotdevice","messages":2} {"starttime":"2021-10-23T01:02:14.5366678Z","endtime":"2021-10-23T01:02:24.5366678Z","device":"iotdevice","messages":3} {"starttime":"2021-10-23T01:02:15.7413754Z","endtime":"2021-10-23T01:02:25.7413754Z","device":"iotdevice","messages":4} ... - Use the ↻ Refresh button to refresh the file, noting that additional results are written to the file as Stream Analytics job processes the device data in real time as it is streamed from the device to the IoT Hub.
- Return to the Azure Cloud Shell and wait for the device simulation to finish (it should run for around 3 minutes).
- Back in the Azure portal, refresh the file one more time to see the full set of results that were produced during the simulation.
- Return to the learnxxxxxxxxxxxxxxxxx… resource group, and re-open the streamxxxxxxxxxxxxx Stream Analytics job.
- At the top of the Stream Analytics job page, use the ⬜ Stop button to stop the job, confirming when prompted.
Note: If you’ve finished exploring the streaming solution, delete the resource group that you created in this exercise.