Query files using a serverless SQL pool
SQL is probably the most used language for working with data in the world. Most data analysts are proficient in using SQL queries to retrieve, filter, and aggregate data - most commonly in relational databases. As organizations increasingly take advantage of scalable file storage to create data lakes, SQL is often still the preferred choice for querying the data. Azure Synapse Analytics provides serverless SQL pools that enable you to decouple the SQL query engine from the data storage and run queries against data files in common file formats such as delimited text and Parquet.
This lab will take approximately 40 minutes to complete.
Before you start
You’ll need an Azure subscription in which you have administrative-level access.
Provision an Azure Synapse Analytics workspace
You’ll need an Azure Synapse Analytics workspace with access to data lake storage. You can use the built-in serverless SQL pool to query files in the data lake.
In this exercise, you’ll use a combination of a PowerShell script and an ARM template to provision an Azure Synapse Analytics workspace.
- Sign into the Azure portal at
https://portal.azure.com. -
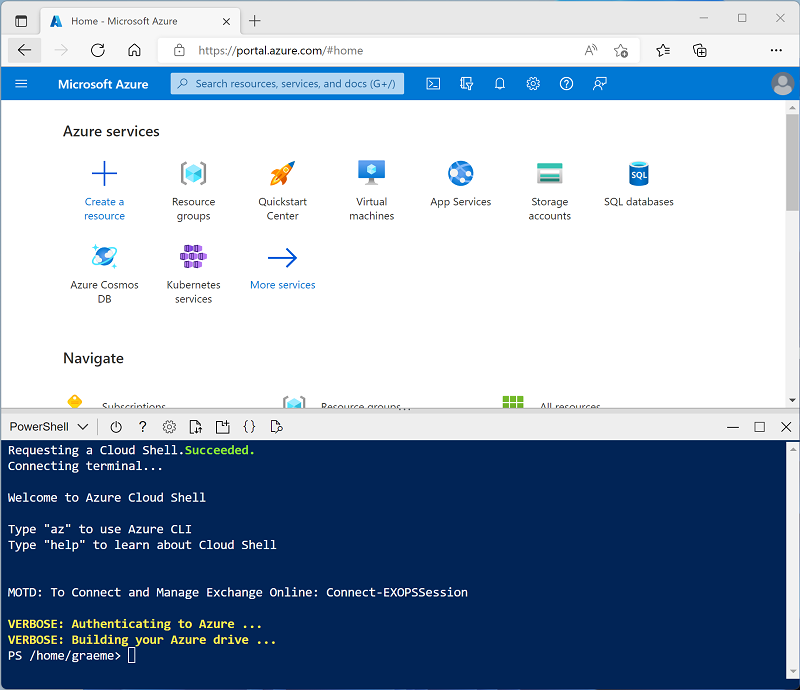
Use the [>_] button to the right of the search bar at the top of the page to create a new Cloud Shell in the Azure portal, selecting a PowerShell environment and creating storage if prompted. The cloud shell provides a command line interface in a pane at the bottom of the Azure portal, as shown here:
Note: If you have previously created a cloud shell that uses a Bash environment, use the the drop-down menu at the top left of the cloud shell pane to change it to PowerShell.
-
Note that you can resize the cloud shell by dragging the separator bar at the top of the pane, or by using the —, ◻, and X icons at the top right of the pane to minimize, maximize, and close the pane. For more information about using the Azure Cloud Shell, see the Azure Cloud Shell documentation.
-
In the PowerShell pane, manually enter the following commands to clone this repo:
rm -r dp500 -f git clone https://github.com/MicrosoftLearning/DP-500-Azure-Data-Analyst dp500 -
After the repo has been cloned, enter the following commands to change to the folder for this lab and run the setup.ps1 script it contains:
cd dp500/Allfiles/01 ./setup.ps1 - If prompted, choose which subscription you want to use (this will only happen if you have access to multiple Azure subscriptions).
-
When prompted, enter a suitable password to be set for your Azure Synapse SQL pool.
Note: Be sure to remember this password!
- Wait for the script to complete - this typically takes around 10 minutes, but in some cases may take longer. While you are waiting, review the Serverless SQL pool in Azure Synapse Analytics article in the Azure Synapse Analytics documentation.
Query data in files
The script provisions an Azure Synapse Analytics workspace and an Azure Storage account to host the data lake, then uploads some data files to the data lake.
View files in the data lake
- After the script has completed, in the Azure portal, go to the dp500-xxxxxxx resource group that it created, and select your Synapse workspace.
- In the Overview page for your Synapse workspace, in the Open Synapse Studio card, select Open to open Synapse Studio in a new browser tab; signing in if prompted.
- On the left side of Synapse Studio, use the ›› icon to expand the menu - this reveals the different pages within Synapse Studio that you’ll use to manage resources and perform data analytics tasks.
- On the Data page, view the Linked tab and verify that your workspace includes a link to your Azure Data Lake Storage Gen2 storage account, which should have a name similar to synapsexxxxxxx (Primary - datalakexxxxxxx).
- Expand your storage account and verify that it contains a file system container named files.
- Select the files container, and note that it contains a folder named sales. This folder contains the data files you are going to query.
- Open the sales folder and the csv folder it contains, and observe that this folder contains .csv files for three years of sales data.
- Right-click any of the files and select Preview to see the data it contains. Note that the files do not contain a header row, so you can unselect the option to display column headers.
- Close the preview, and then use the ↑ button to navigate back to the sales folder.
- In the sales folder, open the json folder and observe that it contains some sample sales orders in .json files. Preview any of these files to see the JSON format used for a sales order.
- Close the preview, and then use the ↑ button to navigate back to the sales folder.
- In the sales folder, open the parquet folder and observe that it contains a subfolder for each year (2019-2021), in each of which a file named orders.snappy.parquet contains the order data for that year.
- Return to the sales folder so you can see the csv, json, and parquet folders.
Use SQL to query CSV files
- Select the csv folder, and then in the New SQL script list on the toolbar, select Select TOP 100 rows.
- In the File type list, select Text format, and then apply the settings to open a new SQL script that queries the data in the folder.
- In the Properties pane for SQL Script 1 that is created, change the name to Sales CSV query, and change the result settings to show All rows. Then in the toolbar, select Publish to save the script and use the Properties button (which looks similar to 🗏.) on the right end of the toolbar to hide the Properties pane.
-
Review the SQL code that has been generated, which should be similar to this:
 -- This is auto-generated code
 SELECT
     TOP 100 *
 FROM
     OPENROWSET(
         BULK 'https://datalakexxxxxxx.dfs.core.windows.net/files/sales/csv/',
         FORMAT = 'CSV',
         PARSER_VERSION='2.0'
     ) AS [result]
This code uses the OPENROWSET to read data from the CSV files in the sales folder and retrieves the first 100 rows of data.
- In the Connect to list, ensure Built-in is selected - this represents the built-in SQL Pool that was created with your workspace.
-
On the toolbar, use the ▷ Run button to run the SQL code, and review the results, which should look similar to this:
C1 C2 C3 C4 C5 C6 C7 C8 C9 SO45347 1 2020-01-01 Clarence Raji clarence35@adventure-works.com Road-650 Black, 52 1 699.0982 55.9279 … … … … … … … … … -
Note the results consist of columns named C1, C2, and so on. In this example, the CSV files do not include the column headers. While it’s possible to work with the data using the generic column names that have been assigned, or by ordinal position, it will be easier to understand the data if you define a tabular schema. To accomplish this, add a WITH clause to the OPENROWSET function as shown here (replacing datalakexxxxxxx with the name of your data lake storage account), and then rerun the query:
 SELECT
     TOP 100 *
 FROM
     OPENROWSET(
         BULK 'https://datalakexxxxxxx.dfs.core.windows.net/files/sales/csv/',
         FORMAT = 'CSV',
         PARSER_VERSION='2.0'
     )
     WITH (
         SalesOrderNumber VARCHAR(10) COLLATE Latin1_General_100_BIN2_UTF8,
         SalesOrderLineNumber INT,
         OrderDate DATE,
         CustomerName VARCHAR(25) COLLATE Latin1_General_100_BIN2_UTF8,
         EmailAddress VARCHAR(50) COLLATE Latin1_General_100_BIN2_UTF8,
         Item VARCHAR(30) COLLATE Latin1_General_100_BIN2_UTF8,
         Quantity INT,
         UnitPrice DECIMAL(18,2),
         TaxAmount DECIMAL (18,2)
     ) AS [result]
Now the results look like this:
SalesOrderNumber SalesOrderLineNumber OrderDate CustomerName EmailAddress Item Quantity UnitPrice TaxAmount SO45347 1 2020-01-01 Clarence Raji clarence35@adventure-works.com Road-650 Black, 52 1 699.10 55.93 … … … … … … … … … - Publish the changes to your script, and then close the script pane.
Use SQL to query parquet files
While CSV is an easy format to use, it’s common in big data processing scenarios to use file formats that are optimized for compression, indexing, and partitioning. One of the most common of these formats is parquet.
- In the files tab contaning the file system for your data lake, return to the sales folder so you can see the csv, json, and parquet folders.
- Select the parquet folder, and then in the New SQL script list on the toolbar, select Select TOP 100 rows.
-
In the File type list, select Parquet format, and then apply the settings to open a new SQL script that queries the data in the folder. The script should look similar to this:
-- This is auto-generated code SELECT TOP 100 * FROM OPENROWSET( BULK 'https://datalakexxxxxxx.dfs.core.windows.net/files/sales/parquet/**', FORMAT = 'PARQUET' ) AS [result] - Run the code, and note that it returns sales order data in the same schema as the CSV files you explored earlier. The schema information is embedded in the parquet file, so the appropriate column names are shown in the results.
-
Modify the code as follows (replacing datalakexxxxxxx with the name of your data lake storage account) and then run it.
SELECT YEAR(OrderDate) AS OrderYear, COUNT(*) AS OrderedItems FROM OPENROWSET( BULK 'https://datalakexxxxxxx.dfs.core.windows.net/files/sales/parquet/**', FORMAT = 'PARQUET' ) AS [result] GROUP BY YEAR(OrderDate) ORDER BY OrderYear -
Note that the results include order counts for all three years - the wildcard used in the BULK path causes the query to return data from all subfolders.
The subfolders reflect partitions in the parquet data, which is a technique often used to optimize performance for systems that can process multiple partitions of data in parallel. You can also use partitions to filter the data.
-
Modify the code as follows (replacing datalakexxxxxxx with the name of your data lake storage account) and then run it.
SELECT YEAR(OrderDate) AS OrderYear, COUNT(*) AS OrderedItems FROM OPENROWSET( BULK 'https://datalakexxxxxxx.dfs.core.windows.net/files/sales/parquet/year=*/', FORMAT = 'PARQUET' ) AS [result] WHERE [result].filepath(1) IN ('2019', '2020') GROUP BY YEAR(OrderDate) ORDER BY OrderYear -
Review the results and note that they include only the sales counts for 2019 and 2020. This filtering is achieved by inclusing a wildcard for the partition folder value in the BULK path (year=*) and a WHERE clause based on the filepath property of the results returned by OPENROWSET (which in this case has the alias [result]).
- Name your script Sales Parquet query, and publish it. Then close the script pane.
Use SQL to query JSON files
JSON is another popular data format, so it;s useful to be able to query .json files in a serverless SQL pool.
- In the files tab containing the file system for your data lake, return to the sales folder so you can see the csv, json, and parquet folders.
- Select the json folder, and then in the New SQL script list on the toolbar, select Select TOP 100 rows.
-
In the File type list, select Text format, and then apply the settings to open a new SQL script that queries the data in the folder. The script should look similar to this:
 -- This is auto-generated code
 SELECT
     TOP 100 *
 FROM
     OPENROWSET(
         BULK 'https://datalakexxxxxxx.dfs.core.windows.net/files/sales/json/',
         FORMAT = 'CSV',
         PARSER_VERSION = '2.0'
     ) AS [result]
The script is designed to query comma-delimited (CSV) data rather then JSON, so you need to make a few modifications before it will work successfully.
- Modify the script as follows (replacing datalakexxxxxxx with the name of your data lake storage account) to:
- Remove the parser version parameter.
- Add parameters for field terminator, quoted fields, and row terminators with the character code 0x0b.
- Format the results as a single field containing the JSON row of data as an NVARCHAR(MAX) string.
SELECT TOP 100 * FROM OPENROWSET( BULK 'https://datalakexxxxxxx.dfs.core.windows.net/files/sales/json/', FORMAT = 'CSV', FIELDTERMINATOR ='0x0b', FIELDQUOTE = '0x0b', ROWTERMINATOR = '0x0b' ) WITH (Doc NVARCHAR(MAX)) as rows -
Run the modified code and observe that the results include a JSON document for each order.
-
Modify the query as follows (replacing datalakexxxxxxx with the name of your data lake storage account) so that it uses the JSON_VALUE function to extract individual field values from the JSON data.
SELECT JSON_VALUE(Doc, '$.SalesOrderNumber') AS OrderNumber, JSON_VALUE(Doc, '$.CustomerName') AS Customer, Doc FROM OPENROWSET( BULK 'https://datalakexxxxxxx.dfs.core.windows.net/files/sales/json/', FORMAT = 'CSV', FIELDTERMINATOR ='0x0b', FIELDQUOTE = '0x0b', ROWTERMINATOR = '0x0b' ) WITH (Doc NVARCHAR(MAX)) as rows - Name your script Sales JSON query, and publish it. Then close the script pane.
Access external data in a database
So far, you’ve used the OPENROWSET function in a SELECT query to retrieve data from files in a data lake. The queries have been run in the context of the master database in your serverless SQL pool. This approach is fine for an initial exploration of the data, but if you plan to create more complex queries it may be more effective to use the PolyBase capability of Synapse SQL to create objects in a database that reference the external data location.
Create an external data source
By defining an external data source in a database, you can use it to reference the data lake location where the files are stored.
- In Synapse Studio, on the Develop page, in the + menu, select SQL script.
-
In the new script pane, add the following code (replacing datalakexxxxxxx with the name of your data lake storage account) to create a new database and add an external data source to it.
CREATE DATABASE Sales COLLATE Latin1_General_100_BIN2_UTF8; GO; Use Sales; GO; CREATE EXTERNAL DATA SOURCE sales_data WITH ( LOCATION = 'https://datalakexxxxxxx.dfs.core.windows.net/files/sales/' ); GO; - Modify the script properties to change its name to Create Sales DB, and publish it.
- Ensure that the script is connected to the Built-in SQL pool and the master database, and then run it.
- Switch back to the Data page and use the ↻ button at the top right of Synapse Studio to refresh the page. Then view the Workspace tab in the Data pane, where a SQL database list is now displayed. Expand this list to verify that the Sales database has been created.
- Expand the Sales database, its External Resources folder, and the External data sources folder under that to see the sales_data external data source you created.
-
In the … menu for the Sales database, select New SQL script > Empty script. Then in the new script pane, enter and run the following query:
 SELECT *
 FROM
     OPENROWSET(
         BULK 'csv/*.csv',
         DATA_SOURCE = 'sales_data',
         FORMAT = 'CSV',
         PARSER_VERSION = '2.0'
     ) AS orders
The query uses the external data source to connect to the data lake, and the OPENROWSET function now only need to reference the relative path to the .csv files.
-
Modify the code as follows to query the parquet files using the data source.
 SELECT *
 FROM
     OPENROWSET(
         BULK 'parquet/year=*/*.snappy.parquet',
         DATA_SOURCE = 'sales_data',
         FORMAT='PARQUET'
     ) AS orders
 WHERE orders.filepath(1) = '2019'
Create an external table
The external data source makes it easier to access the files in the data lake, but most data analysts using SQL are used to working with tables in a database. Fortunately, you can also define external file formats and external tables that encapsulate rowsets from files in database tables.
-
Replace the SQL code with the following statement to define an external data format for CSV files, and an external table that references the CSV files, and run it:
CREATE EXTERNAL FILE FORMAT CsvFormat WITH ( FORMAT_TYPE = DELIMITEDTEXT, FORMAT_OPTIONS( FIELD_TERMINATOR = ',', STRING_DELIMITER = '"' ) ); GO; CREATE EXTERNAL TABLE dbo.orders ( SalesOrderNumber VARCHAR(10), SalesOrderLineNumber INT, OrderDate DATE, CustomerName VARCHAR(25), EmailAddress VARCHAR(50), Item VARCHAR(30), Quantity INT, UnitPrice DECIMAL(18,2), TaxAmount DECIMAL (18,2) ) WITH ( DATA_SOURCE =sales_data, LOCATION = 'csv/*.csv', FILE_FORMAT = CsvFormat ); GO - Refresh and expand the External tables folder in the Data pane and confirm that a table named dbo.orders has been created in the Sales database.
- In the … menu for the dbo.orders table, select New SQL script > Select TOP 100 rows.
-
Run the SELECT script that has been generated, and verify that it retrieves the first 100 rows of data from the table, which in turn references the files in the data lake.
Note: You should always choose the method that best fits your specific needs and use case. For more detailed information, you can check the How to use OPENROWSET using serverless SQL pool in Azure Synapse Analytics and Access external storage using serverless SQL pool in Azure Synapse Analytics articles.
Visualize query results
Now that you’ve explored various ways to query files in the data lake by using SQL queries, you can analyze the results of these queries to gain insights into the data. Often, insights are easier to uncover by visualizing the query results in a chart; which you can easily do by using the integrated charting functionality in the Synapse Studio query editor.
- On the Develop page, create a new empty SQL query.
- Ensure that the script is connected to the Built-in SQL pool and the Sales database.
-
Enter and run the following SQL code:
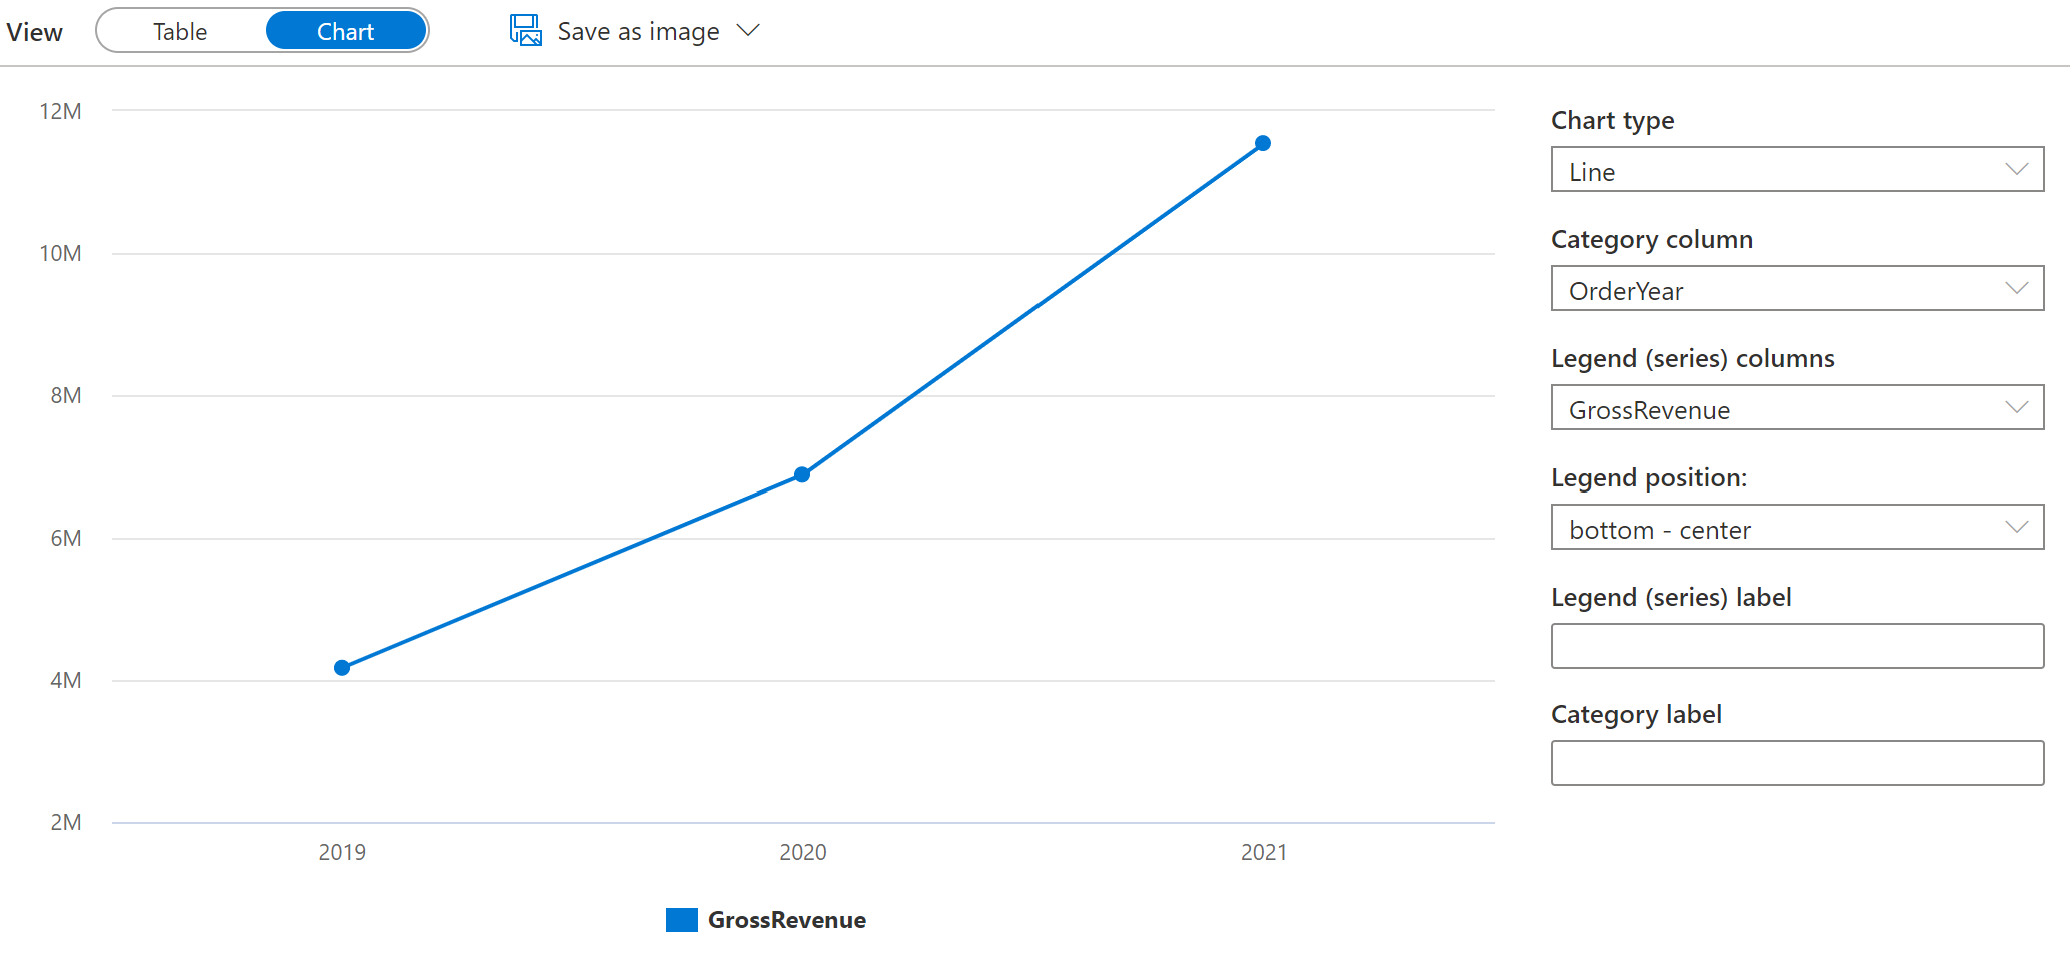
SELECT YEAR(OrderDate) AS OrderYear, SUM((UnitPrice * Quantity) + TaxAmount) AS GrossRevenue FROM dbo.orders GROUP BY YEAR(OrderDate) ORDER BY OrderYear; - In the Results pane, select Chart and view the chart that is created for you; which should be a line chart.
-
Change the Category column to OrderYear so that the line chart shows the revenue trend over the three year period from 2019 to 2021:
-
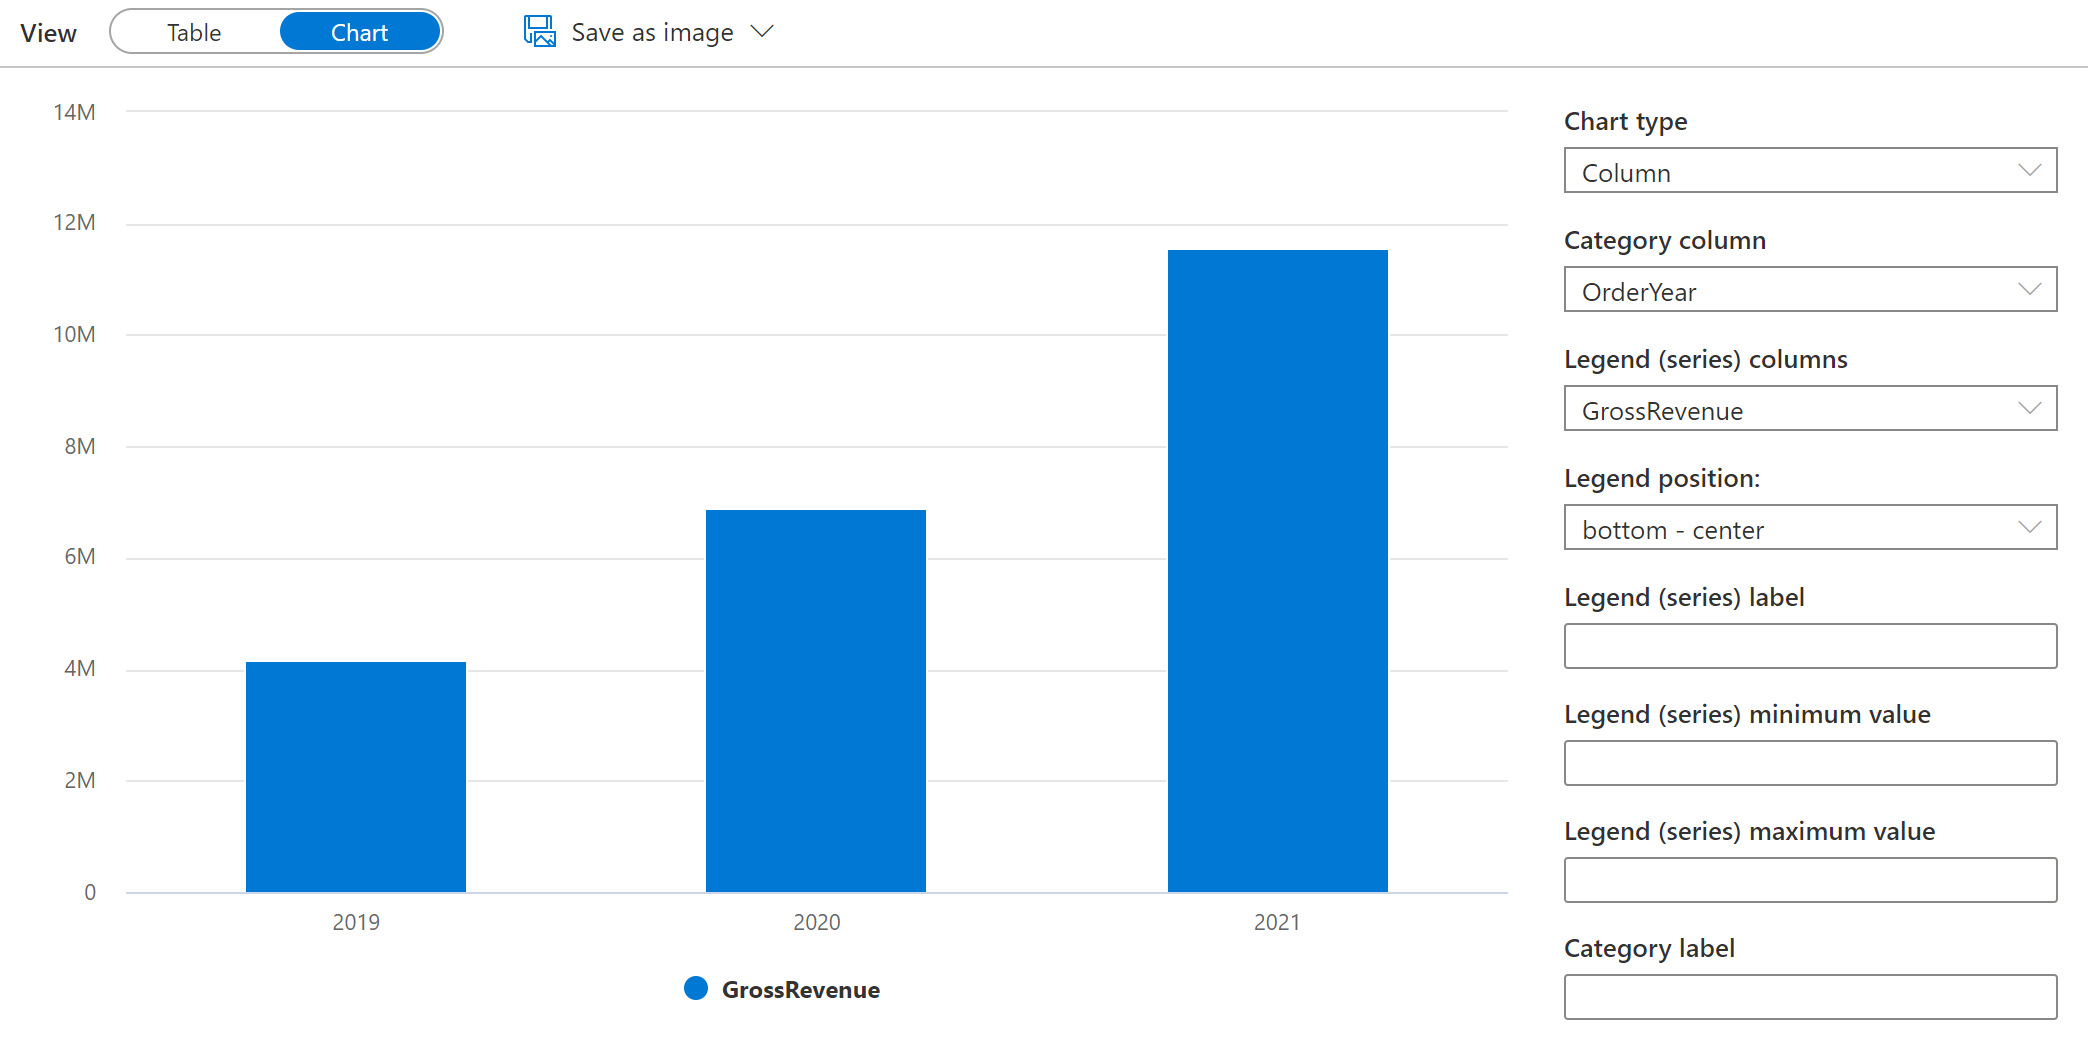
Switch the Chart type to Column to see the yearly revenue as a column chart:
- Experiment with the charting functionality in the query editor. It offers some basic charting capabilities that you can use while interactively exploring data, and you can save charts as images to include in reports. However, functionality is limited compared to enterprise data visualization tools such as Microsoft Power BI.
Delete Azure resources
If you’ve finished exploring Azure Synapse Analytics, you should delete the resources you’ve created to avoid unnecessary Azure costs.
- Close the Synapse Studio browser tab and return to the Azure portal.
- On the Azure portal, on the Home page, select Resource groups.
- Select the dp500-xxxxxxx resource group for your Synapse Analytics workspace (not the managed resource group), and verify that it contains the Synapse workspace and storage account for your workspace.
- At the top of the Overview page for your resource group, select Delete resource group.
-
Enter the dp500-xxxxxxx resource group name to confirm you want to delete it, and select Delete.
After a few minutes, your Azure Synapse workspace resource group and the managed workspace resource group associated with it will be deleted.