Exercise 02: Create and configure network security groups
Scenario
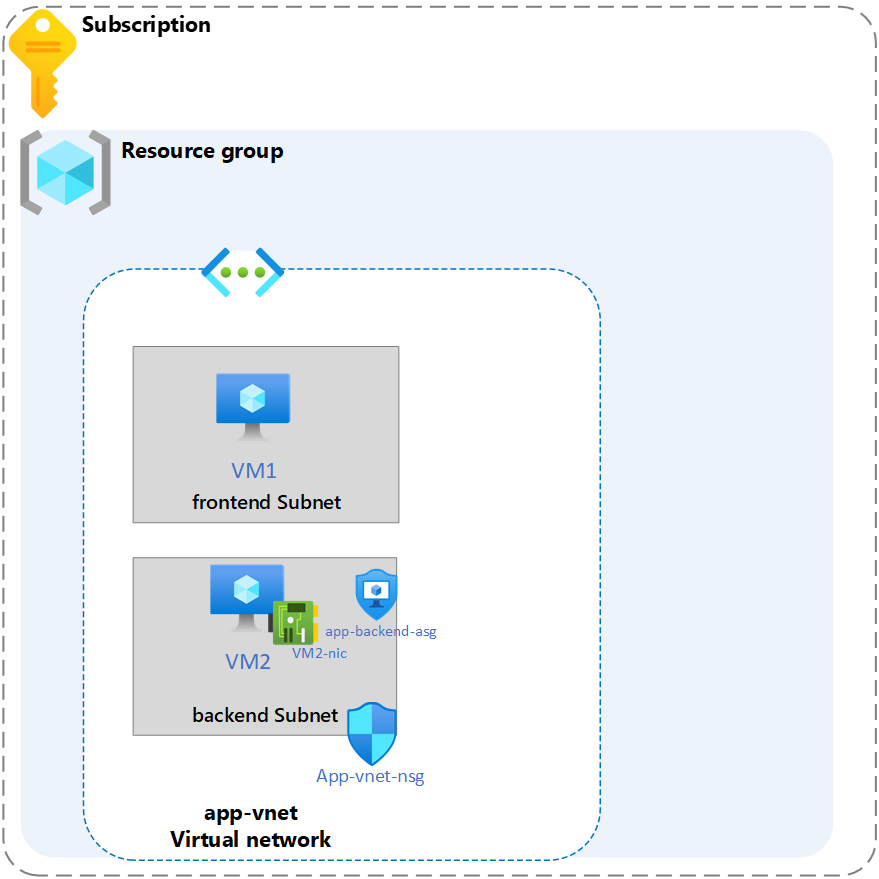
Your organization requires the network traffic in the app-vnet to be tightly controlled. You identify these requirements.
- The frontend subnet has web servers that can be accessed from the internet. An application security group (ASG) is required for those servers. The ASG should be associated with any virtual machine interface that is part of the group. This will allow the web servers to be easily managed.
- The backend subnet has database servers used by the frontend web servers. A network security group (NSG) is required to control this traffic. The NSG should be associated with any virtual machine interface that will be accessed by the web servers.
- For testing, a virtual machine should be installed in the frontend subnet (VM1) and the backend subnet (VM2). The IT group has provided an Azure resource manager template to deploy these Ubuntu servers.
Skilling tasks
- Create a network security group.
- Create network security group rules.
- Associate a network security group to a subnet.
- Create and use application security groups in network security group rules.
Architecture diagram
Estimated timing: 25 minutes
Exercise instructions
Create the network infrastructure for the exercise
Note: This exercise requires the Lab 01 virtual networks and subnets to be installed. A template is provided if you need to deploy those resources.
-
Use the icon (top right) to launch a Cloud Shell session. Alternately, navigate directly to
https://shell.azure.com. -
If prompted to select either Bash or PowerShell, select PowerShell.
-
Storage is not required for this task Select your subscription. Apply your changes.
-
Use these commands to deploy the virtual machines required for this exercise.
Note: If the deployment fails for capacity restriction, edit the template and change the “location” value.
   $RGName = "RG1"

   New-AzResourceGroupDeployment -ResourceGroupName $RGName -TemplateUri https://raw.githubusercontent.com/MicrosoftLearning/Configure-secure-access-to-workloads-with-Azure-virtual-networking-services/main/Instructions/Labs/azuredeploy.json
- In the portal search for and select
virtual machines. Verify both vm1 and vm2 are Running.
Create Application Security Group
Application security groups (ASGs) let you group together servers with similar functions. For example, all the web servers hosting your application.
-
In the portal, search for and select
Application security groups. -
Select + Create and configure the application security group.
Property Value Subscription Select your subscription Resource group RG1 Name app-frontend-asgRegion East US -
Select Review + create and then select Create.
Note: You are creating the application security group in the same region as the existing virtual network.
Associate the application security group to the network interface of the VM
-
In the Azure portal, search for and select
VM1. -
In the Networking blade, select Application security groups and then select Add application security groups.
-
Select the app-frontend-asg and then select Add.
Create and Associate the Network Security Group
Network security groups (NSGs) secure network traffic in a virtual network.
-
In the portal search for and select
Network security group. -
Select + Create and configure the network security group.
Property Value Subscription Select your subscription Resource group RG1 Name app-vnet-nsgRegion East US -
Select Review + create and then select Create.
Associate the NSG with the app-vnet backend subnet.
NSGs can be associated with subnets and/or individual network interfaces attached to Azure virtual machines.
-
Select Go to resource or navigate to the app-vnet-nsg resource.
-
In the Settings blade select Subnets.
-
Select + Associate
-
Select app-vnet (RG1) and then the Backend subnet. Select OK.
Create Network Security Group rules
An NSG use security rules to filter inbound and outbound network traffic.
-
In the search box at the top of the portal, enter Network security groups. Select Network security groups in the search results.
-
Select app-vnet-nsg from the list of network security groups.
-
In the Settings blade, select Inbound security rules.
-
Select + Add and configure an inbound security rule.
Property Value Source Any Source port ranges * Destination Application Security group Destination application security group app-frontend-asg Service SSH Action Allow Priority 100 Name AllowSSH
Learn more with online training
- Filter network traffic with a network security group using the Azure portal. In this module, you focus on filtering network traffic using Network Security Groups (NSGs) in the Azure portal. Learn how to create, configure, and apply NSGs for improved network security.
- Secure and isolate access to Azure resources by using network security groups and service endpoints. In this module, you learn about network security groups and how to restrict network connectivity.
Key takeaways
Congratulations on completing the exercise. Here are the main takeaways:
- Application security groups let you organize virtual machines and define network security policies based on your organization’s applications.
- An Azure network security group is used to filter network traffic between Azure resources in an Azure virtual network.
- You can associate zero, or one, network security group to each virtual network subnet and network interface in a virtual machine.
- A network security group contains security rules that allow or deny inbound network traffic to, or outbound network traffic from, Azure resources.
- You join virtual machines to an application security group. Then you use the application security group as a source or destination in the network security group rules.