Lab 07: Key Vault (Implementing Secure Data by setting up Always Encrypted)
Student lab manual
Lab scenario
You have been asked to create a proof of concept application that makes use of the Azure SQL Database support for Always Encrypted functionality. All of the secrets and keys used in this scenario should be stored in Key Vault. The application should be registered in Microsoft Entra ID in order to enhance its security posture. To accomplish these objectives, the proof of concept should include:
- Creating an Azure Key Vault and storing keys and secrets in the vault.
- Create a SQL Database and encrypting content of columns in database tables by using Always Encrypted.
Note: For all the resources in this lab, we are using the East US region. Verify with your instructor this is the region to use for class.
To keep the focus on the security aspects of Azure, related to building this proof of concept, you will start from an automated ARM template deployment, setting up a Virtual Machine with Visual Studio and SQL Server Management Studio.
Lab objectives
In this lab, you will complete the following exercises:
- Exercise 1: Deploy the base infrastructure from an ARM template
- Exercise 2: Configure the Key Vault resource with a key and a secret
- Exercise 3: Configure an Azure SQL database and a data-driven application
- Exercise 4: Demonstrate the use of Azure Key Vault in encrypting the Azure SQL database
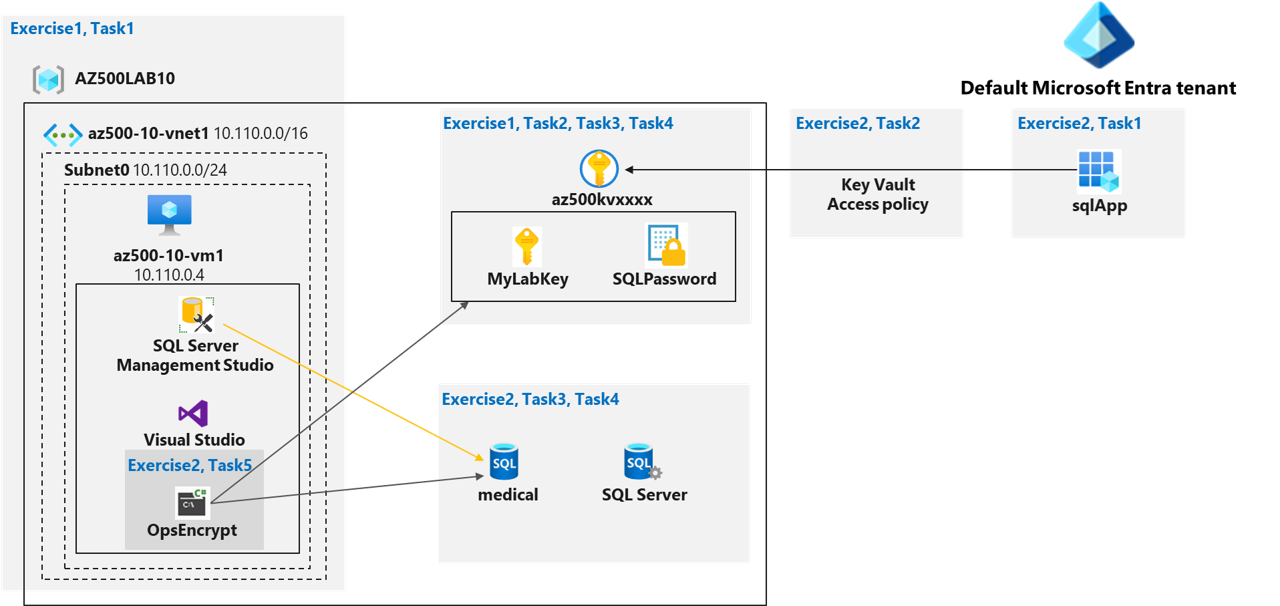
Key Vault diagram
Instructions
Lab files:
-
\Allfiles\Labs\10\az-500-10_azuredeploy.json
-
\Allfiles\Labs\10\program.cs
Total Lab Time estimate: 60 minutes
Exercise 1: Deploy the base infrastructure from an ARM template
In this exercise, you will complete the following tasks:
- Task 1: Deploy an Azure VM and an Azure SQL database
Task 1: Deploy an Azure VM and an Azure SQL database
In this task, you will deploy an Azure VM, which will automatically install Visual Studio and SQL Server Management Studio as part of the deployment.
-
Sign-in to the Azure portal
https://portal.azure.com/.Note: Sign in to the Azure portal using an account that has the Owner or Contributor role in the Azure subscription you are using for this lab.
-
In the Azure portal, in the Search resources, services, and docs text box at the top of the Azure portal page, type Deploy a custom template and press the Enter key.
-
On the Custom deployment blade, click the Build your own template in the editor option.
-
On the Edit template blade, click Load file, locate the \Allfiles\Labs\10\az-500-10_azuredeploy.json file and click Open.
-
On the Edit template blade, click Save.
-
On the Custom deployment blade, under Deployment Scope ensure that the following settings are configured (leave any others with their default values):
Setting Value Subscription the name of the Azure subscription you will be using in this lab Resource group click Create new and type the name AZ500Lab10-lod@lab.LabInstance.Id Location East US Username Student Password Please use your personal password created in Lab 02 > Exercise 2 > Task 1 > Step 3. Note: While you can change the administrative credentials used for logging on to the Virtual Machine, you don’t have to.
Note: To identify Azure regions where you can provision Azure VMs, refer to https://azure.microsoft.com/en-us/regions/offers/
-
Click the Review and Create button and confirm the deployment by clicking the Create button.
Note: This initiates the deployment of the Azure VM and Azure SQL Database required for this lab.
Note: Do not wait for the ARM template deployment to be completed, but instead continue to the next exercise. The deployment might take between 20-25 minutes.
Install the az500-10-DB.json Custom Template
-
In the Azure portal, in the Search resources, services, and docs text box at the top of the Azure portal page, type Deploy a custom template and press the Enter key.
-
On the Custom deployment blade, click the Build your own template in the editor option.
-
On the Edit template blade, click Load file, locate the \Allfiles\Labs\10\az-500-10_DB.json file and click Open.
-
Ensure the correct Resource Group is selected.
-
Set the Admin Password to the same password you used for the previous step.
-
Click the Review and Create button and confirm the deployment by clicking the Create button.
Exercise 2: Configure the Key Vault resource with a key and a secret
Note: For all the resources in this lab, we are using the East (US) region. Verify with your instructor this is the region to use for your class.
In this exercise, you will complete the following tasks:
- Task 1: Create and configure a Key Vault
- Task 2: Add a key to the Key Vault
- Task 3: Add a secret to the Key Vault
Task 1: Create and configure a Key Vault
In this task, you will create an Azure Key Vault resource. You will also configure the Azure Key Vault permissions.
-
Open the Cloud Shell by clicking the first icon (next to the search bar) at the top right of the Azure portal. If prompted, select PowerShell and Create storage.
-
Ensure PowerShell is selected in the drop-down menu in the upper-left corner of the Cloud Shell pane.
-
In the PowerShell session within the Cloud Shell pane, run the following to create an Azure Key Vault in the resource group AZ500Lab10-lod@lab.LabInstance.Id. (If you chose another name for this lab’s Resource Group out of Task 1, use that name for this task as well). The Key Vault name must be unique. Remember the name you have chosen. You will need it throughout this lab.
$kvName = 'az500kv' + $(Get-Random) $location = (Get-AzResourceGroup -ResourceGroupName 'AZ500Lab10-lod@lab.LabInstance.Id').Location New-AzKeyVault -VaultName $kvName -ResourceGroupName 'AZ500Lab10-lod@lab.LabInstance.Id' -Location $location -DisableRbacAuthorizationNote: The output of the last command will display the vault name and the vault URI. The vault URI is in the format
https://<vault_name>.vault.azure.net/ -
Close the Cloud Shell pane.
-
In the Azure portal, in the Search resources, services, and docs text box at the top of the Azure portal page, type Resource groups and press the Enter key.
-
On the Resource groups blade, in the list of resource group, click the AZ500Lab10-lod@lab.LabInstance.Id (or other name you chose earlier for the resource group) entry.
-
On the Resource Group blade, click the entry representing the newly created Key Vault.
-
On the Key Vault blade, in the Overview section, click Access Policies and then click + Create.
-
On the Create an access policy blade, specify the following settings (leave all others with their default values):
Setting Value Configure from template (optional) Key, Secret, & Certificate Management Key permissions click Select all resulting in total of 9 selected permissions Key permissions/Cryptographic Operations click Sign resulting in total of 1 selected permissions Secret permissions click Select all resulting in total of 7 selected permissions Certification permissions click Select all resulting in total of 15 selected permissions Select principal On the Principal blade, select your user account, and click Next Application (optional) click Next Review + create click Create Note: The previous Review + create operation returns to the Access policies page that lists Application, Email, Key Permissions, Secret Permissions, and Certificate Permissions.
Task 2: Add a key to Key Vault
In this task, you will add a key to the Key Vault and view information about the key.
-
In the Azure portal, open a PowerShell session in the Cloud Shell pane.
-
Ensure PowerShell is selected in the upper-left drop-down menu of the Cloud Shell pane.
-
In the PowerShell session within the Cloud Shell pane, run the following to add a software-protected key to the Key Vault:
$kv = Get-AzKeyVault -ResourceGroupName 'AZ500Lab10-lod@lab.LabInstance.Id' $key = Add-AZKeyVaultKey -VaultName $kv.VaultName -Name 'MyLabKey' -Destination 'Software'Note: The name of the key is MyLabKey
-
In the PowerShell session within the Cloud Shell pane, run the following to verify the key was created:
Get-AZKeyVaultKey -VaultName $kv.VaultName -
In the PowerShell session within the Cloud Shell pane, run the following to display the key identifier:
$key.key.kid -
Minimize the Cloud Shell pane.
-
Back in the Azure portal, on the Key Vault blade, in the Objects section, click Keys.
-
In the list of keys, click the MyLabKey entry and then, on the MyLabKey blade, click the entry representing the current version of the key.
Note: Examine the information about the key you created.
Note: You can reference any key by using the key identifier. To get the most current version, reference
https://<key_vault_name>.vault.azure.net/keys/MyLabKeyor get the specific version with:https://<key_vault_name>.vault.azure.net/keys/MyLabKey/<key_version>
Task 3: Add a Secret to Key Vault
-
Switch back to the Cloud Shell pane.
-
In the PowerShell session within the Cloud Shell pane, run the following to create a variable with a secure string value:
$secretvalue = ConvertTo-SecureString 'Pa55w.rd1234' -AsPlainText -Force -
In the PowerShell session within the Cloud Shell pane, run the following to add the secret to the vault:
$secret = Set-AZKeyVaultSecret -VaultName $kv.VaultName -Name 'SQLPassword' -SecretValue $secretvalueNote: The name of the secret is SQLPassword.
-
In the PowerShell session within the Cloud Shell pane, run the following to verify the secret was created.
Get-AZKeyVaultSecret -VaultName $kv.VaultName -
Minimize the Cloud Shell pane.
-
In the Azure portal, navigate back to the Key Vault blade, in the Objects section, click Secrets.
-
In the list of secrets, click the SQLPassword entry and then, on the SQLPassword blade, click the entry representing the current version of the secret.
Note: Examine the information about the secret you created.
Note: To get the most current version of a secret, reference
https://<key_vault_name>.vault.azure.net/secrets/<secret_name>or get a specific version, referencehttps://<key_vault_name>.vault.azure.net/secrets/<secret_name>/<secret_version>
Exercise 3: Configure an Azure SQL database and a data-driven application
In this exercise, you will complete the following tasks:
- Task 1: Enable a client application to access the Azure SQL Database service.
- Task 2: Create a policy allowing the application access to the Key Vault.
- Task 3: Retrieve SQL Azure database ADO.NET Connection String
- Task 4: Log on to the Azure VM running Visual Studio 2019 and SQL Management Studio 19
- Task 5: Create a table in the SQL Database and select data columns for encryption
Task 1: Enable a client application to access the Azure SQL Database service.
In this task, you will enable a client application to access the Azure SQL Database service. This will be done by setting up the required authentication and acquiring the Application ID and Secret that you will need to authenticate your application.
-
In the Azure portal, in the Search resources, services, and docs text box at the top of the Azure portal page, type App Registrations and press the Enter key.
-
On the App Registrations blade, click + New registration.
-
On the Register an application blade, specify the following settings (leave all others with their default values):
Setting Value Name sqlApp Redirect URI (optional) Web and https://sqlapp -
On the Register an application blade, click Register.
Note: Once the registration is completed, the browser will automatically redirect you to sqlApp blade.
-
On the sqlApp blade, identify the value of Application (client) ID.
Note: Record this value. You will need it in the next task.
-
On the sqlApp blade, in the Manage section, click Certificates & secrets.
-
On the **sqlApp Certificates & secrets** blade / Client Secrets section, click + New client secret -
In the Add a client secret pane, specify the following settings:
Setting Value Description Key1 Expires 12 months -
Click Add to update the application credentials.
-
On the **sqlApp Certificates & secrets** blade, identify the value of Key1. Note: Record this value. You will need it in the next task.
Note: Make sure to copy the value before you navigate away from the blade. Once you do, it is no longer possible to retrieve its clear text value.
Task 2: Create a policy allowing the application access to the Key Vault.
In this task, you will grant the newly registered app permissions to access secrets stored in the Key Vault.
-
In the Azure portal, open a PowerShell session in the Cloud Shell pane.
-
Ensure PowerShell is selected in the upper-left drop-down menu of the Cloud Shell pane.
-
In the PowerShell session within the Cloud Shell pane, run the following to create a variable storing the Application (client) ID you recorded in the previous task (replace the
<Azure_AD_Application_ID>placeholder with the value of the Application (client) ID):$applicationId = '<Azure_AD_Application_ID>' - In the PowerShell session within the Cloud Shell pane, run the following to create a variable storing the Key Vault name.
$kvName = (Get-AzKeyVault -ResourceGroupName 'AZ500Lab10-lod@lab.LabInstance.Id').VaultName $kvName -
In the PowerShell session within the Cloud Shell pane, run the following to grant permissions on the Key Vault to the application you registered in the previous task:
Set-AZKeyVaultAccessPolicy -VaultName $kvName -ResourceGroupName AZ500Lab10-lod@lab.LabInstance.Id -ServicePrincipalName $applicationId -PermissionsToKeys get,wrapKey,unwrapKey,sign,verify,list - Close the Cloud Shell pane.
Task 3: Retrieve SQL Azure database ADO.NET Connection String
The ARM-template deployment in Exercise 1 provisioned an Azure SQL Server instance and an Azure SQL database named medical . You will update the empty database resource with a new table structure and select data columns for encryption
-
In the Azure portal, in the Search resources, services, and docs text box at the top of the Azure portal page, type SQL databases and press the Enter key.
-
In the list of SQL databases, click the **medical(
)** entry. Note: If the database cannot be found, this likely means the deployment you initiated in Exercise 1 has not completed yet. You can validate this by browsing to the Azure Resource Group “AZ500Lab10-lod@lab.LabInstance.Id” (or the name you chose), and selecting Deployments from the Settings pane.
-
On the SQL database blade, in the Settings section, click Connection strings.
Note: The interface includes connection strings for ADO.NET, JDBC, ODBC, PHP, and Go.
-
Record the ADO.NET (SQL authentication) connection string. You will need it later.
Note: When you use the connection string, make sure to replace the
{your_password}placeholder with the password that you configured with the deployment in Exercise 1.
Task 4: Log on to the Azure VM running Visual Studio 2019 and SQL Management Studio 19
In this task, you log on to the Azure VM, which deployment you initiated in Exercise 1. This Azure VM hosts Visual Studio 2019 and SQL Server Management Studio 19.
>**Note**: Before you proceed with this task, ensure that the deployment you initiated in the first exercise has completed successfully. You can validate this by navigating to the blade of the Azure resource group "AZ500Lab10-lod@lab.LabInstance.Id" (or other name you chose) and selecting **Deployments** from the Settings pane.
-
In the Azure portal, in the Search resources, services, and docs text box at the top of the Azure portal page, type virtual machines and press the Enter key.
-
In the list of Virtual Machines shown, select the az500-10-vm1 entry. On the az500-10-vm1 blade, on the Essentials pane, take note of the Public IP address. You will use this later.
Task 5: Create a table in the SQL Database and select data columns for encryption
In this task, you will connect to the SQL Database with SQL Server Management Studio and create a table. You will then encrypt two data columns using an autogenerated key from the Azure Key Vault.
-
In the Azure portal, navigate to the blade of the medical SQL database, in the Essentials section, identify the Server name (copy to clipboard), and then, in the toolbar, click Set server firewall.
Note: Record the server name. You will need the server name later in this task.
-
On the Firewall settings blade, scroll down to Rule Name, click + Add a firewall rule, and specify the following settings:
Setting Value Rule Name Allow Mgmt VM Start IP the Public IP Address of the az500-10-vm1 End IP the Public IP Address of the az500-10-vm1 -
Click Save to save the change and close the confirmation pane.
Note: This modifies the server firewall settings, allowing connections to the medical database from the Azure VM’s public IP address you deployed in this lab.
-
Navigate back to the az500-10-vm1 blade, click Overview, next click Connect and, in the drop down menu, click Connect.
-
Download the RDP file and use it to connect to the az500-10-vm1 Azure VM via Remote Desktop. When prompted to authenticate, provide the following credentials:
Setting Value Username Student Password Please use your personal password created in Lab 02 > Exercise 1 > Task 1 > Step 9. Note: Wait for the Remote Desktop session and Server Manager to load. Close Server Manager.
Note: The remaining steps in this lab are performed within the Remote Desktop session to the az500-10-vm1 Azure VM.
-
Install SQL Server Management Studio on az500-10-vm1. Azure VM.
-
Open SQL Server Management Studio.
-
In the Connect to Server dialog box, specify the following settings:
Setting Value Server Type Database Engine Server Name the server name you identified earlier in this task Authentication SQL Server Authentication Username Student Password Please use your personal password created in Lab 02 > Exercise 2 > Task 1 > Step 3. -
In the Connect to Server dialog box, click Connect.
-
Within the SQL Server Management Studio console, in the Object Explorer pane, expand the Databases folder.
-
In the Object Explorer pane, right-click the medical database and click New Query.
-
Paste the following code into the query window and click Execute. This will create a Patients table.
CREATE TABLE [dbo].[Patients]( [PatientId] [int] IDENTITY(1,1), [SSN] [char](11) NOT NULL, [FirstName] [nvarchar](50) NULL, [LastName] [nvarchar](50) NULL, [MiddleName] [nvarchar](50) NULL, [StreetAddress] [nvarchar](50) NULL, [City] [nvarchar](50) NULL, [ZipCode] [char](5) NULL, [State] [char](2) NULL, [BirthDate] [date] NOT NULL PRIMARY KEY CLUSTERED ([PatientId] ASC) ON [PRIMARY] ); -
After the table is created successfully, in the Object Explorer pane, expand the medical database node, the tables node, right-click the dbo.Patients node, and click Always Encrypted wizard….
Note: This will initiate the Always Encrypted wizard.
-
On the Introduction page, click Next.
-
On the Column Selection page, select the SSN and Birthdate columns, set the Encryption Type of the SSN column to Deterministic and of the Birthdate column to Randomized, and click Next.
Note: While performing the encryption if any error thrown like Exception has been thrown by the target of an invocation related to Rotary(Microsoft.SQLServer.Management.ServiceManagement) then make sure the Key Permission’s values of Rotation Policy Operations are unchecked, if not in the Azure portal navigate to the Key Vault » Access Policies » Key Permissions » Uncheck all the values under the Rotation Policy Operations » Under Privileged Key Operations » Uncheck Release.
-
On the Master Key Configuration page, select Azure Key Vault, click Sign in. Make sure to only allow this App to sign in. When prompted, authenticate by using the same user account you used to provision the Azure Key Vault instance earlier in this lab, ensure that that Key Vault appears in the Select an Azure Key Vault drop down list, and click Next.
-
On the Run Settings page, click Next.
-
On the Summary page, click Finish to proceed with the encryption. When prompted, sign in again by using the same user account you used to provision the Azure Key Vault instance earlier in this lab.
-
Once the encryption process is complete, on the Results page, click Close.
-
In the SQL Server Management Studio console, in the Object Explorer pane, under the medical node, expand the Security and Always Encrypted Keys subnodes.
Note: The Always Encrypted Keys subnode contains the Column Master Keys and Column Encryption Keys subfolders.
Exercise 4: Demonstrate the use of Azure Key Vault in encrypting the Azure SQL database
In this exercise, you will complete the following tasks:
- Task 1: Install Visual Studio 2026
- Task 2: Run a data-driven application to demonstrate the use of Azure Key Vault in encrypting the Azure SQL database
Task 1: Install Visual Studio 2026
-
Switch to your Server virtual machine if you are not already there.
-
Open Server Manager.
-
Select Local Servers.
-
Set IE Enhanced Security Configuration to Off.
-
Open the Browser and bypass the warning about IE ESC being turned off.
-
Go to https://visualstudio.microsoft.com/downloads.
-
In the Visual Studio 2026 box, under Community select Free download.
-
When the download finishes, select Open File.
- Select continue to start the install.
- Install takes about 10 minutes
- Choose .Net Desktop Development in the Workloads screen.
Task 2: Run a data-driven application to demonstrate the use of Azure Key Vault in encrypting the Azure SQL database
You will create a Console application using Visual Studio to load data into the encrypted columns and then access that data securely using a connection string that accesses the key in the Key Vault.
-
From the RDP session to the az500-10-vm1, launch Visual Studio 2026 from the Start menu.
-
Switch to the window displaying Visual Studio 2026 welcome message, click the Sign in button and, when prompted, provide the credentials you used to authenticate to the Azure subscription you are using in this lab.
-
On the Get started page, click Create a new project.
-
In the list of project templates, search for Console App (.NET Framework), in the list of results, click Console App (.NET Framework) for C#, and click Next.
-
On the Configure your new project page, specify the following settings (leave other settings with their default values), then click Create:
Setting Value Project name OpsEncrypt Solution name OpsEncrypt Framework .NET Framework 4.7.2 -
In the Visual Studio console, click the Tools menu, in the drop down menu, click NuGet Package Manager, and, in the cascading menu, click Package Manager Console.
-
In the Package Manager Console pane, run the following to install the first required NuGet package:
Install-Package Microsoft.SqlServer.Management.AlwaysEncrypted.AzureKeyVaultProvider -
In the Package Manager Console pane, run the following to install the second required NuGet package:
Install-Package Microsoft.IdentityModel.Clients.ActiveDirectory -
Minimize the RDP session to your Azure virtual machine, then navigate to \Allfiles\Labs\10\program.cs, open it in Notepad, and copy its content into Clipboard.
-
Return to the RDP session, and in the Visual Studio console, in the Solution Explorer window, click Program.cs and replace its content with the code you copied into Clipboard.
-
In the Visual Studio window, in the Program.cs pane, in line 15, replace the
<connection string noted earlier>placeholder with the Azure SQL database ADO.NET connection string you recorded earlier in the lab. In the connection string, replace the{your_password}placeholder, with the password that you specified in the deployment in Exercise 1. If you saved the string on the lab computer, you may need to leave the RDP session to copy the ADO string, then return to the Azure virtual machine to paste it in. -
In the Visual Studio window, in the Program.cs pane, in line 16, replace the
<client id noted earlier>placeholder with the value of Application (client) ID of the registered app you recorded earlier in the lab. -
In the Visual Studio window, in the Program.cs pane, in line 17, replace the
<key value noted earlier>placeholder with the the value of Key1 of the registered app you recorded earlier in the lab. -
In the Visual Studio console, click the Start button to initiate the build of the console application and start it.
-
The application will start a Command Prompt window. When prompted for password, type the password that you specified in the deployment in Exercise 1 to connect to Azure SQL Database.
-
Leave the console app running and switch to the SQL Management Studio console.
-
In the Object Explorer pane, right-click the medical database and, in the right-click menu, click New Query.
-
From the query window, run the following query to verify that the data that loaded into the database from the console app is encrypted.
SELECT FirstName, LastName, SSN, BirthDate FROM Patients; -
Switch back to the console application where you are prompted to enter a valid SSN. This will query the encrypted column for the data. At the Command Prompt, type the following and press the Enter key:
999-99-0003Note: Verify that the data returned by the query is not encrypted.
-
To terminate the console app, press the Enter key
Clean up resources
Remember to remove any newly created Azure resources that you no longer use. Removing unused resources ensures you will not incur unexpected costs.
-
In the Azure portal, open the Cloud Shell by clicking the first icon in the top right of the Azure portal.
-
In the upper-left drop-down menu of the Cloud Shell pane, if needed select PowerShell and, when prompted, click Confirm.
-
In the PowerShell session within the Cloud Shell pane, run the following to remove the resource groups you created in this lab:
Remove-AzResourceGroup -Name "AZ500Lab10-lod@lab.LabInstance.Id" -Force -AsJob -
Close the Cloud Shell pane.