Lab 06: Service Endpoints and Securing Storage
Student lab manual
Lab scenario
You have been asked to create a proof of concept to demonstrate securing Azure file shares. Specifically, you want to:
- Create a storage endpoint so traffic destined to Azure Storage always stays within the Azure backbone network.
- Configure the storage endpoint so only resources from a specific subnet can access the storage.
- Confirm that resources outside of the specific subnet cannot access the storage.
For all the resources in this lab, we are using the East US region. Verify with your instructor this is the region to use for class.
Lab objectives
In this lab, you will complete the following exercise:
- Exercise 1: Service endpoints and security storage
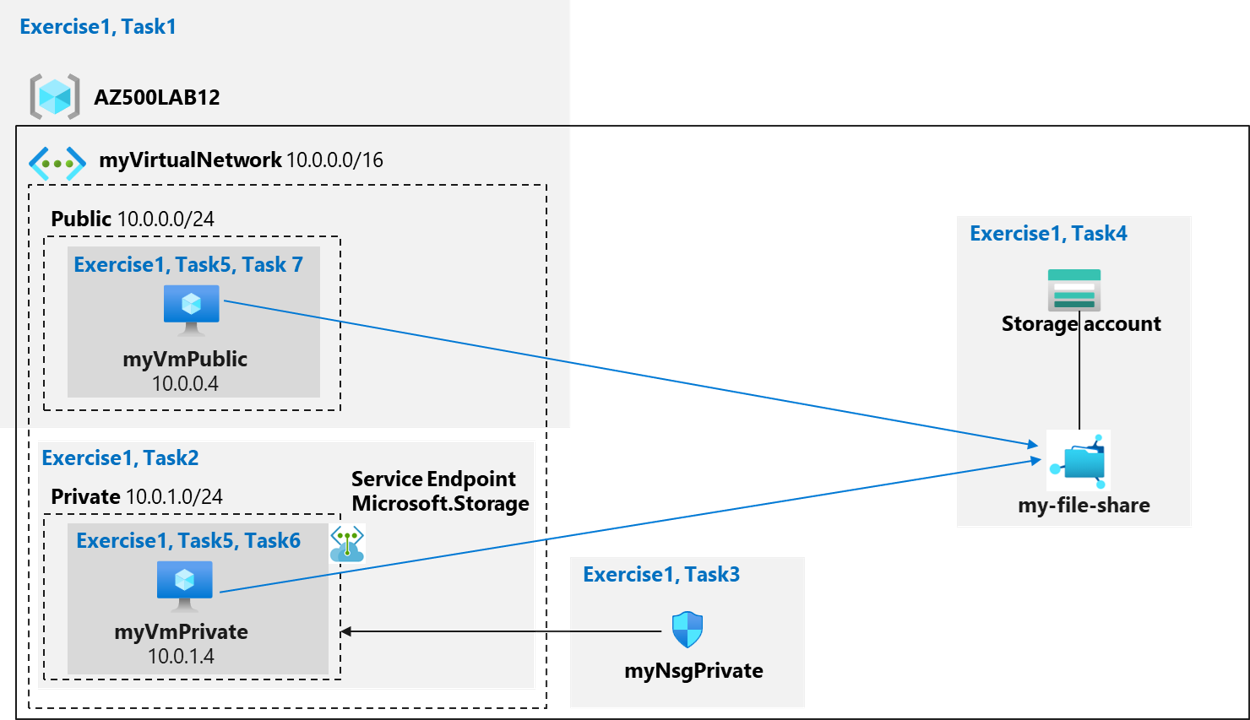
Service Endpoints and Securing Storage diagram
Instructions
Exercise 1: Service endpoints and security storage
Estimated timing: 45 minutes
In this exercise, you will complete the following tasks:
- Task 1: Create a virtual network
- Task 2: Add a subnet to the virtual network and configure a storage endpoint
- Task 3: Configure a network security group to restrict access to the subnet
- Task 4: Configure a network security group to allow rdp on the public subnet
- Task 5: Create a storage account with a file share
- Task 6: Deploy virtual machines into the designated subnets
- Task 7: Test the storage connection from the private subnet to confirm that access is allowed
- Task 8: Test the storage connection from the public subnet to confirm that access is denied
Task 1: Create a virtual network
In this task, you will create a virtual network.
-
Sign-in to the Azure portal
https://portal.azure.com/.Note: Sign in to the Azure portal using an account that has the Owner or Contributor role in the Azure subscription you are using for this lab.
-
In the Azure portal, in the Search resources, services, and docs text box at the top of the Azure portal page, type Virtual networks and press the Enter key.
-
On the Virtual Networks blade, click + Create.
-
On the Basics tab of the Create virtual network blade, specify the following settings (leave others with their default values) and click Next: IP Addresses:
Setting Value Subscription the name of the Azure subscription you are using in this lab Resource group click Create new and type the name AZ500LAB12 Name myVirtualNetwork Region (US) East US -
On the IP addresses tab of the Create virtual network blade, set the IPv4 address space to 10.0.0.0/16, in the Subnet name column, click default and, on the Edit subnet blade, specify the following settings and click Save:
Setting Value Subnet name Public Subnet address range 10.0.0.0/24 -
Back on the IP addresses tab of the Create virtual network blade, click Review + create.
-
On the Review + create tab of the Create virtual network blade, click Create.
Task 2: Add a subnet to the virtual network and configure a storage endpoint
In this task, you will create another subnet and enable a service endpoint on that subnet. Service endpoints are enabled per service, per subnet.
-
In the Azure portal, navigate back to the Virtual Networks blade.
-
On the Virtual networks blade, click the myVirtualNetwork entry.
-
On the myVirtualNetwork blade, in the Settings section, click Subnets.
-
On the myVirtualNetwork | Subnets blade, click + Subnet.
-
On the Add subnet blade, specify the following settings (leave others with their default values):
Setting Value Subnet name Private Subnet address range 10.0.1.0/24 Service endpoints Leave the default of None -
On the Add subnet blade, click Add.
Note: The virtual network now has two subnets: Public and Private.
Task 3: Configure a network security group to restrict access to the subnet
In this task, you will create a network security group with two outbound security rules (Storage and internet) and one inbound security rule (RDP). You will also associate the network security group with the Private subnet. This will restrict outbound traffic from Azure VMs connected to that subnet.
-
In the Azure portal, in the Search resources, services, and docs text box at the top of the Azure portal page, type Network security groups and press the Enter key.
-
On the Network security groups blade, click + Create.
-
On the Basics tab of the Create network security group blade, specify the following settings:
Setting Value Subscription the name of the Azure subscription you are using in this lab Resource group AZ500LAB12 Name myNsgPrivate Region East US -
Click Review + create and then click Create.
Note: In the next steps, you will create an outbound security rule that allows communication to the Azure Storage service.
-
In the Azure portal, navigate back to the Network security groups blade and click the myNsgPrivate entry.
-
On the myNsgPrivate blade, in the Settings section, click Outbound security rules.
-
On the myNsgPrivate | Outbound security rules blade, click + Add.
-
On the Add outbound security rule blade, specify the following settings to explicitly allow outbound traffic to Azure Storage (leave all other values with their default settings):
Setting Value Source Service Tag Source service tag VirtualNetwork Source port ranges * Destination Service Tag Destination service tag Storage Destination port ranges * Protocol Any Action Allow Priority 1000 Name Allow-Storage-All -
On the Add outbound security rule blade, click Add to create the new outbound rule.
-
On the myNsgPrivate blade, in the Settings section, click Outbound security rules, and then click + Add.
-
On the Add outbound security rule blade, specify the following settings to explicitly deny outbound traffic to Internet (leave all other values with their default settings):
Setting Value Source Service Tag Source service tag VirtualNetwork Source port ranges * Destination Service Tag Destination service tag Internet Destination port ranges * Protocol Any Action Deny Priority 1100 Name Deny-Internet-All Note: This rule overrides a default rule in all network security groups that allows outbound internet communication.
Note: In the next steps, you will create an inbound security rule that allows Remote Desktop Protocol (RDP) traffic to the subnet. The rule overrides a default security rule that denies all inbound traffic from the internet. Remote Desktop connections are allowed to the subnet so that connectivity can be tested in a later step.
-
On the myNsgPrivate blade, in the Settings section, click Inbound security rules and then click + Add.
-
On the Add inbound security rule blade, specify the following settings (leave all other values with their default values):
Setting Value Source Any Source port ranges * Destination Service Tag Destination service tag VirtualNetwork Destination port ranges 3389 Protocol TCP Action Allow Priority 1200 Name Allow-RDP-All -
On the Add inbound security rule blade, click Add to create the new inbound rule.
Note: Now you will associate the network security group with the Private subnet.
-
On the Subnets blade, select + Associate and specify the following settings in the Associate subnet section and then click OK:
Setting Value Virtual network myVirtualNetwork Subnet Private
Task 4: Configure a network security group to allow rdp on the public subnet
In this task, you will create a network security group with one inbound security rule (RDP). You will also associate the network security group with the Public subnet. This will allow RDP access to the Public VM.
-
In the Azure portal, in the Search resources, services, and docs text box at the top of the Azure portal page, type Network security groups and press the Enter key.
-
On the Network security groups blade, click + Create.
-
On the Basics tab of the Create network security group blade, specify the following settings:
Setting Value Subscription the name of the Azure subscription you are using in this lab Resource group AZ500LAB12 Name myNsgPublic Region East US -
Click Review + create and then click Create.
Note: In the next steps, you will create an outbound security rule that allows communication to the Azure Storage service.
-
In the Azure portal, navigate back to the Network security groups blade and click the myNsgPublic entry.
-
On the myNsgPublic blade, in the Settings section, click Inbound security rules and then click + Add.
-
On the Add inbound security rule blade, specify the following settings (leave all other values with their default values):
Setting Value Source Any Source port ranges * Destination Service Tag Destination service tag VirtualNetwork Destination port ranges 3389 Protocol TCP Action Allow Priority 1200 Name Allow-RDP-All -
On the Add inbound security rule blade, click Add to create the new inbound rule.
Note: Now you will associate the network security group with the Public subnet.
-
On the Subnets blade, select + Associate and specify the following settings in the Associate subnet section and then click OK:
Setting Value Virtual network myVirtualNetwork Subnet Public
Task 5: Create a storage account with a file share
In this task, you will create a storage account with a file share and obtain the storage account key.
-
In the Azure portal, in the Search resources, services, and docs text box at the top of the Azure portal page, type Storage accounts and press the Enter key.
-
On the Storage accounts blade, click + Create.
-
On the Basics tab of the Create storage account blade, specify the following settings (leave others with their default values):
Setting Value Subscription the name of the Azure subscription you are using in this lab Resource group AZ500LAB12 Storage account name any globally unique name between 3 and 24 in length consisting of letters and digits Location (US) EastUS Performance Standard (general-purpose v2 account) Redundency Locally redundant storage (LRS) -
On the Basics tab of the Create storage account blade, click Review + Create, wait for the validation process to complete, and click Create.
Note: Wait for the Storage account to be created. This should take about 2 minutes.
-
In the Azure portal, in the Search resources, services, and docs text box at the top of the Azure portal page, type Resource groups and press the Enter key.
-
On the Resource groups blade, in the list of resource group, click the AZ500LAB12 entry.
-
On the AZ500LAB12 resource group blade, in the list of resources, click the entry representing the newly created storage account.
-
On the storage account Overview blade, click File Shares under the Data storage tab, and then click + File Share.
-
On the New file share blade, untick the Enable backup option in the backup tab.
-
On the New file share blade, specify the following settings:
Setting Value Name my-file-share -
On the New file share blade, click Create.
Note: Now, retrieve and record the PowerShell script that creates a drive mapping to the Azure file share.
-
On the storage account blade, in the list of file shares, click my-file-share.
-
On the my-file-share blade, click Connect.
-
On the Connect blade, on the Windows tab, copy the PowerShell script that creates a Z drive mapping to the file share.
Note: Record this script. You will need this in a later in this lab in order to map the file share from the Azure virtual machine on the Private subnet.
-
Navigate back to the storage account blade, then in the Security + networking section, click Networking.
-
Under Public network access select Manage and as Default action select Enable from selected networks.
-
Under Resource settings: Virtual networks, IP adresses, and exceptions blade, select view and click the + Add existing virtual network link.
-
On the Add networks blade, specify the following settings:
Setting Value Subscription the name of the Azure subscription you are using in this lab Virtual networks myVirtualNetwork Subnets Private -
On the Add networks blade, click Add.
-
Back on the storage account blade, click Save.
Note: At this point in the lab you have configured a virtual network, a network security group, and a storage account with a file share.
Task 6: Deploy virtual machines into the designated subnets
In this task, you will create two virtual machines one in the Private subnet and one in the Public subnet.
Note: The first virtual machine will be connected to the Private subnet.
-
In the Azure portal, in the Search resources, services, and docs text box at the top of the Azure portal page, type Virtual machines and press the Enter key.
-
On the Virtual machines blade, click + Create and, in the dropdown list, click Virtual machine
-
On the Basics tab of the Create a virtual machine blade, specify the following settings (leave others with their default values):
Setting Value Subscription the name of the Azure subscription you will be using in this lab Resource group AZ500LAB12 Virtual machine name myVmPrivate Region (US)East US Image Windows Server 2022 Datacenter: Azure Edition - Gen 2 Username Student Password Please use your personal password created in Lab 02 > Exercise 2 > Task 1 > Step 3. Public inbound ports None Already have a Windows Server license Not selected Note: For public inbound ports, we will rely on the precreated NSG.
-
Click Next: Disks > and, on the Disks tab of the Create a virtual machine blade, set the OS disk type to Standard HDD and click Next: Networking >.
-
Click Next: Networking >, on the Networking tab of the Create a virtual machine blade, specify the following settings (leave others with their default values):
Setting Value Virtual network myVirtualNetwork Subnet Private (10.0.1.0/24) Public IP (new)myVmPrivate-ip NIC network security group None -
Click Next: Management >, on the Management tab of the Create a virtual machine blade, accept the default settings and click Review + create.
-
On the Review + create blade, ensure that validation was successful and click Create.
Note: The second virtual machine will be connected to the Public subnet.
-
On the Virtual machines blade, click + Add and, in the dropdown list, click Virtual machine.
-
On the Basics tab of the Create a virtual machine blade, specify the following settings (leave others with their default values):
Setting Value Subscription the name of the Azure subscription you will be using in this lab Resource group AZ500LAB12 Virtual machine name myVmPublic Region (US)East US Image Windows Server 2022 Datacenter: Azure Edition - Gen 2 Username Student Password Please use your personal password created in Lab 02 > Exercise 1 > Task 1 > Step 9. Public inbound ports None Already have a Windows Server license Not selected Note: For public inbound ports, we will rely on the precreated NSG.
-
Click Next: Disks > and, on the Disks tab of the Create a virtual machine blade, set the OS disk type to Standard HDD and click Next: Networking >.
-
Click Next: Networking >, on the Networking tab of the Create a virtual machine blade, specify the following settings (leave others with their default values):
Setting Value Virtual network myVirtualNetwork Subnet Public (10.0.0.0/24) Public IP (new)myVmPublic-ip NIC network security group None -
Click Next: Management >, on the Management tab of the Create a virtual machine blade, accept the default settings and click Review + create.
-
On the Review + create blade, ensure that validation was successful and click Create.
Note: You can continue to the next task once the deployment of the myVMPublic Azure VM is completed.
Task 7: Test the storage connection from the private subnet to confirm that access is allowed
In this task, you will connect to the myVMPrivate virtual machine via Remote Desktop and map a drive to the file share.
-
Navigate back to the Virtual machines blade.
-
On the Virtual machines blade, click the myVMPrivate entry.
-
On the myVMPrivate blade, click Connect and, in the drop down menu, click Connect.
-
Download the RDP file and use it to connect to the myVMPrivate Azure VM via Remote Desktop. When prompted to authenticate, provide the following credentials:
Setting Value Username Student Password Please use your personal password created in Lab 02 > Exercise 2 > Task 1 > Step 3. Note: Wait for the Remote Desktop session to open and Server Manager to load.
Note: You will now map drive Z to an Azure File share within the Remote Desktop session to a Windows Server 2022 computer
-
Within the Remote Desktop session to myVMPrivate, click Start and then click Windows PowerShell ISE.
-
Within the Windows PowerShell ISE window, open the Script pane, then paste and run the PowerShell script that you recorded earlier in this lab. The script has the following format:
$connectTestResult = Test-NetConnection -ComputerName <storage_account_name>.file.core.windows.net -Port 445 if ($connectTestResult.TcpTestSucceeded) { # Save the password so the drive will persist on reboot cmd.exe /C "cmdkey /add:`"<storage_account_name>.file.core.windows.net`" /user:`"localhost\<storage_account_name>`" /pass:`"<storage_account_key>`"" # Mount the drive New-PSDrive -Name Z -PSProvider FileSystem -Root "\\<storage_account_name>.file.core.windows.net\my-file-share" -Persist } else { Write-Error -Message "Unable to reach the Azure storage account via port 445. Check to make sure your organization or ISP is not blocking port 445, or use Azure P2S VPN, Azure S2S VPN, or Express Route to tunnel SMB traffic over a different port." }Note: The
<storage_account_name>placeholder represents the name of the storage account hosting the file share and<storage_account_key>one its primary key -
Start File Explorer and verify that the Z: drive mapping has been successfully created.
-
Next, from the console pane of the Windows PowerShell ISE console, run the following to verify that the virtual machine has no outbound connectivity to the internet:
Test-NetConnection -ComputerName www.bing.com -Port 80Note: The test will fail because the network security group associated with the Private subnet does not allow outbound access to the internet.
-
Terminate the Remote Desktop session to the myVMPrivate Azure VM.
Note: At this point, you have confirmed that the virtual machine in the Private subnet can access the storage account.
Task 8: Test the storage connection from the public subnet to confirm that access is denied
-
Navigate back to the Virtual machines blade.
-
On the Virtual machines blade, click the myVMPublic entry.
-
On the myVMPublic blade, click Connect and, in the drop down menu, click Connect.
-
Click Connect via RDP and use it to connect to the myVMPublic Azure VM via Remote Desktop. When prompted to authenticate, provide the following credentials:
Setting Value Username Student Password Please use your personal password created in Lab 02 > Exercise 2 > Task 1 > Step 3. Note: Wait for the Remote Desktop session to open and Server Manager to load.
Note: You will now map drive Z to an Azure File share within the Remote Desktop session to a Windows Server 2022 computer
-
Within the Remote Desktop session to myVMPublic, click Start and then click Windows PowerShell ISE.
-
Within the Windows PowerShell ISE window, open the Script pane, then paste and run the same PowerShell script that you ran within the Remote Desktop session to the myVMPrivate Azure VM.
Note: This time, you will receive the New-PSDrive : Access is denied error.
Note: Access is denied because the myVmPublic virtual machine is deployed in the Public subnet. The Public subnet does not have a service endpoint enabled for the Azure Storage. The storage account only allows network access from the Private subnet.
-
Next, from the console pane of the Windows PowerShell ISE console, run the following to verify that the virtual machine has outbound connectivity to the internet:
Test-NetConnection -ComputerName www.bing.com -Port 80Note: The test will succeed because there is no outbound security rule to deny internet on the Public subnet.
-
Terminate the Remote Desktop session to the myVMPublic Azure VM.
Note: At this point, you have confirmed that the virtual machine in the Public subnet cannot access the storage account, but has access to the internet.
Clean up resources
Remember to remove any newly created Azure resources that you no longer use. Removing unused resources ensures you will not incur unexpected costs.