Lab 05: Securing Azure SQL Database
Student lab manual
Lab scenario
You have been asked to review security features for Azure SQL database. Specifically, you are interested in:
- Protection against attacks such as SQL injection and data exfiltration.
- Ability to discover and classify database information into categories such as Confidential.
- Ability to audit database server and database queries and log events.
For all the resources in this lab, we are using the East US region. Verify with your instructor this is the region to use for class.
Lab objectives
In this lab, you will complete the following exercise:
- Exercise 1: Implement SQL Database security features
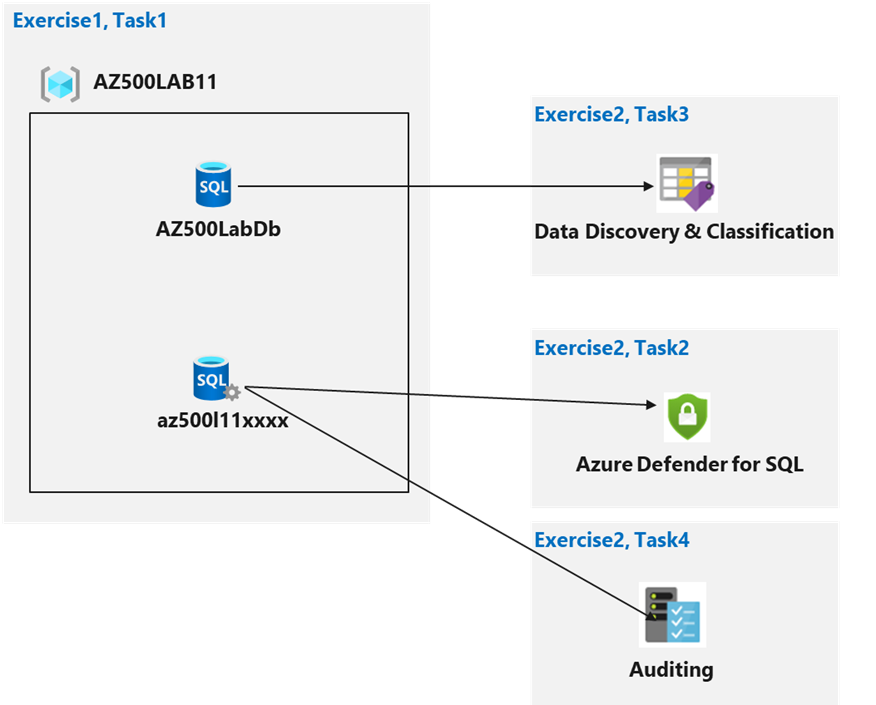
Securing Azure SQL Database diagram
Instructions
Lab files:
- \Allfiles\Labs\11\azuredeploy.json
Exercise 1: Implement SQL Database security features
Estimated timing: 30 minutes
In this exercise, you will complete the following tasks:
- Task 1: Deploy an Azure SQL Database
- Task 2: Configure Advanced Data Protection
- Task 3: Configure Data Classification
- Task 4: Configure Auditing
Task 1: Deploy an Azure SQL Database
In this task, you will use a template to deploy the lab infrastructure.
-
Sign-in to the Azure portal
https://portal.azure.com/.Note: Sign in to the Azure portal using an account that has the Owner or Contributor role in the Azure subscription you are using for this lab.
-
In the Azure portal, in the Search resources, services, and docs text box at the top of the Azure portal page, type Deploy a custom template and press the Enter key.
-
On the Custom deployment blade, click the Build your own template in the editor option.
-
On the Edit template blade, click Load file, locate the \Allfiles\Labs\11\azuredeploy.json file and click Open.
Note: Review the content of the template and note that it deploys an Azure SQL database.
-
On the Edit template blade, click Save.
-
On the Custom deployment blade, ensure that the following settings are configured (leave any others with their default values):
Setting Value Subscription the name of the Azure subscription you will be using in this lab Resource group click Create new and type the name AZ500LAB11 Location (US) East US -
Click Review + Create and then click Create.
Note: Wait for the deployment to complete.
Task 2: Configure Advanced Data Protection
-
In the Azure portal, in the Search resources, services, and docs text box at the top of the Azure portal page, type Resource groups and press the Enter key.
-
On the Resource groups blade, in the list of resource group, click the AZ500LAB11 entry.
-
On the AZ500LAB11 blade, click the entry representing the newly created SQL Server.
-
On the SQL server blade, in the Security section, click Microsoft Defender for Cloud, select Enable Microsoft Defender for SQL.
Note: Wait until notification indicates Azure Defender for SQL has been successfully enabled.
-
On the SQL server blade, in the Security section, on the Microsoft Defender for Cloud page, in the Microsoft Defender for SQL: Enabled at the subscription-level (Configure) parameter, click (configure).
Note: Refresh the browser if (configure) is not displaying.
-
On the Server Settings blade, review the information about pricing and the trial period, VULNERABILITY ASSESSMENT SETTINGS and ADVANCED THREAT PROTECTION SETTINGS.
-
Back to Microsoft Defender for Cloud blade, review Recommendations and Security alerts.
Note: It may take 10-15 minutes for recommendations to appear on the Microsoft Defender for Cloud blade. Rather than waiting, proceed to the next task but consider returning to this blade once you complete all the remaining tasks.
Task 3: Configure Data Classification
In this task, you will discover and classify information in SQL database for GPDR and data protection compliance.
-
On the SQL server blade, in the Settings section, click SQL Databases.
-
In the list of databases, select the AZ500LabDb entry.
-
On the AZ500LabDb SQL database blade, in the Security section, click Data Discovery & Classification.
-
On the Data Discovery & Classification blade, click the Classification tab.
Note: The classification engine scans your database for columns containing potentially sensitive data and provides a list of recommended column classifications.
-
Click the text message We have found 15 columns with classification recommendations displayed on blue bar at the top of the blade.
-
Review the listed columns and the recommended sensitivity label.
-
Enable the Select all checkbox and then click Accept Selected Recommendations.
Note: Alternatively, you could select only certain columns and dismiss others.
Note: You have the option to change the information type and sensitivity label.
-
Once you have completed your review click Save.
Note: This will complete the classification and persistently label the database columns with the new classification metadata.
-
Back on the Data Discovery & Classification blade Overview tab, note that it has been updated to account for the latest classification information.
Task 4 : Configure auditing
In this task, you will first configure server level auditing and then configure database level auditing.
-
In the Azure portal, navigate back to the SQL Server blade.
-
On the SQL Server blade, in the Security section, click Auditing.
Note: This is server level auditing. The default auditing settings include all the queries and stored procedures executed against the database, as well as successful and failed logins.
-
Set the Enable Azure SQL Auditing switch to ON to enable auditing.
-
Select the Storage checkbox and entry boxes for Subscription and Storage Account will display.
-
Choose your Subscription from the dropdown list.
-
Click Storage account and choose Create new.
-
On the Create storage account blade, in the Name box, type a globally unique name consisting of between 3 and 24 lower case letters and digits, click OK,
Note: You may need to refresh the browser before the storage account becomes available.
-
Back on the Auditing blade, under Advanced properties set Retention (days) to 5.
-
On the Auditing blade, click Save to save the auditing settings.
Note: If you receive an error message regarding invalid storage container path then the storage account may not have have been provisioned yet. Wait a few minutes, click Storage account, on the Choose storage account blade, select the newly created storage account and back on the Auditing blade, click Save.
-
On the server blade, in the Settings section, click SQL Databases.
-
In the list of databases, select the AZ500LabDb entry.
-
On the AZ500LabDb SQL database blade, in the Security section, click Auditing.
Note: This is database level auditing. Server-level auditing is already enabled.
Note: Audits can be written to an Azure storage account, to a Log Analytics workspace, or to the Event Hub. You can configure any combination of these options.
Note: If storage-based auditing is enabled on the server, it will always apply to the database, regardless of the database settings.
-
On your SQL database Overview page in the Azure portal, select Query editor (preview) from the left menu. Try to sign in, you might fail on password, firewall rule for your IP address, everything gets audited. Try successful login as well, run query and you might find more details in audit logs
-
switch back to DB, Auditing and Click View Audit Logs.
-
On the Audit records blade, note that you can switch between Server audit and Database audit.
Results: You have created a SQL server and database, configured data classification, and auditing.
Clean up resources
Remember to remove any newly created Azure resources that you no longer use. Removing unused resources ensures you will not incur unexpected costs.
-
In the Azure portal, open the Cloud Shell by clicking the first icon in the top right of the Azure Portal. If prompted, click PowerShell and Create storage.
-
Ensure PowerShell is selected in the drop-down menu in the upper-left corner of the Cloud Shell pane.
-
In the PowerShell session within the Cloud Shell pane, run the following to remove the resource group you created in this lab:
Remove-AzResourceGroup -Name "AZ500LAB11" -Force -AsJob -
Close the Cloud Shell pane.