Lab 04: Configuring and Securing ACR and AKS
Student lab manual
Lab scenario
You have been asked to deploy a proof of concept with Azure Container Registry and Azure Kubernetes Service. Specifically, the proof of concept should demonstrate:
- Using Dockerfile to build an image.
- Using Azure Container Registry to store images.
- Configuring an Azure Kubernetes Service.
- Securing and accessing container applications both internally and externally.
For all the resources in this lab, we are using the East US region. Verify with your instructor this is the region to use for class.
Lab objectives
In this lab, you will complete the following exercise:
- Exercise 1: Configuring and Securing ACR and AKS
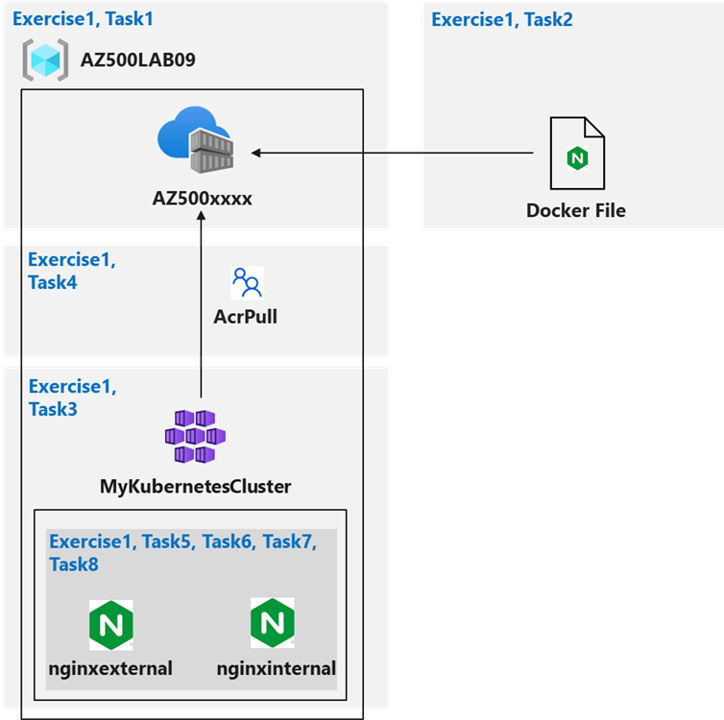
Configuring and Securing ACR and AKS diagram
Instructions
Lab files:
- \Allfiles\Labs\09\nginxexternal.yaml
- \Allfiles\Labs\09\nginxinternal.yaml
Exercise 1: Configuring and Securing ACR and AKS
Estimated timing: 45 minutes
For all the resources in this lab, we are using the East (US) region. Verify with your instructor this is the region to use for your class.
In this exercise, you will complete the following tasks:
- Task 1: Create an Azure Container Registry
- Task 2: Create a Dockerfile, build a container and push it to Azure Container Registry
- Task 3: Create an Azure Kubernetes Service cluster
- Task 4: Grant the AKS cluster permissions to access the ACR
- Task 5: Deploy an external service to AKS
- Task 6: Verify the you can access an external AKS-hosted service
- Task 7: Deploy an internal service to AKS
- Task 8: Verify the you can access an internal AKS-hosted service
Task 1: Create an Azure Container Registry
In this task, you will create a resource group for the lab and an Azure Container Registry.
-
Sign-in to the Azure portal
https://portal.azure.com/.Note: Sign in to the Azure portal using an account that has the Owner or Contributor role in the Azure subscription you are using for this lab and the Global Administrator role in the Microsoft Entra tenant associated with that subscription.
-
In the Azure portal, open the Cloud Shell by clicking the first icon in the top right of the Azure Portal. If prompted, click Bash, No storage account required, select your Subscription, and then click Apply.
-
Ensure Bash is selected in the drop-down menu in the upper-left corner of the Cloud Shell pane.
-
In the Bash session within the Cloud Shell pane, run the following to create a new resource group for this lab:
az group create --name AZ500LAB09 --location eastus -
In the Bash session within the Cloud Shell pane, run the following to verify the resource group was created:
az group list --query "[?name=='AZ500LAB09']" -o table -
In the Bash session run the following commands to register the Container Registery in the lab environment.
az provider register --namespace Microsoft.Kubernetes az provider register --namespace Microsoft.KubernetesConfiguration az provider register --namespace Microsoft.OperationsManagement az provider register --namespace Microsoft.OperationalInsights az provider register --namespace Microsoft.ContainerService az provider register --namespace Microsoft.ContainerRegistry -
In the Bash session within the Cloud Shell pane, run the following to create a new Azure Container Registry (ACR) instance (The name of the ACR must be globally unique):
az acr create --resource-group AZ500LAB09 --name az500$RANDOM$RANDOM --sku Basic -
In the Bash session within the Cloud Shell pane, run the following to confirm that the new ACR was created:
az acr list --resource-group AZ500LAB09 -o tableNote: Record the name of the ACR. You will need it in the next task.
Task 2: Create a Dockerfile, build a container and push it to Azure Container Registry
In this task, you will create a Dockerfile, build an image from the Dockerfile, and deploy the image to the ACR.
-
In the Bash session within the Cloud Shell pane, run the following to create a Dockerfile to create an Nginx-based image:
echo FROM nginx > Dockerfile -
In the Bash session within the Cloud Shell pane, run the following to build an image from the Dockerfile and push the image to the new ACR.
Note: The trailing period at the end of the command line is required. It designates the current directory as the location of Dockerfile.
ACRNAME=$(az acr list --resource-group AZ500LAB09 --query '[].{Name:name}' --output tsv) az acr build --resource-group AZ500LAB09 --image sample/nginx:v1 --registry $ACRNAME --file Dockerfile .Note: Wait for the command to successfully complete. This might take about 2 minutes.
-
Close the Cloud Shell pane.
-
In the Azure portal, navigate to the AZ500Lab09 resource group and, in the list of resources, click the entry representing the Azure Container Registry instance you provisioned in the previous task.
-
On the Container registry blade, in the Services section, click Repositories.
-
Verify that the list of repositories includes the new container image named sample/nginx.
-
Click the sample/nginx entry and verify presence of the v1 tag that identifies the image version.
-
Click the v1 entry to view the image manifest.
Note: The manifest includes the sha256 digest, manifest creation date, and platform entries.
Task 3: Create an Azure Kubernetes Service cluster
In this task, you will create an Azure Kubernetes service and review the deployed resources.
-
In the Azure portal, in the Search resources, services, and docs text box at the top of the Azure portal page, type +++Kubernetes services+++ and press the Enter key.
-
On the Kubernetes services blade, click + Create and, in the drop-down menu, click + Create a Kubernetes cluster
-
On the Basics tab of the Create Kubernetes cluster blade, select Cluster preset configuration, select Dev/Test ($). Now specify the following settings (leave others with their default values):
Setting Value Subscription Use the name of the Azure subscription you are using in this lab Resource group AZ500LAB09 Cluster preset configuration Dev/Test Kubernetes cluster name +++MyKubernetesCluster+++ Region (US) East US Fleet Manager None Availability zones None AKS pricing tier Free Enable long term support Unchecked Kubernetes version Use default Automatic upgrade *Keep the default * Node security channel type Keep the default Authentication and Authorization Local accounts with Kubernetes RBAC -
Click Next and, on the Node Pools tab of the Create Kubernetes cluster blade, specify the following settings (leave others with their default values):
Setting Value Enable node auto-provisioning Uncheck box Enable virtual nodes Uncheck box Other values Keep the defaults -
Click Next, to get to Networking.
Note: You will get a pop-up that says a Recommendation is available for your VM Size. Accept the recommendation to move forward.
-
On the Networking tab of the Create Kubernetes cluster blade, specify the following settings (leave others with their default values):
Setting Value Enable private cluster Unchecked Set authorized IP ranges Unchecked Network configuration Azure CNI Overlay DNS name prefix Leave the default value Network policy None Note: AKS can be configured as a private cluster. This assigns a private IP to the API server to ensure network traffic between your API server and your node pools remains on the private network only. For more information, visit Create a private Azure Kubernetes Service cluster page.
-
Click Next and, on the Integrations tab of the Create Kubernetes cluster page, leave All values at default.
Note: In production scenarios, you would want to enable monitoring. Monitoring is disabled in this case since it is not covered in the lab.
-
Click Review + Create and then click Create.
Note: Wait for the deployment to complete. This might take about 10 minutes.
-
Once the deployment completes, in the Azure portal, in the Search resources, services, and docs text box at the top of the Azure portal page, type +++Resource groups+++ and press the Enter key.
-
On the Resource groups blade, in the listing of resource groups, note a new resource group named MC_AZ500LAB09_MyKubernetesCluster_eastus that holds components of the AKS Nodes. Review resources in this resource group.
-
Navigate back to the Resource groups blade and click the AZ500LAB09 entry.
Note: In the list of resources, note the AKS Cluster and the corresponding virtual network.
-
In the Azure portal, open a Bash session in the Cloud Shell.
Note: Ensure Bash is selected in the drop-down menu in the upper-left corner of the Cloud Shell pane.
-
In the Bash session within the Cloud Shell pane, run the following to connect to the Kubernetes cluster:
az aks get-credentials --resource-group AZ500LAB09 --name MyKubernetesCluster -
In the Bash session within the Cloud Shell pane, run the following to list nodes of the Kubenetes cluster:
kubectl get nodesNote: Verify that the Status of the cluster node is listed as Ready.
Task 4: Grant the AKS cluster permissions to access the ACR and manage its virtual network
In this task, you will grant the AKS cluster permission to access the ACR and manage its virtual network.
-
In the Bash session within the Cloud Shell pane, run the following to configure the AKS cluster to use the Azure Container Registry instance you created earlier in this lab.
ACRNAME=$(az acr list --resource-group AZ500LAB09 --query '[].{Name:name}' --output tsv) az aks update -n MyKubernetesCluster -g AZ500LAB09 --attach-acr $ACRNAMENote: This command grants the ‘acrpull’ role assignment to the ACR.
Note: It may take a few minutes for this command to complete.
-
In the Bash session within the Cloud Shell pane, run the following to grant the AKS cluster the Contributor role to its virtual network.
 RG_AKS=AZ500LAB09

 RG_VNET=MC_AZ500LAB09_MyKubernetesCluster_eastus

 AKS_VNET_NAME=aks-vnet-30198516

 AKS_CLUSTER_NAME=MyKubernetesCluster

 AKS_VNET_ID=$(az network vnet show --name $AKS_VNET_NAME --resource-group $RG_VNET --query id -o tsv)

 AKS_MANAGED_ID=$(az aks show --name $AKS_CLUSTER_NAME --resource-group $RG_AKS --query identity.principalId -o tsv)

 az role assignment create --assignee $AKS_MANAGED_ID --role "Contributor" --scope $AKS_VNET_ID
Task 5: Deploy an external service to AKS
In this task, you will download the Manifest files, edit the YAML file, and apply your changes to the cluster.
-
In the Bash session within the Cloud Shell pane, click the Upload/Download files icon, in the drop-down menu, click Upload, in the Open dialog box, navigate to the location where you downloaded the lab files, select \Allfiles\Labs\09\nginxexternal.yaml click Open. Next, select \Allfiles\Labs\09\nginxinternal.yaml, and click Open.
-
In the Bash session within the Cloud Shell pane, run the following to identify the name of the Azure Container Registry instance:
echo $ACRNAMENote: Record the Azure Container Registry instance name. You will need it later in this task.
-
In the Bash session within the Cloud Shell pane, run the following to open the nginxexternal.yaml file, so you can edit its content.
code ./nginxexternal.yamlNote: This is the external yaml file.
Note: If you see the pop-up Switch to Classic Cloud Shell, select Confirm, run the following command and then repeat this step:
ACRNAME=$(az acr list --resource-group AZ500LAB09 --query '[].{Name:name}' --output tsv) -
In the editor pane, scroll down to line 24 and replace the
<ACRUniquename>placeholder with the ACR name. -
In the editor pane, in the upper right corner, click the ellipses icon, click Save and then click Close editor.
Note: You could use Ctrl+S and Ctrl+Q to save the file and close the editor.
-
In the Bash session within the Cloud Shell pane, run the following to apply the change to the cluster:
kubectl apply -f nginxexternal.yaml -
In the Bash session within the Cloud Shell pane, review the output of the command you run in the previous task to verify that the deployment and the corresponding service have been created. Here’s what you should see:
 deployment.apps/nginxexternal created
 service/nginxexternal created
Task 6: Verify the you can access an external AKS-hosted service
In this task, verify the container can be accessed externally using the public IP address.
-
In the Bash session within the Cloud Shell pane, run the following to retrieve information about the nginxexternal service including name, type, IP addresses, and ports.
kubectl get service nginxexternal -
In the Bash session within the Cloud Shell pane, review the output and record the value in the External-IP column. You will need it in the next step.
-
Open a new browser tab and browse to the IP address you identified in the previous step.
-
Ensure the Welcome to nginx! page displays.
Task 7: Deploy an internal service to AKS
In this task, you will deploy the internal facing service on the AKS.
-
In the Bash session within the Cloud Shell pane, run the following to open the nginxintenal.yaml file, so you can edit its content.
code ./nginxinternal.yamlNote: This is the internal yaml file.
-
In the editor pane, scroll down to the line containing the reference to the container image and replace the
<ACRUniquename>placeholder with the ACR name. -
In the editor pane, in the upper right corner, click the ellipses icon, click Save and then click Close editor.
Note: You could use Ctrl+S and Ctrl+Q to save the file and close the editor.
-
In the Bash session within the Cloud Shell pane, run the following to apply the change to the cluster:
kubectl apply -f nginxinternal.yaml -
In the Bash session within the Cloud Shell pane, review the output to verify your deployment and the service have been created. Here’s what you should see:
deployment.apps/nginxinternal created service/nginxinternal created -
In the Bash session within the Cloud Shell pane, run the following to retrieve information about the nginxinternal service including name, type, IP addresses, and ports.
kubectl get service nginxinternal -
In the Bash session within the Cloud Shell pane, review the output. The External-IP is, in this case, a private IP address. If it is in a Pending state then run the previous command again.
Note: Record this IP address. You will need it in the next task.
Note: To access the internal service endpoint, you will connect interactively to one of the pods running in the cluster.
Note: Alternatively you could use the CLUSTER-IP address.
Task 8: Verify the you can access an internal AKS-hosted service
In this task, you will use one of the pods running on the AKS cluster to access the internal service.
-
In the Bash session within the Cloud Shell pane, run the following to list the pods in the default namespace on the AKS cluster:
kubectl get pods -
In the listing of the pods, copy the first entry in the NAME column.
Note: This is the pod you will use in the subsequent steps.
-
In the Bash session within the Cloud Shell pane, run the following to connect interactively to the first pod (replace the
<pod_name>placeholder with the name you copied in the previous step):kubectl exec -it <pod_name> -- /bin/bash -
In the Bash session within the Cloud Shell pane, run the following to verify that the nginx web site is available via the private IP address of the service (replace the
<internal_IP>placeholder with the IP address you recorded in the previous task):curl http://<internal_IP> -
Close the Cloud Shell pane.
Result: You have configured and secured ACR and AKS.
Clean up resources
Remember to remove any newly created Azure resources that you no longer use. Removing unused resources ensures you will not incur unexpected costs.
-
In the Azure portal, open the Cloud Shell by clicking the first icon in the top right of the Azure Portal.
-
In the upper-left drop-down menu of the Cloud Shell pane, select PowerShell and, when prompted, click Confirm.
-
In the PowerShell session within the Cloud Shell pane, run the following to remove the resource groups you created in this lab:
Remove-AzResourceGroup -Name "AZ500LAB09" -Force -AsJob -
Ensure that the HTML code of the Welcome to nginx! page is displayed.
-
Close the Cloud Shell pane.