Lab 01: Role-Based Access Control
Student lab manual
Lab scenario
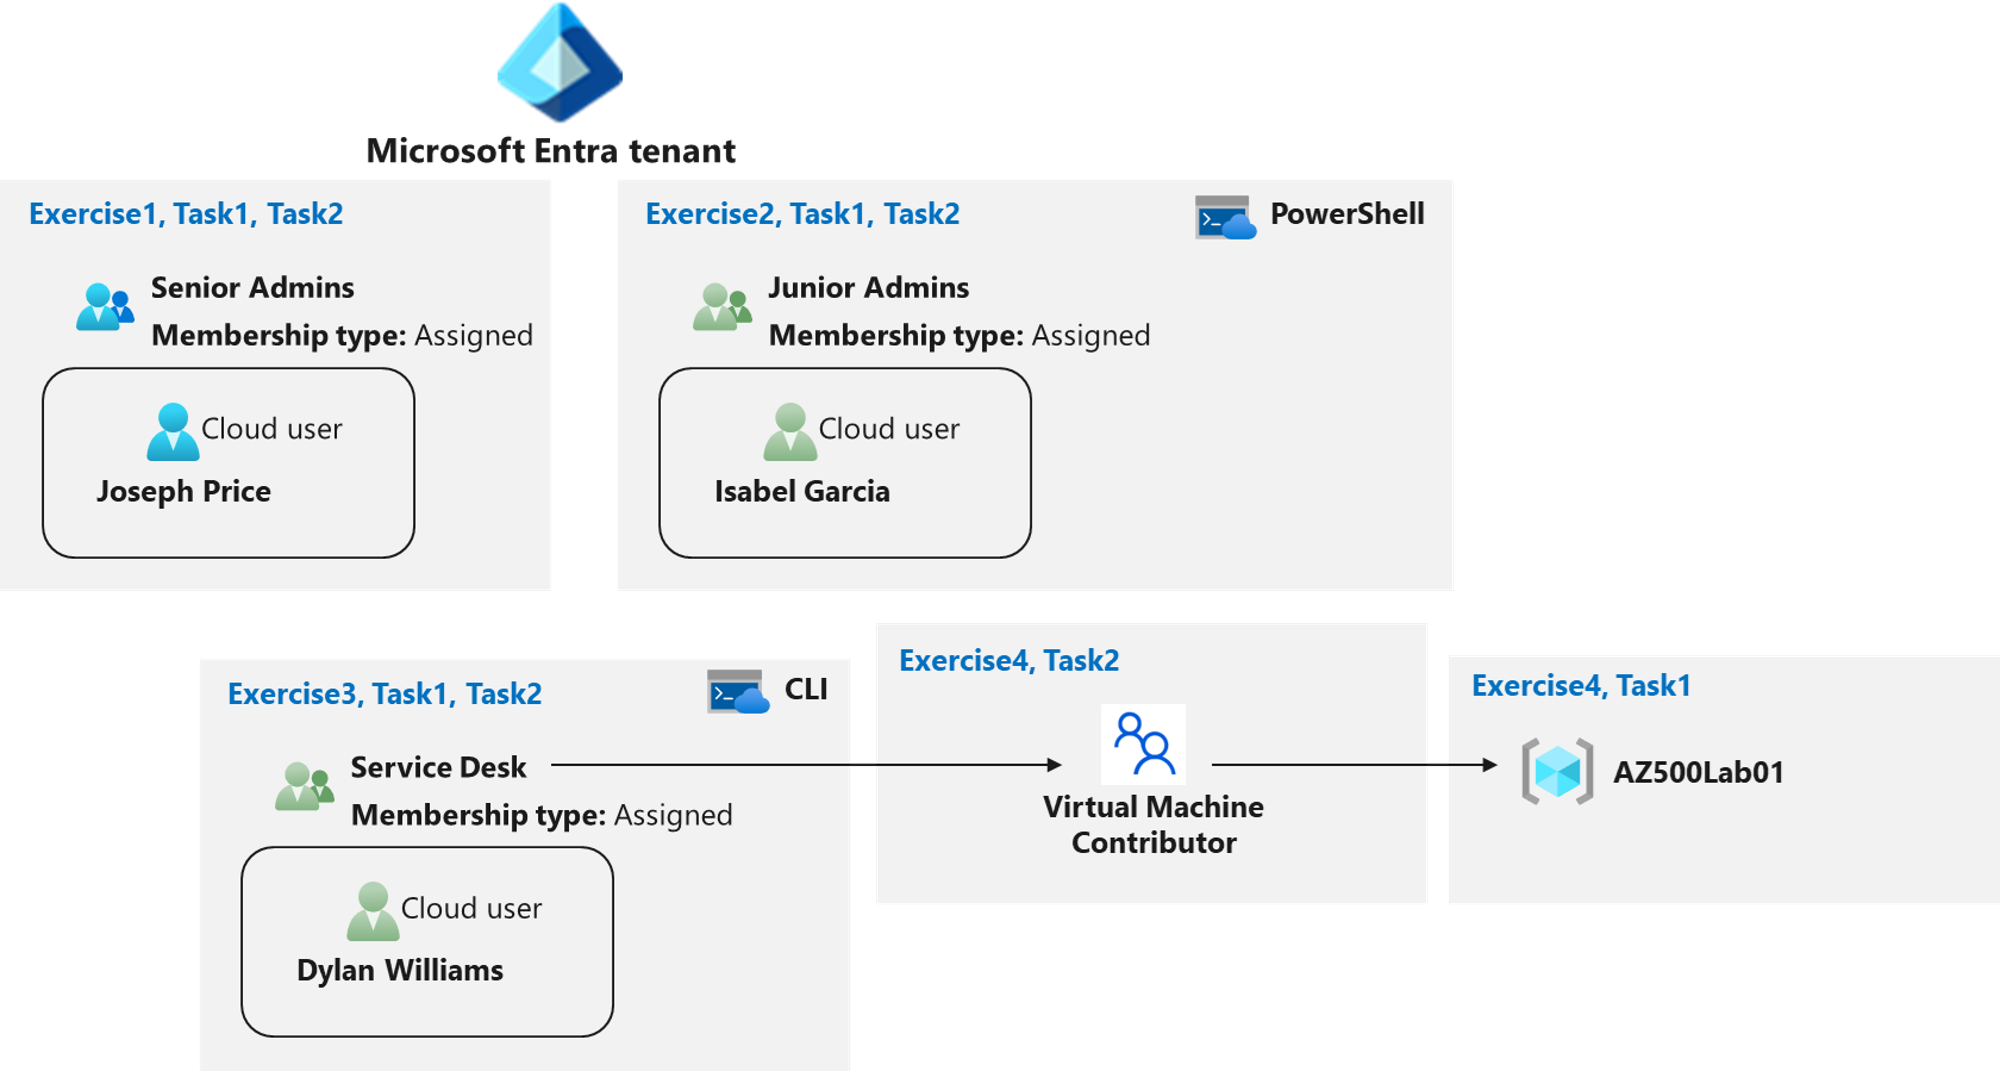
You have been asked to create a proof of concept showing how Azure users and groups are created. Also, how role-based access control is used to assign roles to groups. Specifically, you need to:
- Create a Senior Admins group containing the user account of Joseph Price as its member.
- Create a Junior Admins group containing the user account of Isabel Garcia as its member.
- Create a Service Desk group containing the user account of Dylan Williams as its member.
- Assign the Virtual Machine Contributor role to the Service Desk group.
For all the resources in this lab, we are using the East US region. Verify with your instructor this is the region to use for class.
Lab objectives
In this lab, you will complete the following exercises:
- Exercise 1: Create the Senior Admins group with the user account Joseph Price as its member (the Azure portal).
- Exercise 2: Create the Junior Admins group with the user account Isabel Garcia as its member (PowerShell).
- Exercise 3: Create the Service Desk group with the user Dylan Williams as its member (Azure CLI).
- Exercise 4: Assign the Virtual Machine Contributor role to the Service Desk group.
Role-Based Access Control architecture diagram
Instructions
Exercise 1: Create the Senior Admins group with the user account Joseph Price as its member.
Estimated timing: 10 minutes
In this exercise, you will complete the following tasks:
- Task 1: Use the Azure portal to create a user account for Joseph Price.
- Task 2: Use the Azure portal to create a Senior Admins group and add the user account of Joseph Price to the group.
Task 1: Use the Azure portal to create a user account for Joseph Price
In this task, you will create a user account for Joseph Price.
-
Start a browser session and sign-in to the Azure portal
https://portal.azure.com/.Note: Sign in to the Azure portal using an account that has the Owner or Contributor role in the Azure subscription you are using for this lab and the Global Administrator role in the Microsoft Entra tenant associated with that subscription.
-
In the Search resources, services, and docs text box at the top of the Azure portal page, type Microsoft Entra ID and press the Enter key.
-
On the Overview blade of the Microsoft Entra ID tenant, in the Manage section, select Users, and then select + New user.
-
On the New User blade, ensure that the Create user option is selected, and specify the following settings:
Setting Value User name Joseph Name Joseph Price -
Click on the copy icon next to the User name to copy the full user.
-
Ensure that the Auto-generate password is selected, select the Show password checkbox to identify the automatically generated password. You would need to provide this password, along with the user name to Joseph.
-
Click Create.
-
Refresh the **Users All users** blade to verify the new user was created in your Microsoft Entra tenant.
Task2: Use the Azure portal to create a Senior Admins group and add the user account of Joseph Price to the group.
In this task, you will create the Senior Admins group, add the user account of Joseph Price to the group, and configure it as the group owner.
-
In the Azure portal, navigate back to the blade displaying your Microsoft Entra ID tenant.
-
In the Manage section, click Groups, and then select + New group.
-
On the New Group blade, specify the following settings (leave others with their default values):
Setting Value Group type Security Group name Senior Admins Membership type Assigned -
Click the No owners selected link, on the Add owners blade, select Joseph Price, and click Select.
-
Click the No members selected link, on the Add members blade, select Joseph Price, and click Select.
-
Back on the New Group blade, click Create.
Result: You used the Azure Portal to create a user and a group, and assigned the user to the group.
Exercise 2: Create a Junior Admins group containing the user account of Isabel Garcia as its member.
Estimated timing: 10 minutes
In this exercise, you will complete the following tasks:
- Task 1: Use PowerShell to create a user account for Isabel Garcia.
- Task 2: Use PowerShell to create the Junior Admins group and add the user account of Isabel Garcia to the group.
Task 1: Use PowerShell to create a user account for Isabel Garcia.
In this task, you will create a user account for Isabel Garcia by using PowerShell.
-
Open the Cloud Shell by clicking the Cloud Shell icon in the top-right corner of the Azure portal.
-
If prompted, select No storage account required, select the name of your subscription, and then select Apply. This is required only the first time you launch the Cloud Shell.
-
In the Cloud Shell pane, ensure PowerShell is selected from the drop-down menu in the upper-left corner. (Note: In the new Cloud Shell, this will say: –>Switch to Bash)
Note: To paste copied text into the Cloud Shell, right-click within the pane window and select Paste. Alternatively, you can use the Shift+Insert key combination.
-
In the PowerShell session within the Cloud Shell pane, run the following to create a password profile object:
$passwordProfile = New-Object -TypeName Microsoft.Open.AzureAD.Model.PasswordProfile - In the PowerShell session within the Cloud Shell pane, run the following to set the value of the password within the profile object:
$passwordProfile.Password = "Pa55w.rd1234" -
In the PowerShell session within the Cloud Shell pane, run the following to connect to Microsoft Entra ID:
Connect-AzureAD -
In the PowerShell session within the Cloud Shell pane, run the following to identify the name of your Microsoft Entra tenant:
$domainName = ((Get-AzureAdTenantDetail).VerifiedDomains)[0].Name -
In the PowerShell session within the Cloud Shell pane, run the following to create a user account for Isabel Garcia:
New-AzureADUser -DisplayName 'Isabel Garcia' -PasswordProfile $passwordProfile -UserPrincipalName "Isabel@$domainName" -AccountEnabled $true -MailNickName 'Isabel' -
In the PowerShell session within the Cloud Shell pane, run the following to list Microsoft Entra ID users (the accounts of Joseph and Isabel should appear on the listed):
Get-AzureADUser -All $true | Where-Object {$_.UserPrincipalName -like "Isabel-@lab.LabInstance.Id*"}
Task2: Use PowerShell to create the Junior Admins group and add the user account of Isabel Garcia to the group.
In this task, you will create the Junior Admins group and add the user account of Isabel Garcia to the group by using PowerShell.
-
In the same PowerShell session within the Cloud Shell pane, run the following to create a new security group named Junior Admins:
New-AzureADGroup -DisplayName 'Junior Admins@lab.LabInstance.Id' -MailEnabled $false -SecurityEnabled $true -MailNickName JuniorAdmins -
In the PowerShell session within the Cloud Shell pane, run the following to list groups in your Microsoft Entra tenant (the list should include the Senior Admins and Junior Admins groups)
Get-AzureADGroup -
In the PowerShell session within the Cloud Shell pane, run the following to obtain a reference to the user account of Isabel Garcia:
$user = Get-AzureADUser -Filter "UserPrincipalName eq 'Isabel-@lab.LabInstance.Id@LODSPRODMCA.onmicrosoft.com'" - In the PowerShell session within the Cloud Shell pane, run the following to add the user account of Isabel to the Junior Admins@lab.LabInstance.Id group:
Add-AzADGroupMember -MemberUserPrincipalName $user.userPrincipalName -TargetGroupDisplayName "Junior Admins@lab.LabInstance.Id" -
In the PowerShell session within the Cloud Shell pane, run the following to verify that the Junior Admins@lab.LabInstance.Id group contains the user account of Isabel:
Get-AzADGroupMember -GroupDisplayName "Junior Admins@lab.LabInstance.Id"
Result: You used PowerShell to create a user and a group account, and added the user account to the group account.
Exercise 3: Create a Service Desk group containing the user account of Dylan Williams as its member.
Estimated timing: 10 minutes
In this exercise, you will complete the following tasks:
- Task 1: Use Azure CLI to create a user account for Dylan Williams.
- Task 2: Use Azure CLI to create the Service Desk group and add the user account of Dylan to the group.
Task 1: Use Azure CLI to create a user account for Dylan Williams.
In this task, you will create a user account for Dylan Williams.
-
In the drop-down menu in the upper-left corner of the Cloud Shell pane, select Bash (or: Switch to Bash), and, when prompted, click Confirm.
-
In the Bash session within the Cloud Shell pane, run the following to identify the name of your Microsoft Entra tenant:
DOMAINNAME=$(az ad signed-in-user show --query 'userPrincipalName' | cut -d '@' -f 2 | sed 's/\"//') -
In the Bash session within the Cloud Shell pane, run the following to create a user, Dylan Williams. Use yourdomain.
az ad user create --display-name "Dylan Williams" --password "Pa55w.rd1234" --user-principal-name Dylan@$DOMAINNAME -
In the Bash session within the Cloud Shell pane, run the following to list Microsoft Entra ID user accounts (the list should include user accounts of Joseph, Isabel, and Dylan)
az ad user list --output table
Task 2: Use Azure CLI to create the Service Desk group and add the user account of Dylan to the group.
In this task, you will create the Service Desk group and assign Dylan to the group.
-
In the same Bash session within the Cloud Shell pane, run the following to create a new security group named Service Desk.
az ad group create --display-name "Service Desk" --mail-nickname "ServiceDesk" -
In the Bash session within the Cloud Shell pane, run the following to list the Microsoft Entra ID groups (the list should include Service Desk, Senior Admins, and Junior Admins groups):
az ad group list -o table -
In the Bash session within the Cloud Shell pane, run the following to obtain a reference to the user account of Dylan Williams:
USER=$(az ad user list --filter "displayname eq 'Dylan Williams'") -
In the Bash session within the Cloud Shell pane, run the following to obtain the objectId property of the user account of Dylan Williams:
OBJECTID=$(echo $USER | jq '.[].id' | tr -d '"') -
In the Bash session within the Cloud Shell pane, run the following to add the user account of Dylan to the Service Desk group:
az ad group member add --group "Service Desk" --member-id $OBJECTID -
In the Bash session within the Cloud Shell pane, run the following to list members of the Service Desk group and verify that it includes the user account of Dylan:
az ad group member list --group "Service Desk" -
Close the Cloud Shell pane.
Result: Using Azure CLI you created a user and a group accounts, and added the user account to the group.
Exercise 4: Assign the Virtual Machine Contributor role to the Service Desk group.
Estimated timing: 10 minutes
In this exercise, you will complete the following tasks:
- Task 1: Create a resource group.
- Task 2: Assign the Service Desk Virtual Machine Contributor permissions to the resource group.
Task 1: Create a resource group
-
In the Azure portal, in the Search resources, services, and docs text box at the top of the Azure portal page, type Resource groups and press the Enter key.
-
On the Resource groups blade, click + Create and specify the following settings:
Setting Value Subscription name the name of your Azure subscription Resource group name AZ500Lab01 Location East US -
Click Review + create and then Create.
Note: Wait for the resource group to deploy. Use the Notification icon (top right) to track progress of the deployment status.
-
Back on the Resource groups blade, refresh the page and verify your new resource group appears in the list of resource groups.
Task 2: Assign the Service Desk Virtual Machine Contributor permissions.
-
On the Resource groups blade, click the AZ500LAB01 resource group entry.
-
On the AZ500Lab01 blade, click Access control (IAM) in the middle pane.
-
On the **AZ500Lab01 Access control (IAM)** blade, click + Add and then, in the drop-down menu, click Add role assignment. -
On the Add role assignment blade, complete each of the following settings before clicking Next:
Note: After completing all the steps, click Next.
Setting Value Role in the search tab Virtual Machine Contributor Assign access to (Under Members Pane) User, group, or service principal Select (+Select Members) Service Desk -
Click Review + assign twice to create the role assignment.
-
From the Access control (IAM) blade, select Role assignments.
-
On the **AZ500Lab01 Access control (IAM)** blade, on the Check access tab, in the Search by name or email address text box, type Dylan Williams. -
In the list of search results, select the user account of Dylan Williams and, on the Dylan Williams assignments - AZ500Lab01 blade, view the newly created assignment.
NOTE - Always remember to check both the Active and Eligible tabs when confirming RBAC assignments.
-
Close the Dylan Williams assignments - AZ500Lab01 blade.
- Repeat the same last two steps to check access for Joseph Price.
Result: You have assigned and checked RBAC permissions.
Clean up resources
Remember to remove any newly created Azure resources that you no longer use. Removing unused resources ensures you will not incur unexpected costs.
-
In the Azure portal, open the Cloud Shell by clicking the first icon in the top right of the Azure Portal.
-
In the drop-down menu in the upper-left corner of the Cloud Shell pane, select PowerShell, and, when prompted, click Confirm.
-
In the PowerShell session within the Cloud Shell pane, run the following to remove the resource group you created in this lab:
Remove-AzResourceGroup -Name "AZ500LAB01" -Force -AsJob -
Close the Cloud Shell pane.