Implement Security and Compliance in an Azure DevOps pipeline
Student lab manual
Lab requirements
-
This lab requires Microsoft Edge or an Azure DevOps supported browser.
-
Set up an Azure DevOps organization: If you don’t already have an Azure DevOps organization that you can use for this lab, create one by following the instructions available at Create an organization or project collection.
Lab overview
In this lab, you will use Mend Bolt (formerly WhiteSource) to automatically detect vulnerable open source components, outdated libraries, and license compliance issues in your code. You will leverage WebGoat, an intentionally insecure web application, maintained by OWASP designed to illustrate common web application security issues.
Mend is the leader in continuous open source software security and compliance management. WhiteSource integrates into your build process, irrespective of your programming languages, build tools, or development environments. It works automatically, continuously, and silently in the background, checking the security, licensing, and quality of your open source components against WhiteSource constantly-updated definitive database of open source repositories.
Mend provides Mend Bolt, a lightweight open source security and management solution developed specifically for integration with Azure DevOps and Azure DevOps Server. Note that Mend Bolt works per project and does not offer real-time alert capabilities, which requires Full platform, generally recommended for larger development teams that want to automate their open source management throughout the entire software development lifecycle (from the repositories to post-deployment stages) and across all projects and products.
Azure DevOps integration with Mend Bolt will enable you to:
- Detect and remedy vulnerable open source components.
- Generate comprehensive open source inventory reports per project or build.
- Enforce open source license compliance, including dependencies’ licenses.
- Identify outdated open source libraries with recommendations to update.
Objectives
After you complete this lab, you will be able to:
- Activate Mend Bolt.
- Run a build pipeline and review Mend security and compliance report.
Estimated timing: 45 minutes
Instructions
Exercise 0: Configure the lab prerequisites
In this exercise, you will set up the prerequisites for the lab, which consist of a new Azure DevOps project with a repository based on the eShopOnWeb.
Task 1: (skip if done) Create and configure the team project
In this task, you will create an eShopOnWeb Azure DevOps project to be used by several labs.
-
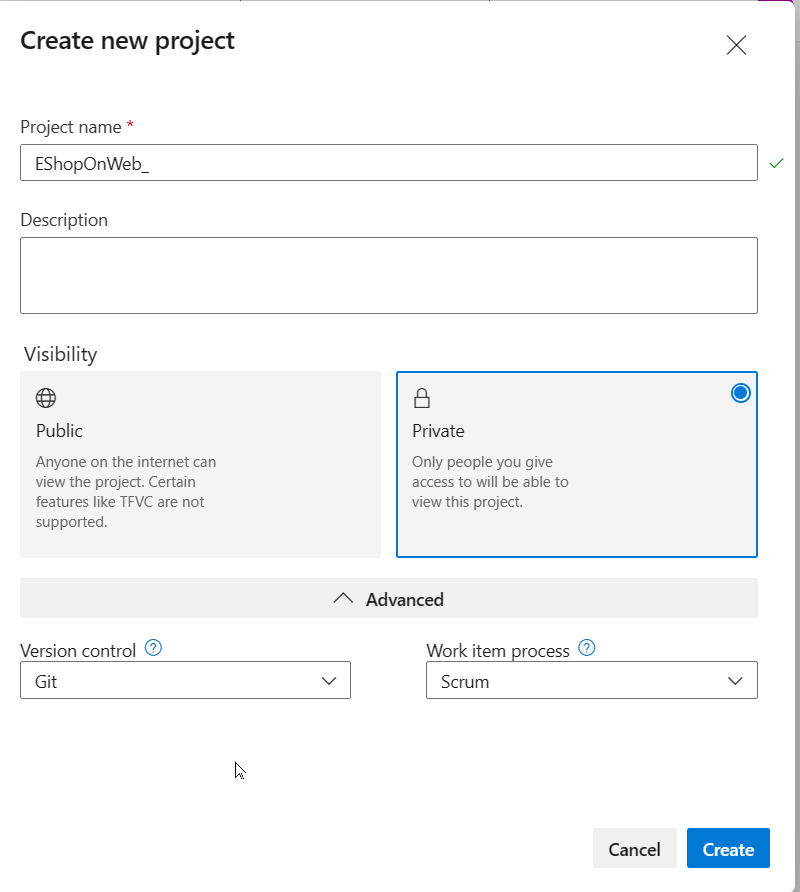
On your lab computer, in a browser window open your Azure DevOps organization. Click on New Project. Give your project the name eShopOnWeb and leave the other fields with defaults. Click on Create.
Task 2: (skip if done) Import eShopOnWeb Git Repository
In this task you will import the eShopOnWeb Git repository that will be used by several labs.
-
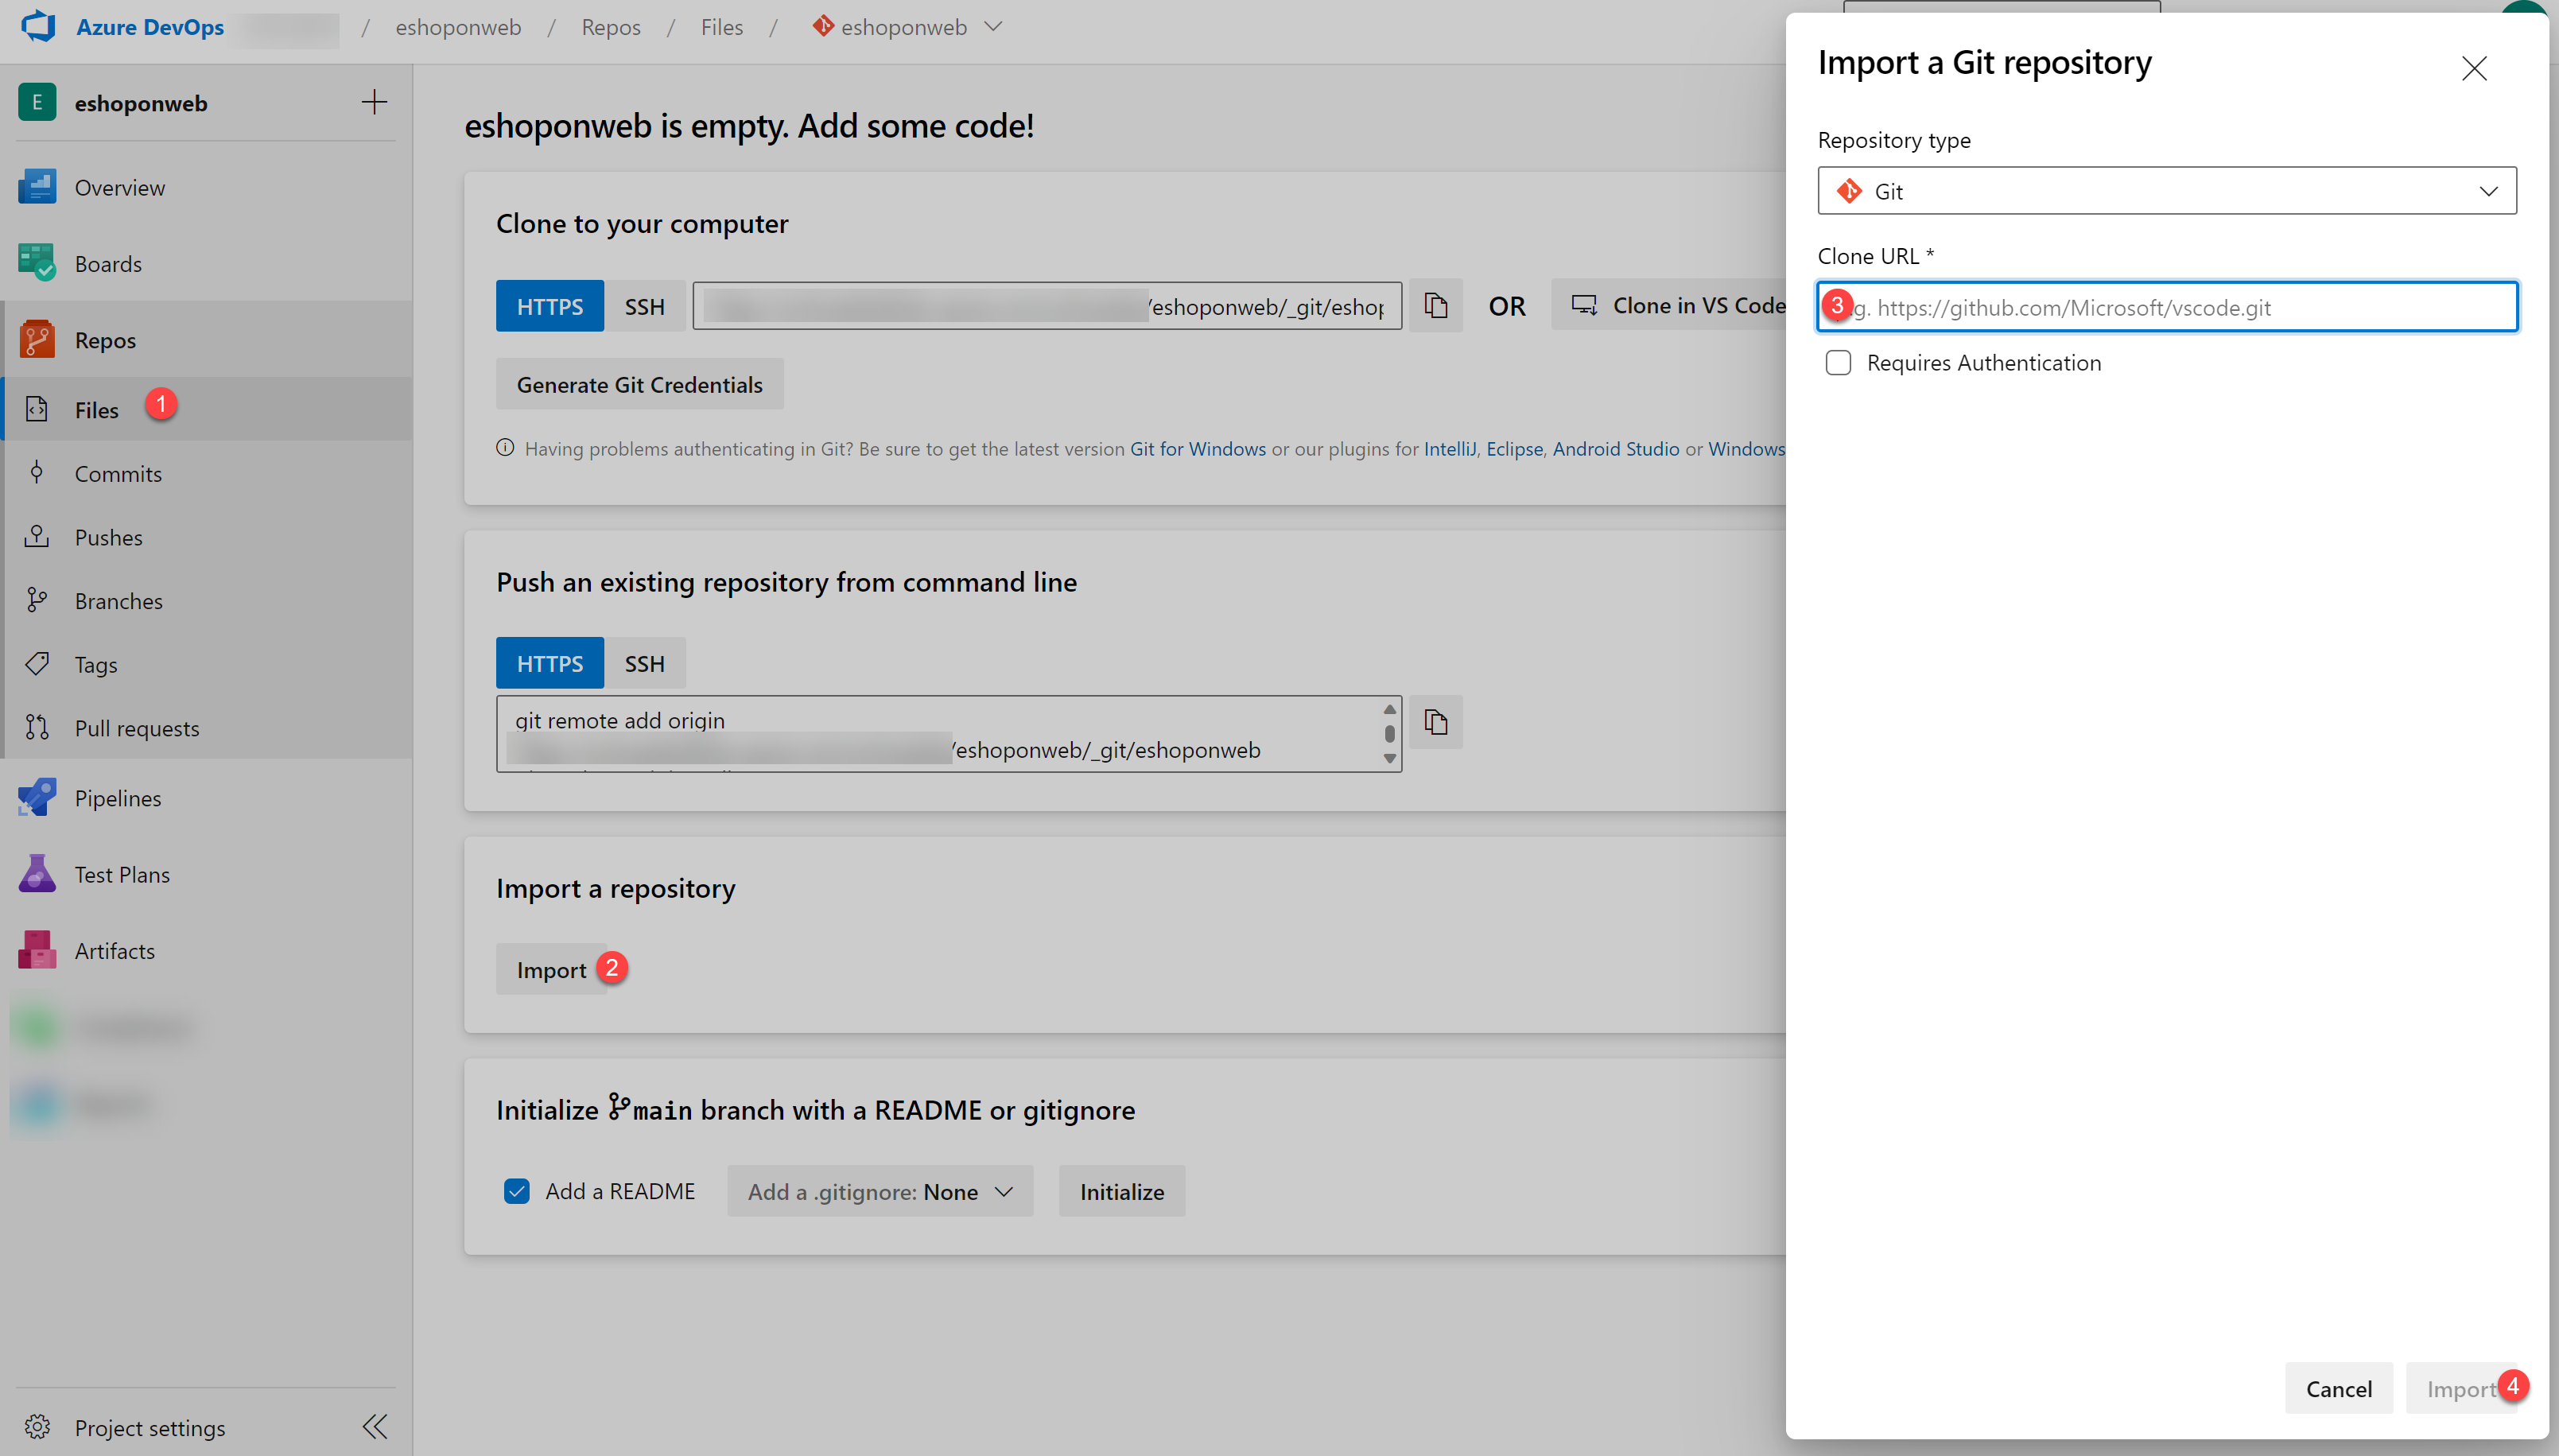
On your lab computer, in a browser window open your Azure DevOps organization and the previously created eShopOnWeb project. Click on Repos>Files , Import. On the Import a Git Repository window, paste the following URL https://github.com/MicrosoftLearning/eShopOnWeb.git and click Import:
-
The repository is organized the following way:
- .ado folder contains Azure DevOps YAML pipelines.
- .devcontainer folder container setup to develop using containers (either locally in VS Code or GitHub Codespaces).
- infra folder contains Bicep&ARM infrastructure as code templates used in some lab scenarios.
- .github folder container YAML GitHub workflow definitions.
- src folder contains the .NET 8 website used on the lab scenarios.
Exercise 1: Implement Security and Compliance in an Azure DevOps pipeline by using Mend Bolt
In this exercise, leverage Mend Bolt to scan the project code for security vulnerabilities and licensing compliance issues, and view the resulting report.
Task 1: Activate Mend Bolt extension
In this task, you will activate WhiteSource Bolt in the newly generated Azure Devops project.
-
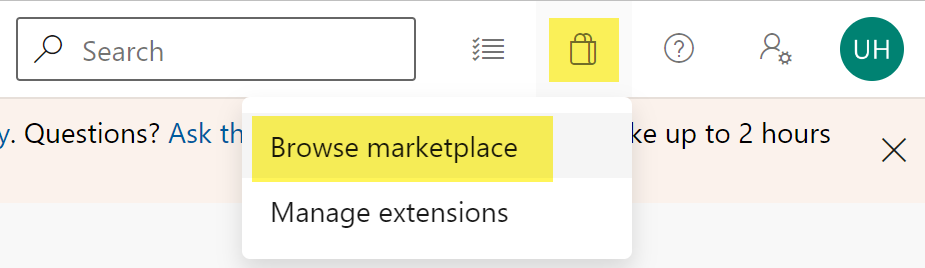
On your lab computer, in the web browser window displaying the Azure DevOps portal with the eShopOnWeb project open, click on the marketplace icon > Browse Marketplace.
-
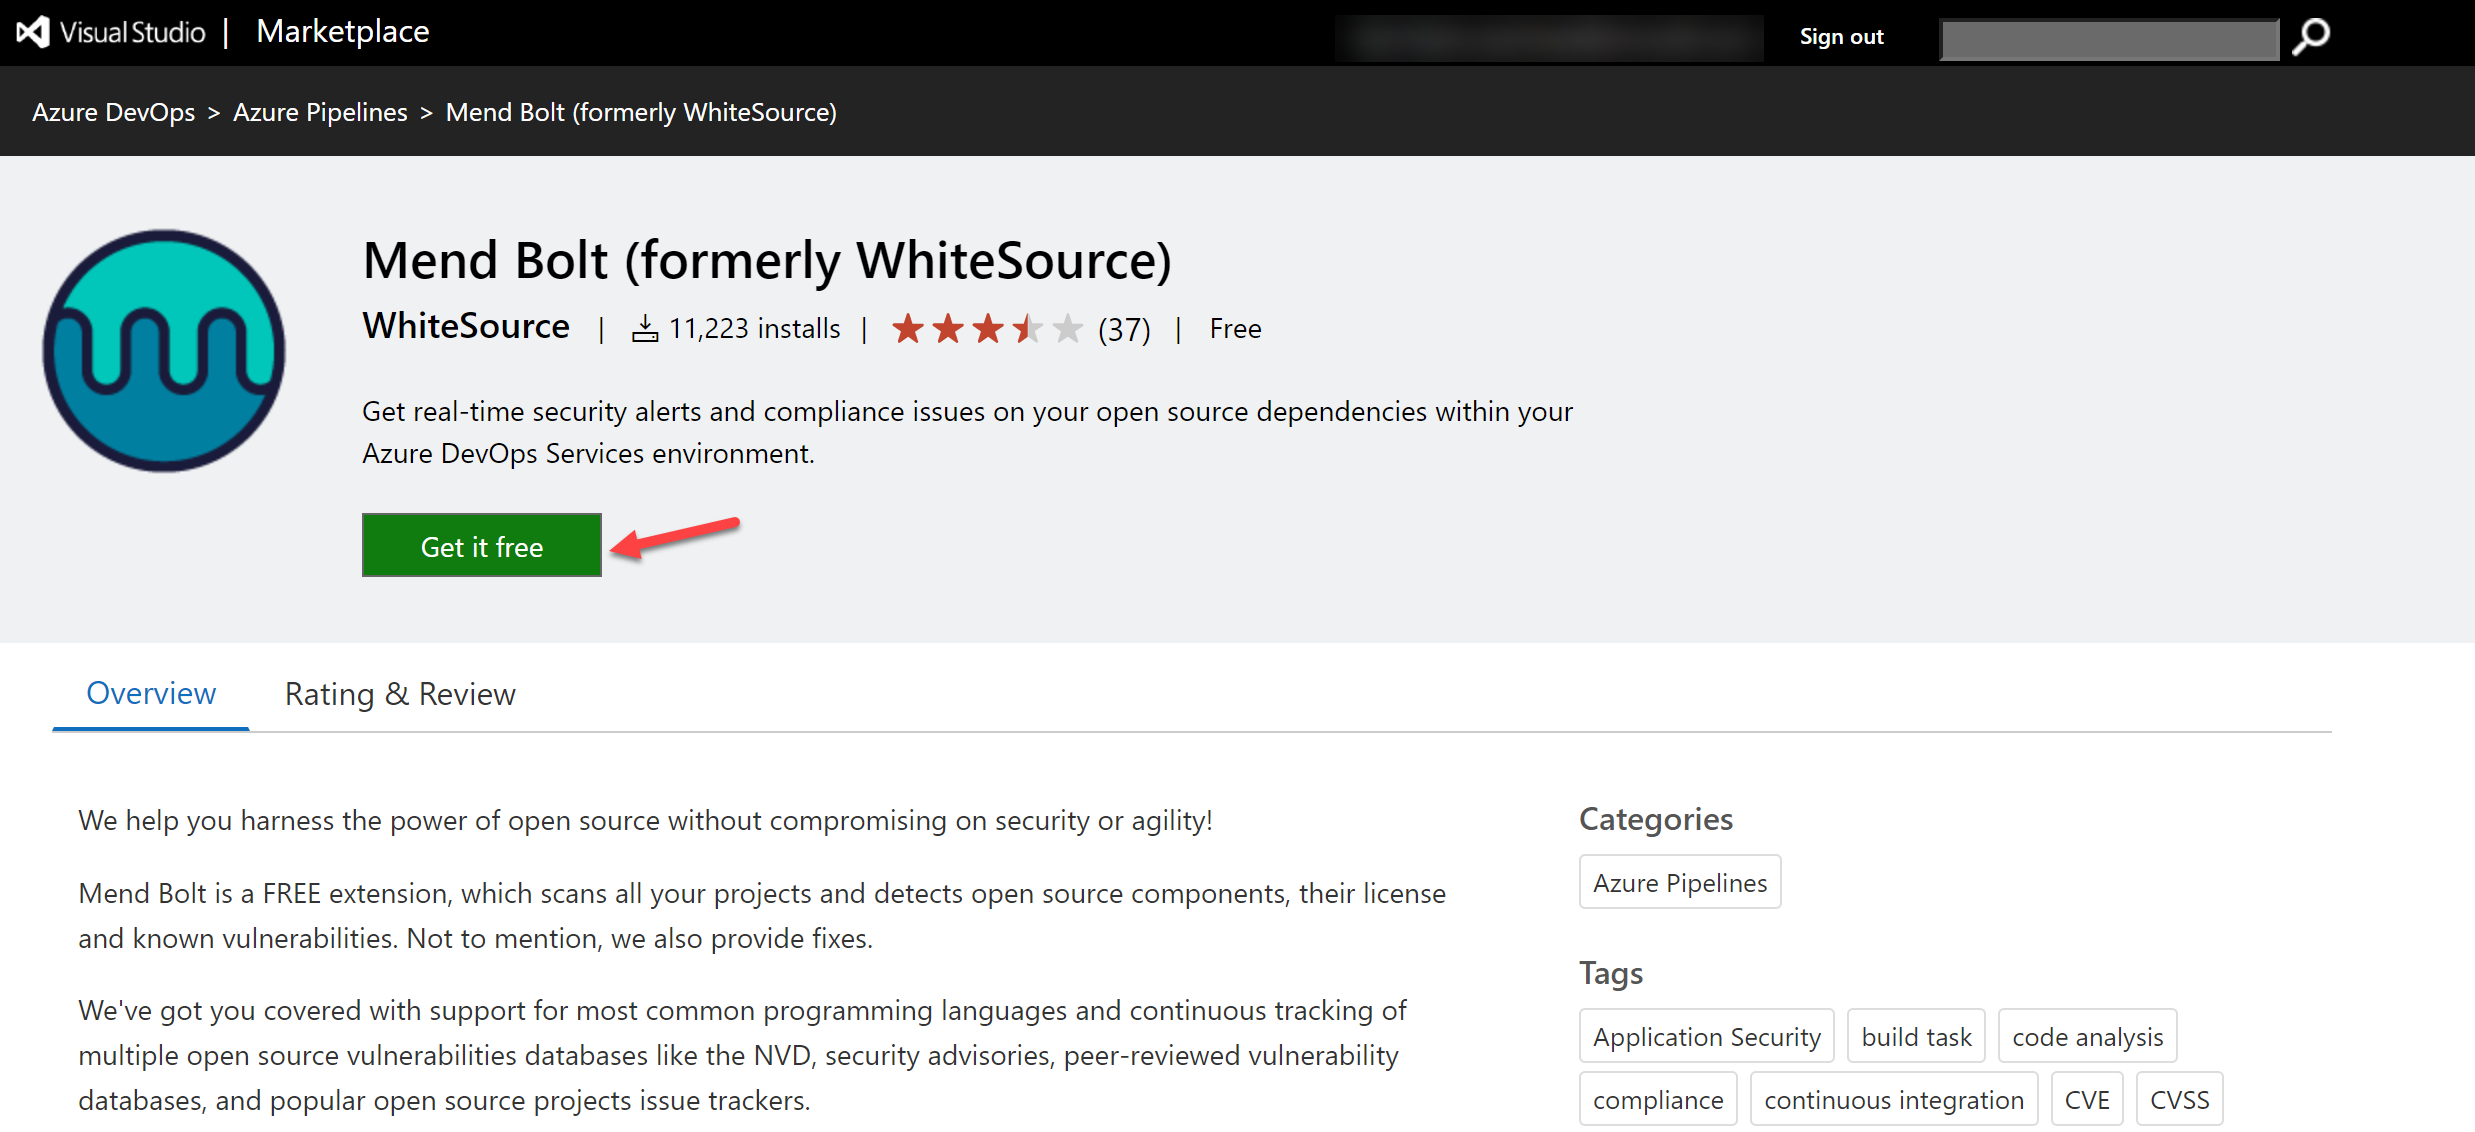
On the MarketPlace, search for Mend Bolt (formerly WhiteSource) and open it. Mend Bolt is the free version of the previously known WhiteSource tool, which scans all your projects and detects open source components, their license and known vulnerabilities.
Warning: make sure you select the Mend Bolt option (the free one)!
-
On the Mend Bolt (formerly WhiteSource) page, click on Get it for free.
-
On the next page, select the desired Azure DevOps organization and Install. Proceed to organization once installed.
-
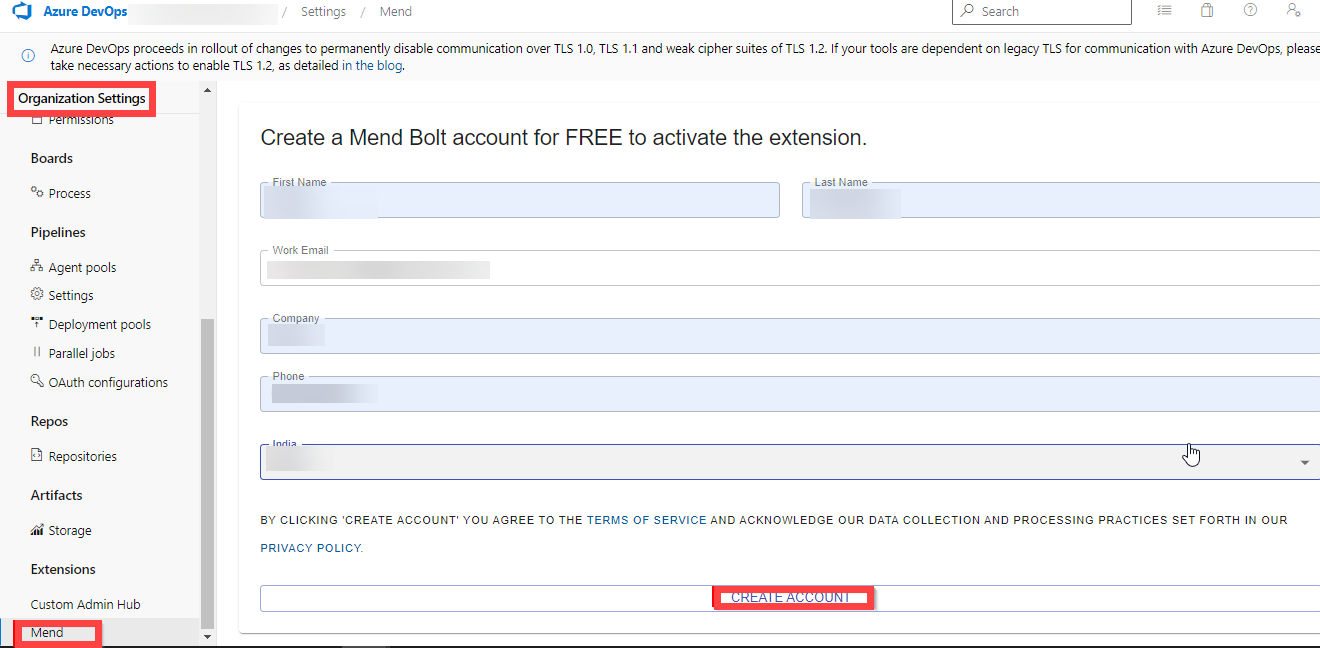
In your Azure DevOps navigate to Organization Settings and select Mend under Extensions. Provide your Work Email (your lab personal account, e.g. using AZ400learner@outlook.com instead of student@microsoft.com ), Company Name and other details and click Create Account button to start using the Free version.
Task 2: Create and Trigger a build
In this task, you will create and trigger a CI build pipeline within Azure DevOps project. You will use Mend Bolt extension to identify vulnerable OSS components present in this code.
-
On your lab computer, from the eShopOnWeb Azure DevOps project, in the vertical menu bar on the left side, navigate to the Pipelines>Pipelines section, click Create Pipeline (or New Pipeline).
-
On the Where is your code? window, select Azure Repos Git (YAML) and select the eShopOnWeb repository.
-
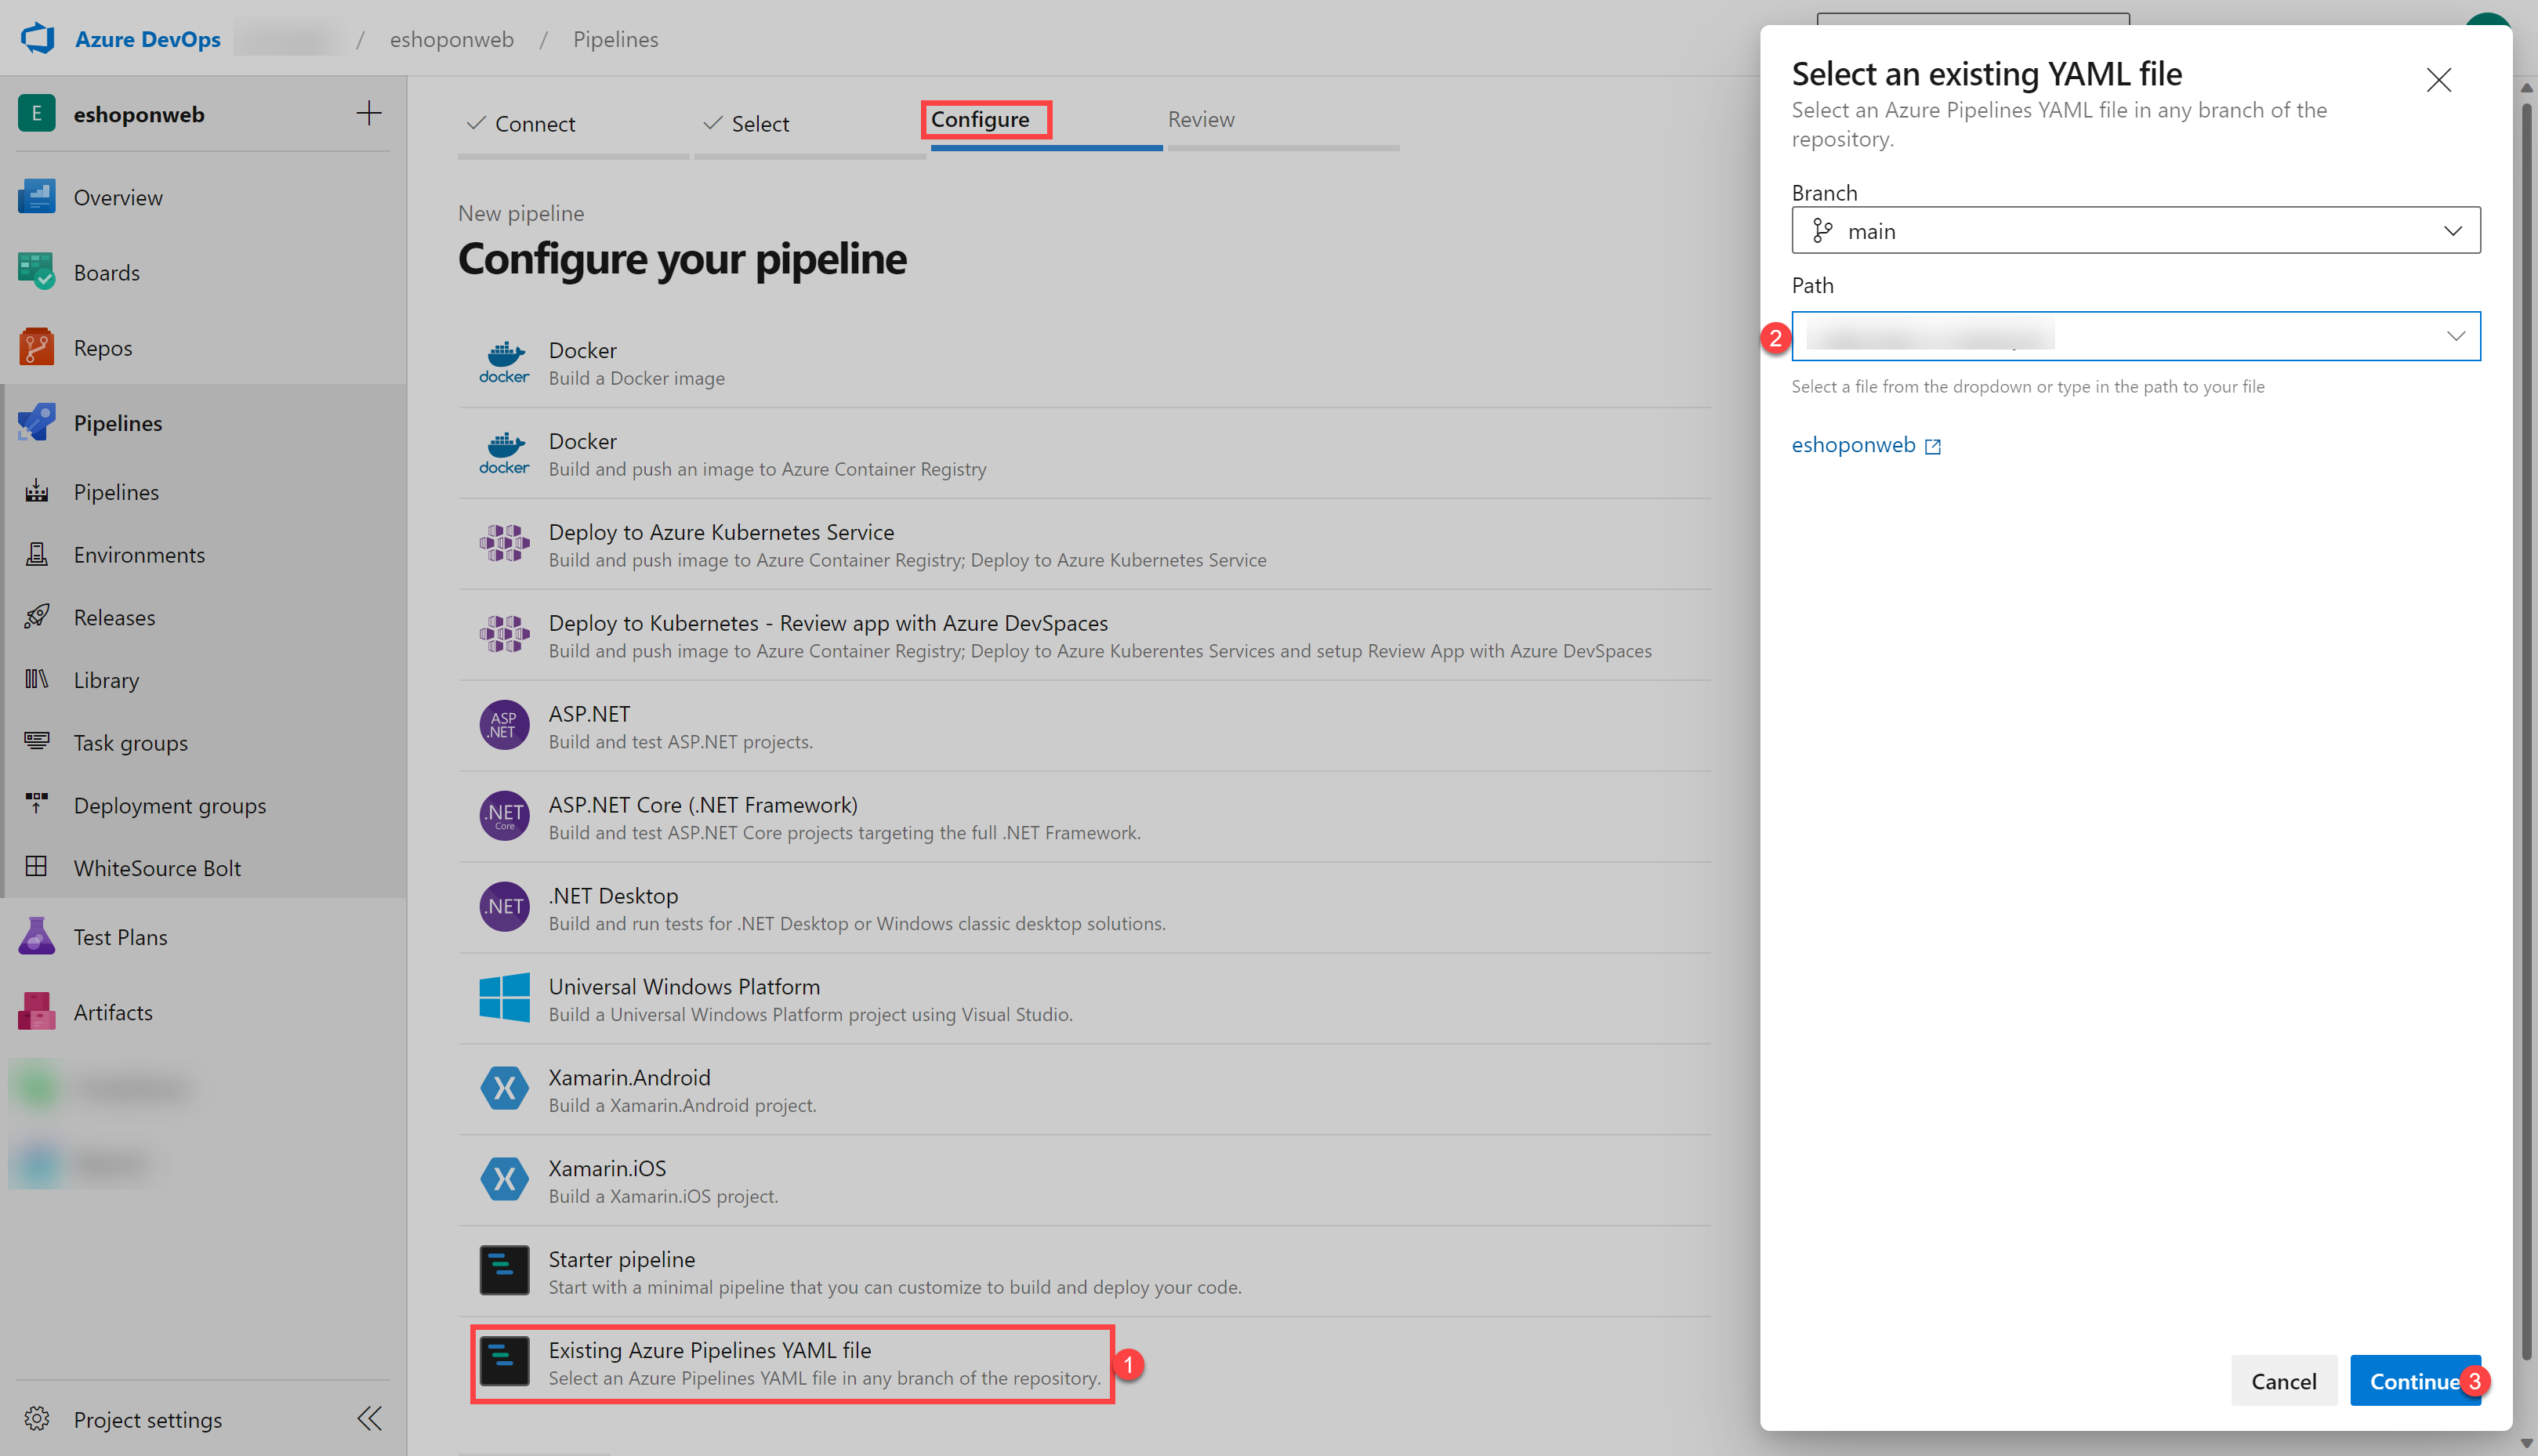
On the Configure section, choose Existing Azure Pipelines YAML file. Select branch: main, provide the following path /.ado/eshoponweb-ci-mend.yml and click Continue.
- Review the pipeline and click on Run. It will take a few minutes to run successfully.
Note: The build may take a few minutes to complete. The build definition consists of the following tasks:
- DotnetCLI task for restoring, building, testing and publishing the dotnet project.
- Whitesource task (still keeps the old name), to run the Mend tool analysis of OSS libraries.
- Publish Artifacts the agents running this pipeline will upload the published web project.
-
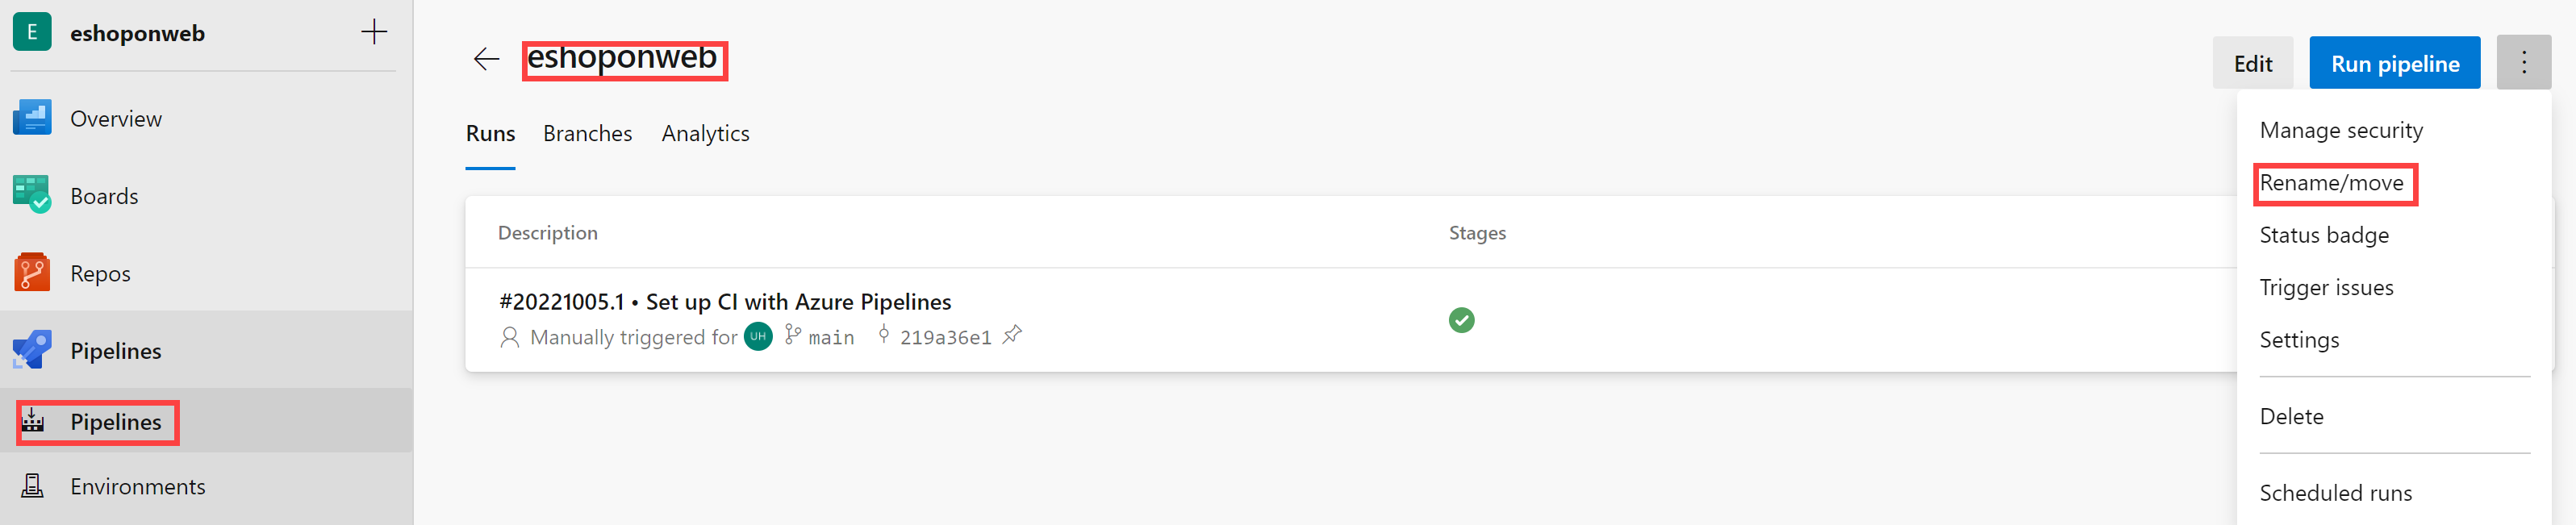
While the pipeline is executing, lets rename it to identify it easier (as the project may be used for multiple labs). Go to Pipelines/Pipelines section in Azure DevOps project, click on the executing Pipeline name (it will get a default name), and look for Rename/move option on the ellipsis icon. Rename it to eshoponweb-ci-mend and click Save.
-
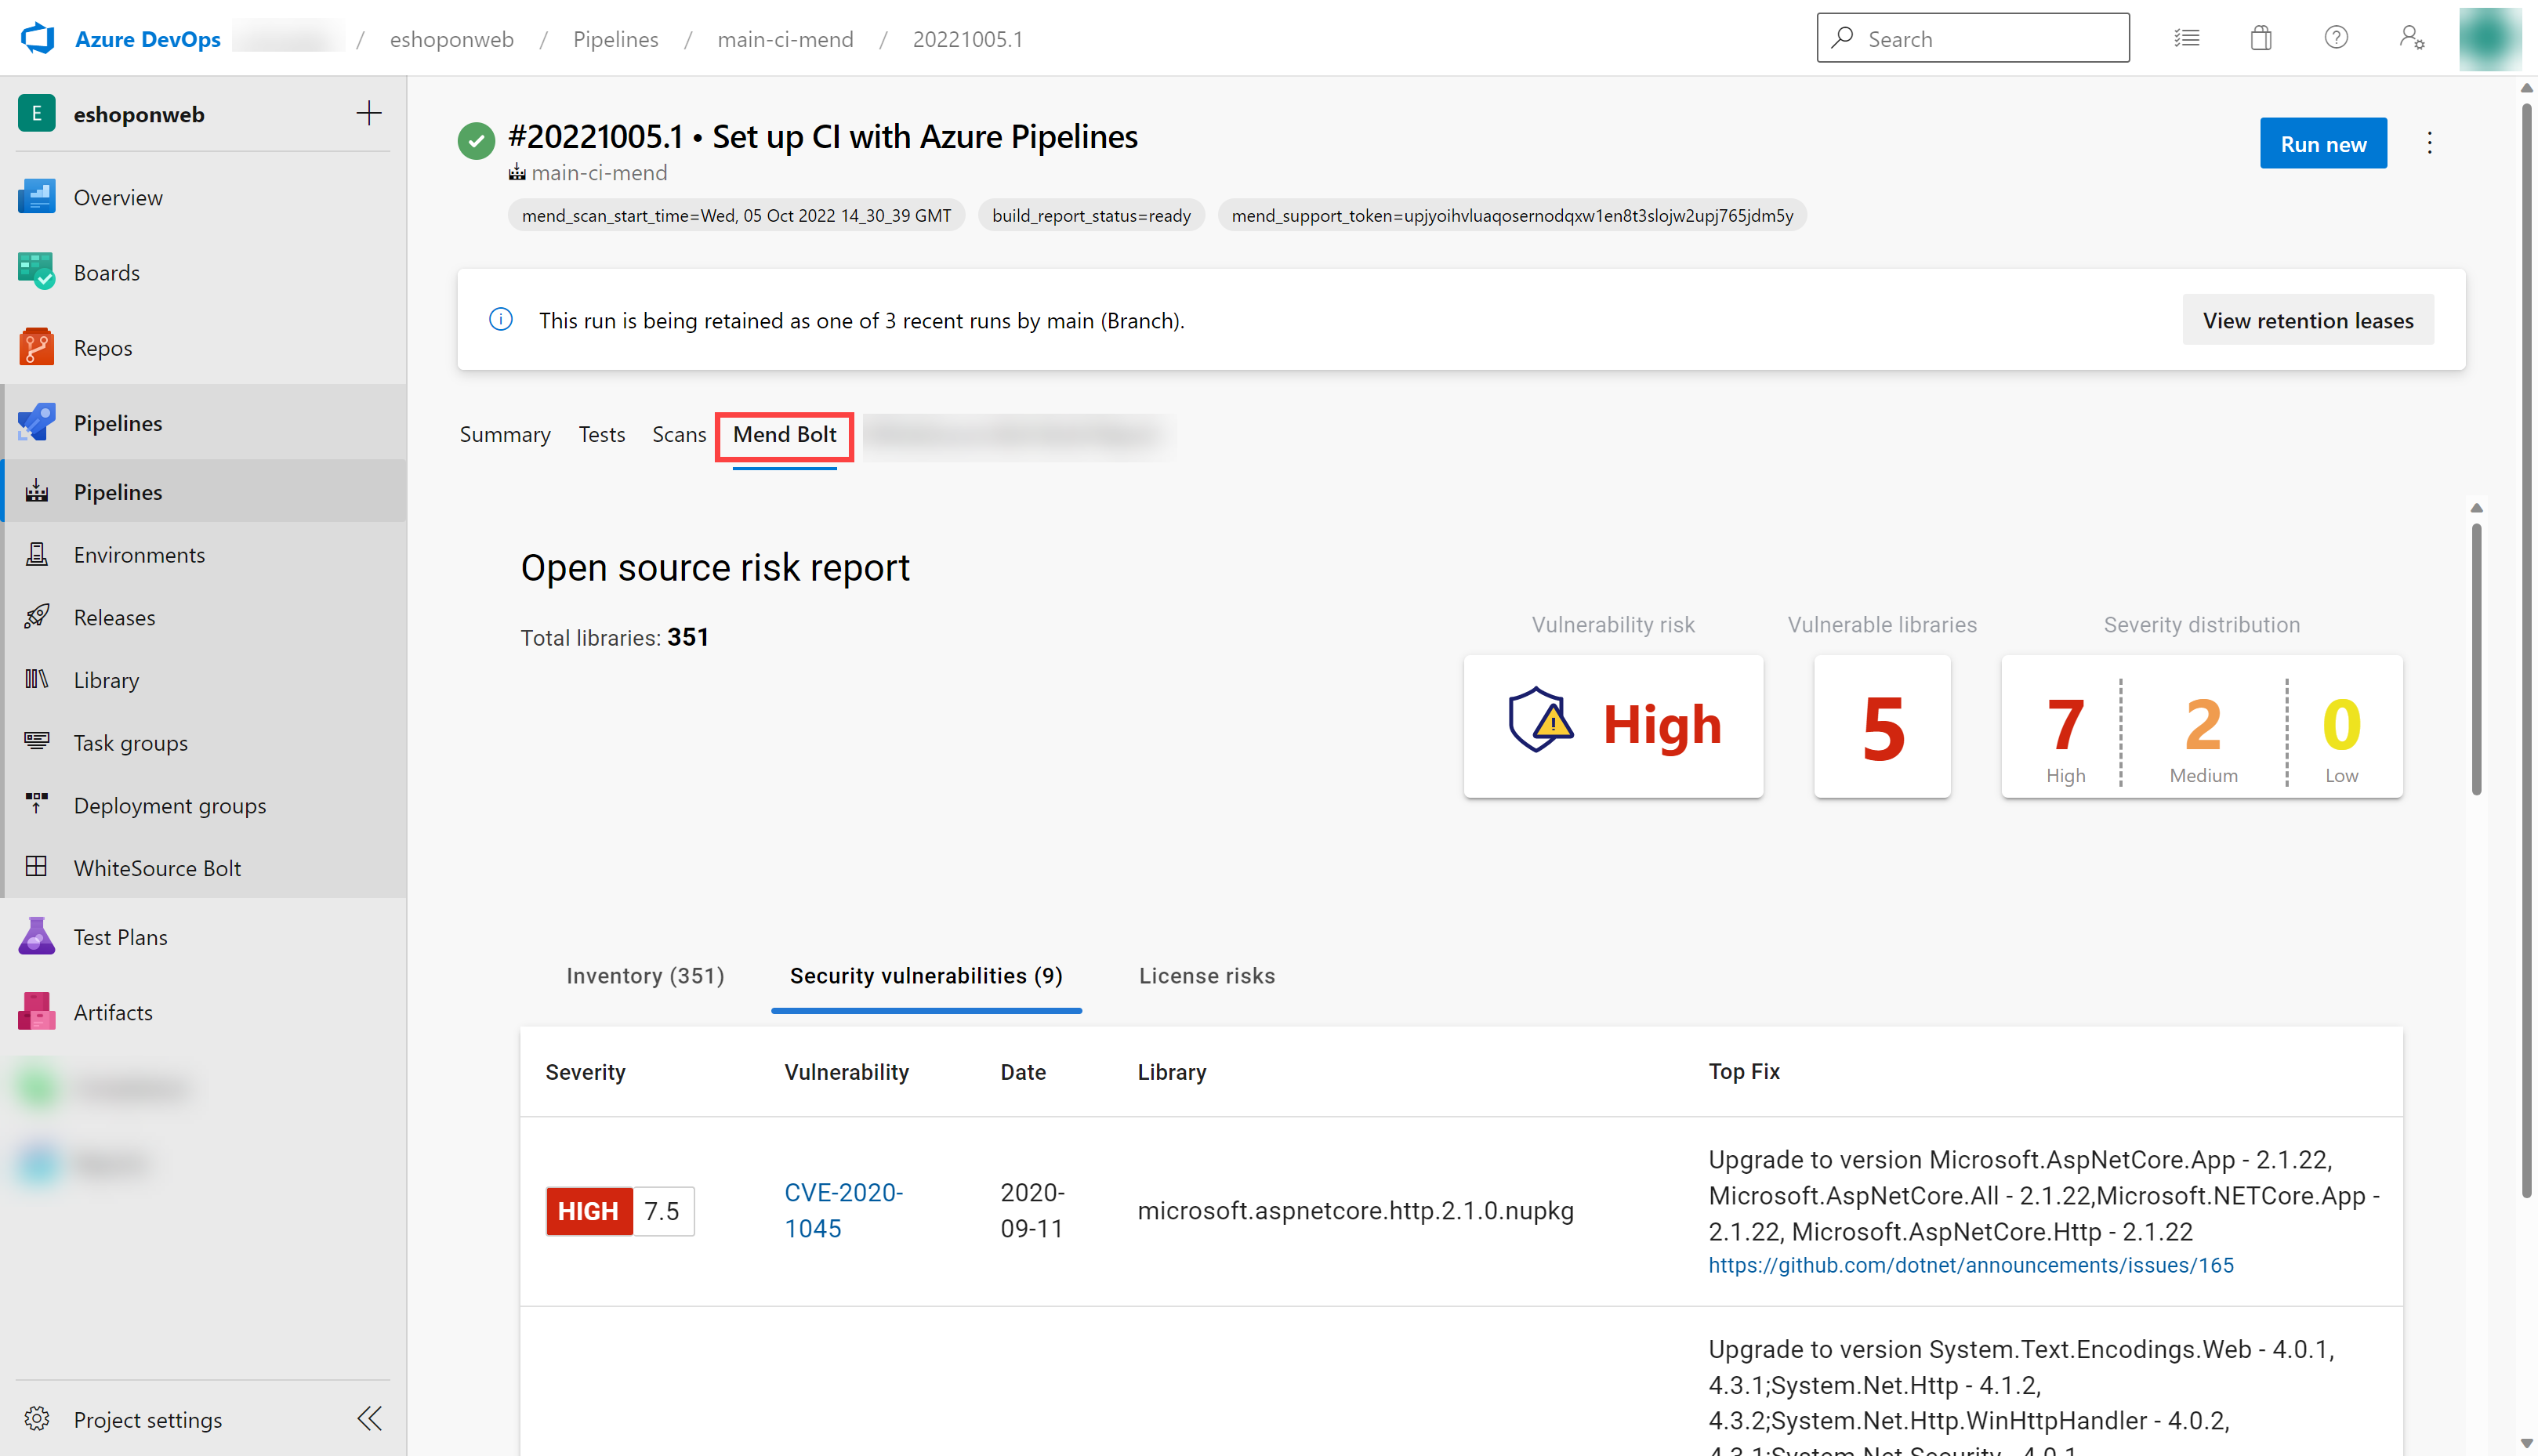
Once the pipeline execution has finished, you can review the results. Open the latest execution for eshoponweb-ci-mend pipeline. The summary tab will show the logs of the execution, together with related details such as the repository version(commit) used, trigger type, published artifacts, test coverage, etc.
-
On the Mend Bolt tab, you can review the OSS security analysis. It will show you details around the inventory used, vulnerabilities found (and how to solve them), and an interesting report around library related Licenses. Take some time to review the report.
Review
In this lab, you will use Mend Bolt with Azure DevOps to automatically detect vulnerable open source components, outdated libraries, and license compliance issues in your code.