Setting Up and Running Tests
Student lab manual
Lab requirements
-
This lab requires Microsoft Edge or an Azure DevOps supported browser.
-
Set up an Azure DevOps organization: If you don’t already have an Azure DevOps organization that you can use for this lab, create one by following the instructions available at Create an organization or project collection.
Lab overview
Software of any complexity can fail in unexpected ways in response to changes. Thus, testing after making changes is required for all but the most trivial (or least critical) applications. Manual testing is the slowest, least reliable, most expensive way to test software.
There are many kinds of automated tests for software applications. The simplest, lowest level test is the unit test. At a slightly higher level, there are integration tests and functional tests. Other kinds of tests, such as UI tests, load tests, stress tests, and smoke tests, are beyond the scope of this lab.
If you want to know more about the different types of testing, we recommend you reading this article: Test ASP.NET Core MVC apps.
Objectives
After you complete this lab, you will be able to configure a CI pipeline for a .Net application that includes:
- Unit Tests
- Integration Tests
- Functional Tests
Estimated timing: 60 minutes
Instructions
Exercise 0: Configure the lab prerequisites
In this exercise, you will set up the prerequisites for the lab, which consist of a new Azure DevOps project with a repository based on the eShopOnWeb.
Task 1: (skip if done) Create and configure the team project
In this task, you will create an eShopOnWeb Azure DevOps project to be used by several labs.
- On your lab computer, in a browser window open your Azure DevOps organization. Click on New Project. Give your project the name eShopOnWeb and leave the other fields with defaults. Click on Create.
Task 2: (skip if done) Import the eShopOnWeb Git Repository
In this task you will import the eShopOnWeb Git repository that will be used by several labs.
-
On your lab computer, in a browser window open your Azure DevOps organization and the previously created eShopOnWeb project. Click on Repos>Files , Import a Repository. Select Import. On the Import a Git Repository window, paste the following URL https://github.com/MicrosoftLearning/eShopOnWeb.git and click Import:
-
The repository is organized the following way:
- .ado folder contains Azure DevOps YAML pipelines.
- .devcontainer folder container setup to develop using containers (either locally in VS Code or GitHub Codespaces).
- infra folder contains Bicep & ARM infrastructure as code templates used in some lab scenarios.
- .github folder contains YAML GitHub workflow definitions.
- src folder contains the .NET website used in the lab scenarios.
Exercise 1: Setup Tests in CI pipeline
In this exercise, you will setup tests in CI pipeline.
Task 1: (Skip if done) Import the YAML build definition for CI
In this task, you will add the YAML build definition that will be used to implement the Continuous Integration.
Let’s start by importing the CI pipeline named eshoponweb-ci.yml.
- Go to Pipelines>Pipelines.
- Click on New Pipeline button.
- Select Azure Repos Git (YAML).
- Select the eShopOnWeb repository.
- Select Existing Azure Pipelines YAML File.
-
Select the main branch and the /.ado/eshoponweb-ci.yml file, then click on Continue.
The CI definition consists of the following tasks:
- DotNet Restore: With NuGet Package Restore you can install all your project’s dependency without having to store them in source control.
- DotNet Build: Builds a project and all of its dependencies.
- DotNet Test: .Net test driver used to execute unit tests.
- DotNet Publish: Publishes the application and its dependencies to a folder for deployment to a hosting system. In this case, it’s Build.ArtifactStagingDirectory.
- Publish Artifact - Website: Publish the app artifact (created in the previous step) and make it available as a pipeline artifact.
- Publish Artifact - Bicep: Publish the infrastructure artifact (Bicep file) and make it available as a pipeline artifact.
- Click the Save button (not Save and run) to save the pipeline definition.
Task 2: Add tests to the CI pipeline
In this task, you will add the integration and functional tests to the CI Pipeline.
You can notice that the Unit Tests task is already part of the pipeline.
- Unit Tests test a single part of your application’s logic. One can further describe it by listing some of the things that it isn’t. A unit test doesn’t test how your code works with dependencies or infrastructure – that’s what integration tests are for.
-
Now you need to add the Integration Tests task after the Unit Tests task:
 - task: DotNetCoreCLI@2
   displayName: Integration Tests
   inputs:
     command: 'test'
     projects: 'tests/IntegrationTests/*.csproj'
Integration Tests test how your code works with dependencies or infrastructure. Although it’s a good idea to encapsulate your code that interacts with infrastructure like databases and file systems, you will still have some of that code, and you will probably want to test it. Additionally, you should verify that your code’s layers interact as you expect when your application’s dependencies are fully resolved. This functionality is the responsibility of integration tests.
-
Then you need to add the Functional tests task after the Integration Tests task:
 - task: DotNetCoreCLI@2
   displayName: Functional Tests
   inputs:
     command: 'test'
     projects: 'tests/FunctionalTests/*.csproj'
Functional Tests are written from the perspective of the user, and verify the correctness of the system based on its requirements. Unlike integration tests that are written from the perspective of the developer, to verify that some components of the system work correctly together.
-
Click Save, on the Save pane, click Save again to commit the changes directly into the main branch.
Task 4: Check the tests summary
-
Click on the Run, then from the Run pipeline tab, click on Run again.
-
Wait for the pipeline to start and until it completes the Build Stage successfully.
-
Once completed, the Test tab will show as part of the pipeline run. Click on it to check the summary. It looks like shown below:
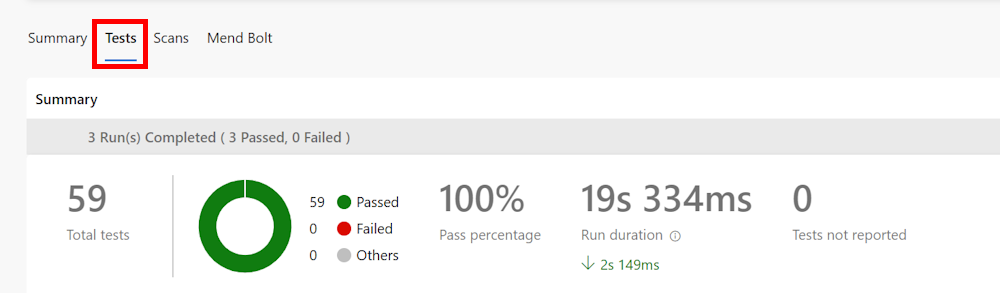
-
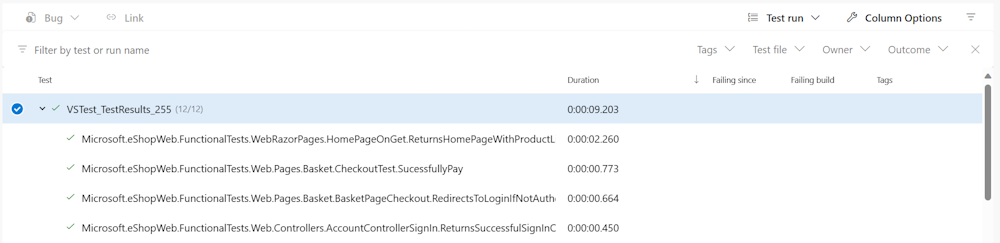
For more details, at the bottom of the page, the table shows a list of the different run tests.
Note: If the table is empty, you need to reset the filters to have all the details about the tests run.
Review
In this lab, you learned how to setup and run different tests types using Azure Pipelines and .Net.