Controlling Deployments using Classic Release Gates
Student lab manual
Lab requirements
-
This lab requires Microsoft Edge or an Azure DevOps supported browser.
-
Set up an Azure DevOps organization: If you don’t already have an Azure DevOps organization that you can use for this lab, create one by following the instructions available at Create an organization or project collection.
-
Identify an existing Azure subscription or create a new one.
-
Verify that you have a Microsoft account or a Microsoft Entra account with the Owner role in the Azure subscription and the Global Administrator role in the Microsoft Entra tenant associated with the Azure subscription. For details, refer to List Azure role assignments using the Azure portal and View and assign administrator roles in Azure Active Directory.
Lab overview
This lab covers the configuration of the deployment gates and details how to use them to control the execution of Azure Pipelines. To illustrate their implementation, you’ll configure a release definition with two environments for an Azure Web App. You’ll deploy to the DevTest environment only when there are no blocking bugs for the app and mark the DevTest environment complete only when there are no active alerts in Application Insights of Azure Monitor.
A release pipeline specifies the end-to-end release process for an application to be deployed across various environments. Deployments to each environment are fully automated by using jobs and tasks. Ideally, you don’t want new updates to the applications to be simultaneously exposed to all the users. It’s a best practice to expose updates in a phased manner, that is, expose them to a subset of users, monitor their usage, and expose them to other users based on the experience of the initial set of users.
Approvals and gates enable you to take control over the start and completion of the deployments in a release. You can wait for users to approve or reject deployments with approvals manually. Using release gates, you can specify application health criteria to be met before the release is promoted to the following environment. Before or after any environment deployment, all the specified gates are automatically evaluated until they pass or reach your defined timeout period and fail.
Gates can be added to an environment in the release definition from the pre-deployment conditions or the post-deployment conditions panel. Multiple gates can be added to the environment conditions to ensure all the inputs are successful for the release.
As an example:
- Pre-deployment gates ensure no active issues in the work item or problem management system before deploying a build to an environment.
- Post-deployment gates ensure no incidents from the app’s monitoring or incident management system after being deployed before promoting the release to the following environment.
There are 4 types of gates included by default in every account.
- Invoke Azure Function: Trigger the execution of an Azure Function and ensures a successful completion.
- Query Azure Monitor alerts: Observe the configured Azure Monitor alert rules for active alerts.
- Invoke REST API: Make a call to a REST API and continues if it returns a successful response.
- Query work items: Ensure the number of matching work items returned from a query is within a threshold.
Objectives
After you complete this lab, you will be able to:
- Configure release pipelines.
- Configure release gates.
- Test release gates.
Estimated timing: 75 minutes
Instructions
Exercise 0: Configure the lab prerequisites
Note: If you already created this project during previous labs, this exercise can be skipped.
In this exercise, you will set up the prerequisites for the lab, which consist of a new Azure DevOps project with a repository based on the eShopOnWeb.
Task 1: (skip if already done) Create and configure the team project
In this task, you will create an eShopOnWeb Azure DevOps project to be used by several labs.
-
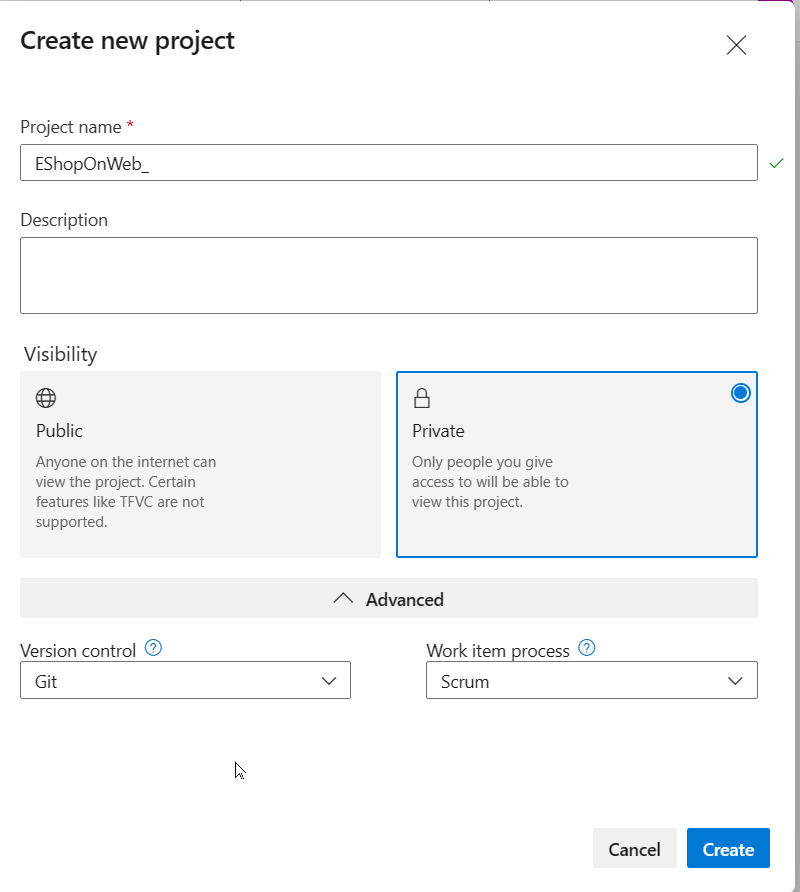
On your lab computer, in a browser window open your Azure DevOps organization. Click on New Project. Give your project the name eShopOnWeb and leave the other fields with defaults. Click on Create.
Task 2: (skip if already done) Import eShopOnWeb Git Repository
In this task you will import the eShopOnWeb Git repository that will be used by several labs.
-
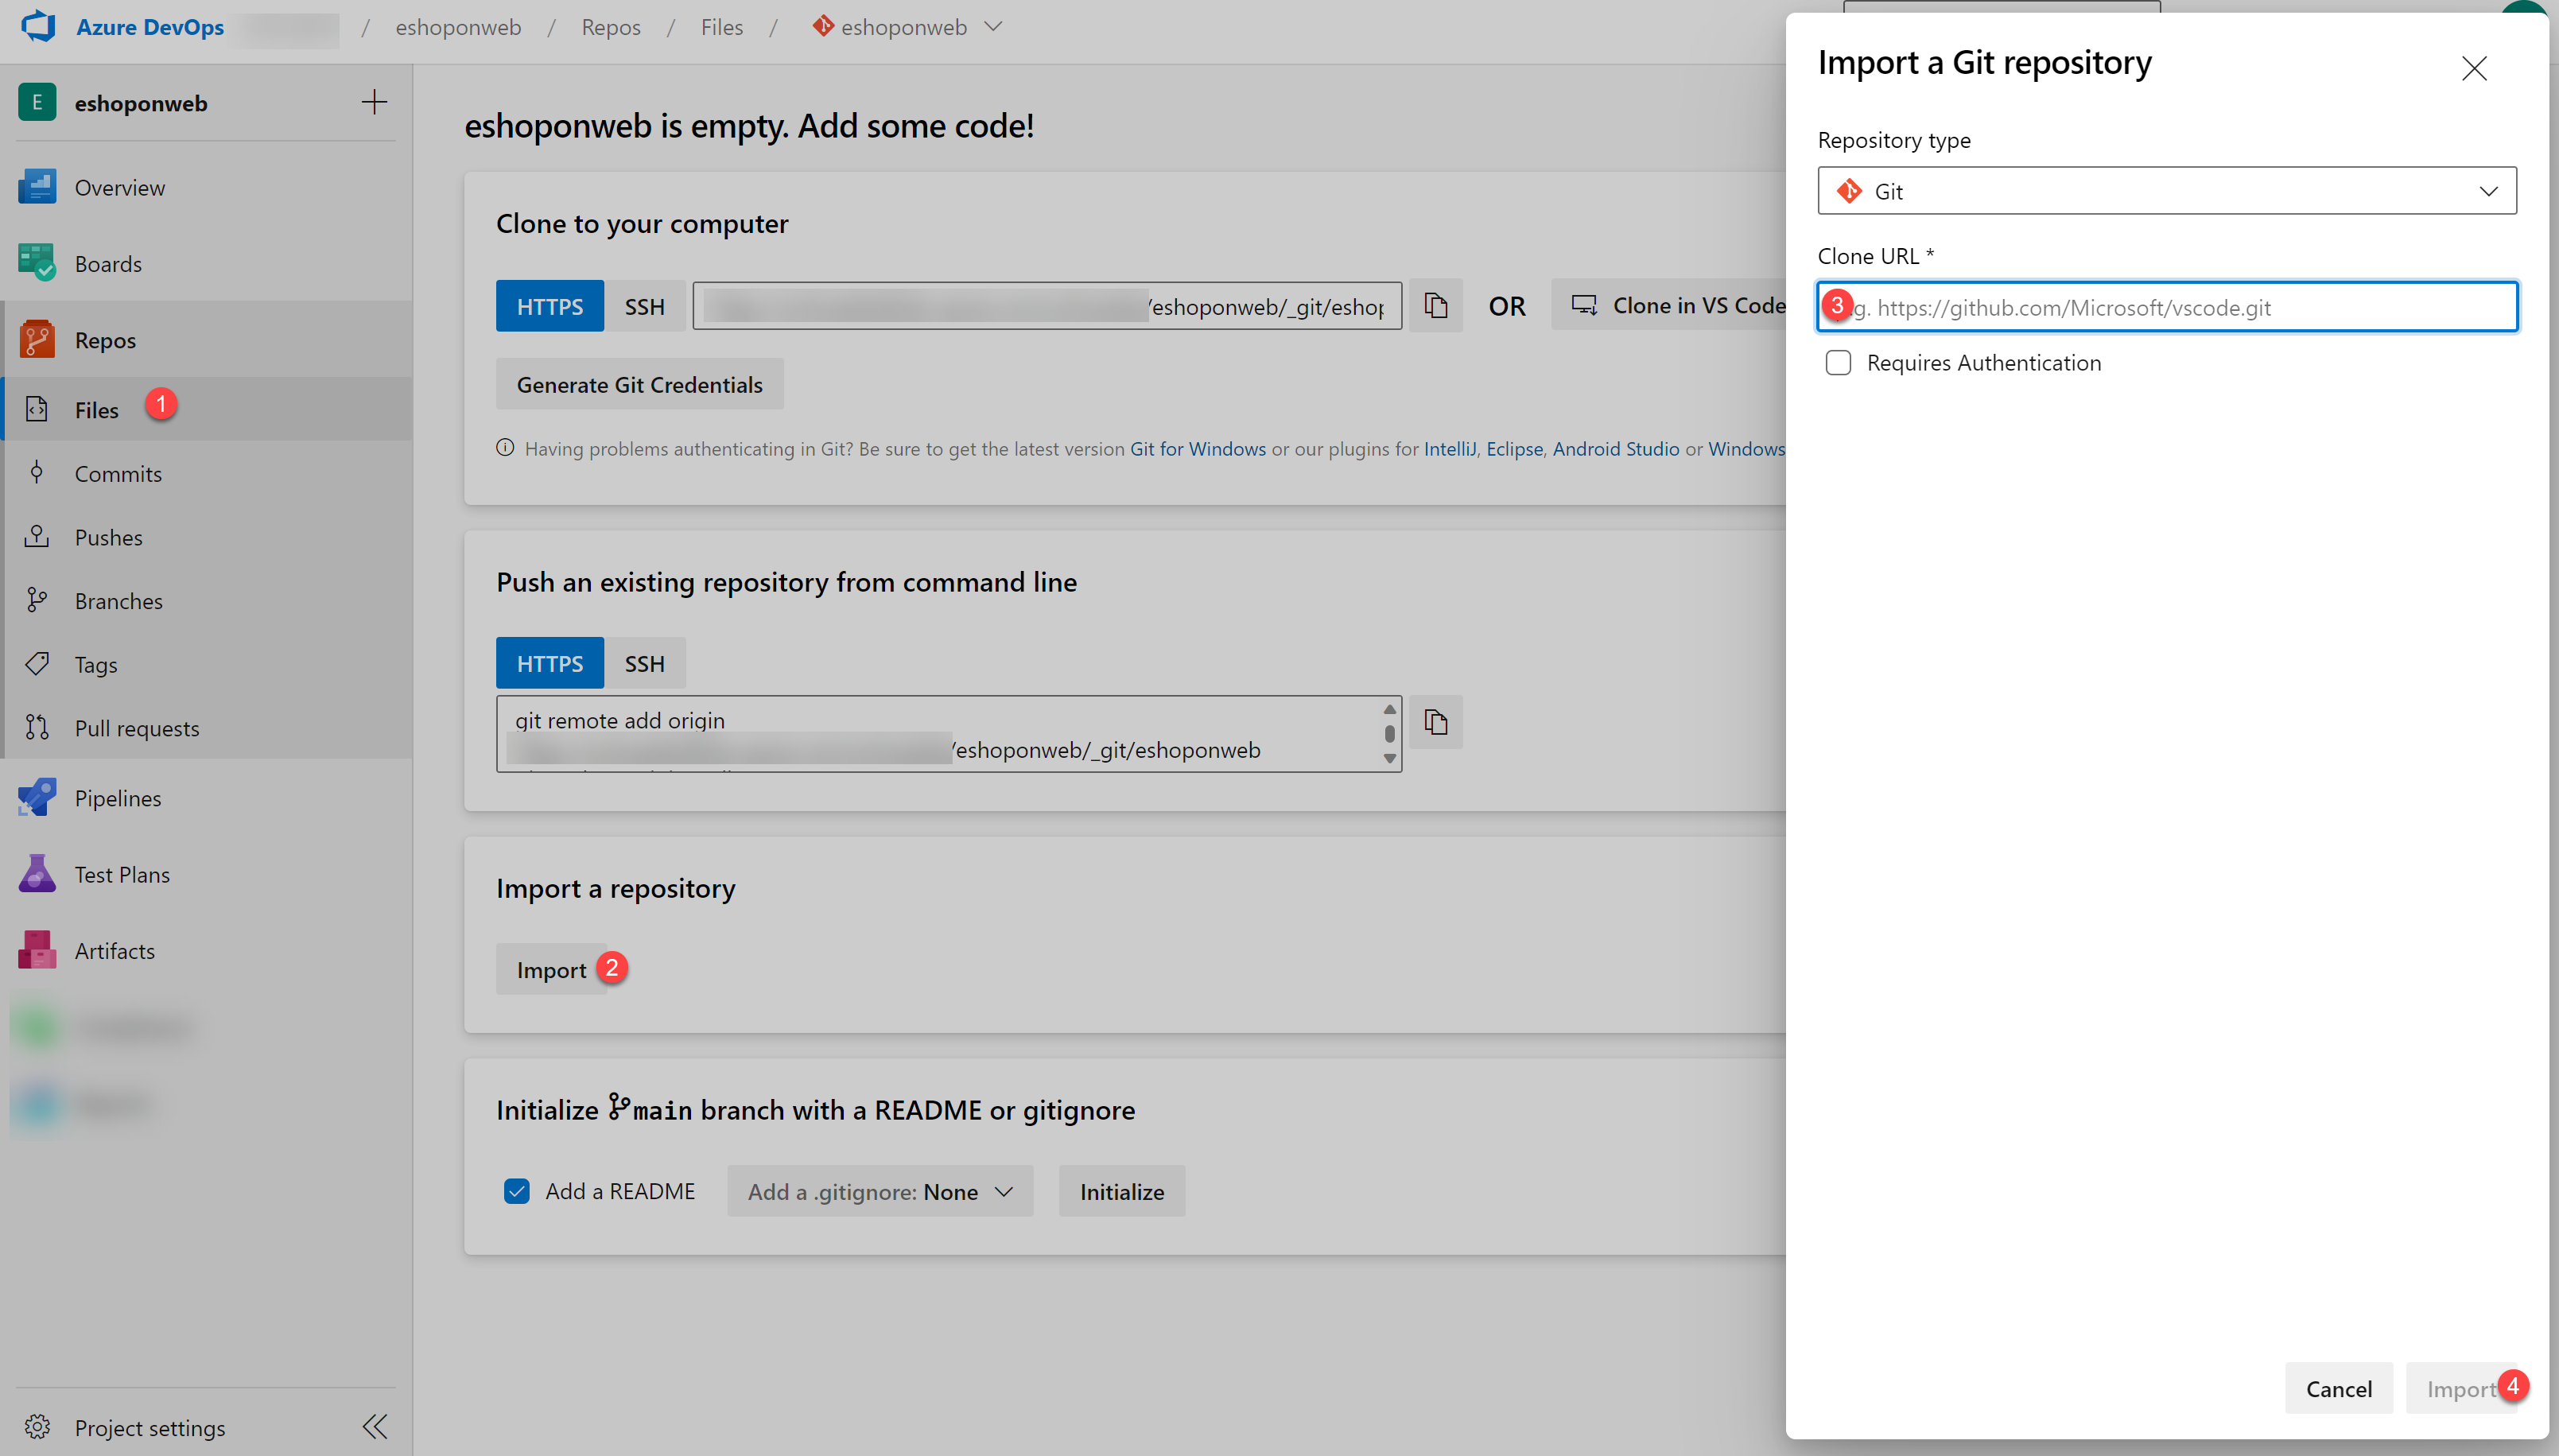
On your lab computer, in a browser window open your Azure DevOps organization and the previously created eShopOnWeb project. Click on Repos>Files , Import a Repository. Select Import. On the Import a Git Repository window, paste the following URL https://github.com/MicrosoftLearning/eShopOnWeb.git and click Import:
-
The repository is organized the following way:
- .ado folder contains Azure DevOps YAML pipelines.
- .devcontainer folder container setup to develop using containers (either locally in VS Code or GitHub Codespaces).
- infra folder contains Bicep&ARM infrastructure as code templates used in some lab scenarios.
- .github folder container YAML GitHub workflow definitions.
- src folder contains the .NET 8 website used on the lab scenarios.
Task 3: (skip if already done) Configure CI Pipeline as Code with YAML in Azure DevOps
In this task, you will add a YAML build definition to the existing project.
- Navigate back to the Pipelines pane in of the Pipelines hub.
-
In the Create your first Pipeline window, click Create pipeline.
Note: We will use the wizard to create a new YAML Pipeline definition based on our project.
- On the Where is your code? pane, click Azure Repos Git (YAML) option.
- On the Select a repository pane, click eShopOnWeb.
- On the Configure your pipeline pane, scroll down and select Existing Azure Pipelines YAML File.
- In the Selecting an existing YAML File blade, specify the following parameters:
- Branch: main
- Path: .ado/eshoponweb-ci.yml
- Click Continue to save these settings.
- From the Review your Pipeline YAML screen, click Run to start the Build Pipeline process.
-
Wait for the Build Pipeline to complete successfully. Ignore any warnings regarding the source code itself, as they are not relevant for this lab exercise.
Note: Each task from the YAML file is available for review, including any warnings and errors.
- Your pipeline will take a name based on the project name. Let’s rename it for identifying the pipeline better. Go to Pipelines>Pipelines and click on the recently created pipeline. Click on the ellipsis and Rename/move option. Name it eshoponweb-ci and click on Save.
Exercise 2: Creating the necessary Azure Resources for the Release Pipeline
Task 1: Create two Azure web apps
In this task, you will create two Azure web apps representing the DevTest and Production environments, into which you’ll deploy the application via Azure Pipelines.
- From the lab computer, start a web browser, navigate to the Azure Portal, and sign in with the user account that has the Owner role in the Azure subscription you will be using in this lab and has the role of the Global Administrator in the Microsoft Entra tenant associated with this subscription.
- In the Azure portal, click the Cloud Shell icon, located directly to the right of the search textbox at the top of the page.
-
If prompted to select either Bash or PowerShell, select Bash.
Note: If this is the first time you are starting Cloud Shell and you are presented with the You have no storage mounted message, select the subscription you are using in this lab, and select Create storage.
-
From the Bash prompt, in the Cloud Shell pane, run the following command to create a resource group (replace the
<region>variable placeholder with the name of the Azure region that will host the two Azure web apps, for example ‘westeurope’ or ‘centralus’ or any other available region of your choice):Note: possible locations can be found by running the following command, use the Name on
<region>:az account list-locations -o tableREGION='centralus' RESOURCEGROUPNAME='az400m04l09-RG' az group create -n $RESOURCEGROUPNAME -l $REGION -
To create an App service plan
SERVICEPLANNAME='az400m04l09-sp1' az appservice plan create -g $RESOURCEGROUPNAME -n $SERVICEPLANNAME --sku S1 -
Create two web apps with unique app names.
SUFFIX=$RANDOM$RANDOM az webapp create -g $RESOURCEGROUPNAME -p $SERVICEPLANNAME -n RGATES$SUFFIX-DevTest az webapp create -g $RESOURCEGROUPNAME -p $SERVICEPLANNAME -n RGATES$SUFFIX-ProdNote: Record the name of the DevTest web app. You will need it later in this lab.
- Wait for the Web App Services Resources provisioning process to complete and close the Cloud Shell pane.
Task 2: Configure an Application Insights resource
- In the Azure portal, use the Search resources, services, and docs text box at the top of the page to search for Application Insights and, in the list of results, select Application Insights.
- On the Application Insights blade, select + Create.
-
On the Application Insights blade, on the Basics tab, specify the following settings (leave others with their default values):
Setting Value Resource group az400m04l09-RG Name the name of the DevTest web app you recorded in the previous task Region the same Azure region to which you deployed the web apps earlier in the previous task Resource Mode Classic Note: Disregard the deprecation message. This is required in order to prevent failures of the Enable Continuous Integration DevOps task you will be using later in this lab.
- Click Review + create and then click Create.
- Wait for the provisioning process to complete.
- In the Azure portal, navigate to the resource group az400m04l09-RG you created in the previous task.
- In the list of resources, click the DevTest web app.
- On the DevTest web app page, in the vertical menu on the left, in the Settings section, click Application Insights.
- On the Application Insights blade, click Turn on Application Insights.
- In the Change your resource section, click the Select existing resource option, in the list of existing resources, select the newly created Application Insight resource, click Apply and, when prompted for confirmation, click Yes.
-
Wait until the change takes effect.
Note: You will create monitor alerts here, which you will use in later part of this lab.
- From the same Settings / Application Insights menu option within the Web App, select View Application Insights Data. This redirects you to the Application Insights blade in the Azure Portal.
- On the Application Insights resource blade, in the Monitoring section, click Alerts and then click Create > Alert rule.
- On the Select a signal blade, in the Search by signal name textbox, type Requests. From the list of results, select Failed Requests.
-
On the Create an Alert Rule blade, in the Condition section, leave the Threshold set to Static, validate the other default settings as follows:
- Aggregation Type: Count
- Operator: Greater Than
- Unit: Count
-
In the Threshold value textbox, type 0, and click on Next:Actions. Don’t make any changes in the Actions settings blade, and define the following parameters under the Details section:
Setting Value Severity 2- Warning Alert rule name RGATESDevTest_FailedRequests Advanced Options: Automatically resolve alerts cleared Note: Metric alert rules might take up to 10 minutes to activate.
Note: You can create multiple alert rules on different metrics such as availability < 99 percent, server response time > 5 Seconds, or server exceptions > 0
- Confirm the creation of the Alert rule by clicking Review+Create, and confirm once more by clicking Create. Wait for the alert rule to get created successfully.
Exercise 3: Configure the release pipeline
In this exercise, you will configure a release pipeline.
Task 1: Set Up Release Tasks
In this task, you will set up the release tasks as part of the Release Pipeline.
- From the eShopOnWeb project in the Azure DevOps portal, in the vertical navigational pane, select Pipelines and then, within the Pipelines section, click Releases.
- Click New Pipeline.
- From the Select a template window, choose Azure App Service Deployment (Deploy your application to Azure App Service. Choose from Web App on Windows, Linux, containers, Function Apps, or WebJobs) under the Featured list of templates.
- Click Apply.
- From the Stage window appearing, update the default “Stage 1” Stage Name to DevTest. Close the popup window by using the X button. You are now in the graphical editor of the Release Pipeline, showing the DevTest Stage.
- On the top of the page, rename the current pipeline from New release pipeline to eshoponweb-cd.
-
Hover the mouse over the DevTest Stage, and click the Clone button, to copy the DevTest Stage to an additional Stage. Name this Stage Production.
Note: The pipeline now contains two stages named DevTest and Production.
- On the Pipeline tab, select the Add an Artifact rectangle, and select the eshoponweb-ci in the Source (build pipeline) field. Click Add to confirm the selection of the artifact.
- From the Artifacts rectangle, notice the Continuous deployment trigger (lightning bolt). Click it to open the Continuous deployment trigger settings. Click Disabled to toggle the switch and enable it. Leave all other settings at default and close the Continuous deployment trigger pane, by clicking the x mark in its upper right corner.
-
Within the DevTest Environments stage, click the 1 job, 1 task label and review the tasks within this stage.
Note: The DevTest environment has 1 task which, respectively, publishes the artifact package to Azure Web App.
- On the All pipelines > eshoponweb-cd pane, ensure that the DevTest stage is selected. In the Azure subscription dropdown list, select your Azure subscription and click Authorize. If prompted, authenticate by using the user account with the Owner role in the Azure subscription.
- Confirm the App Type is set to “Web App on Windows”. Next, in the App Service name dropdown list, select the name of the DevTest web app.
-
Select the Task Deploy Azure App Service. In the Package or Folder field, update the default value of “$(System.DefaultWorkingDirectory)/**/*.zip” to “$(System.DefaultWorkingDirectory)/**/Web.zip”
notice an exclamation mark next to the Tasks tab. This is expected, as we need to configure the settings for the Production Stage.
-
Open the Application and Configuration Settings pane and enter
-UseOnlyInMemoryDatabase true -ASPNETCORE_ENVIRONMENT Developmentin the App settings box. - On the All pipelines > eshoponweb-cd pane, navigate to the Pipeline tab, and this time, within the Production Stage, click the 1 job, 1 task label. Similar to the DevTest stage earlier, complete the pipeline settings. Under the Tasks tab / Production Deployment process, in the Azure subscription dropdown list, select the Azure subscription you used for the DevTest Environment stage, shown under Available Azure Service connections, as we already created the service connection before when authorizing the subscription use.
- In the App Service name dropdown list, select the name of the Prod web app.
- Select the Task Deploy Azure App Service. In the Package or Folder field, update the default value of “$(System.DefaultWorkingDirectory)/**/*.zip” to “$(System.DefaultWorkingDirectory)/**/Web.zip”
- Open the Application and Configuration Settings pane and enter
-UseOnlyInMemoryDatabase true -ASPNETCORE_ENVIRONMENT Developmentin the App settings box. -
On the All pipelines > eshoponweb-cd pane, click Save and, in the Save dialog box, click OK.
You have now successfully configured the Release Pipeline.
- In the browser window displaying the eShopOnWeb project, in the vertical navigational pane, in the Pipelines section, click Pipelines.
- On the Pipelines pane, click the entry representing eshoponweb-ci build pipeline and then click on Run Pipeline.
-
On the Run pipeline pane, accept the default settings and click Run to trigger the pipeline. Wait for the build pipeline to finish.
Note: After the build succeeds, the release will be triggered automatically and the application will be deployed to both the environments. Validate the release actions, once the build pipeline completed successfully.
- In the vertical navigational pane, in the Pipelines section, click Releases and, on the eshoponweb-cd pane, click the entry representing the most recent release.
- On the eshoponweb-cd > Release-1 blade, track the progress of the release and verify that the deployment to both web apps completed successfully.
- Switch to the Azure portal interface, navigate to the resource group az400m04l09-RG, in the list of resources, click the DevTest web app, on the web app blade, click Browse, and verify that the web page (E-commerce website) loads successfully in a new web browser tab.
- Switch back to the Azure portal interface, this time navigating to the resource group az400m04l09-RG, in the list of resources, click the Production web app, on the web app blade, click Browse, and verify that the web page loads successfully in a new web browser tab.
-
Close the web browser tab displaying the EShopOnWeb web site.
Note: Now you have the application with CI/CD configured. In the next exercise we will set up Quality Gates as part of a more advanced Release pipeline.
Exercise 4: Configure release gates
In this exercise, you will set up Quality Gates in the release pipeline.
Task 1: Configure pre-deployment gates for approvals
In this task, you will configure pre-deployment gates.
- Switch to the web browser window displaying the Azure DevOps portal, and open the eShopOnWeb project. In the vertical navigational pane, in the Pipelines section, click Releases and, on the eshoponweb-cd pane, click Edit.
- On the All pipelines > eshoponweb-cd pane, on the left edge of the rectangle representing the DevTest Environment stage, click the oval shape representing the Pre-deployment conditions.
-
On Pre-deployment conditions pane, set the Pre-deployment approvals slider to Enabled and, in the Approvers text box, type and select your Azure DevOps account name.
Note: In a real-life scenario, this should be a DevOps Team name alias instead of your own name.
- Save the pre-approval settings and close the popup window.
- Click Create Release and confirm by pressing the Create button from the popup window.
- Notice the green confirmation message, saying “Release-2” has been created. Click the link of “Release-2” to navigate to its details.
- Notice the DevTest Stage is in a Pending Approval state. Click the Approve button. This sets off the DevTest Stage again.
Task 2: Configure post-deployment gates for Azure Monitor
In this task, you will enable the post-deployment gate for the DevTest Environment.
- Back on the All pipelines > eshoponweb-cd pane, on the right edge of the rectangle representing the DevTest Environment stage, click the oval shape representing the Post-deployment conditions.
- On Post-deployment conditions pane, set the Gates slider to Enabled, click + Add, and, in the pop-up menu, click Query Azure Monitor Alerts.
- On Post-deployment conditions pane, in the Query Azure Monitor Alerts section, in the Azure subscription dropdown list, select the service connection entry representing the connection to your Azure subscription, and, in the Resource group dropdown list, select the az400m04l09-RG entry.
-
On the Post-deployment conditions pane, expand the Advanced section and configure the following options:
- Filter type: None
- Severity: Sev0, Sev1, Sev2, Sev3, Sev4
- Time Range: Past Hour
- Alert State: Acknowledged, New
- Monitor Condition: Fired
-
On Post-deployment conditions pane, expand the Evaluation options and configure the following options:
- Set the value of Time between re-evaluation of gates to 5 Minutes.
- Set the value of Timeout after which gates fail to 8 Minutes.
- Select the On successful gates, ask for approvals option.
Note: The sampling interval and timeout work together so that the gates will call their functions at suitable intervals and reject the deployment if they don’t succeed during the same sampling interval within the timeout period.
- Close the Post-deployment conditions pane, by clicking the x mark in its upper right corner.
- Back on the eshoponweb-cd pane, click Save, and in the Save dialog box, click OK.
Exercise 5: Test release gates
In this exercise, you will test the release gates by updating the application, which will trigger a deployment.
Task 1: Update and deploy application after adding release gates
In this task, you will first generate some alerts for the DevTest Web App, followed by tracking the release process with the release gates enabled.
- From the Azure Portal, browse to the DevTest Web App Resource deployed earlier.
- From the Overview pane, notice the URL field showing the Hyperlink of the web application. Click this link, which redirects you to the eShopOnWeb web application in the browser.
- To simulate a Failed Request, add /discount to the URL, which will result in an error message, since that page does not exist. Refresh this page several times to generate multiple events.
- From the Azure Portal, in the “Search resources, services and docs” field, enter Application Insights and select the DevTest-AppInsights Resource created in the previous exercise. Next, navigate to Alerts.
- There should be at least 1 new alert in the list of results, having a Severity 2 enter Alerts to open the Alerts Service of Azure Monitor.
-
Notice there should be at least 1 Failed_Alert with Severity 2 - Warning showing up in the list. This got trigger when you validated the non-existing website URL address in the previous exercise.
Note: If no Alert shows up yet, wait another few minutes.
- Return back to the Azure DevOps Portal, open the eShopOnWeb Project. Navigate to Pipelines, select Releases and select the eshoponweb-cd.
- Click the Create Release button.
- Wait for the Release pipeline to kick off, and approve the DevTest Stage release action.
- Wait for the DevTest release Stage to complete successfully. Notice how the Post-deployment Gates is switching to an Evaluation Gates status. Click the Evaluation Gates icon.
- For the Query Azure Monitor Alerts, notice an initial failed state.
- Let the Release pipeline in a pending state for the next 5 minutes. After the 5 minutes did pass, notice the 2nd evaluation failing again.
-
This is expected behavior, since there is an Application Insights Alerts triggered for the DevTest Web App.
Note: Since there is an alert triggered by the exception, Query Azure Monitor gate will fail. This, in turn, will prevent deployment to the Production environment.
-
Wait a couple of minutes and validate the status of the Release Gates again. Within a few minutes after the initial Release Gates got checked, and since the initial Application Insight Alert got triggered with the action “Fired”, it should result in a successful Release Gate, allowing the deployment of the Production Release Stage.
Note: If your gate fails, close the alert.
Exercise 6: Remove the Azure lab resources
In this exercise, you will remove the Azure resources provisioned in this lab to eliminate unexpected charges.
Note: Remember to remove any newly created Azure resources that you no longer use. Removing unused resources ensures you will not see unexpected charges.
Task 1: Remove the Azure lab resources
In this task, you will use Azure Cloud Shell to remove the Azure resources provisioned in this lab to eliminate unnecessary charges.
- In the Azure portal, open the Bash shell session within the Cloud Shell pane.
-
List all resource groups created throughout the labs of this module by running the following command:
az group list --query "[?starts_with(name,'az400m04l09-RG')].name" --output tsv -
Delete all resource groups you created throughout the labs of this module by running the following command:
az group list --query "[?starts_with(name,'az400m04l09-RG')].[name]" --output tsv | xargs -L1 bash -c 'az group delete --name $0 --no-wait --yes'Note: The command executes asynchronously (as determined by the –nowait parameter), so while you will be able to run another Azure CLI command immediately afterwards within the same Bash session, it will take a few minutes before the resource groups are actually removed.
Review
In this lab, you configured release pipelines and then configured and tested release gates.