Configuring Agent Pools and Understanding Pipeline Styles
Student lab manual
Lab requirements
-
This lab requires Microsoft Edge or an Azure DevOps supported browser.
-
Set up an Azure DevOps organization: If you don’t already have an Azure DevOps organization that you can use for this lab, create one by following the instructions available at Create an organization or project collection.
-
Git for Windows download page. This will be installed as part of prerequisites for this lab.
-
Visual Studio Code. This will be installed as part of prerequisites for this lab.
Lab overview
YAML-based pipelines allow you to fully implement CI/CD as code, in which pipeline definitions reside in the same repository as the code that is part of your Azure DevOps project. YAML-based pipelines support a wide range of features that are part of the classic pipelines, such as pull requests, code reviews, history, branching, and templates.
Regardless of the choice of the pipeline style, to build your code or deploy your solution by using Azure Pipelines, you need an agent. An agent hosts compute resources that run one job at a time. Jobs can be run directly on the host machine of the agent or in a container. You have an option to run your jobs using Microsoft-hosted agents, which are managed for you, or implementing a self-hosted agent that you set up and manage on your own.
In this lab, you will learn how to implement and use self-hosted agents with YAML pipelines.
Objectives
After you complete this lab, you will be able to:
- Implement YAML-based pipelines.
- Implement self-hosted agents.
Estimated timing: 45 minutes
Instructions
Exercise 0: Configure the lab prerequisites
In this exercise, you will set up the prerequisites for the lab, which consist of a new Azure DevOps project with a repository based on the eShopOnWeb.
Task 1: (skip if done) Create and configure the team project
In this task, you will create an eShopOnWeb Azure DevOps project to be used by several labs.
- On your lab computer, in a browser window open your Azure DevOps organization. Click on New Project. Give your project the name eShopOnWeb and leave the other fields with defaults. Click on Create.
Task 2: (skip if done) Import eShopOnWeb Git Repository
In this task you will import the eShopOnWeb Git repository that will be used by several labs.
-
On your lab computer, in a browser window open your Azure DevOps organization and the previously created eShopOnWeb project. Click on Repos>Files , Import a Repository. Select Import. On the Import a Git Repository window, paste the following URL https://github.com/MicrosoftLearning/eShopOnWeb.git and click Import:
-
The repository is organized the following way:
- .ado folder contains Azure DevOps YAML pipelines.
- .devcontainer folder container setup to develop using containers (either locally in VS Code or GitHub Codespaces).
- infra folder contains Bicep & ARM infrastructure as code templates used in some lab scenarios.
- .github folder contains YAML GitHub workflow definitions.
- src folder contains the .NET 8 website used in the lab scenarios.
Exercise 1: Author YAML-based Azure Pipelines
In this exercise, you will create an application lifecycle build pipeline, using a YAML-based template.
Task 1: Create an Azure DevOps YAML pipeline
In this task, you will create a template-based Azure DevOps YAML pipeline.
- From the web browser displaying the Azure DevOps portal with the eShopOnWeb project open, in the vertical navigational pane on the left side, click Pipelines.
-
Click the Create Pipeline button - if you don’t have any other pipelines created yet or click New pipeline to create an additional new one.
- On the Where is your code? pane, click Azure Repos Git.
- On the Select a repository pane, click eShopOnWeb.
- On the Configure your pipeline pane, click Existing Azure Pipelines YAML File.
- On the Select an existing YAML file, select main for the Branch, and /.ado/eshoponweb-ci-pr.yml for the Path.
- Click Continue.
-
On the Review your pipeline YAML pane, review the sample pipeline. This is a rather straight-forward .NET application Build pipeline, which does the following:
- A single Stage: Build
- A single Job: Build
- 3 tasks within the Build Job:
- Dotnet Restore
- Dotnet Build
- Dotnet Publish
-
On the Review your pipeline YAML pane, click the down-facing caret symbol next to the Run button, click Save.
Note: we are just creating the pipeline definition for now, without running it. You will first set up an Azure DevOps agent pool and run the pipeline in a later exercise.
Exercise 2: Manage Azure DevOps agent pools
In this exercise, you will implement a self-hosted Azure DevOps agent.
Task 1: Configure an Azure DevOps self-hosting agent
In this task, you will configure your lab Virtual Machine as an Azure DevOps self-hosting agent and use it to run a build pipeline.
- Within the Lab Virtual machine (Lab VM) or your own computer, start a web browser, navigate to the Azure DevOps portal and sign in by using the Microsoft account associated with your Azure DevOps organization.
Note: The Lab Virtual machine should have all necessary prerequisite software installed. If you are installing on your own computer, you will need to install .NET 8 SDKs or higher necessary to build the demo project. See Download .NET.
- In the Azure DevOps portal, in the upper right corner of the Azure DevOps page, click the User settings icon, depending on whether or not you have preview features turned on, you should either see a Security or Personal access tokens item in the menu, if you see Security, click on that, then select Personal access tokens. On the Personal Access Tokens pane, and click + New Token.
-
On the Create a new personal access token pane, click the Show all scopes link and, specify the following settings and click Create (leave all others with their default values):
Setting Value Name eShopOnWeb Scope (custom defined) Agent Pools (show more scopes option below if needed) Permissions Read and manage -
On the Success pane, copy the value of the personal access token to Clipboard.
Note: Make sure you copy the token. You will not be able to retrieve it once you close this pane.
- On the Success pane, click Close.
- On the Personal Access Token pane of the Azure DevOps portal, click Azure DevOps symbol in the upper left corner and then click Organization settings label in the lower left corner.
- To the left side of the Overview pane, in the vertical menu, in the Pipelines section, click Agent pools.
- On the Agent pools pane, in the upper right corner, click Add pool.
- On the Add agent pool pane, in the Pool type dropdown list, select Self-hosted, in the Name text box, type az400m03l03a-pool and then click Create.
- Back on the Agent pools pane, click the entry representing the newly created az400m03l03a-pool.
- On the Jobs tab of the az400m03l03a-pool pane, click the New agent button.
-
On the Get the agent pane, ensure that the Windows and x64 tabs are selected, and click Download to download the zip archive containing the agent binaries to download it into the local Downloads folder within your user profile.
Note: If you receive an error message at this point indicating that the current system settings prevent you from downloading the file, in the Browser window, in the upper right corner, click the gearwheel symbol designating the Settings menu header, in the dropdown menu, select Internet Options, in the Internet Options dialog box, click Advanced, on the Advanced tab, click Reset, in the Reset Browser Settings dialog box, click Reset again, click Close, and try the download again.
-
Start Windows PowerShell as administrator and in the Administrator: Windows PowerShell console run the following lines to create the C:\agent directory and extract the content of the downloaded archive into it.
cd \ mkdir agent ; cd agent $TARGET = Get-ChildItem "$Home\Downloads\vsts-agent-win-x64-*.zip" Add-Type -AssemblyName System.IO.Compression.FileSystem [System.IO.Compression.ZipFile]::ExtractToDirectory($TARGET, "$PWD") -
In the same Administrator: Windows PowerShell console, run the following to configure the agent:
.\config.cmd -
When prompted, specify the values of the following settings:
Setting Value Enter server URL the URL of your Azure DevOps organization, in the format https://dev.azure.com/ <organization_name>, where<organization_name>represents the name of your Azure DevOps organizationEnter authentication type (press enter for PAT) Enter Enter personal access token The access token you recorded earlier in this task Enter agent pool (press enter for default) az400m03l03a-pool Enter agent name az400m03-vm0 Enter work folder (press enter for _work) Enter (Only if shown) Enter Perform an unzip for tasks for each step. (press enter for N) WARNING: only press Enter if the message is shown Enter run agent as service? (Y/N) (press enter for N) Y enter enable SERVICE_SID_TYPE_UNRESTRICTED (Y/N) (press enter for N) Y Enter User account to use for the service (press enter for NT AUTHORITY\NETWORK SERVICE) Enter Enter whether to prevent service starting immediately after configuration is finished? (Y/N) (press enter for N) Enter Note: You can run self-hosted agent as either a service or an interactive process. You might want to start with the interactive mode, since this simplifies verifying agent functionality. For production use, you should consider either running the agent as a service or as an interactive process with auto-logon enabled, since both persist their running state and ensure that the agent starts automatically if the operating system is restarted.
- Switch to the browser window displaying the Azure DevOps portal and close the Get the agent pane.
- Back on the Agents tab of the az400m03l03a-pool pane, note that the newly configured agent is listed with the Online status.
- In the web browser window displaying the Azure DevOps portal, in the upper left corner, click the Azure DevOps label.
- From the list of projects, click the tile representing your eShopOnWeb project.
- On the eShopOnWeb pane, in the vertical navigational pane on the left side, in the Pipelines section, click Pipelines.
- On the Recent tab of the Pipelines pane, select eShopOnWeb and, on the eShopOnWeb pane, select Edit.
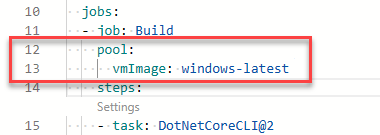
-
On the eShopOnWeb edit pane, in the existing YAML-based pipeline, replace line 13 which says
vmImage: windows-latestdesignating the target agent pool the following content, designating the newly created self-hosted agent pool:name: az400m03l03a-pool demands: - Agent.Name -equals az400m03-vm0WARNING: Be careful with copy/paste, make sure you have same indentation shown above.

- On the eShopOnWeb edit pane, in the upper right corner of the pane, click Save and Run. This will automatically trigger the build based on this pipeline.
- In the Azure DevOps portal, in the vertical navigational pane on the left side, in the Pipelines section, click Pipelines. Depending on your lab setup, the pipeline might prompt you for permissions. Click Permit to allow the pipeline to run.
- On the Recent tab of the Pipelines pane, click the eShopOnWeb entry, on the Runs tab of the eShopOnWeb pane, select the most recent run, on the Summary pane of the run, scroll down to the bottom, in the Jobs section, click Phase 1 and monitor the job until its successful completion.
Exercise 3: Remove the resources used in the lab
- Stop and remove the agent service by running
.\config.cmd removefrom the command prompt. - Delete the agent pool.
- Revoke the PAT token.
- Revert the changes in the eshoponweb-ci-pr.yml file by navigating to it from Repos/.ado/eshoponweb-ci-pr.yml, selecting Edit and removing lines 13-15 (the agent pool snippet), and changing back to
vmImage: windows-latestas it was originally. (This is because you will use the same sample pipeline file in a future lab exercise.)
Review
In this lab, you learned how to implement and use self-hosted agents with YAML pipelines.