M07-Unit 5 Restrict network access to PaaS resources with virtual network service endpoints
Exercise scenario
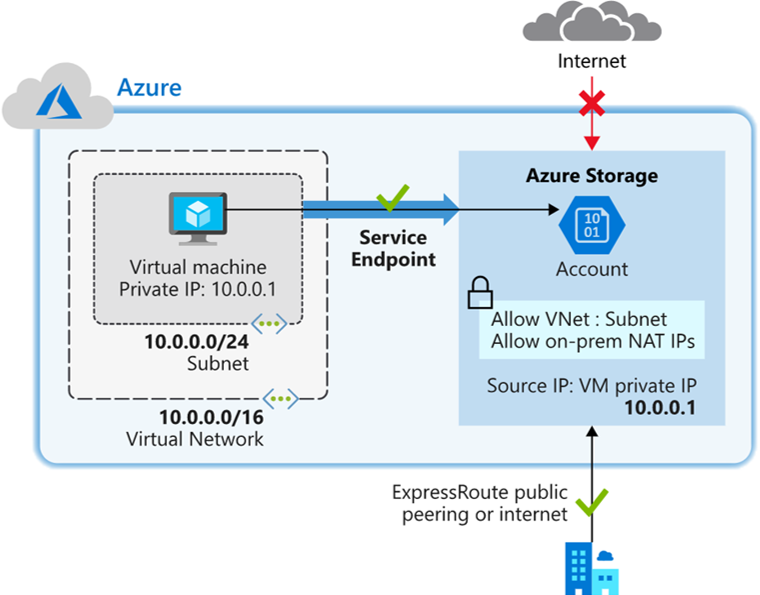
Virtual network service endpoints enable you to limit network access to some Azure service resources to a virtual network subnet. You can also remove internet access to the resources. Service endpoints provide direct connection from your virtual network to supported Azure services, allowing you to use your virtual network’s private address space to access the Azure services. Traffic destined to Azure resources through service endpoints always stays on the Microsoft Azure backbone network.
Estimated time: 35 minutes
Job skills
In this exercise, you will:
- Task 1: Create a virtual network
- Task 2: Enable a service endpoint
- Task 3: Restrict network access for a subnet
- Task 4: Add additional outbound rules
- Task 5: Allow access for RDP connections
- Task 6: Restrict network access to a resource
- Task 7: Create a file share in the storage account
- Task 8: Restrict network access to a subnet
- Task 9: Create virtual machines
- Task 10: Confirm access to storage account
Task 1: Create a virtual network
-
Login to the Azure Portal.
-
On the Azure Portal home page, search for
virtual networkand then select Virtual network from the results. -
Select + Create.
-
Enter, or select, the following information:
Setting Value Subscription Select your subscription Resource group (New) myResourceGroup Name CoreServicesVNet Location Select East US -
Select the Security tab and enter the following values:
Setting Value BastionHost Disabled DDoS Network Protection Disabled Firewall Disabled -
Select the IP Addresses tab and enter the following values (select default to change the subnet name):
Setting Value Address space 10.0.0.0/16 Subnet Name Public Subnet Address range 10.0.0.0/24 -
Select Review + Create. Once the resource is validated select Create.
Task 2: Enable a service endpoint
Service endpoints are enabled per service, per subnet. Create a subnet and enable a service endpoint for the subnet.
-
In the Search resources, services, and docs box at the top of the portal, enter CoreServicesVNet. When CoreServicesVNet appears in the search results, select it.
-
Add a subnet to the virtual network. Under Settings, select Subnets, and then select + Subnet, as shown in the following picture:
-
Under Add subnet, select or enter the following information:
Setting Value Name Private Address range 10.0.1.0/24 Service endpoints: Services Select Microsoft.Storage -
Select Add.
You should now have two subnets configured:
Task 3: Restrict network access for a subnet
By default, all VMs in a subnet can communicate with all resources. You can limit communication to and from all resources in a subnet by creating a network security group and associating it to the subnet.
-
In the Search resources, services, and docs box at the top of the portal, enter security group. When Network Security groups appears in the search results, select it.
-
In Network security groups, select + Create.
-
Enter or select, the following information:
Setting Value Subscription Select your subscription Resource group myResourceGroup Name ContosoPrivateNSG Location Select East US -
select Review + create, then select Create:
-
After the ContosoPrivateNSG network security group is created, select Go to resource.
-
Under Settings, select Outbound security rules.
-
Select + Add.
-
Create a rule that allows outbound communication to the Azure Storage service. Enter, or select, the following information:
Setting Value Source Select Service Tag Source service tag Select VirtualNetwork Source port ranges * Destination Select Service Tag Destination service tag Select Storage Service Custom Destination port ranges * Protocol Any Action Allow Priority 100 Name Allow-Storage-All -
Select Add:
Task 4: Add additional outbound rules
Create another outbound security rule that denies communication to the internet. This rule overrides a default rule in all network security groups that allows outbound internet communication.
-
Select +Add under Outbound security rules.
-
Enter, or select, the following information:
Setting Value Source Select Service Tag Source service tag Select VirtualNetwork Source port ranges * Destination Select Service Tag Destination service tag Select Internet Service Custom Destination port ranges * Protocol Any Action Deny Priority 110 Name Deny-Internet-All -
Select Add.
Task 5: Allow access for RDP connections
Create an inbound security rule that allows Remote Desktop Protocol (RDP) traffic to the subnet from anywhere. The rule overrides a default security rule that denies all inbound traffic from the internet. Remote desktop connections are allowed to the subnet so that connectivity can be tested in a later step.
-
On ContosoPrivateNSG Outbound security rules, under Settings, select Inbound security rules. -
Select + Add.
-
In Add inbound security rule, enter the following values::
Setting Value Source Any Source port ranges * Destination Any Service Custom Destination port ranges 3389 Protocol Any Action Allow Priority 120 Name Allow-RDP-All - And then select Add.
Warning: RDP port 3389 is exposed to the Internet. This is only recommended for testing. For production environments, we recommend using a VPN or private connection.
-
Under Settings, select Subnets.
-
Select + Associate.
-
Under Associate subnet, select Virtual network and then select CoreServicesVNet under Choose a virtual network.
-
Under Choose subnet, select Private, and then select OK.
Task 6: Restrict network access to a resource
The steps necessary to restrict network access to resources created through Azure services enabled for service endpoints varies across services. See the documentation for individual services for specific steps for each service. The remainder of this exercise includes steps to restrict network access for an Azure Storage account, as an example.
-
In the Azure portal, search for and select
Storage accounts. -
Select Create.
-
Enter, or select, the following information and accept the remaining defaults:
Setting Value Subscription Select your subscription Resource group myResourceGroup Name Enter contosostoragexx (where xx are your initials to make it unique) Primary service Azure Files Performance Standard StorageV2 (general purpose v2) Location Select East US Replication Locally-redundant storage (LRS) -
Select Review, then select Create.
-
After the storage account successfully deploys, select Go to resource.
Task 7: Create a file share in the storage account
-
In the Storage account, in the Data storage blade, select Classic file shares.
-
Select + Classic file share.
-
For Name, enter marketing, and then select Next : Backup.
-
Unselect Enable backup, as shown in the following picture:
-
Select Review + Create. Once the resource is validated select Create.
Task 8: Restrict network access to a subnet
By default, storage accounts accept network connections from clients in any network, including the internet. Deny network access from the internet, and all other subnets in all virtual networks, except for the Private subnet in the CoreServicesVNet virtual network.
-
Under Security + networking for the storage account, select Networking.
-
Select Manage in the Public network access section.
1 In the Public access scope section, select Enabled from selected networks.
-
Select + Add existing virtual network, and then Add existing virtual network.
Setting Value Subscription Select your subscription. Virtual networks CoreServicesVNet Subnets Private. -
Select Add, and then Save.
-
Under Security and Networking for the storage account, select Access keys.
-
Use Show for the Key1 value. Copy the value you will need it later.
Task 9: Create virtual machines
To test network access to a storage account, deploy a VM to each subnet.
- In the Azure portal, select the Cloud Shell icon (top right). If necessary, configure the shell.
- Select PowerShell.
- Select No Storage Account required and your Subscription, then select Apply.
- Wait for the terminal to create and a prompt to be displayed.
-
In the toolbar of the Cloud Shell pane, select the Manage files icon, in the drop-down menu, select Upload and upload the following files VMs.json and VMs.parameters.json into the Cloud Shell home directory. This Module 07, Exercise 05.
-
Deploy the following ARM templates to create the VMs needed for this exercise:
Note: You will be prompted to provide an Admin password.
$RGName = "myResourceGroup" New-AzResourceGroupDeployment -ResourceGroupName $RGName -TemplateFile VMs.json -TemplateParameterFile VMs.parameters.json - When the deployment is complete, go to the Azure portal home page, and then select Virtual Machines.
Task 10: Confirm access to storage account
-
In the portal, search for and select the ContosoPrivate virtual machine.
-
Selecting Connect, then Connect, and then Download RDP file. If prompted, confirm the download.
-
From the Downloads folder, open the ContosoPrivate.rdp file.
-
Select Connect and provide the virtual machine password. Select Ok and indicate Yes to the certificate warning.
- Use PowerShell to create a file share. Replace
, (i.e. contosostoragexx) with the values when you created the storage account. $acctKey = ConvertTo-SecureString -String "<storage-account-key1-value>" -AsPlainText -Force $credential = New-Object System.Management.Automation.PSCredential -ArgumentList "Azure\<storage-account-name>", $acctKey New-PSDrive -Name Z -PSProvider FileSystem -Root "\\<storage-account-name>.file.core.windows.net\marketing" -Credential $credential -
Confirm that the VM has no outbound connectivity. You receive no replies because the network security group associated to the Private subnet does not allow outbound access to the internet.
ping bing.com - Close the remote desktop session to the ContosoPrivate VM.
Confirm access is denied to storage account
-
Return to the Azure portal.
-
Navigate to your storage account, select Classic file shares then select the marketing file share.
-
Select Browse and notice the access denied error. Your error may look different. Access is denied, because your computer is not in the Private subnet of the CoreServicesVNet virtual network.
Clean up resources
Note: Remember to remove any newly created Azure resources that you no longer use. Removing unused resources ensures you will not see unexpected charges.
-
On the Azure portal, open the PowerShell session within the Cloud Shell pane.
-
Delete all resource groups you created throughout the labs of this module by running the following command:
Remove-AzResourceGroup -Name 'myResourceGroup' -Force -AsJobNote: The command executes asynchronously (as determined by the -AsJob parameter), so while you will be able to run another PowerShell command immediately afterwards within the same PowerShell session, it will take a few minutes before the resource groups are actually removed.
Extend your learning with Copilot
Copilot can assist you in learning how to use the Azure scripting tools. Copilot can also assist in areas not covered in the lab or where you need more information. Open an Edge browser and choose Copilot (top right) or navigate to copilot.microsoft.com. Take a few minutes to try these prompts.
- What is the difference between azure service endpoints and private endpoints?
- Which Azure services can use service endpoints?
- What are the steps to restricting access to Azure Storage by using service endpoints?
Learn more with self-paced training
- Secure and isolate access to Azure resources by using network security groups and service endpoints. In this module, you learn how to use virtual network service endpoints to control network traffic to and from Azure services.
Key takeaways
- Virtual network service endpoints extend your private address space in Azure by providing a direct connection to your Azure services.
- Service endpoints let you secure your Azure resources to only your virtual network. Service traffic will remain on the Azure backbone, and doesn’t go out to the internet.
- Azure service endpoints are available for many services, such as: Azure Storage, Azure SQL Database, and Azure Cosmos DB.
- Virtual network service endpoints are not, by default, accessible from on-premises networks. To access resources from an on-premises network, use NAT IPs.