M06-Unit 9 Secure your virtual hub using Azure Firewall Manager
Exercise scenario
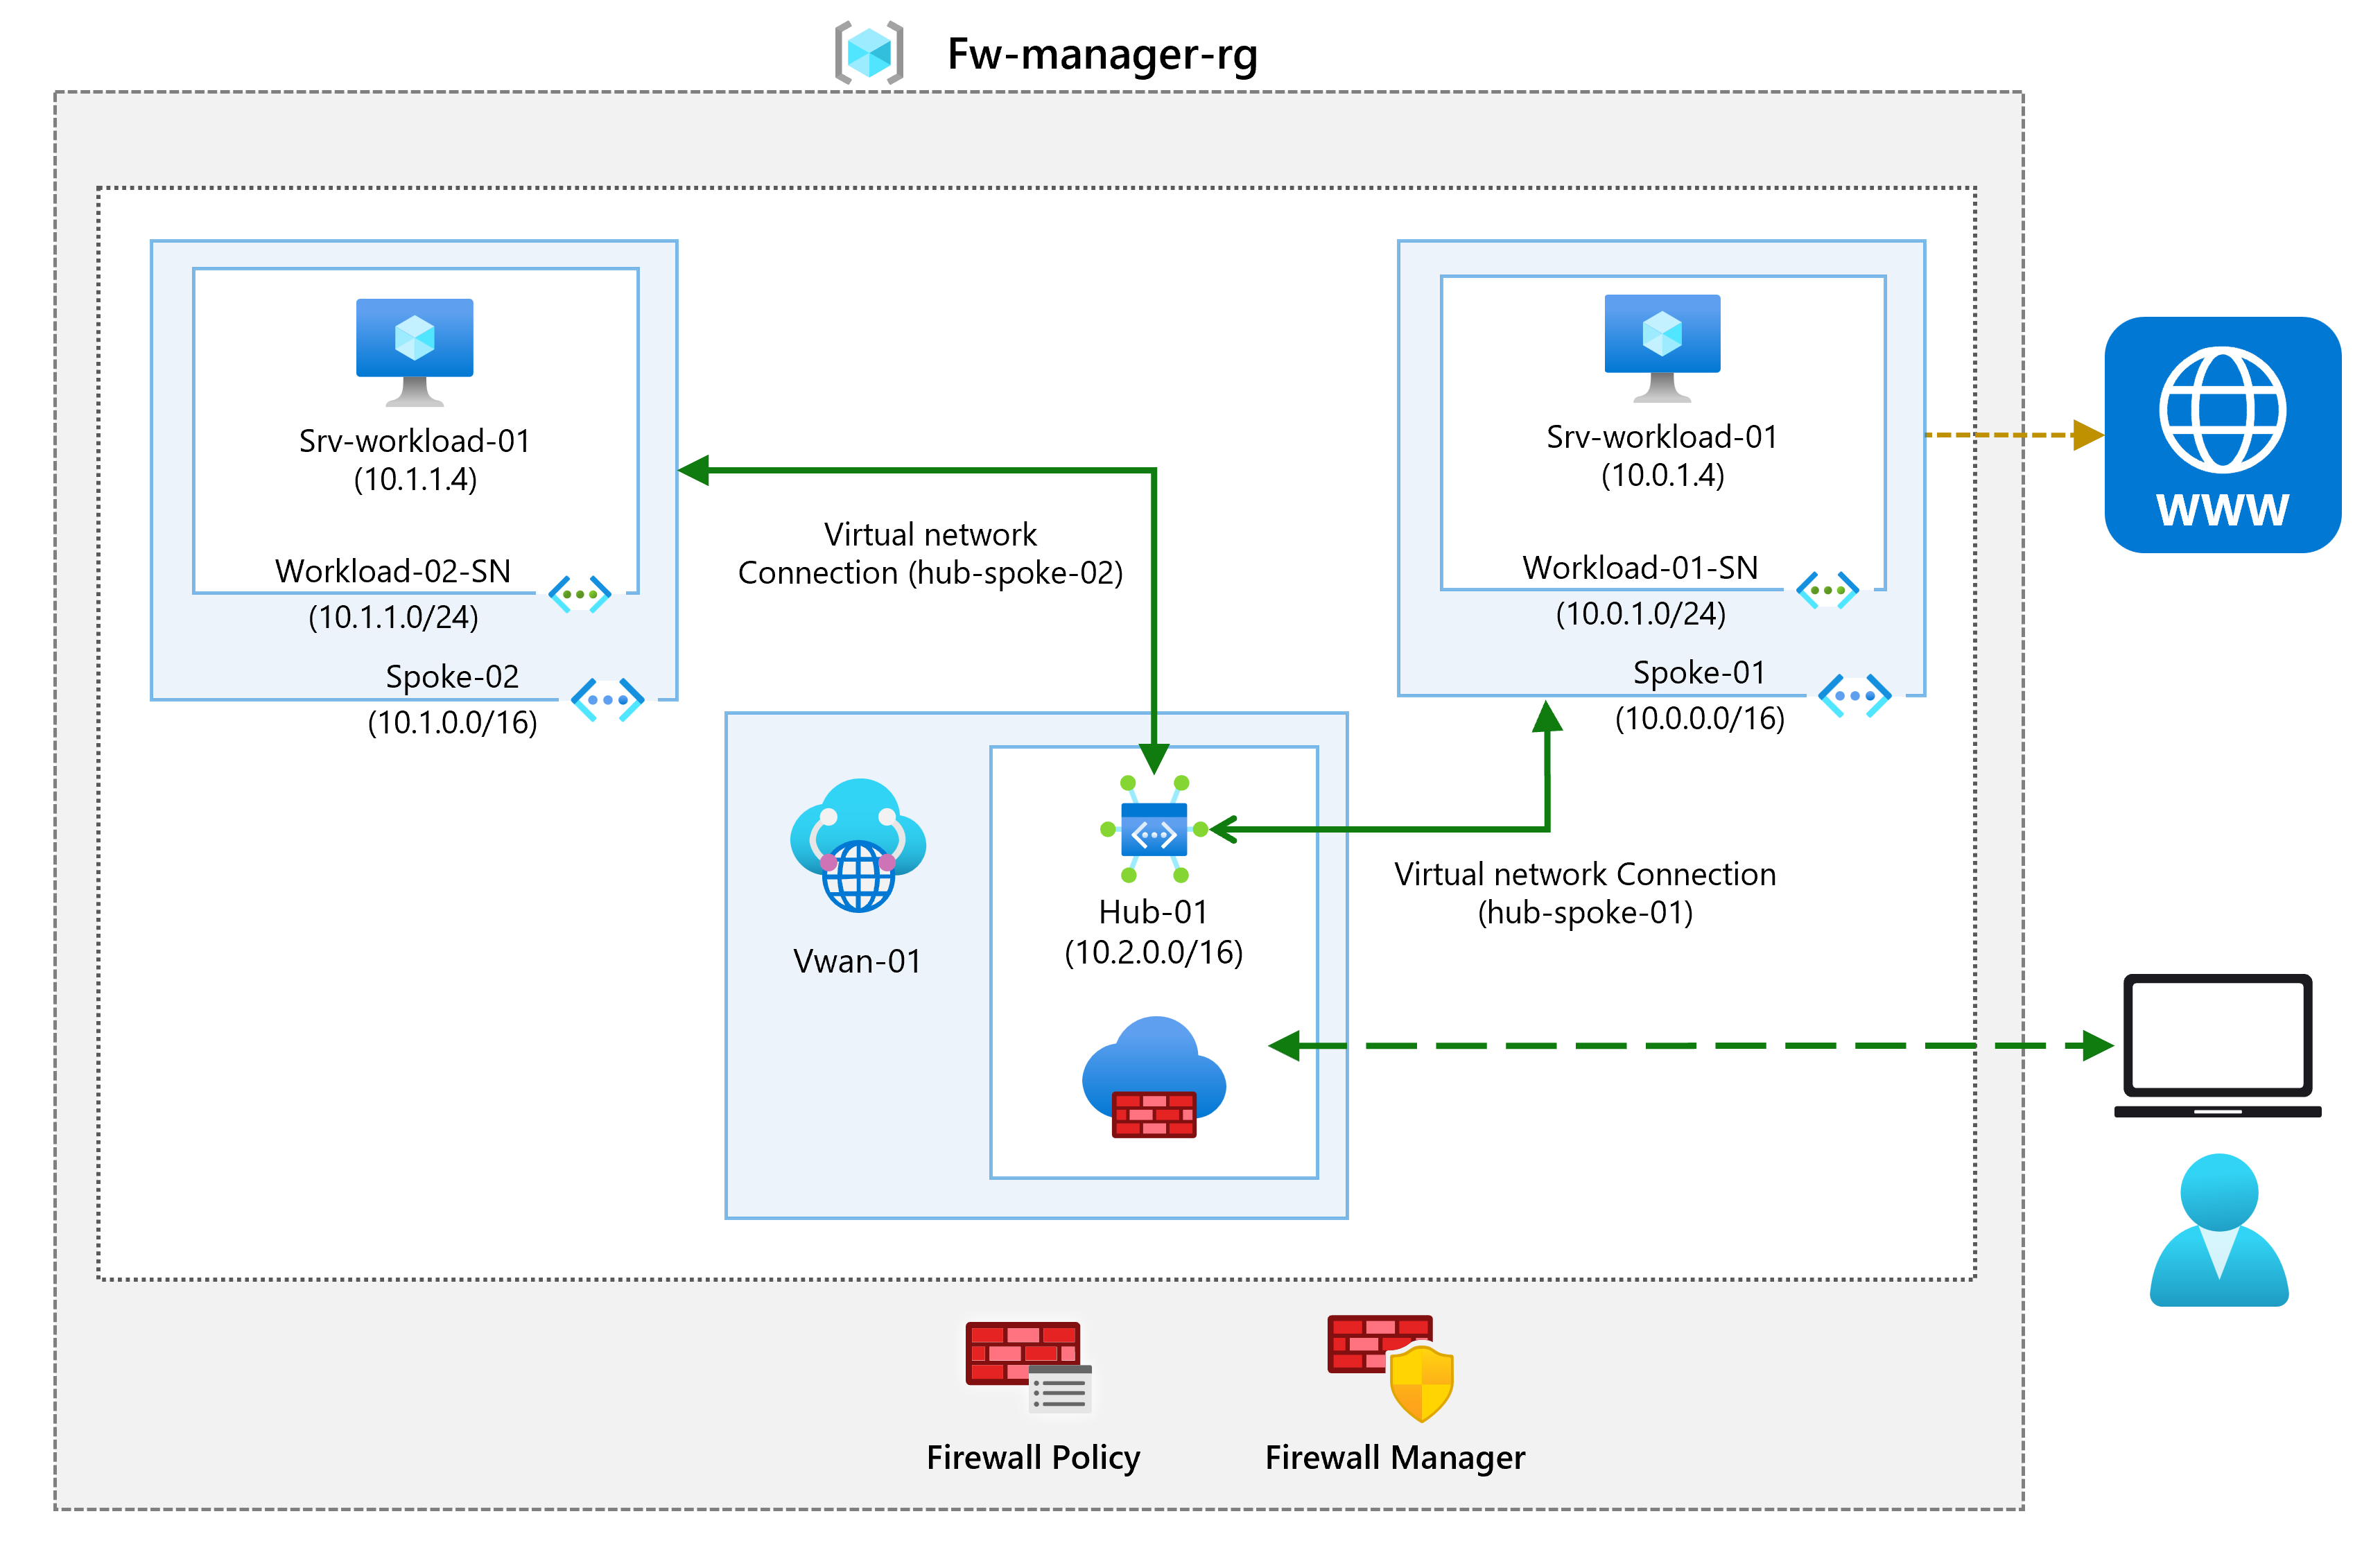
In this exercise, you will create the spoke virtual network and create a secured virtual hub, then you will connect the hub and spoke virtual networks and route traffic to your hub. Next you will deploy the workload servers, then create a firewall policy and secure your hub, and finally you will test the firewall.
Estimated time: 35 minutes
Job skills
In this exercise, you will:
- Task 1: Create two spoke virtual networks and subnets
- Task 2: Create the secured virtual hub
- Task 3: Connect the hub and spoke virtual networks
- Task 4: Deploy the servers
- Task 5: Create a firewall policy and secure your hub
- Task 6: Associate the firewall policy
- Task 7: Route traffic to your hub
- Task 8: Test the application rule
- Task 9: Test the network rule
- Task 10: Clean up resources
Task 1: Create two spoke virtual networks and subnets
In this task, you will create the two spoke virtual networks each containing a subnet that will host your workload servers.
-
In the Azure portal, search for and select
Virtual Networks. -
Select Create.
-
In Resource group, select Create new, and enter
fw-manager-rgas the name and select OK. -
In Virtual network name, enter
Spoke-01. -
In Region, select your region.
-
Select Next. Review but don’t make any changes on the Security tab.
-
Select Next and move to the IP Addresses tab.
-
Select Delete address space then Add IPv4 address space.
-
Verify the IP address space is 10.0.0.0/16.
-
Select Add a subnet.
-
Change the subnet Name to
Workload-01-SN. -
Change the Starting address to
10.0.1.0. -
Select Add.
-
Select Review + create.
-
Select Create.
Repeat steps 1 to 14 above to create another similar virtual network and subnet using the following information. You don’t need to wait for the first virtual network to finish deploying.
- Resource Group: fw-manager-rg (select existing)
- Virtual network name:
Spoke-02 - Address space: 10.1.0.0/16 - (delete any other listed address spaces)
- Subnet name:
Workload-02-SN - Subnet starting address:
10.1.1.0
Task 2: Create the secured virtual hub
In this task you will create your secured virtual hub using Firewall Manager.
-
In the portal search for
firewall managerand then select Network Security keyword firewall manager. -
In the Secure your resources blade, select Virtual Hubs.
-
Select Create new secured virtual hub.
-
For Resource group, select fw-manager-rg.
-
For Region, select your region.
-
For the Secured virtual hub name, enter
Hub-01. -
For Hub address space, enter
10.2.0.0/16. -
Ensure New vWAN is selected
-
In Virtual WAN Name, enter
Vwan-01. -
Select Next: Azure Firewall. Review but don’t make any changes.
-
Select Next: Security Partner Provider. Review but don’t make any changes.
-
Select Next: Review + create.
-
Select Create.
Note: This can take up to 30 minutes to deploy.
-
Wait for the deployment to complete.
-
In the portal search for
firewall managerand then select Network Security keyword firewall manager. -
On the Firewall Manager page, select Virtual hubs.
-
Select Hub-01.
-
Select Azure Firewall and then Public IP configuration.
-
Note the public IP address (e.g., 172.191.79.203), which you will use later.
Task 3: Connect the hub and spoke virtual networks
In this task you will connect the hub and spoke virtual networks. This is commonly known as peering.
-
In the portal, search for and select the
Vwan-01virtual WAN. -
Under Connectivity, select Virtual network connections.
-
Select Add connection.
-
For Connection name, enter
hub-spoke-01. -
For Hubs, select Hub-01.
-
For Resource group, select fw-manager-rg.
-
For Virtual network, select Spoke-01.
-
Select Create.
-
Repeat steps 4 to 9 above to create another similar connection but using the connection name of
hub-spoke-02to connect the Spoke-02 virtual network. -
Refresh the virtual network connections page and verify you have two virtual networks, Spoke-01 and Spoke-02.
Task 4: Deploy the servers
- In the Azure portal, select the Cloud Shell icon (top right). If necessary, configure the shell.
- Select PowerShell.
- Select No Storage Account required and your Subscription, then select Apply.
- Wait for the terminal to create and a prompt to be displayed.
-
In the toolbar of the Cloud Shell pane, select the Manage files icon, in the drop-down menu, select Upload and upload the following files FirewallManager.json and FirewallManager.parameters.json into the Cloud Shell home directory.
Note: If you are working in your own subscription the template files are available in the GitHub lab repository.
-
Deploy the following ARM templates to create the VM needed for this exercise:
Note: You will be prompted to provide an Admin password. You will need this password in a later step.
$RGName = "fw-manager-rg" New-AzResourceGroupDeployment -ResourceGroupName $RGName -TemplateFile FirewallManager.json -TemplateParameterFile FirewallManager.parameters.json -
When the deployment is complete, go to the Azure portal home page, and then select Virtual Machines.
-
On the Overview page of Srv-workload-01, in the right-hand pane, under the Networking section, note down the Private IP address (e.g., 10.0.1.4).
- On the Overview page of Srv-workload-02, in the right-hand pane, under the Networking section, note down the Private IP address (e.g., 10.1.1.4).
Task 5: Create a firewall policy and secure your hub
In this task you will first create your firewall policy, then secure your hub. The firewall policy will define collections of rules to direct traffic on one or more Secured virtual hubs.
-
In the portal, search for and select
Firewall Policies. -
Select Create.
Setting Value Resource group fw-manager-rg Name Policy-01Region Select your region Policy tier Standard -
Select Next : DNS Settings. Review but don’t make any changes.
-
Select Next : TLS Inspection. Review but don’t make any changes.
Add a rule collection and rule to allow the Microsoft domain
-
Select Next : Rules, and then select Add a rule collection.
Setting Value Name App-RC-01Rule collection type Application Priority 100Rule collection action Allow -
In the Rules section.
Setting Value Name Allow-msftSource type IP Address Source *Protocol http,httpsDestination type FQDN Destination *.microsoft.com
Add a rule collection and rule to allow a remote desktop connection to the Srv-workload-01 virtual machine.
-
Select Add a rule collection.
Setting Value Name dnat-rdpRule collection type DNAT Priority 100Rule collection action Allow -
In the Rules section.
Setting Value Name Allow-rdpSource type IP Address Source *Protocol TCP Destination Ports 3389Destination (Firewall IP Address) Enter the firewall virtual hub public IP address Translated type IP Address Translated address or FQDN Enter the private IP address for Srv-workload-01 virtual machine Translated port 3389
Add a rule collection and rule to allow a remote desktop connection to the Srv-workload-02 virtual machine.
-
Select Add a rule collection.
Setting Value Name vnet-rdpRule collection type Network Priority 100Rule collection action Allow -
In the Rules section.
Setting Value Name Allow-vnetSource type IP Address Source *Protocol TCP Destination Ports 3389Destination (Firewall IP Address) Enter the firewall virtual hub public IP address Translated type IP Address Translated address or FQDN Enter the private IP address for Srv-workload-02 virtual machine Translated port 3389 -
Select Add.
-
Verify you have three rule collections.
-
Select Review + create.
-
Select Create.
Task 6: Associate the firewall policy
In this task you will associate the firewall policy with the virtual hub.
-
In the portal search for and select
Hub-01. -
In the Settings blade, select Security providers
-
Select the checkbox for Add Policy.
-
Select Policy-01 and then Save.
-
Select the checkbox for Hub-01.
-
Select Add.
-
When the policy has been association, select Refresh. The association should be displayed.
Task 7: Route traffic to your hub
In this task you will ensure that network traffic gets routed through your firewall.
-
In the portal, search for and select Vwan-01.
-
In the Connectivity blade, select Hubs, and then Hub-01.
-
In the Security blade, select Azure Firewall and Firewall Manager, select Hub-01, and then Security configuration.
-
On Internet traffic, select Azure Firewall.
-
On Private traffic, select Send via Azure Firewall.
-
Select Save and click OK to confirm your choice.
-
This will take a few minutes to complete.
-
Once configuration has completed, ensure that under INTERNET TRAFFIC and PRIVATE TRAFFIC, it says Secured by Azure Firewall for both hub-spoke connections.
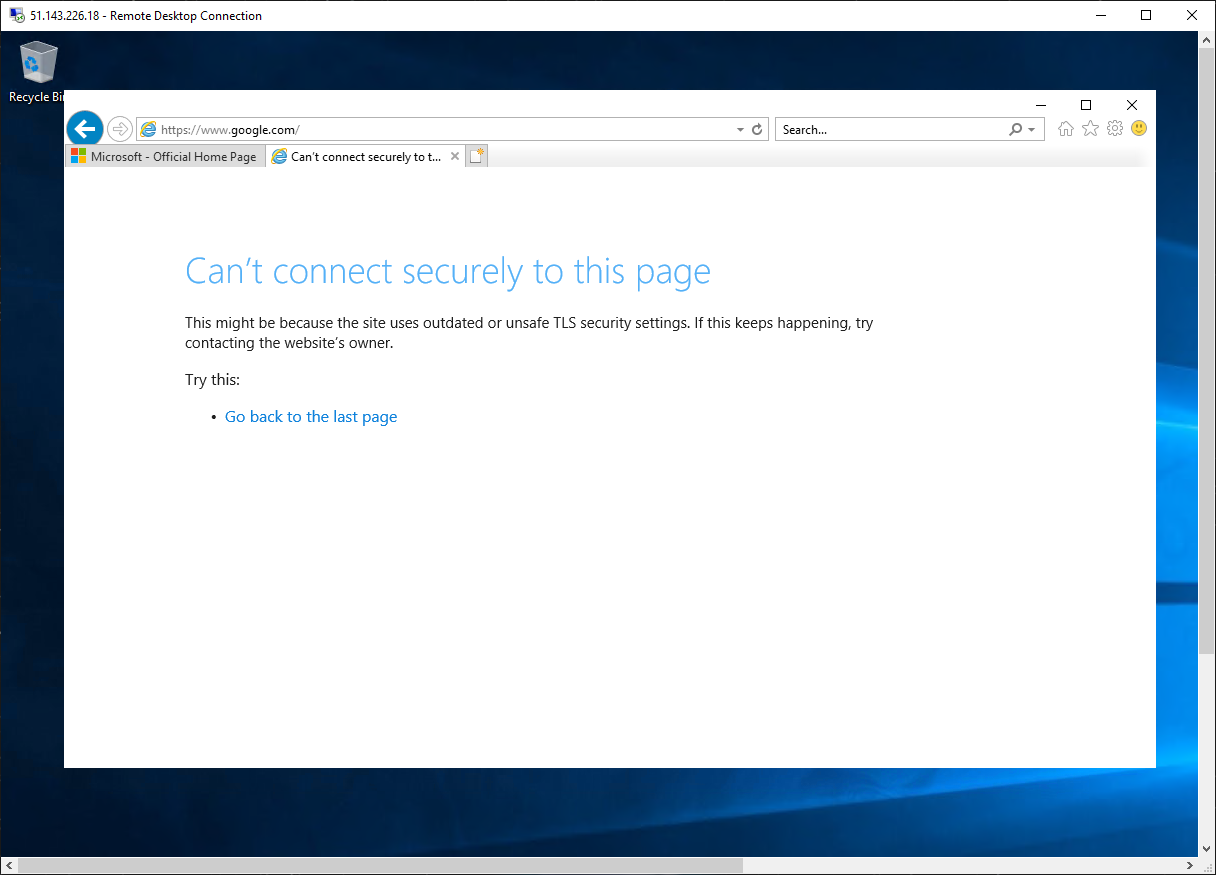
Task 8: Test the application rule
In this task you will test the application rule to confirm that it works as expected.
-
Open Remote Desktop Connection on your PC.
-
On the Computer box, enter the firewall’s public IP address (e.g., 51.143.226.18).
-
Select Show Options.
-
On the Username box, enter TestUser.
-
Select Connect.
-
On the Enter your credentials dialog box, log into the Srv-workload-01 server virtual machine, by using the password you provided during deployment.
-
Select OK.
-
Select Yes on the certificate message.
-
Open Internet Explorer and select OK in the Set up Internet Explorer 11 dialog box.
-
Browse to
https://www.microsoft.com -
On the Security Alert dialog box, select OK.
-
Select Close on the Internet Explorer security alerts that may pop-up.
-
You should see the Microsoft home page.
-
Browse to https:// **
**. -
You should be blocked by the firewall.
-
So, you have verified that you can connect to the one allowed FQDN but are blocked from all others.
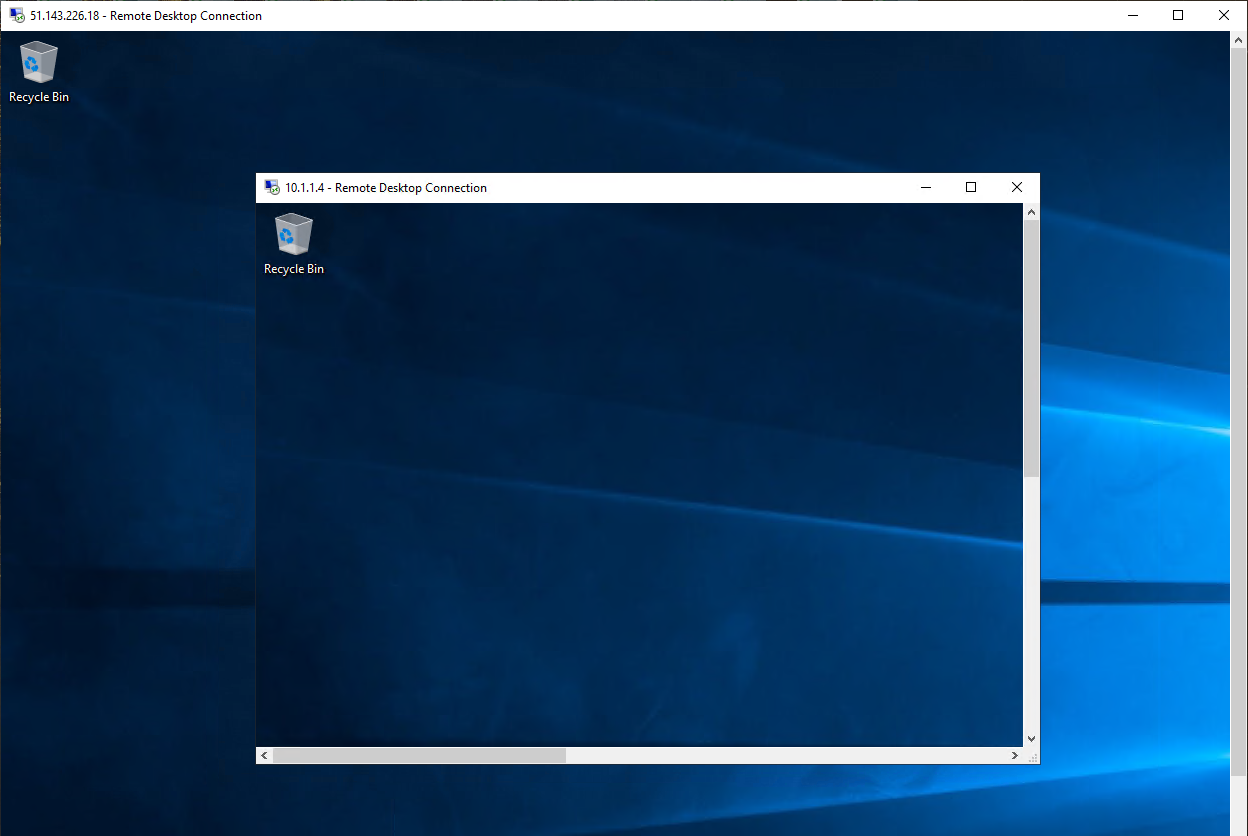
Task 9: Test the network rule
In this task you will test the network rule to confirm that it works as expected.
-
While still logged in to the Srv-workload-01 RDP session, from this remote computer, open Remote Desktop Connection.
-
On the Computer box, enter the private IP address of Srv-workload-02 (e.g., 10.1.1.4).
-
On the Enter your credentials dialog box, log in to the Srv-workload-02 server by using the username TestUser, and the password you provided during deployment.
-
Select OK.
-
Select Yes on the certificate message.
-
So, now you have verified that the firewall network rule is working, as you have connected a remote desktop from one server to another server located in another virtual network.
-
Close both RDP sessions to disconnect them.
Task 10: Clean up resources
Note: Remember to remove any newly created Azure resources that you no longer use. Removing unused resources ensures you will not see unexpected charges.
-
On the Azure portal, open the PowerShell session within the Cloud Shell pane.
-
Delete all resource groups you created throughout the labs of this module by running the following command:
Remove-AzResourceGroup -Name 'fw-manager-rg' -Force -AsJobNote: The command executes asynchronously (as determined by the -AsJob parameter), so while you will be able to run another PowerShell command immediately afterwards within the same PowerShell session, it will take a few minutes before the resource groups are actually removed.
Extend your learning with Copilot
Copilot can assist you in learning how to use the Azure scripting tools. Copilot can also assist in areas not covered in the lab or where you need more information. Open an Edge browser and choose Copilot (top right) or navigate to copilot.microsoft.com. Take a few minutes to try these prompts.
- Provide three common usage scenarios for Azure Firewall Manager.
- What types of Firewall Policy rules are available. Provide usage cases for each type.
Learn more with self-paced training
- Introduction to Azure Firewall. In this module, you learn how Azure Firewall protects Azure virtual network resources including features, rules, and deployment options.
- Introduction to Azure Firewall Manager. In this module, you learn how Azure Firewall Manager provides central security policy and route management for cloud-based security perimeters.
Key takeaways
Congratulations on completing the lab. Here are the main takeaways for this lab.
- Azure Firewall Manager provides centralized configuration and management across multiple Azure Firewall instances.
- Azure Firewall Manager lets you create one or more firewall policies and rapidly apply them to multiple firewalls.
- There are Firewall Policy rules for application, network, and NAT.