M06-Unit 4 Configure DDoS Protection on a virtual network using the Azure portal
Exercise scenario
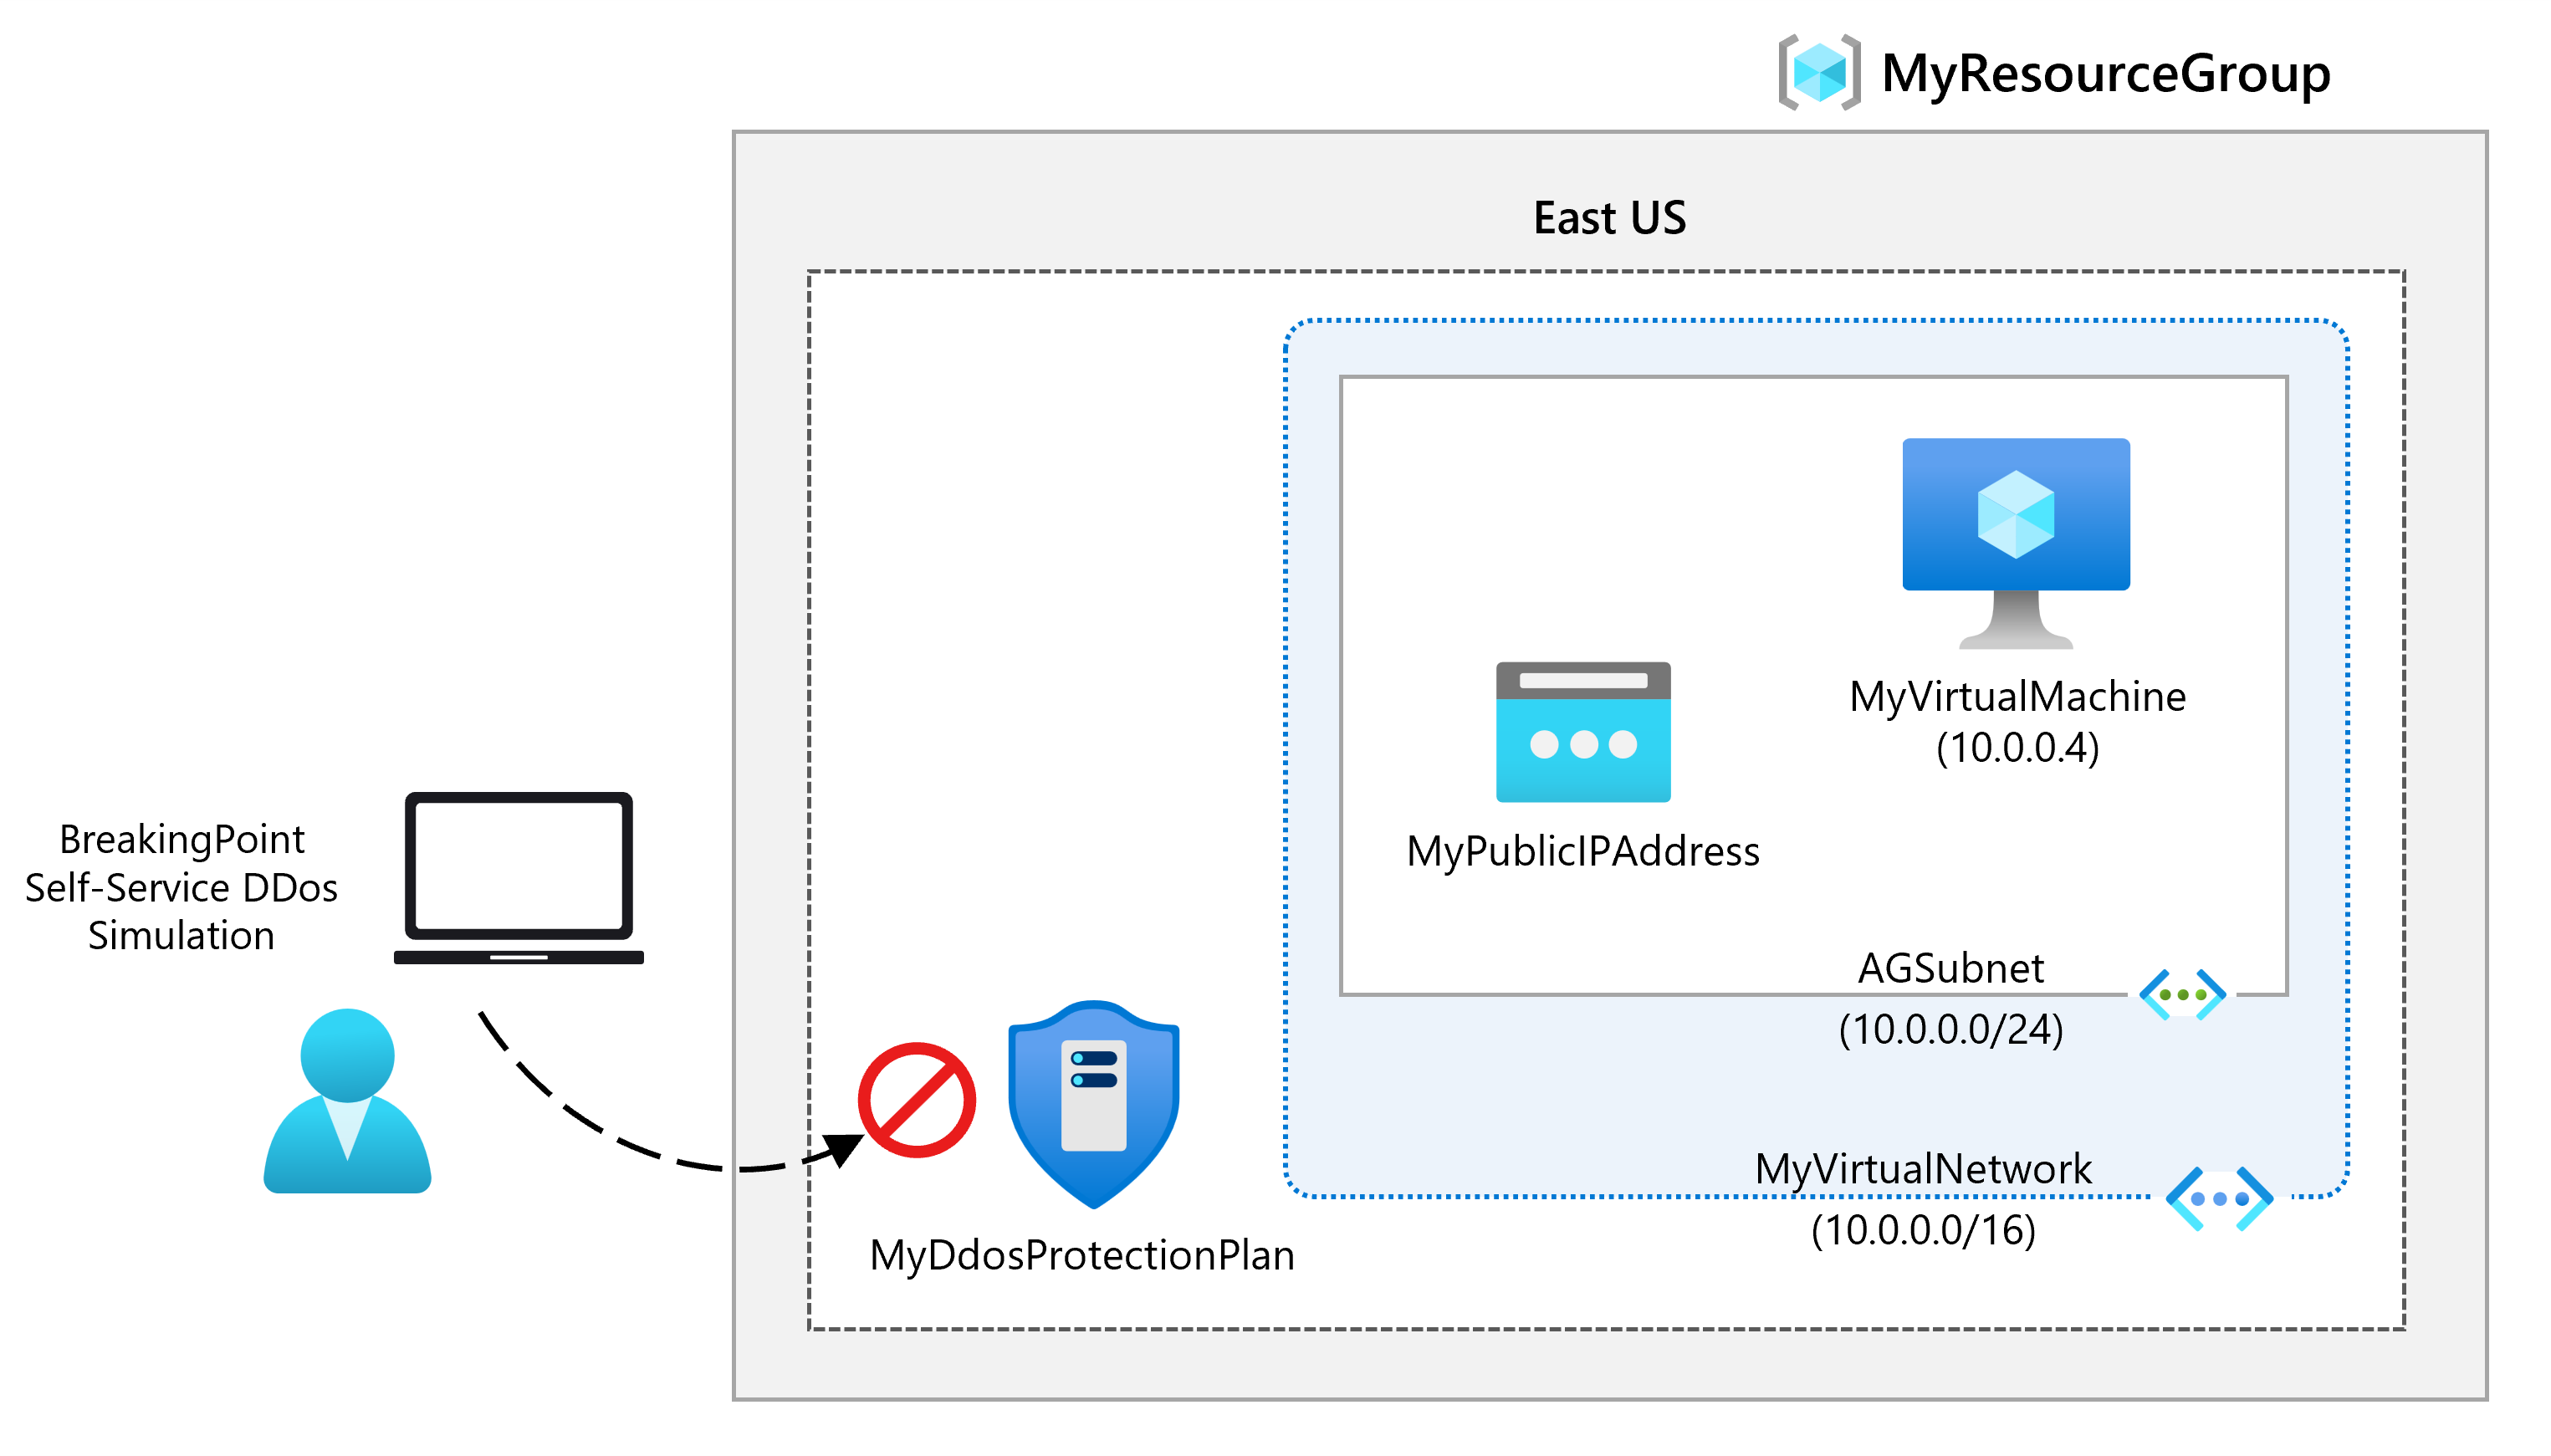
Being responsible for Contoso’s Network Security team, you are going to run a mock DDoS attack on the virtual network. The following steps walk you through creating a virtual network, configuring DDoS Protection, and creating an attack which you can observe and monitor with the help of telemetry and metrics.
Estimated time: 40 minutes
Job skills
In this exercise, you will:
- Task 1: Create a resource group
- Task 2: Create a DDoS Protection plan
- Task 3: Enable DDoS Protection on a new virtual network
- Task 4: Configure DDoS telemetry
- Task 5: Configure DDoS diagnostic logs
- Task 6: Configure DDoS alerts
- Task 7: Test with simulation partners
Task 1: Create a resource group
-
Log in to your Azure account.
-
On the Azure portal home page, select Resource groups.
-
Select Create.
-
On the Basics tab, in Resource group, enter MyResourceGroup.
-
On Region, select East US.
-
Select Review + create.
-
Select Create.
Task 2: Create a DDoS Protection plan
-
On the Azure portal home page, in the search box enter DDoS and select DDoS protection plan when it appears.
-
Select + Create.
-
On the Basics tab, in the Resource group list, select the resource group you just created.
-
On the Instance name box, enter MyDdoSProtectionPlan, then select Review + create.
-
Select Create.
Task 3: Enable DDoS Protection on a new virtual network
Here you will enable DDoS on a new virtual network rather than on an existing one, so first you need to create the new virtual network, then enable DDoS protection on it using the plan you created previously.
-
On the Azure portal home page, select Create a resource, then in the search box, enter Virtual Network, then select Virtual Network when it appears.
-
On the Virtual Network page, select Create.
-
On the Basics tab, select the resource group you created previously.
-
On the Name box, enter MyVirtualNetwork, then select the Security tab.
-
On the Security tab, next to DDoS Network Protection, select Enable.
-
On the DDoS protection plan drop-down list, select MyDdosProtectionPlan.
-
Select Review + create.
-
Select Create.
Task 4: Configure DDoS telemetry
You create a Public IP address, and then set up telemetry in the next steps.
-
On the Azure portal home page, select Create a resource, then in the search box, enter public ip, then select Public IP address when it appears.
-
On the Public IP address page, select Create.
-
On the Create public IP address page, under SKU, select Standard.
-
On the Name box, enter MyPublicIPAddress.
-
Under IP address assignment, select Static.
-
On DNS name label, enter mypublicdnsxx (where xx is your initials to make this unique).
-
Select Create.
-
To set up telemetry, navigate to the Azure home page, select All resources.
-
On the list of your resources, select MyDdosProtectionPlan.
-
Under Monitoring, select Metrics.
-
Select the Scope box, then select the checkbox next to MyPublicIPAddress.
-
Select Apply.
-
On the Metrics box, select Inbound packets dropped DDoS.
-
On the Aggregation box, select Max.
Task 5: Configure DDoS diagnostic logs
-
On the Azure home page, select All resources.
-
On the list of your resources, select MyPublicIPAddress.
-
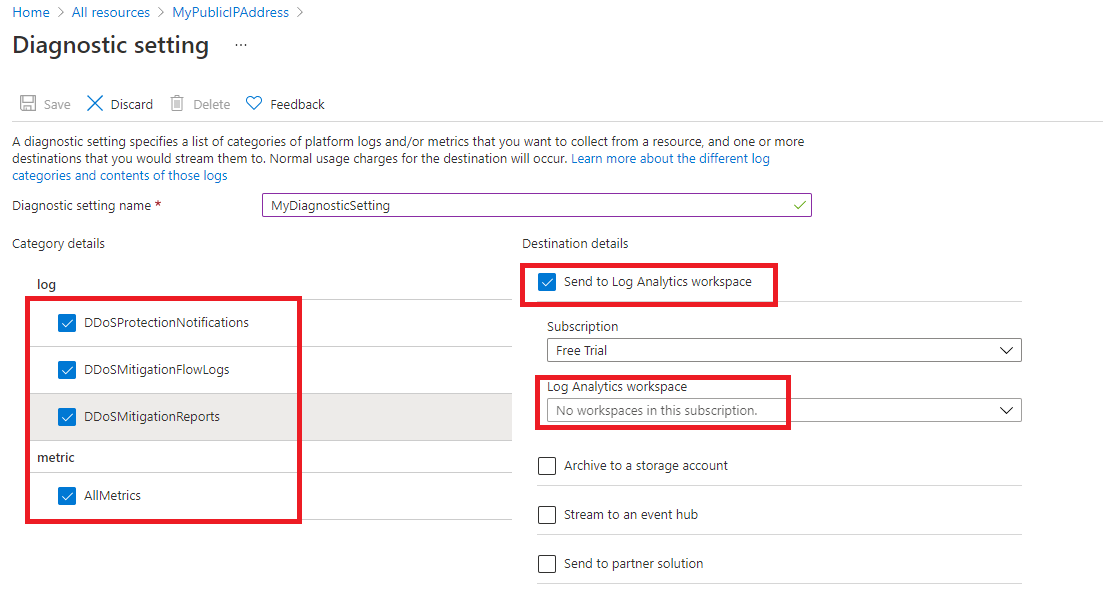
Under Monitoring, select Diagnostic settings.
-
Select Add diagnostic setting.
-
On the Diagnostic setting page, in the Diagnostic setting name box, enter MyDiagnosticSetting.
-
Under Category details, select all 3 log checkboxes and the AllMetrics checkbox.
-
Under Destination details, select the Send to Log Analytics workspace checkbox. Here, you could select a pre-existing Log Analytics workspace, but as you haven’t set up a destination for the diagnostic logs yet, you will just enter the settings, but then discard them in the next step in this exercise.
-
Normally you would now select Save to save your diagnostic settings. Note that this option is still grayed out as we cannot complete the setting configuration yet.
-
Select Discard, then select Yes.
Task 6: Configure DDoS alerts
In this step you will create a virtual machine, assign a public IP address to it, and then configure DDoS alerts.
Create the VM
-
On the Azure portal home page, select Create a resource, then in the search box, enter virtual machine, then select Virtual machine when it appears.
-
On the Virtual machine page, select Create.
-
On the Basics tab, create a new VM using the information in the table below.
Note: If the Ubuntu image and size isn’t available in your region, select something else. The image and size isn’t important to configuring the alert.
Setting Value Subscription Select your subscription Resource group MyResourceGroup Virtual machine name MyVirtualMachine Region Your region Availability options No infrastructure redundancy required Image Ubuntu Server 22.04 LTS - x64 Gen 2 (Select Configure VM Generation link if needed) Size Select See all sizes, then choose D-series v3 and then Standard_D2s_v3 Authentication type SSH public key Username azureuser SSH public key source Generate new key pair Key pair name myvirtualmachine-ssh-key Public inbound ports Select None -
Select Review + create.
-
Select Create.
-
On the Generate new key pair dialog box, select Download private key and create resource.
-
Save the private key.
-
When deployment is complete, select Go to resource.
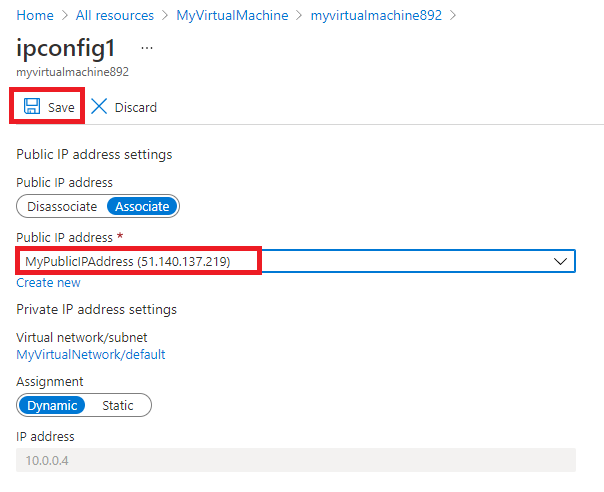
Assign the Public IP address
-
On the Overview page of the new virtual machine, under Settings, select Networking.
-
Next to Network Interface, select myvirtualmachine-nic. The name of the nic may differ.
-
Under Settings, select IP configurations.
-
Select ipconfig1.
-
On the Public IP address list, select MyPublicIPAddress.
-
Select Save.
Configure DDoS alerts
-
On the Azure home page, select All resources.
-
On the list of your resources, select MyPublicIPAddress.
-
Under Monitoring, select Alerts.
-
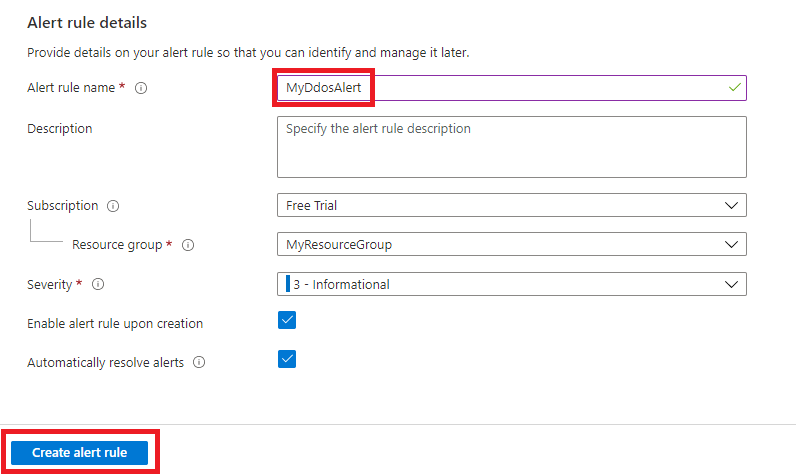
Select Create alert rule.
-
On the Create alert rule page, under Scope, select Edit resource.
-
Select Under DDoS attack or not for the signal name.
-
Under Alert logic find the Operator setting and select Greater than or equal to.
-
On Threshold value, enter 1 (means under attack).
-
Navigate to the details tab and select Alert rule name, enter MyDdosAlert.
-
Select Create alert rule.
Task 7: Test with simulation partners
-
Review the Azure DDoS simulation testing policy page.
-
Notice there are several testing partners. As you have time, review and try any of the simulation partners.
Clean up resources
Note: Remember to remove any newly created Azure resources that you no longer use. Removing unused resources ensures you will not see unexpected charges.
-
On the Azure portal, open the PowerShell session within the Cloud Shell pane.
-
Delete all resource groups you created throughout the labs of this module by running the following command:
Remove-AzResourceGroup -Name 'MyResourceGroup' -Force -AsJobNote: The command executes asynchronously (as determined by the -AsJob parameter), so while you will be able to run another PowerShell command immediately afterwards within the same PowerShell session, it will take a few minutes before the resource groups are actually removed.
Extend your learning with Copilot
Copilot can assist you in learning how to use the Azure scripting tools. Copilot can also assist in areas not covered in the lab or where you need more information. Open an Edge browser and choose Copilot (top right) or navigate to copilot.microsoft.com. Take a few minutes to try these prompts.
- What are DDoS attacks? How are DDoS attacks categorized and are there mitigation strategies?
- Provide a table summarizing the two different Azure DDoS Protection tiers.
- What Azure resources can be protected by DDoS Protection?
Learn more with self-paced training
- Design and implement network security. In this module, you learn about and deploy Azure DDoS Protection.
Key takeaways
Congratulations on completing the lab. Here are the main takeaways for this lab.
- A DDoS attack is a malicious attempt to overwhelm an application’s resources, making the application unavailable to legitimate users.
- Azure DDoS Protection defends against DDoS attacks. It’s automatically tuned to help protect your specific Azure resources in a virtual network.
- Azure DDoS Proectection features include: always on traffic monitoring, adaptive real time tuning, and telemetry and alerting.
- Azure DDoS Protection supports two tier types, DDoS IP Protection and DDoS Network Protection.