M02-Unit 3 Create and configure a virtual network gateway
Exercise scenario
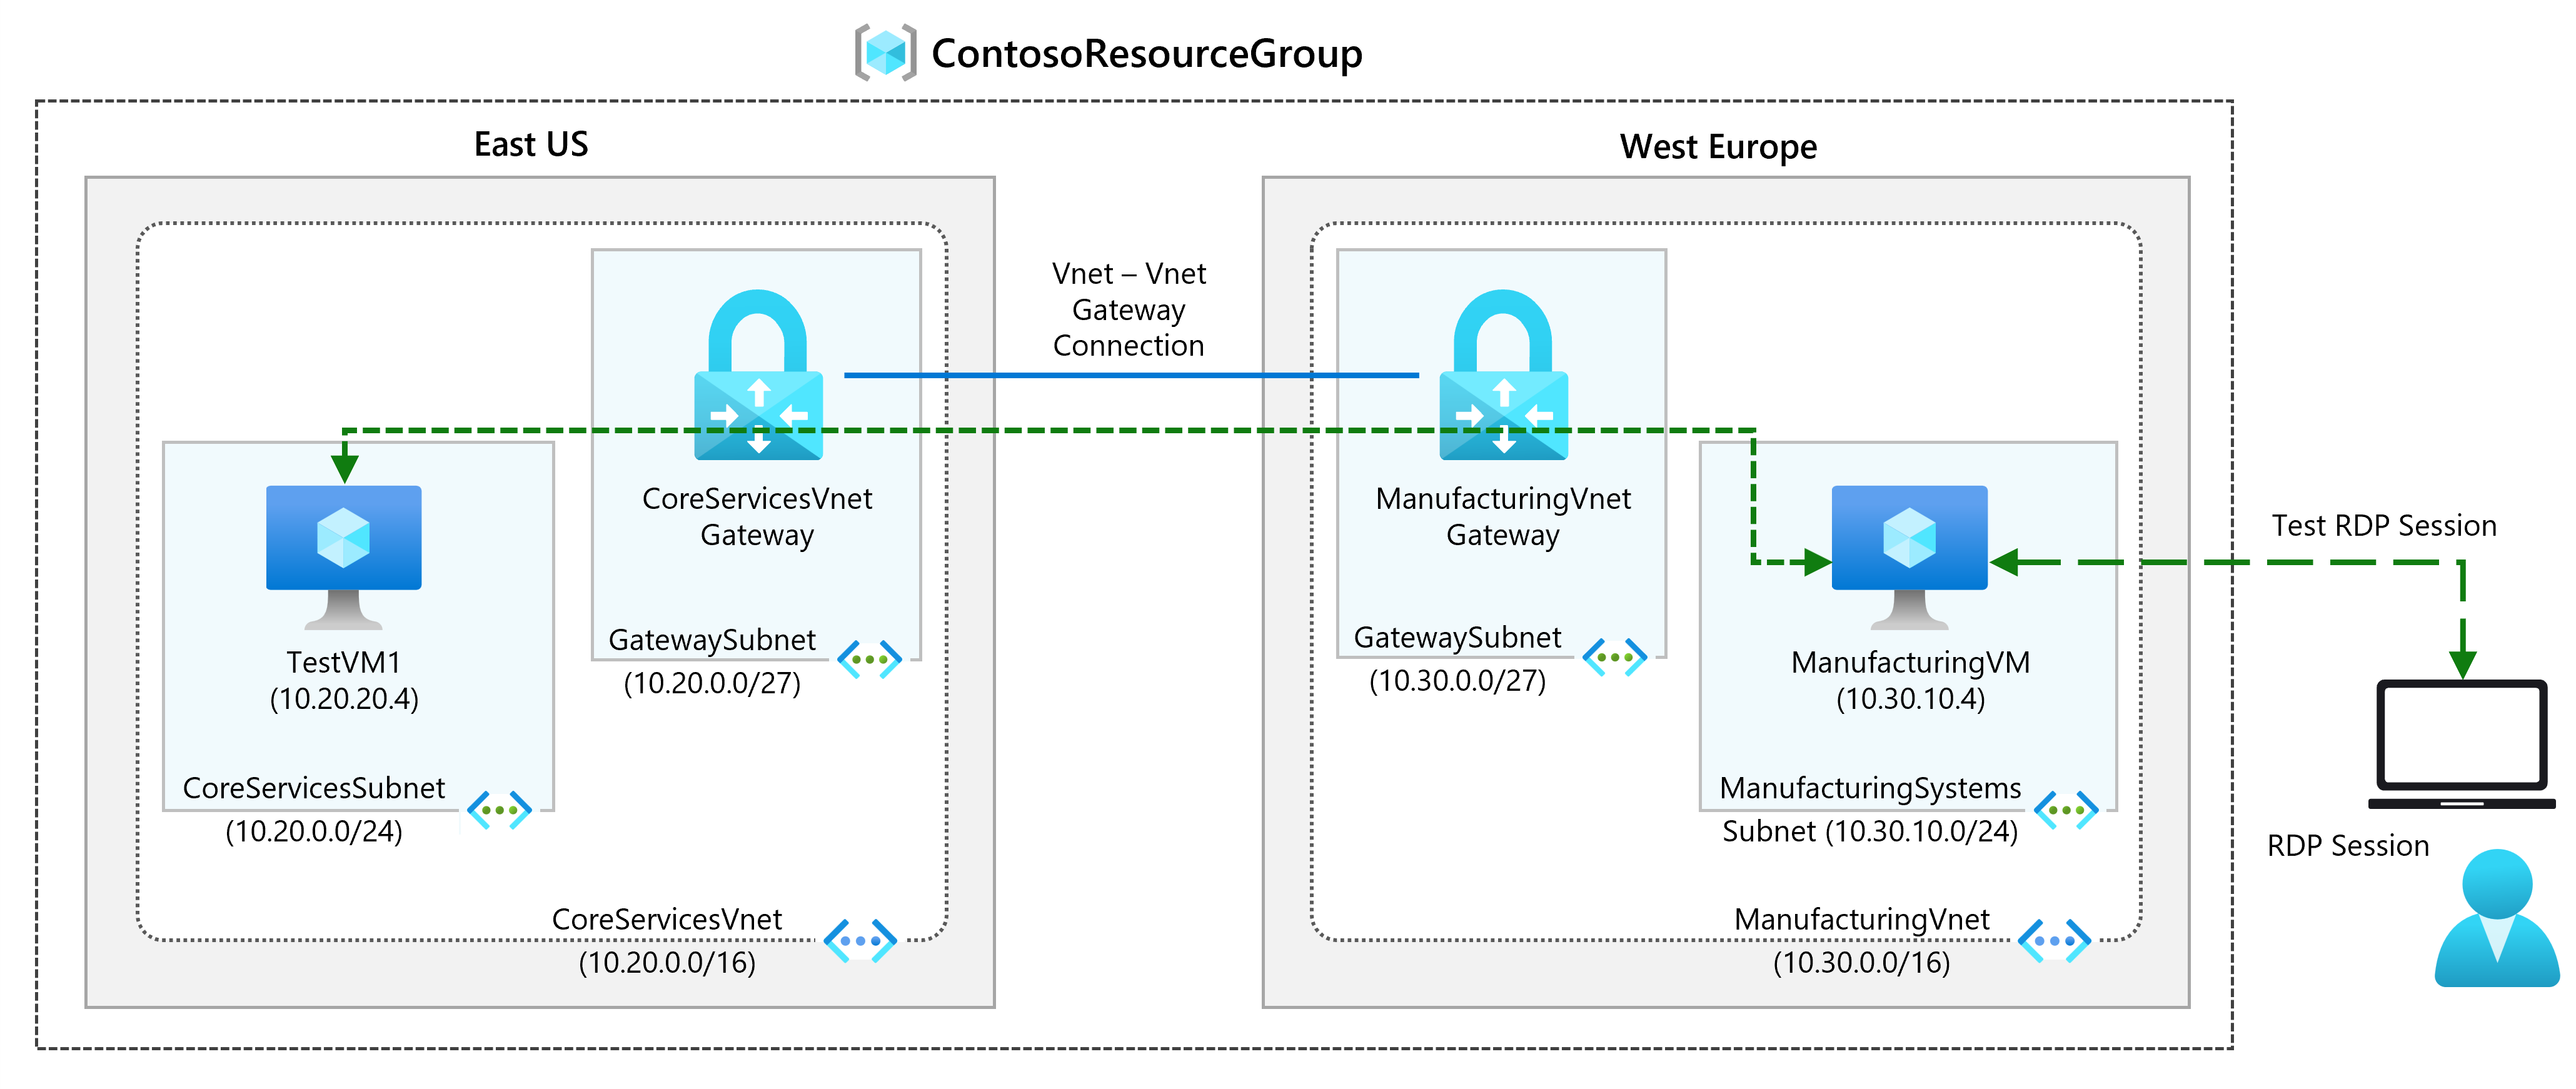
In this exercise you will configure a virtual network gateway to connect the Contoso Core Services VNet and Manufacturing VNet.
Estimated time: 70 minutes (including ~45 minutes deployment waiting time)
Region availability note
If a deployment fails due to regional capacity or quota limits, use these guidelines:
- Keep the lab defaults whenever possible.
- If East US is unavailable, use a nearby backup region (for example, East US 2, Central US, or South Central US) for the affected CoreServices resources.
- Keep each virtual network gateway in the same region as its virtual network.
- Keep paired resources aligned in the same region (VNet, VPN gateway, public IP, and VM).
- If gateway SKU capacity is unavailable, first try another supported region before changing lab-required settings.
Job skills
In this exercise, you:
- Task 1: Create CoreServicesVnet and ManufacturingVnet
- Task 2: Create CoreServicesVM
- Task 3: Create ManufacturingVM
- Task 4: Connect to the VMs using RDP
- Task 5: Test the connection between the VMs
- Task 6: Create CoreServicesVnet Gateway
- Task 7: Create ManufacturingVnet Gateway
- Task 8: Connect CoreServicesVnet to ManufacturingVnet
- Task 9: Connect ManufacturingVnet to CoreServicesVnet
- Task 10: Verify that the connections connect
- Task 11: Test the connection between the VMs
Task 1: Create CoreServicesVnet and ManufacturingVnet
- In the Azure portal, select the Cloud Shell icon (top right). If necessary, configure the shell.
- Select PowerShell.
- Select No Storage Account required and your Subscription, then select Apply.
- Wait for the terminal to create and a prompt to be displayed.
- On the toolbar of the Cloud Shell pane, select the Manage files icon, in the drop-down menu, select Upload and upload the following files azuredeploy.json and azuredeploy.parameters.json into the Cloud Shell home directory.
Note:: If you are working in your own subscription the template files are available in the GitHub lab repository.
-
Deploy the following ARM templates to create the virtual network and subnets needed for this exercise:
$RGName = "ContosoResourceGroup" #create resource group if it doesnt exist New-AzResourceGroup -Name $RGName -Location "eastus" New-AzResourceGroupDeployment -ResourceGroupName $RGName -TemplateFile azuredeploy.json -TemplateParameterFile azuredeploy.parameters.json -
In the portal, you can verify three virtual networks were created.
Task 2: Create CoreServicesVM
-
On the Azure portal, open the PowerShell session within the Cloud Shell pane.
-
On the toolbar of the Cloud Shell pane, select the Manage files icon, in the drop-down menu, select Upload and upload the following files CoreServicesVMazuredeploy.json and CoreServicesVMazuredeploy.parameters.json into the Cloud Shell home directory one by one from the source folder F:\Allfiles\Exercises\M02.
-
Deploy the following ARM templates to create the VMs needed for this exercise:
Note: You will be prompted to provide an Admin password. You will need this password later in the exercise.
$RGName = "ContosoResourceGroup" New-AzResourceGroupDeployment -ResourceGroupName $RGName -TemplateFile CoreServicesVMazuredeploy.json -TemplateParameterFile CoreServicesVMazuredeploy.parameters.json -
When the deployment is complete, go to the Azure portal home page, and then select Virtual Machines.
-
Verify that the virtual machine has been created.
Task 3: Create ManufacturingVM
-
On the Azure portal, open the PowerShell session within the Cloud Shell pane.
-
On the toolbar of the Cloud Shell pane, select the Manage files icon, in the drop-down menu, select Upload and upload the following files ManufacturingVMazuredeploy.json and ManufacturingVMazuredeploy.parameters.json into the Cloud Shell home directory one by one from the source folder F:\Allfiles\Exercises\M02.
Note:: If you are working in your own subscription the template files are available in the GitHub lab repository.
-
Deploy the following ARM templates to create the VMs needed for this exercise.
Note: You will be prompted to provide an Admin password.You will need this password in the next task.
$RGName = "ContosoResourceGroup" New-AzResourceGroupDeployment -ResourceGroupName $RGName -TemplateFile ManufacturingVMazuredeploy.json -TemplateParameterFile ManufacturingVMazuredeploy.parameters.json -
When the deployment is complete, go to the Azure portal home page, and then select Virtual Machines.
-
Verify that the virtual machine has been created.
Task 4: Connect to the VMs using RDP
-
On the Azure Portal home page, select Virtual Machines.
-
Select ManufacturingVM.
-
On ManufacturingVM, select Connect and then Connect.
-
Select Download RDP file.
-
Save the RDP file to your desktop.
-
Connect to ManufacturingVM using the RDP file, and the username TestUser and the password you provided during deployment. After connecting, minimize the RDP session.
-
On the Azure Portal home page, select Virtual Machines.
-
Select CoreServicesVM.
-
On CoreServicesVM, select Connect. On the Connect page, select the Native RDP card (marked MOST POPULAR and LOCAL MACHINE).
-
Select Download RDP file.
-
Save the RDP file to your desktop.
-
Connect to CoreServicesVM using the RDP file, and the username TestUser and the password you provided during deployment.
-
On both VMs, in Choose privacy settings for your device, select Accept.
-
On both VMs, in Networks, select Yes.
-
On CoreServicesVM, open PowerShell, and run the following command: ipconfig
-
Note the IPv4 address.
Task 5: Test the connection between the VMs
-
On the ManufacturingVM, open PowerShell.
-
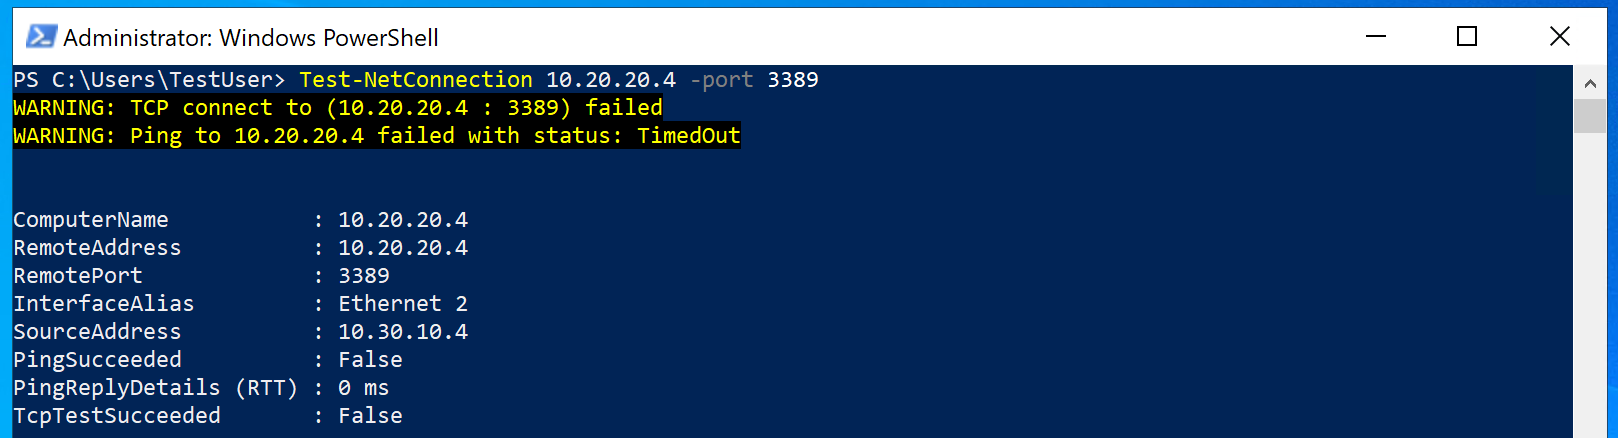
Use the following command to verify that there is no connection to CoreServicesVM on CoreServicesVnet. Be sure to use the IPv4 address for CoreServicesVM.
Test-NetConnection 10.20.20.4 -port 3389 -
The test connection should fail, and you will see a result similar to the following:
Task 6: Create CoreServicesVnet Gateway
-
In the Azure portal, search for and select Hybrid connectivity.
-
On the Hybrid connectivity page, in the left menu, expand VPN Gateway and then select VPN gateways.
-
On the VPN gateways page, select + Create.
-
Use the information in the following table to create the virtual network gateway:
Note: The Azure portal defaults for SKU, Generation, Active-active mode, and BGP have changed. Be sure to change these values from their defaults to match the table below.
Tab Section Option Value Basics Project Details Subscription No changes required ResourceGroup ContosoResourceGroup Instance Details Name CoreServicesVnetGateway Region East US Gateway type VPN SKU VpnGw1AZ Generation Generation1 Virtual network CoreServicesVnet Subnet GatewaySubnet (10.20.0.0/27) Public IP address type Standard Public IP address Public IP address Create new Public IP address name CoreServicesVnetGateway-ip Enable active-active mode Disabled Configure BGP Disabled Review + create Review your settings and select Create. Note: It can take up to 15 - 30 minutes to create a virtual network gateway. You don’t need to wait for the deployment to complete. Proceed to creating the next gateway.
Task 7: Create ManufacturingVnet Gateway
Create the GatewaySubnet
Note: The template created the GatewaySubnet for the CoreServicesVnet. Here you create the subnet manually.
-
Search for and select the ManufacturingVnet.
-
In the Settings blade, select Subnets, and then + Subnet.
Parameter Value Subnet purpose Virtual Network Gateway Size /27 (32 addresses) -
Select Add.
Create the virtual network gateway
-
In the Azure portal, search for and select Hybrid connectivity.
-
On the Hybrid connectivity page, in the left menu, expand VPN Gateway and then select VPN gateways.
-
On the VPN gateways page, select + Create.
-
Use this information and the Settings tab to create the virtual network gateway.
Note: The Azure portal defaults for SKU, Generation, Active-active mode, and BGP have changed. Be sure to change these values from their defaults to match the table below.
Tab Section Option Value Basics Project Details Subscription No changes required ResourceGroup ContosoResourceGroup Instance Details Name ManufacturingVnetGateway Region West Europe Gateway type VPN SKU VpnGw1AZ Generation Generation1 Virtual network ManufacturingVnet Subnet GatewaySubnet Public IP Address Type Standard Public IP address Public IP address Create new Public IP address name ManufacturingVnetGateway-ip Enable active-active mode Disabled Configure BGP Disabled Review + create Review your settings and select Create. Note: It can take up to 15 -30 minutes to create a virtual network gateway.
Task 8: Connect CoreServicesVnet to ManufacturingVnet
-
In the Azure portal, search for and select Hybrid connectivity.
-
On the Hybrid connectivity page, in the left menu, expand VPN Gateway and then select VPN gateways.
-
In the VPN gateways list, select CoreServicesVnetGateway.
-
In CoreServicesGateway, select Connections, and then select + Add.
Note: You will not be able to complete this configuration until the virtual network gateways are fully deployed.
-
Use this information and the Settings tab to create the virtual network gateway.
Option Value Name CoreServicesGW-to-ManufacturingGW Connection type VNet-to-VNet Region East US First virtual network gateway CoreServicesVnetGateway Second virtual network gateway ManufacturingVnetGateway Shared key (PSK) abc123 Use Azure Private IP Address Not selected Enable BGP Not selected IKE Protocol IKEv2 Subscription No changes required Resource group No changes required -
To create the connection, select Review + Create and then Create.
Task 9: Connect ManufacturingVnet to CoreServicesVnet
-
In the Azure portal, search for and select Hybrid connectivity.
-
On the Hybrid connectivity page, in the left menu, expand VPN Gateway and then select VPN gateways.
-
In the VPN gateways list, select ManufacturingVnetGateway.
-
In CoreServicesGateway, select Connections, and then select + Add.
-
Use the information in the following table to create the connection:
Option Value Name ManufacturingGW-to-CoreServicesGW Connection type VNet-to-VNet Location West Europe First virtual network gateway ManufacturingVnetGateway Second virtual network gateway CoreServicesVnetGateway Shared key (PSK) abc123 Use Azure Private IP Address Not selected Enable BGP Not selected IKE Protocol IKEv2 Subscription No changes required Resource group No changes required -
To create the connection, select Review + Create and then Create.
Task 10: Verify that the connections connect
-
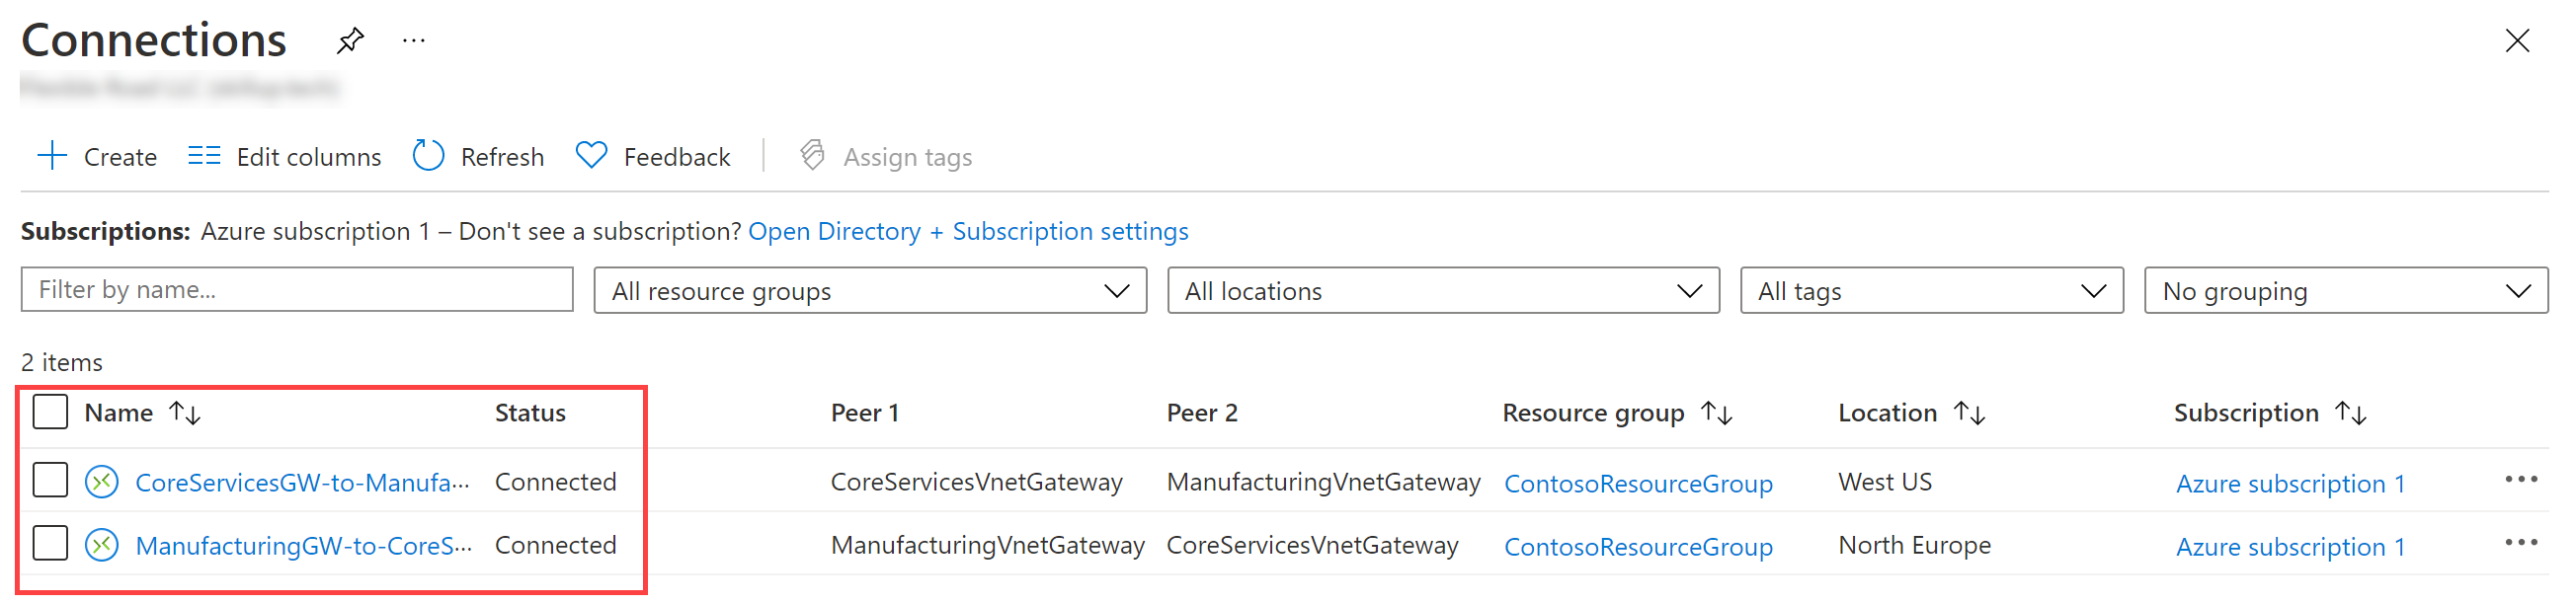
In Search resources, services, and docs (G+/), enter vpn, and then select connections from the results.
-
Wait until the status of both connections is Connected. You may need to refresh your screen.
Task 11: Test the connection between the VMs
-
On the ManufacturingVM, open PowerShell.
-
Use the following command to verify that there is now a connection to CoreServicesVM on CoreServicesVnet. Be sure to use the IPv4 address for CoreServicesVM.
Test-NetConnection 10.20.20.4 -port 3389 -
The test connection should succeed, and you will see a result similar to the following:

-
Close the Remote Desktop connection windows.
Extend your learning with Copilot
Copilot can assist you in learning how to use the Azure scripting tools. Copilot can also assist in areas not covered in the lab or where you need more information. Open an Edge browser and choose Copilot (top right) or navigate to copilot.microsoft.com. Take a few minutes to try these prompts.
- What are the main types of Azure VPN gateways and why would you use each type?
- What factors should I consider when selecting the Azure VPN gateway sku? Give examples.
- Are there costs associated with Azure VPN gateways?
Learn more with self-paced training
- Introduction to Azure VPN Gateway. This module describes what Azure VPN Gateway does, how it works, and when you should choose to use Azure VPN Gateway as a solution to meet your organization’s needs.
- Troubleshoot VPN gateways in Microsoft Azure. In this module, you learn how to monitor and troubleshoot site-to-site and point-to-site VPNs.
Key takeaways
Congratulations on completing the lab. Here are the main takeaways for this lab.
- Azure VPN Gateway is a service that provides secure connectivity between your on-premises networks and Azure virtual networks.
- Site-to-Site (S2S) connections connect your on-premises network to an Azure virtual network using IPsec/IKE VPN tunnels. Ideal for hybrid cloud scenarios.
- Point-to-Site (P2S) connections connnect individual clients to an Azure virtual network from remote locations. VPN protocols inlcude OpenVPN, IKEv2, or SSTP. Useful for remote workers.
- VNet-to-VNet connections connect two or more Azure virtual networks using IPsec/IKE VPN tunnels. Suitable for multi-region or multi-VNet deployments.
- Different VPN Gateway SKUs offer varying levels of performance, throughput, and features.