Lab 14: Implement containerized solutions
Microsoft Azure user interface
Given the dynamic nature of Microsoft cloud tools, you might experience Azure UI changes that occur after the development of this training content. As a result, the lab instructions and lab steps might not align correctly.
Microsoft updates this training course when the community alerts us to needed changes. However, cloud updates occur frequently, so you might encounter UI changes before this training content updates. If this occurs, adapt to the changes, and then work through them in the labs as needed.
Instructions
Before you start
Sign in to the lab environment
Sign in to your Windows 11 virtual machine (VM) by using the following credentials:
- Username:
Admin - Password:
Pa55w.rd
Note: Your instructor will provide instructions to connect to the virtual lab environment.
Review the installed applications
Find the taskbar on your Windows 11 desktop. The taskbar contains the icon for the application that you’ll use in this lab:
- Microsoft Edge
Lab Scenario
In this lab, you will explore how to create and deploy containers to the Container Registry using a .NET application and Docker files.
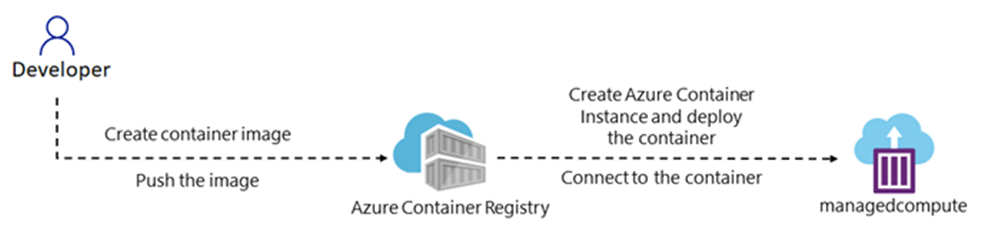
Architecture diagram
Exercise 1: Create and run containers in Azure
Task 1: Create a Container Registry
-
On the taskbar, select the Microsoft Edge icon.
-
In the browser window, browse to the Azure portal at
https://portal.azure.com, and then sign in with the account you’ll be using for this lab. -
Select + Create a resource in the top left corner of the page.
-
In the search bar, type Container Registry and select Container Registry from the results.
-
Select Create.
-
In the Basics tab of the Create Container Registry page, fill out the following information (leave others with their default values):
Setting Action Subscription text box Retain the default value Resource group section Select Create new, enter acr-sam-rg, and then select OK Registry name section enter acrsam[yourname] Location drop-down list Select East US Pricing plan drop-down list Select Basic -
Select the Review + create to review your settings, and then select Create.
Note: Wait for the deployment to complete. This can take a few minutes.
-
On the Overview blade, select the Go to resource button to navigate to the blade of the newly created container registry account.
-
On the Container registry blade, in the Settings section, select Access keys.
-
On the Access keys blade, enable the Admin user.
-
Copy the value of username box to the clipboard.
-
Open Notepad, and then paste the copied value to Notepad. You’ll use this value later in this lab.
Congratulations! You have successfully created a Container Registry in Azure.
Task 2: Create a Docker file to build a container image
-
Open the File Explorer window, browse to Allfiles (F):\Allfiles\Labs\14\Starter\webapp-lab14, and then open a text editor.
-
Create a new file in your project directory and name it
Dockerfile. -
In the Dockerfile, add the following code:
FROM mcr.microsoft.com/dotnet/aspnet:8.0 AS base WORKDIR /app EXPOSE 5151 ENV ASPNETCORE_URLS=http://+:5151 # Creates a non-root user with an explicit UID and adds permission to access the /app folder # For more info, please refer to https://aka.ms/vscode-docker-dotnet-configure-containers RUN adduser -u 5678 --disabled-password --gecos "" appuser && chown -R appuser /app USER appuser FROM mcr.microsoft.com/dotnet/sdk:8.0 AS build ARG configuration=Release WORKDIR /src COPY ["<web-app-name>.csproj", "./"] RUN dotnet restore "<web-app-name>.csproj" COPY . . WORKDIR "/src/." RUN dotnet build "<web-app-name>.csproj" -c $configuration -o /app/build FROM build AS publish ARG configuration=Release RUN dotnet publish "<web-app-name>.csproj" -c $configuration -o /app/publish /p:UseAppHost=false FROM base AS final WORKDIR /app COPY --from=publish /app/publish . ENTRYPOINT ["dotnet", "<web-app-name>.dll"] -
Make sure to replace
<web-app-name>with the name of your .NET 8 web application project. -
Save the Dockerfile.
Congratulations! You have successfully created a Docker file.
Task 3: Create a Linux container on Azure using a Docker file
Make sure you have the Docker CLI installed on your local machine. If you don’t have it, install it from the Docker website.
-
On the taskbar, select the Terminal icon.
-
At the open command prompt, enter the following command, and then select Enter to sign in to the Azure Command-Line Interface (CLI):
az login -
In the Microsoft Edge browser window, enter the email address and password for your Microsoft account, and then select Sign in.
-
Return to the currently open Terminal Command Prompt window. Wait for the sign-in process to finish.
-
Enter the following command, and then select Enter to change the current directory to the Allfiles (F):\Allfiles\Labs\14\Starter\webapp-lab14 directory that contains the lab files:
cd 'F:\Allfiles\Labs\14\Starter\webapp-lab14\' -
Run the following command to upload the source code to your container registry and build the container image as a Container Registry task, replace
with the name of your Container Registry and replace with a new name for your image: az acr build --registry <your-registry-name> --image <image-name>:latest .Note: Wait for the build task to complete before moving forward with this lab.
-
Close the Terminal pane.
-
Open the Azure portal and navigate to your Container Registry.
-
On the Container registry blade, in the Services section, select Repositories.
-
Verify that your Docker image is listed in the repository.
Congratulations! You have successfully created a Linux container on Azure using a Docker file.
Task 4: Deploy Linux container image to an Azure container instance
-
On the Azure portal, select + Create a resource in the top left corner of the page.
-
In the search bar, type Container Instances and select Container Instances from the results.
-
Select Create.
-
On the Basics tab of the Create Container Instance page, fill out the following information (leave others with their default values), and then select Next: Networking:
Setting Action Subscription text box Retain the default value Resource group drop-down list Select acr-sam-rg in the list Container name section enter acisam[yourname] Region drop-down list Select East US Availability zones drop-down list Select 1 Image source section Select Azure Container Registry Registry drop-down list Select acrsam[yourname] Image drop-down list Select docker-image-name Image tag drop-down list Select docker-image-tag OS type section Select Linux -
On the Networking tab, fill out the following information:
Setting Action DNS name label text box Enter a dns-name Ports text box Enter port-number, that is in your DockerFile Ports protocol drop-down list Select TCP in the list -
Select the Review + create to review your settings, and then select Create.
Note: Wait for the deployment to complete. This can take a few minutes.
-
On the Overview blade, select the Go to resource button to navigate to the blade of the newly created container instance account.
-
Copy the public IP address of the container and paste it into your web browser with the port number then press enter.
<public-IP-number>:<port-number>or<DNS-name>:<port-number> -
You should see the web page of the .NET web application.
Congratulations! You have successfully deployed a Linux container to your Container instance.
Task 5: Query the container registry for existing containers
-
Open the Azure portal and navigate to the Resource Group that you created earlier.
-
Select the Container Registry that you created in Task 4.
-
Select on the Repositories tab and then select the repository that you want to query for existing containers.
-
In the Tags section, you can view the list of tags for the selected repository.
-
Select a tag to view the details of the container image. This will show you the metadata for the container image, including the size, creation date, and any associated layers.
-
You can also search for specific container images by using the search bar at the top of the page. Simply enter a keyword or tag name and select the Search button.
-
If you want to delete a container image, select the tag and then select the Delete button.
Note: This will permanently delete the container image and it cannot be recovered.
That’s it! You have successfully learned how to query the Container Registry for existing containers.
Review
By completing this exercise, you gained hands-on experience with creating a Container Registry, creating a Dockerfile, building a container image, deploying a Linux container to an Azure container instance.
Exercise 2: Create and run Azure container Apps service
In this exercise, you will learn how to create a container App by using the container image that you created in the exercise one.
Task 1: Create a Container App in Azure
-
On the Azure portal, select + Create a resource in the top left corner of the page.
-
In the search bar, type Container App and select Container App from the results.
-
Select Create.
-
On the Basics tab of the Create Container App page, fill out the following information (leave others with their default values), and then select Next: Container:
Setting Action Subscription text box Retain the default value Resource group drop-down list Select acr-sam-rg in the list Container app name section enter acasam[yourname] Region drop-down list Select East US Container Apps Environment drop-down list Retain the default value -
On the Container tab, fill out the following information, and then select Ingress tab:
Setting Action Use quickstart image checkbox uncheck Name text box Enter [yourname]-container-app Image source drop-down list Select Azure Container Registry Registry drop-down list Select acrsam[yourname] Image drop-down list Select ** ** Image tag drop-down list Select latest CPU and Memory drop-down list Select 0.25 CPU cores, 0.5 Gi memory in the list -
On the Ingress tab, fill out the following information:
Setting Action Ingress checkbox Select Enable Ingress traffic box Select Accepting traffic from anywhere Ingress type box Select HTTP Client certificate mode box Select Ignore Transport drop-down list Select Auto Target port text box Enter 5151 -
Select the Review + create to review your settings, and then select Create.
Note: Wait for the deployment to complete. This can take a few minutes.
-
On the Overview blade, select the Go to resource button to navigate to the blade of the newly created container App account.
-
On the Container App blade, select the Application Url to see the web page of the .NET web application.
Congratulations! You have successfully deployed a Linux container to your Container App.
Review
By completing this exercise, you gained hands-on experience with creating a Container App, deploying a Linux container to an Azure container App.