Lab 12: Enhance a web application by using the Azure Content Delivery Network
Microsoft Azure user interface
Given the dynamic nature of Microsoft cloud tools, you might experience Azure UI changes that occur after the development of this training content. As a result, the lab instructions and lab steps might not align correctly.
Microsoft updates this training course when the community alerts us to needed changes. However, cloud updates occur frequently, so you might encounter UI changes before this training content updates. If this occurs, adapt to the changes, and then work through them in the labs as needed.
Instructions
Before you start
Sign in to the lab environment
Sign in to your Windows 11 virtual machine (VM) by using the following credentials:
- Username:
Admin - Password:
Pa55w.rd
Note: Your instructor will provide instructions to connect to the virtual lab environment.
Review the installed applications
Find the taskbar on your Windows 11 desktop. The taskbar contains the icon for the application that you’ll use in this lab:
- Microsoft Edge
Lab Scenario
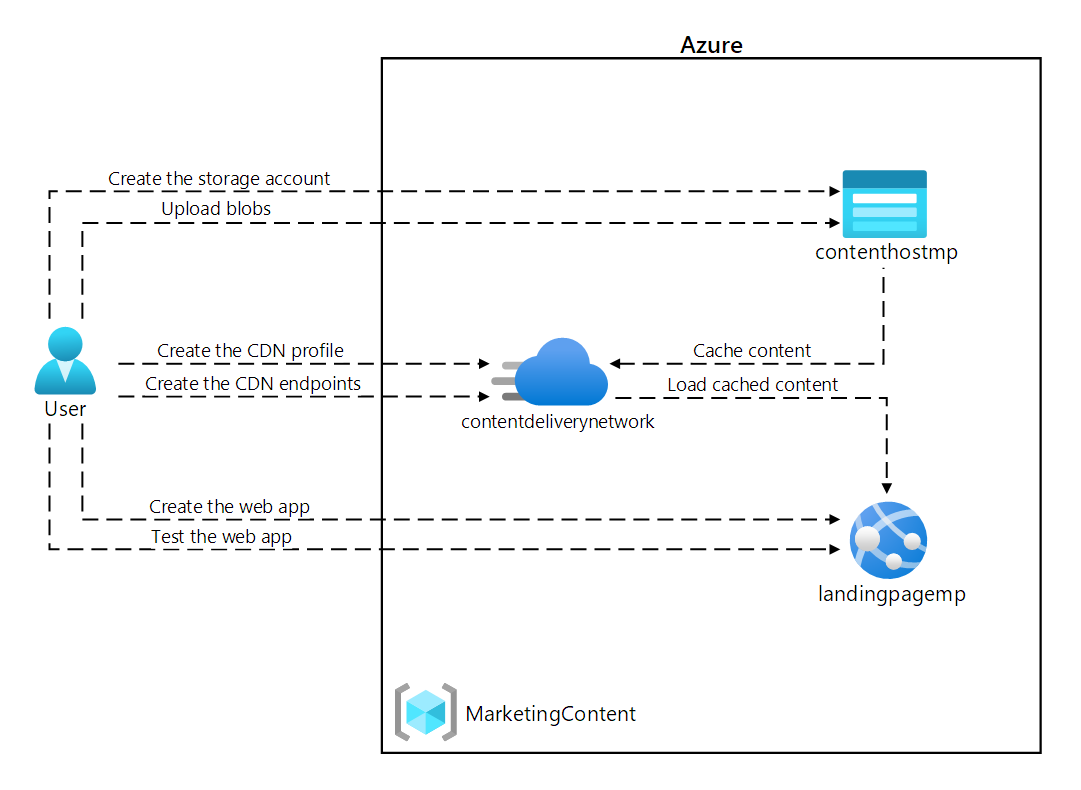
In this lab, you will implement the Azure Content Delivery Network capabilities to provide a caching solution based on customer locations. The lab configures a storage account for image and video files, which are impacted the most by the latency issues. You will use the Azure Content Delivery Network to implement the caching solution to aid in reducing latency for these image and video files.
Architecture diagram
Exercise 1: Create Azure resources
Task 1: Open the Azure portal
-
On the taskbar, select the Microsoft Edge icon.
-
In the open browser window, browse to the Azure portal at
https://portal.azure.com, and then sign in with the account you’ll be using for this lab.Note: If this is your first time signing in to the Azure portal, you’ll be offered a tour of the portal. Select Get Started to skip the tour and begin using the portal.
Task 2: Create a Storage account
-
In the Azure portal, use the Search resources, services, and docs text box to search for Storage account, and then in the list of results, select Storage accounts.
-
On the Storage accounts blade, select + Create.
-
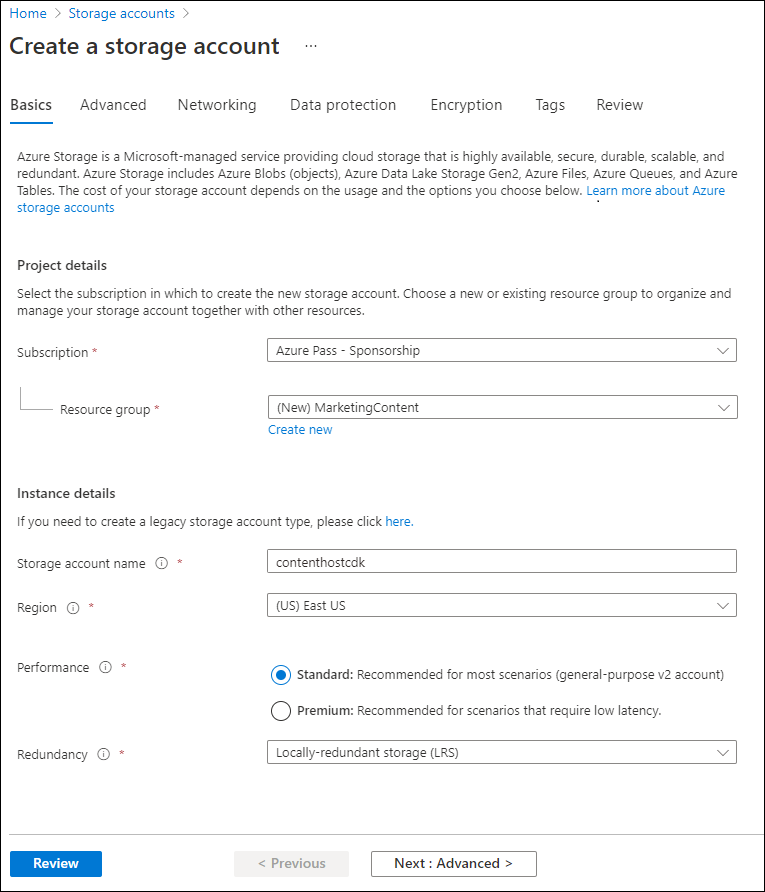
On the Create a storage account blade, on the Basics tab, perform the following actions, and then select Next: Advanced >:
Setting Action Subscription drop-down list Retain the default value Resource group section Select Create new, enter MarketingContent, and then select OK Storage account name text box Enter contenthost[yourname] Region drop-down list Select (US) East US Primary service No changes Performance section Select the Standard option Redundancy drop-down list Select Locally-redundant storage (LRS) The following screenshot displays the configured settings in the Create a storage account blade.
-
On the Advanced tab, ensure Allow enabling anonymous access on individual containers is enabled. Check the box if it is not enabled.
-
On the Review tab, review the options that you selected during the previous steps.
-
Select Create to create the storage account by using your specified configuration.
Note: Wait for the creation task to complete before you move forward with this lab.
Task 3: Create a web app by using Azure App Service
-
On the Azure portal’s navigation pane, select Create a resource.
-
On the Create a resource blade, in the Search services and marketplace text box, enter Web App, and then select Enter.
-
On the search results blade, select the Web App result, and then select Create.
-
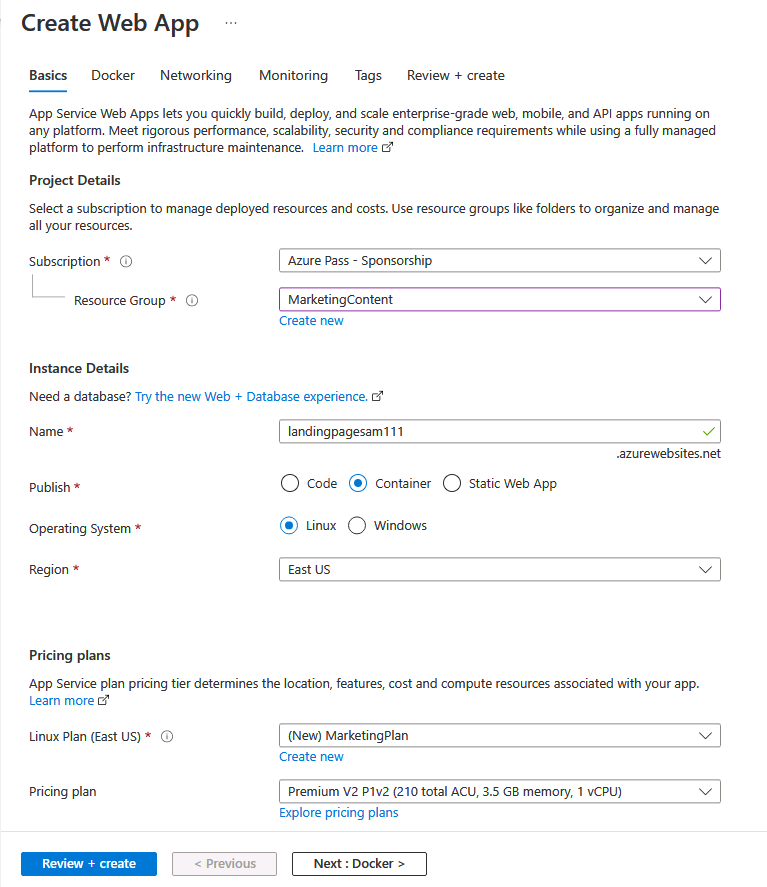
On the Create Web App blade, on the Basics tab, perform the following actions, and then select Next: Docker:
Setting Action Subscription drop-down list Retain the default value Resource group drop-down list Select MarketingContent in the list Name text box Enter landingpage[yourname] Publish section Select Container Operating System section Select Linux Region drop-down list Select East US Linux Plan (East US) section Select Create new. In the Name text box, enter MarketingPlan, and then select OK Pricing plan section Retain the default value The following screenshot displays the configured settings on the Create Web App blade.
-
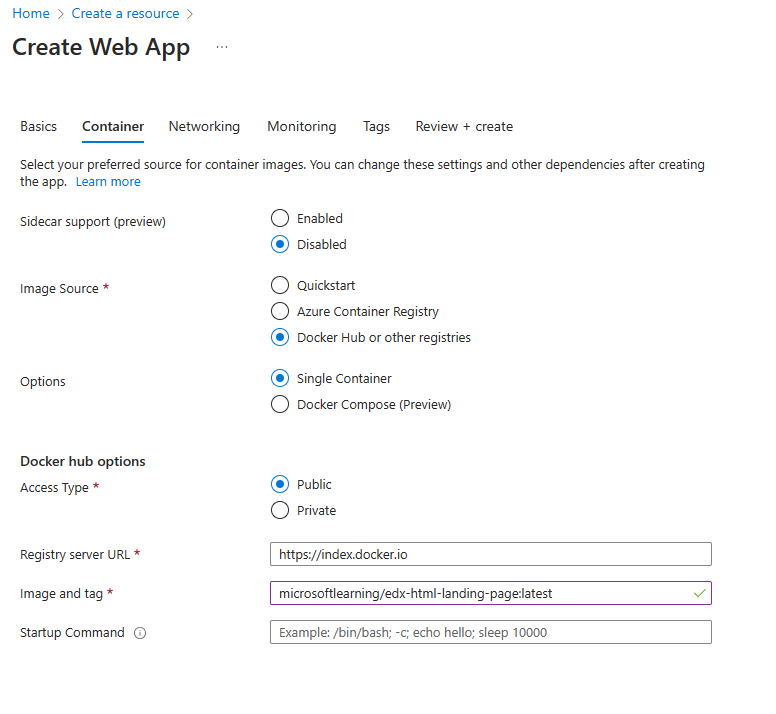
On the Container tab, perform the following actions, and then select Review + create:
Setting Action Sidecar support (preview) Select Disabled Image Source Select Docker Hub or other registries Options Select Single container Access Type drop-down list Select Public Registry server URL Enter https://index.docker.ioImage and tag text box Enter microsoftlearning/edx-html-landing-page:latest The following screenshot displays the configured settings on the Container tab.
-
On the Review + create tab, review the options that you selected during the previous steps.
-
Select Create to create the web app by using your specified configuration.
Note: Wait for the creation task to complete before you move forward with this lab.
-
On the Deployment blade, select Go to resource.
-
On the App Service Overview blade, in the Essentials, record the value of the Default domain link. You’ll use this value later in the lab.
Review
In this exercise, you created an Azure Storage account and an Azure Web App that you’ll use later in this lab.
Exercise 2: Configure Content Delivery Network and endpoints
Task 1: Open Azure Cloud Shell
-
In the Azure portal, select the Cloud Shell icon
 to open a the Cloud Shell. If Cloud Shell defaults to a PowerShell session, select Switch to Bash in the Cloud Shell menu and then select Confirm.
Note: The Cloud Shell icon is represented by a greater than sign (>) and underscore character (_).
If this is the first time you’re starting Cloud Shell you will be presented with a Getting started prompt. Select No storage account required, then select Apply.
-
In the Azure portal, at the Cloud Shell command prompt, run the following command to get the version of the Azure Command-Line Interface (Azure CLI) tool:
az --version
Task 2: Register the Microsoft.CDN provider
-
At the Cloud Shell command prompt in the portal, perform the following actions:
a. Enter the following command to check if the Microsoft.CDN has been registered. Proceed to step 2. if the Microsoft.CDN has already been registered:
az provider show --namespace Microsoft.CDN --query "registrationState"b. If the Microsoft.CDN has not been registered. Enter the following command, and then select Enter to register the Microsoft.CDN namespace with your current subscription:
az provider register --namespace Microsoft.CDN -
Close the Cloud Shell pane in the portal.
Task 3: Create a Content Delivery Network profile
-
On the Azure portal’s navigation pane, select Create a resource.
-
On the Create a resource blade, in the Search services and marketplace text box, enter CDN, and then select Enter.
-
On the Marketplace search results blade, select the Front Door and CDN profiles result, and then select Create.
-
On the Compare offerings page, select Explore other offerings and then select Azure CDN Standard from Microsoft (classic), and then select Continue.
-
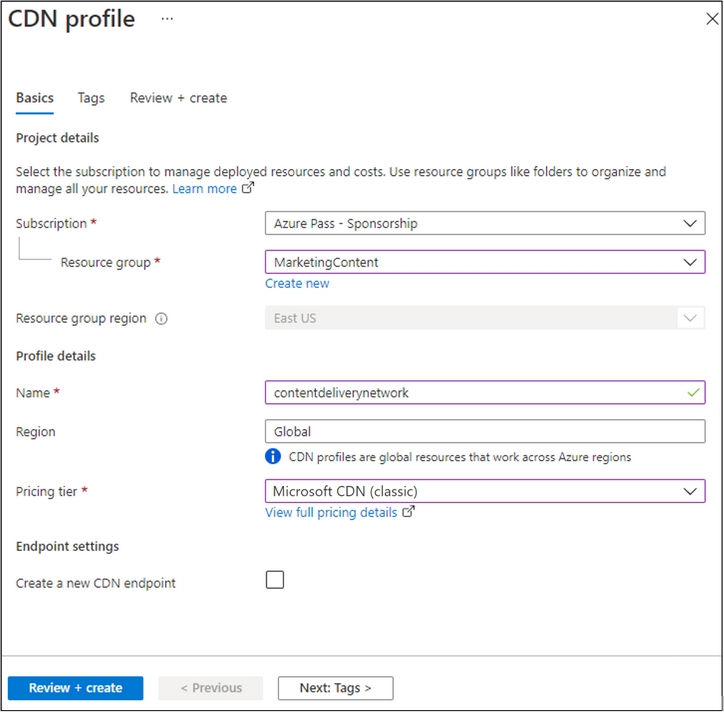
On the CDN profile blade, on the Basics tab, perform the following actions, and then select Review + create:
Setting Action Subscription drop-down list Retain the default value Resource group drop-down list Select MarketingContent in the list Name text box Enter contentdeliverynetwork Region text box Retain the default value Global Pricing tier drop-down list Retain the default value Microsoft CDN (classic) Create a new CDN endpoint check box Not selected The following screenshot displays the configured settings on the CDN profile blade.
-
On the Review + create tab, review the options that you selected during the previous steps.
-
Select Create to create the CDN profile by using your specified configuration.
Note: Wait for Azure to finish creating the CDN profile before you move forward with the lab. You’ll receive a notification when the profile is created.
Task 4: Configure Storage containers
-
On the Azure portal’s navigation pane, select Resource groups.
-
On the Resource groups blade, select the MarketingContent resource group that you created previously in this lab.
-
On the MarketingContent blade, select the contenthost[yourname] storage account that you created previously in this lab.
-
On the Storage account blade, select the Containers link in the Data storage section.
-
In the Containers section, select + Container.
-
In the New container pop-up window, perform the following actions, and then select Create:
Setting Action Name text box Enter media Public access level drop-down list Select Blob (anonymous read access for blobs only) -
In the Containers section, select + Container again.
-
In the New container pop-up window, perform the following actions, and then select Create:
Setting Action Name text box Enter video Public access level drop-down list Select Blob (anonymous read access for blobs only) -
Observe the updated list of containers and confirm that both the media and video containers are listed.
Task 5: Create Content Delivery Network endpoints
-
On the Azure portal’s navigation pane, select the Resource groups link.
-
On the Resource groups blade, select the MarketingContent resource group that you created previously in this lab.
-
On the MarketingContent blade, select the contentdeliverynetwork CDN profile that you created previously in this lab.
-
On the CDN profile blade, select + Endpoint.
-
In the Add an endpoint pop-up dialog box, perform the following actions, and then select Add:
Setting Action Name text box Enter cdnmedia[yourname] Origin type drop-down list Select Storage Origin hostname drop-down list Select the contenthost[yourname].blob.core.windows.net option for the Storage account that you created previously in this lab Origin path text box Enter /media Origin host header text box Retain the default value Protocol and Origin port sections Retain the default values Optimized for drop-down list Select General web delivery The following screenshot displays the configured settings in the Add an endpoint dialog box.

-
On the CDN profile blade, select + Endpoint again.
-
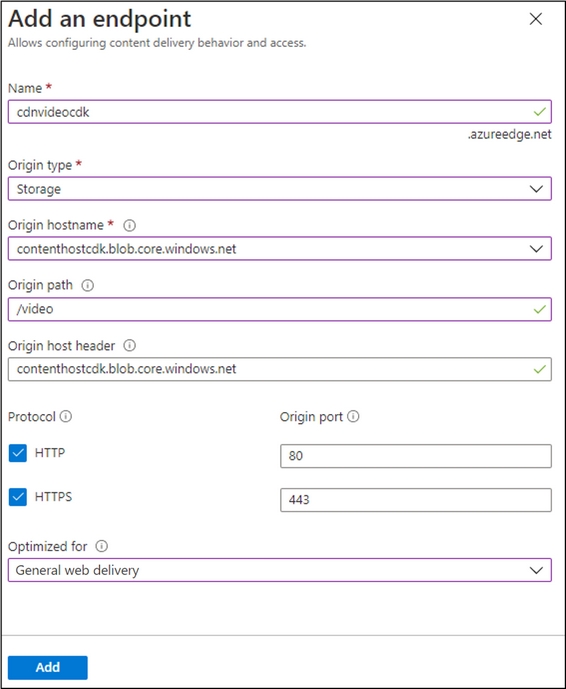
In the Add an endpoint pop-up dialog box, perform the following actions, and then select Add:
Setting Action Name text box Enter cdnvideo[yourname] Origin type drop-down list Select Storage Origin hostname drop-down list Select the contenthost[yourname].blob.core.windows.net option for the Storage account that you created previously in this lab Origin path text box Enter /video Origin host header text box Retain the default value Protocol and Origin port sections Retain the default values Optimized for drop-down list Select General web delivery The following screenshot displays the configured settings in the Add an endpoint dialog box.
-
On the CDN profile blade, select + Endpoint again.
-
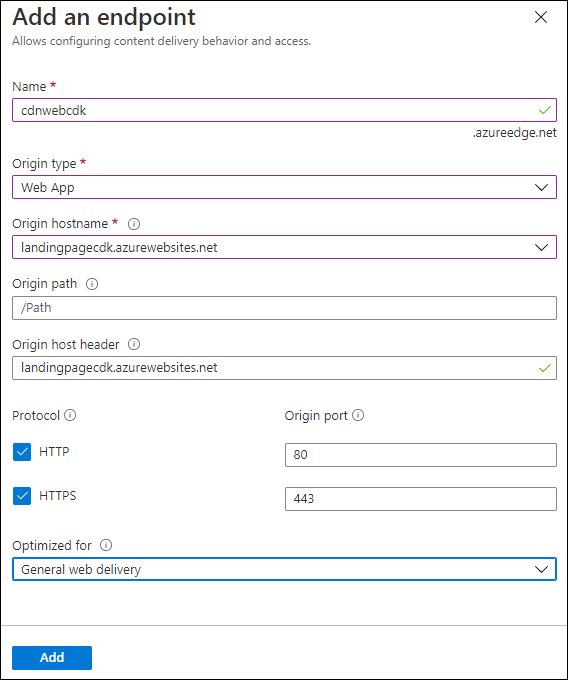
In the Add an endpoint pop-up dialog box, perform the following actions, and then select Add:
Setting Action Name text box Enter cdnweb[yourname] Origin type drop-down list Select Web App Origin hostname drop-down list Select the landingpage[yourname].azurewebsites.net option for the web app that you created previously in this lab Origin path text box Retain the default value Origin host header text box Retain the default value Protocol and Origin port sections Retain the default values Optimized for drop-down list Select General web delivery The following screenshot displays the configured settings in the Add an endpoint dialog box.
Review
In this exercise, you registered the resource provider for Content Delivery Network (CDN), and then used the provider to create both a CDN profile and endpoint resources.
Exercise 3: Upload and configure static web content
Task 1: Observe the landing page
-
On the Azure portal’s navigation pane, select Resource groups.
-
On the Resource groups blade, select the MarketingContent resource group that you created previously in this lab.
-
On the MarketingContent blade, select the landingpage[yourname] web app that you created previously in this lab.
-
On the App Service blade, select Browse. A new browser tab opens and returns the current website. Observe the error message displayed on the screen. The website won’t work until you configure the specified settings to reference multimedia content.
-
Return to your currently open browser window that’s displaying the Azure portal.
Task 2: Upload Storage blobs
-
On the Azure portal’s navigation pane, select Resource groups.
-
On the Resource groups blade, select the MarketingContent resource group that you created previously in this lab.
-
On the MarketingContent blade, select the contenthost[yourname] storage account that you created previously in this lab.
-
On the Storage account blade, select the Containers link in the Data storage section.
-
In the Containers section, select the media container, and then select Upload.
-
In the Upload blob pop-up window, perform the following actions:
a. In the Files section, select Browse for files or use the drag and drop feature.
b. In the File Explorer window, browse to Allfiles (F):\Allfiles\Labs\12\Starter, select the following files, and then select Open:
-
campus.jpg
-
conference.jpg
-
poster.jpg
c. Ensure that Overwrite if files already exist is selected, and then select Upload.
Note: Wait for the blob to upload before you continue with this lab.
-
-
On the Container blade, select Properties in the Settings section.
-
Record the value in the URL text box. You’ll use this value later in the lab.
-
Close the Container blade.
-
On the Containers blade, select the video container, and then select Upload.
-
In the Upload blob pop-up window, perform the following actions:
a. In the Files section, select Browse for files or use the drag and drop feature.
b. In the File Explorer window, browse to Allfiles (F):\Allfiles\Labs\12\Starter, select the welcome.mp4 file, and then select Open.
c. Ensure that Overwrite if files already exist is selected, and then select Upload.
Note: Wait for the blob to upload before you continue with this lab.
-
On the Container blade, select Properties in the Settings section.
-
Record the value in the URL text box. You’ll use this value later in the lab.
Task 3: Configure Web App settings
-
On the Azure portal’s navigation pane, select Resource groups.
-
On the Resource groups blade, select the MarketingContent resource group that you created previously in this lab.
-
On the MarketingContent blade, select the landingpage[yourname] web app that you created previously in this lab.
-
On the App Service blade, in the Settings section, select the Environment variables link.
-
In the App settings tab, select + Add. Enter the following information in the Add/Edit application setting pop-up dialog:
Setting Action Name text box Enter CDNMediaEndpoint Value text box Enter the URI value of the media container in the contenthost[yourname] storage account that you recorded previously in this lab Deployment slot setting check box Retain the default value -
Select Apply to close the pop-up dialog and return to the App settings section.
-
In the App settings tab, select + Add. Enter the following information in the Add/Edit application setting pop-up dialog:
Setting Action Name text box Enter CDNVideoEndpoint Value text box Enter the URI value of the video container in the contenthost[yourname] storage account that you recorded previously in this lab Deployment slot setting check box Retain the default value -
Select Apply to close the pop-up dialog and return to the App settings section.
-
At the bottom of the App settings section, select Apply.
Note: You may receive a warning that your app may restart when updating app settings. Select Confirm. Wait for your application settings to save before you continue with the lab.
Task 4: Validate the corrected landing page
-
On the Azure portal’s navigation pane, select Resource groups.
-
On the Resource groups blade, select the MarketingContent resource group that you created previously in this lab.
-
On the MarketingContent blade, select the landingpage[yourname] web app that you created previously in this lab.
-
On the App Service blade, select Restart, and then select Yes to confirm the app restart process.
Note: Wait for the restart operation to complete before you move forward with the lab. You’ll receive a notification when the operation is done.
-
On the App Service blade, select Browse. A new browser window or tab will open and return to the current website. Observe the updated website rendering multimedia content of various types.
-
Return to your currently open browser window that’s displaying the Azure portal.
Review
In this exercise, you uploaded multimedia content as blobs to Storage containers, and then updated your web app to point directly to the storage blobs.
Exercise 4: Use Content Delivery Network endpoints
Task 1: Retrieve endpoint Uniform Resource Identifiers (URIs)
-
On the Azure portal’s navigation pane, select the Resource groups link.
-
On the Resource groups blade, select the MarketingContent resource group that you created previously in this lab.
-
On the MarketingContent blade, select the contentdeliverynetwork CDN profile that you created previously in this lab.
-
On the CDN profile blade, select the cdnmedia[yourname] endpoint.
-
On the Endpoint blade, copy the value of the Endpoint hostname link. You’ll use this value later in the lab.
-
Close the Endpoint blade.
-
On the CDN profile blade, select the cdnvideo[yourname] endpoint.
-
On the Endpoint blade, copy the value of the Endpoint hostname link. You’ll use this value later in the lab.
-
Close the Endpoint blade.
Task 2: Test multimedia content
-
Construct a URL for the campus.jpg resource by combining the Endpoint hostname URL from the cdnmedia[yourname] endpoint that you copied previously in the lab with a relative path of /campus.jpg.
Note: For example, if your Endpoint hostname URL is
https://cdnmediastudent.azureedge.net/, your newly constructed URL would behttps://cdnmediastudent.azureedge.net/campus.jpg. -
Construct a URL for the conference.jpg resource by combining the Endpoint hostname URL from the cdnmedia[yourname] endpoint that you copied previously in the lab with a relative path of /conference.jpg.
Note: For example, if your Endpoint hostname URL is
https://cdnmediastudent.azureedge.net/, your newly constructed URL would behttps://cdnmediastudent.azureedge.net/conference.jpg. -
Construct a URL for the poster.jpg resource by combining the Endpoint hostname URL from the cdnmedia[yourname] endpoint that you copied previously in the lab with a relative path of /poster.jpg.
Note: For example, if your Endpoint hostname URL is
https://cdnmediastudent.azureedge.net/, your newly constructed URL would behttps://cdnmediastudent.azureedge.net/poster.jpg. -
Construct a URL for the welcome.mp4 resource by combining the Endpoint hostname URL from the cdnvideo[yourname] endpoint that you copied previously in the lab with a relative path of /welcome.mp4.
Note: For example, if your Endpoint hostname URL is
https://cdnvideostudent.azureedge.net/, your newly constructed URL would behttps://cdnvideostudent.azureedge.net/welcome.mp4. -
On the taskbar, activate the shortcut menu for the Microsoft Edge icon, and then select New window.
-
In the new browser window, refer to the URL that you constructed for the campus.jpg media resource, and then verify that the resource was successfully found.
Note: If the content isn’t available yet, the CDN endpoint is still initializing. This initialization process can take anywhere from 5 to 15 minutes.
-
Refer to the URL that you constructed for the conference.jpg media resource, and then verify that the resource was successfully found.
-
Refer to the URL that you constructed for the poster.jpg media resource, and then verify that the resource was successfully found.
-
Refer to the URL that you constructed for the welcome.mp4 video resource, and then verify that the resource was successfully found.
-
Close the browser window that you created in this task.
Task 3: Update the Web App settings
-
On the Azure portal’s navigation pane, select Resource groups.
-
On the Resource groups blade, select the MarketingContent resource group that you created previously in this lab.
-
On the MarketingContent blade, select the landingpage[yourname] web app that you created previously in this lab.
-
On the App Service blade, in the Settings section, select the Environment variables link.
-
In the Application settings tab, select the existing CDNMediaEndpoint application setting.
-
In the Add/Edit application setting pop-up dialog box, update the Value text box by entering the Endpoint hostname URL from the cdnmedia[yourname] endpoint that you copied previously in the lab, and then select Apply.
-
Select the existing CDNVideoEndpoint application setting.
-
In the Add/Edit application setting pop-up dialog box, update the Value text box by entering the Endpoint hostname URL from the cdnvideo[yourname] endpoint that you copied previously in the lab, and then select Apply.
-
At the bottom of the App settings section, select Apply.
Note: You may receive a warning that your app may restart when updating app settings. Select Confirm. Wait for your application settings to save before you continue with the lab.
-
In the Configuration section, select Overview.
-
In the Overview section, select Restart, and then select Yes to confirm the app restart process.
Note: Wait for the restart operation to complete before you continue with the lab. You’ll receive a notification when the operation is done.
Task 4: Test the web content
-
On the Azure portal’s navigation pane, select the Resource groups link.
-
On the Resource groups blade, select the MarketingContent resource group that you created previously in this lab.
-
On the MarketingContent blade, select the contentdeliverynetwork CDN profile that you created previously in this lab.
-
On the CDN profile blade, select the cdnweb[yourname] endpoint.
-
On the Endpoint blade, copy the value of the Endpoint hostname link.
-
On the taskbar, activate the shortcut menu for the Microsoft Edge icon, and then select New window.
-
In the new browser window, refer to the Endpoint hostname URL for the cdnweb[yourname] endpoint.
-
Observe the website and multimedia content that are all served using Content Delivery Network.
Review
In this exercise, you updated your web app to use Content Delivery Network to serve multimedia content and to serve the web application itself.