Lab 10: Asynchronously process messages by using Azure Service Bus Queues
Microsoft Azure user interface
Given the dynamic nature of Microsoft cloud tools, you might experience Azure UI changes that occur after the development of this training content. As a result, the lab instructions and lab steps might not align correctly.
Microsoft updates this training course when the community alerts us to needed changes. However, cloud updates occur frequently, so you might encounter UI changes before this training content updates. If this occurs, adapt to the changes, and then work through them in the labs as needed.
Instructions
Before you start
Sign in to the lab environment
Sign in to your Windows 11 virtual machine (VM) by using the following credentials:
- Username:
Admin - Password:
Pa55w.rd
Note: Your instructor will provide instructions to connect to the virtual lab environment.
Review the installed applications
Find the taskbar on your Windows 11 desktop. The taskbar contains the icons for the applications that you’ll use in this lab, including:
- Microsoft Edge
- Visual Studio Code
Lab Scenario
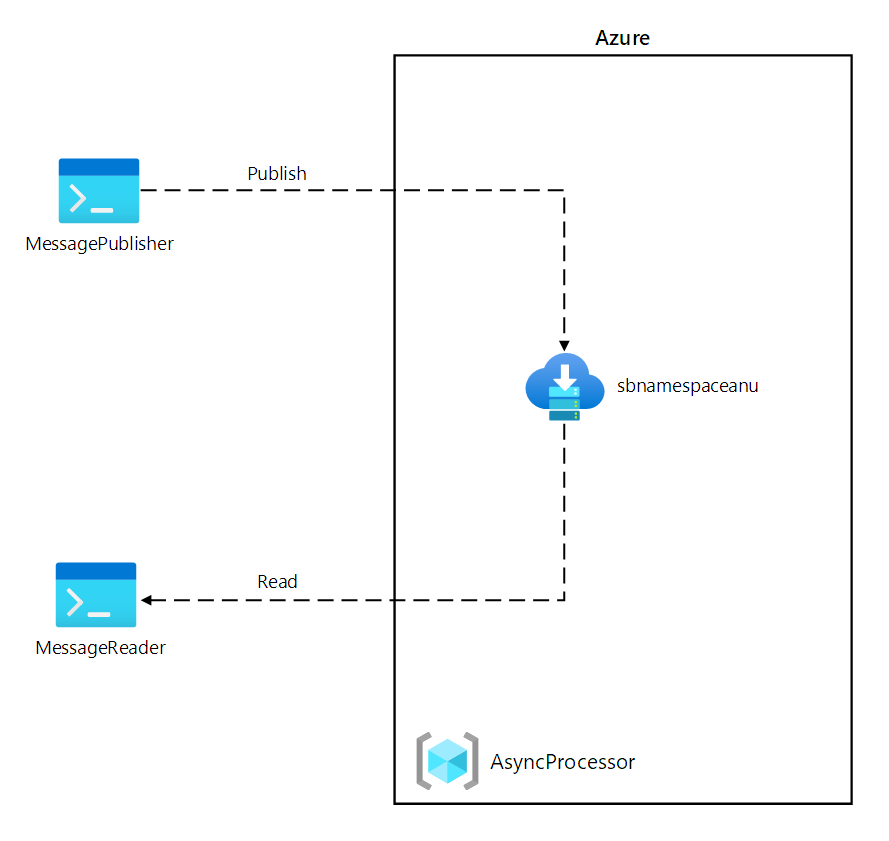
In this lab, you will create a proof of concept for this scenario by employing an Azure Service Bus Queue. To demonstrate how the system could function, you will create a .NET project that will publish messages to the system, and a second .NET application that will read messages from the queue. The first app will simulate data coming from a sensor, while the second app will simulate the system that will read the messages from the queue for processing.
Architecture diagram
Exercise 1: Create Azure resources
Task 1: Open the Azure portal
-
On the taskbar, select the Microsoft Edge icon.
-
In the browser window, browse to the Azure portal at
https://portal.azure.com, and sign in with the account you’ll be using for this lab.Note: If this is your first time signing in to the Azure portal, you’ll be offered a tour of the portal. Select Get Started to skip the tour and begin using the portal.
Task 2: Create an Azure Service Bus queue
-
In the Azure portal, use the Search resources, services, and docs text box to search for Service Bus and then, in the list of results, select Service Bus.
-
On the Service Bus blade, select + Create.
-
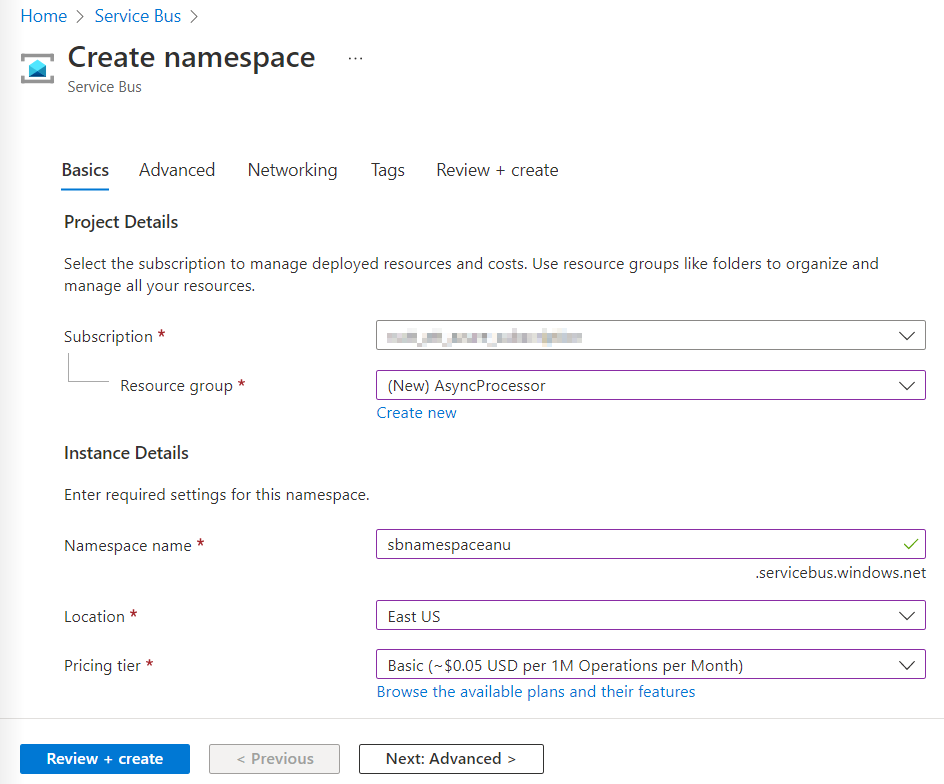
On the Create namespace blade, on the Basics tab, perform the following actions, and select Review + create:
Setting Action Subscription drop-down list Retain the default value Resource group section Select Create new, enter AsyncProcessor, and then select OK Namespace name text box Enter sbnamespace[yourname] Region drop-down list Select any Azure region in which you can deploy an Azure Service Bus Pricing tier drop-down list Select Basic The following screenshot displays the configured settings on the Basics tab on the Create namespace blade.
-
On the Review + create tab, review the options that you selected during the previous steps.
-
Select Create to create the Service Bus namespace by using your specified configuration.
Note: Wait for the creation task to complete before you proceed with this lab.
-
On the Deployment blade, select the Go to resource button to navigate to the blade of the newly created Service Bus namespace.
-
On the Service Bus namespace blade, in the Settings section, select Shared access policies.
-
In the list of policies, select RootManageSharedAccessKey.
-
On the SAS Policy: RootManageSharedAccessKey pane, next to the Primary Connection String entry, select the Copy to clipboard button, and record the copied value. You’ll use it later in this lab.
Note: It doesn’t matter which of the two available keys you choose. They are interchangeable.
-
On the Service Bus namespace blade, in the Entities section, select Queues, and then select + Queue.
-
On the Create queue blade, review the available settings, in the Name text box, enter messagequeue, and then select Create.
-
Select messagequeue to display the properties of the Service Bus queue.
-
Leave the browser window open. You’ll use it again later in this lab.
Review
In this exercise, you created an Azure Service Bus namespace and a Service Bus queue that you’ll use throughout the remainder of the lab.
Exercise 2: Create a .NET Core project to publish messages to a Service Bus queue
Task 1: Create a .NET Core project
-
From the lab computer, start Visual Studio Code.
-
In Visual Studio Code, in the File menu, select Open Folder.
-
In the Open Folder window, browse to Allfiles (F):\Allfiles\Labs\10\Starter\MessagePublisher, and then select Select Folder.
-
In the Visual Studio Code window, on the Menu Bar, select Terminal and then select New Terminal.
-
At the terminal prompt, run the following command to create a new .NET project named MessagePublisher in the current folder:
dotnet new console --framework net8.0 --name MessagePublisher --output .Note: The dotnet new command will create a new console project in a folder with the same name as the project.
-
Run the following command to import version 7.17.3 of the Azure.Messaging.ServiceBus package from NuGet:
dotnet add package Azure.Messaging.ServiceBus --version 7.17.3Note: The dotnet add package command will add the Azure.Messaging.ServiceBus package from NuGet. For more information, go to Azure.Messaging.ServiceBus.
-
At the terminal prompt, run the following command to build the .NET Core console application:
dotnet build -
Select Kill Terminal (the Recycle Bin icon) to close the terminal pane and any associated processes.
Task 2: Publish messages to an Azure Service Bus queue
-
In the Explorer pane of the Visual Studio Code window, open the Program.cs file.
-
On the code editor tab for the Program.cs file, delete all the code in the existing file.
-
Add the following code:
using System; using System.Threading.Tasks; using Azure.Messaging.ServiceBus; namespace MessagePublisher { public class Program { /* The `<serviceBus-connection-string>` placeholder represents the connection string to the target Azure Service Bus namespace */ private const string serviceBusConnectionString = "<serviceBus-connection-string>"; /* To create a string constant named "queueName" with a value of "messagequeue", matching the name of the Service Bus queue.*/ private const string queueName = "messagequeue"; /* Stores the number of messages to be sent to the target queue */ private const int numOfMessages = 3; /* To create a Service Bus client that will own the connection to the target queue */ static ServiceBusClient client = default!; /* To create a Service Bus sender that will be used to publish messages to the target queue */ static ServiceBusSender sender = default!; public static async Task Main(string[] args) { /* To initialize "client" of type "ServiceBusClient" that will provide connectivity to the Service Bus namespace and "sender" that will be responsible for sending messages */ client = new ServiceBusClient(serviceBusConnectionString); sender = client.CreateSender(queueName); /* To create a "ServiceBusMessageBatch" object that will allow you to combine multiple messages into a batch by using the "TryAddMessage" method */ using ServiceBusMessageBatch messageBatch = await sender.CreateMessageBatchAsync(); /* To add messages to a batch and throw an exception if a message size exceeds the limits supported by the batch */ for (int i = 1; i <= numOfMessages; i++) { if (!messageBatch.TryAddMessage(new ServiceBusMessage($"Message {i}"))) { throw new Exception($"The message {i} is too large to fit in the batch."); } } try { /* To create a try block, with "sender" asynchronously publishing messages in the batch to the target queue */ await sender.SendMessagesAsync(messageBatch); Console.WriteLine($"A batch of {numOfMessages} messages has been published to the queue."); } finally { /* To create a finally block that asynchronously disposes of the "sender" and "client" objects, releasing any network and unmanaged resources */ await sender.DisposeAsync(); await client.DisposeAsync(); } } } }Note: Update the serviceBusConnectionString string constant by setting its value to Primary Connection String of the Service Bus namespace and verify that the queueName constant is set to messagequeue, matching the name of the Service Bus queue you created earlier in this exercise
Note: The Service Bus client is safe to cache and use as a singleton for the lifetime of the application. This is considered one of the best practices when publishing and reading messages on a regular basis.
-
Save the Program.cs file.
-
At the terminal prompt, run the following command to launch the .NET Core console app:
dotnet runNote: If you encounter any errors, review the Program.cs file in the Allfiles (F):\Allfiles\Labs\10\Solution\MessagePublisher folder.
-
Verify that the console message displayed at the terminal prompt states that a batch of three messages has been published to queue.
-
Select Kill Terminal (the Recycle Bin icon) to close the terminal pane and any associated processes.
-
Switch to the Microsoft Edge browser displaying the Service Bus queue messagequeue in the Azure portal.
-
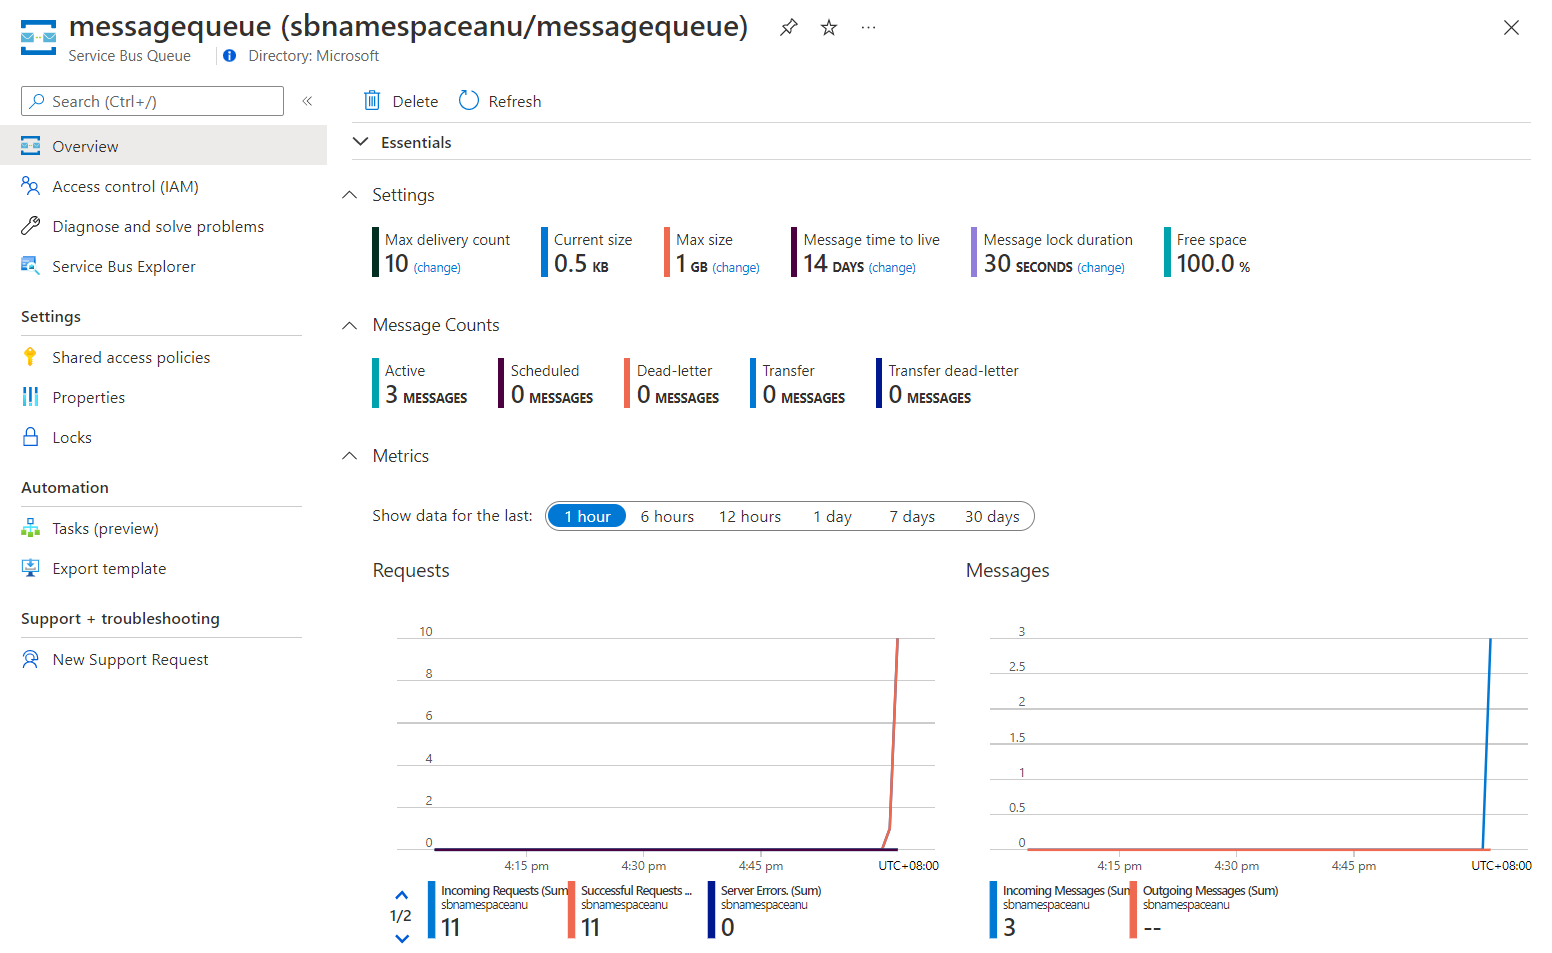
Review the Essentials pane and note that the queue contains three active messages.
The following screenshot displays the Service Bus queue metrics and message count.
-
Select Service Bus Explorer.
-
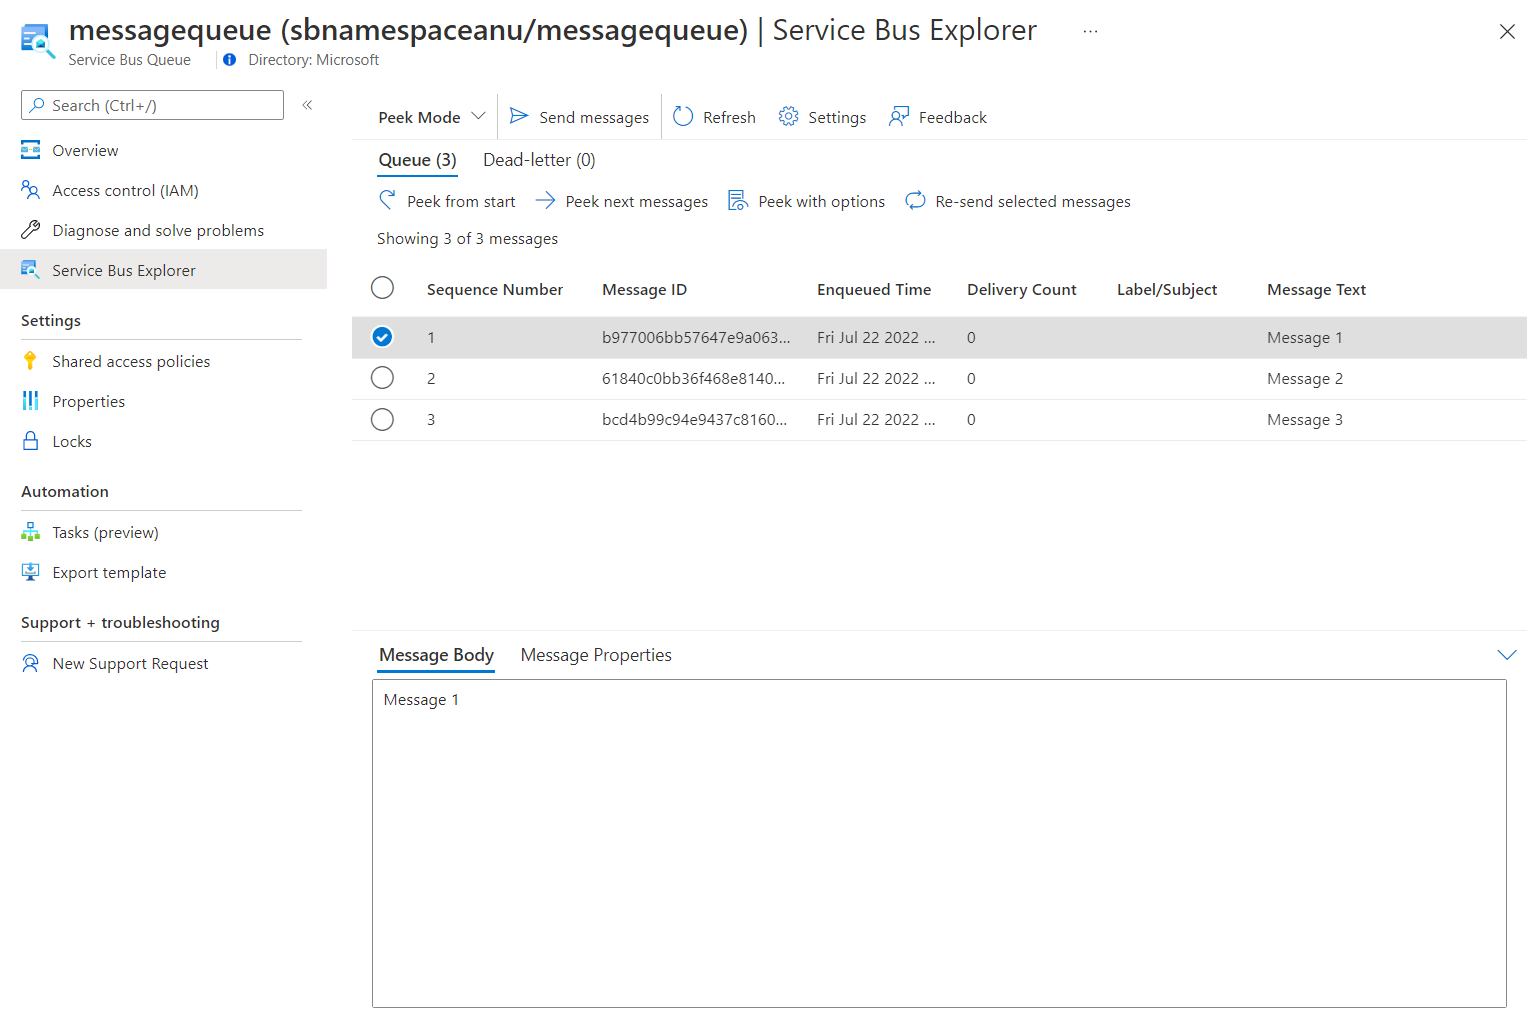
With the Peek Mode tab header selected, on the Queue tab, select the Peek from start button.
-
Verify that the queue contains three messages.
-
Select the first message and review its content in the Message pane.
The following screenshot displays the first message’s content.
-
Close the Message pane.
Review
In this exercise, you configured your .NET project that published messages into an Azure Service Bus queue.
Exercise 3: Create a .NET Core project to read messages from a Service Bus queue
Task 1: Create a .NET project
-
From the lab computer, start Visual Studio Code.
-
In Visual Studio Code, in the File menu, select Open Folder.
-
In the Open Folder window, browse to Allfiles (F):\Allfiles\Labs\10\Starter\MessageReader, and then select Select Folder.
-
In the Visual Studio Code window, on the Menu Bar, select Terminal and then select New Terminal.
-
At the terminal prompt, run the following command to create a new .NET project named MessageReader in the current folder:
dotnet new console --framework net8.0 --name MessageReader --output . -
Run the following command to import version 7.17.3 of the Azure.Messaging.ServiceBus package from NuGet:
dotnet add package Azure.Messaging.ServiceBus --version 7.17.3 -
At the terminal prompt, run the following command to build the .NET Core console application:
dotnet build -
Select Kill Terminal (the Recycle Bin icon) to close the terminal pane and any associated processes.
Task 2: Read messages from an Azure Service Bus queue
-
In the Explorer pane of the Visual Studio Code window, open the Program.cs file.
-
On the code editor tab for the Program.cs file, delete all the code in the existing file.
-
Add the following code:
using System; using System.Threading.Tasks; using Azure.Messaging.ServiceBus; namespace MessageReader { class Program { /* The `<serviceBus-connection-string>` placeholder represents the connection string to the target Azure Service Bus namespace */ static string serviceBusConnectionString = "<serviceBus-connection-string>"; /* To create a string constant named "queueName" with a value of "messagequeue", matching the name of the Service Bus queue.*/ static string queueName = "messagequeue"; static ServiceBusClient client= default!; /* Create a ServiceBusProcessor that will be used to process messages from the queue */ static ServiceBusProcessor processor = default!; static async Task MessageHandler(ProcessMessageEventArgs args) { /* To create a static async "MessageHandler" task that displays the body of messages in the queue as they are being processed and deletes them after the processing completes */ string body = args.Message.Body.ToString(); Console.WriteLine($"Received: {body}"); await args.CompleteMessageAsync(args.Message); } static Task ErrorHandler(ProcessErrorEventArgs args) { /* To create a static async "ErrorHandler" task that manages any exceptions encountered during message processing */ Console.WriteLine(args.Exception.ToString()); return Task.CompletedTask; } static async Task Main() { /* To initialize "client" of type "ServiceBusClient" that will provide connectivity to the Service Bus namespace and "processor" that will be responsible for processing of messages */ client = new ServiceBusClient(serviceBusConnectionString); processor = client.CreateProcessor(queueName, new ServiceBusProcessorOptions()); try { /* To create a try block, which first implements a message and error processing handler, initiates message processing, and stops processing following a user input */ processor.ProcessMessageAsync += MessageHandler; processor.ProcessErrorAsync += ErrorHandler; await processor.StartProcessingAsync(); Console.WriteLine("Wait for a minute and then press any key to end the processing"); Console.ReadKey(); Console.WriteLine("\nStopping the receiver..."); await processor.StopProcessingAsync(); Console.WriteLine("Stopped receiving messages"); } finally { /* To create a finally block that asynchronously disposes of the "processor" and "client" objects, releasing any network and unmanaged resources */ await processor.DisposeAsync(); await client.DisposeAsync(); } } } }Note: Update the serviceBusConnectionString string constant by setting its value to Primary Connection String of the Service Bus namespace you recorded earlier in this lab.
-
Save the Program.cs file.
-
At the terminal prompt, run the following command to launch the .NET Core console app:
dotnet runNote: If you encounter any errors, review the Program.cs file in the Allfiles (F):\Allfiles\Labs\10\Solution\MessageReader folder.
-
Verify that the console message displayed at the terminal prompt states that each of the three messages in the queue has been received.
-
At the terminal prompt, press any key to stop the receiver and terminate the app execution.
-
Select Kill Terminal (the Recycle Bin icon) to close the terminal pane and any associated processes.
-
Switch back to the Microsoft Edge browser displaying the Service Bus queue messagequeue in the Azure portal.
-
On the Service Bus Explorer (preview) blade, select Peek from start, and note that the number of active messages in the queue has changed to 0.
Review
In this exercise, you read and deleted messages from the Azure Service Bus queue by using the .NET library.