Lab 08: Create a multi-tier solution by using Azure services
Microsoft Azure user interface
Given the dynamic nature of Microsoft cloud tools, you might experience Azure UI changes that occur after the development of this training content. As a result, the lab instructions and lab steps might not align correctly.
Microsoft updates this training course when the community alerts us to needed changes. However, cloud updates occur frequently, so you might encounter UI changes before this training content updates. If this occurs, adapt to the changes, and then work through them in the labs as needed.
Instructions
Before you start
Sign in to the lab environment
Sign in to your Windows 11 virtual machine (VM) by using the following credentials:
- Username:
Admin - Password:
Pa55w.rd
Note: Your instructor will provide instructions to connect to the virtual lab environment.
Review the installed applications
Find the taskbar on your Windows 11 desktop. The taskbar contains the icons for the applications that you’ll use in this lab:
- Microsoft Edge
Lab Scenario
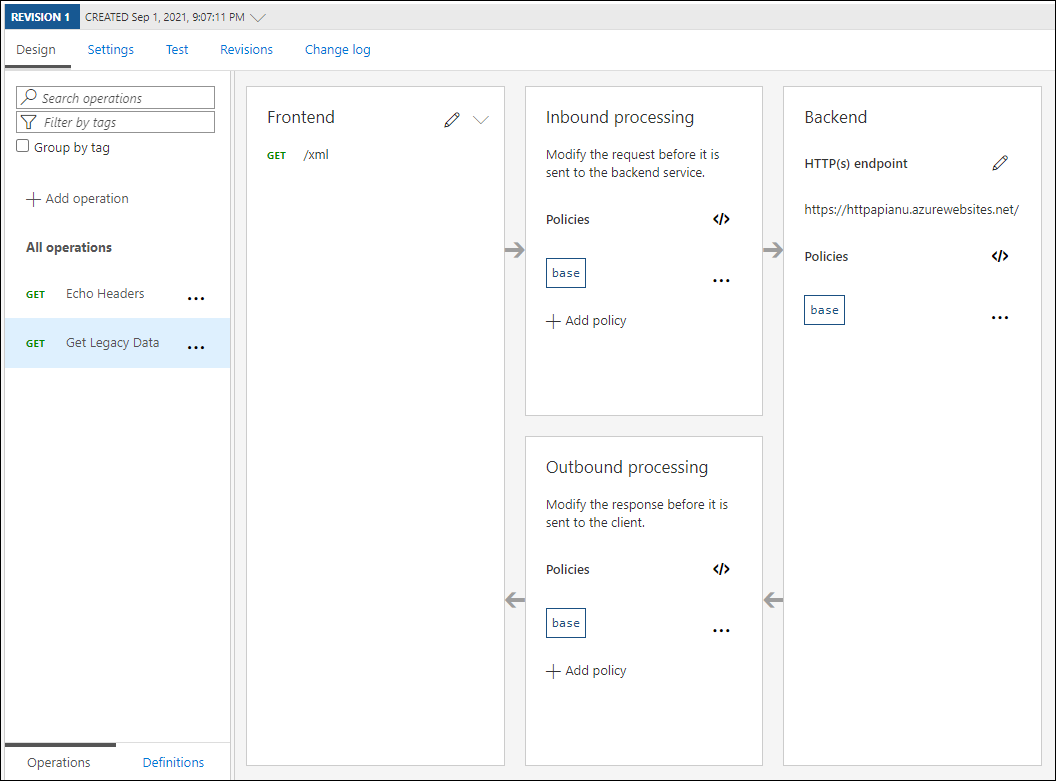
In this proof of concept, you will create a containerized application to host a web app on Azure, as the source of information for the API. You will then build an API proxy using the Azure API Management capabilities to expose and test your APIs. Developers can query the APIs to test the service and validate its applicability.
Architecture diagram
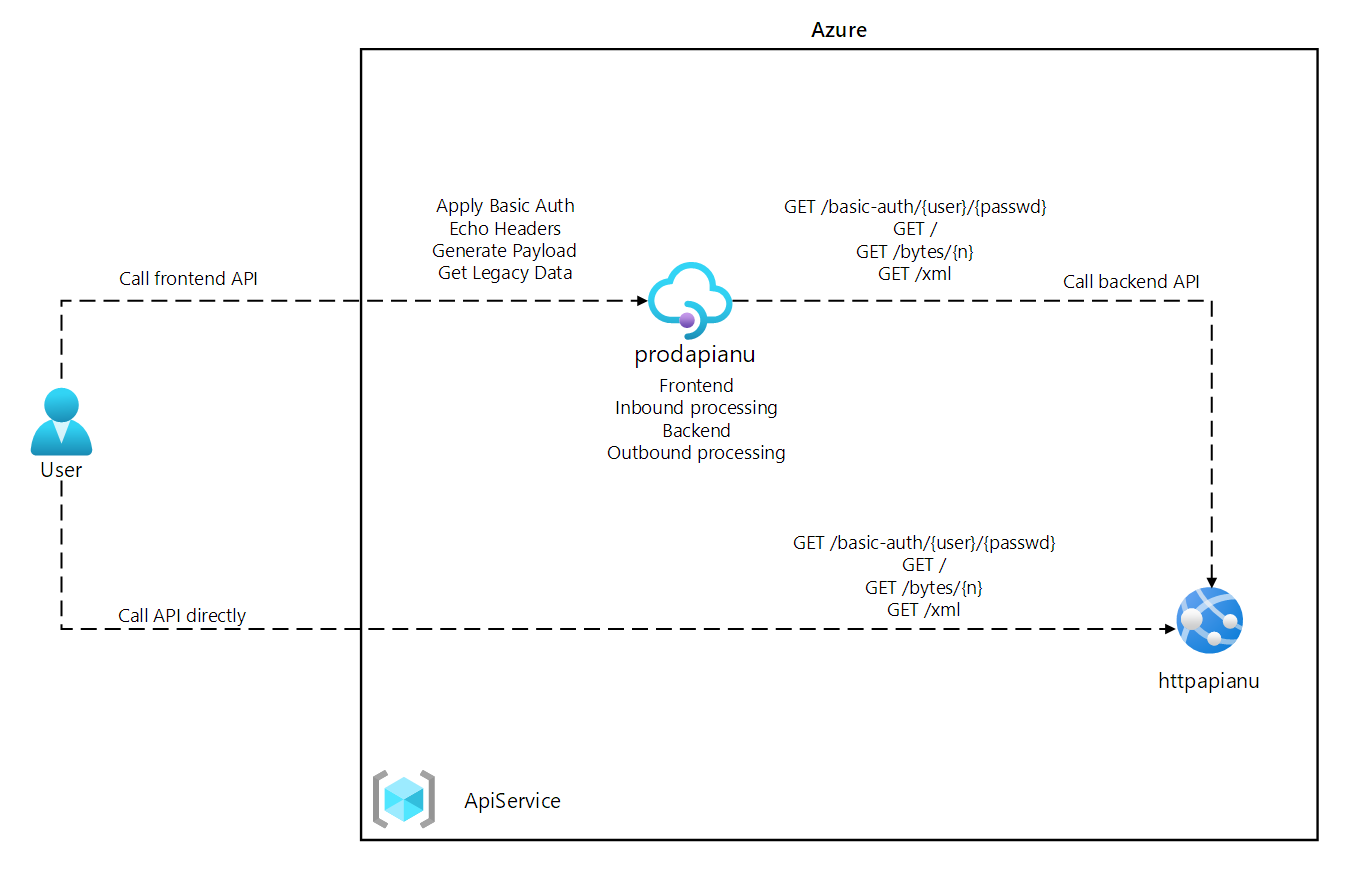
Exercise 1: Create an Azure App Service resource by using a Docker container image
Task 1: Open the Azure portal
-
On the taskbar, select the Microsoft Edge icon.
-
In the browser window that opens, browse to the Azure portal at
https://portal.azure.com, and then sign in with the account you’ll be using for this lab.Note: If this is your first time signing in to the Azure portal, you’ll be offered a tour of the portal. Select Get Started to skip the tour and begin using the portal.
Task 2: Create a web app by using Azure App Service resource by using an httpbin container image
-
In the Azure portal, use the Search resources, services, and docs text box to search for App Services and, in the list of results, select App Services.
-
On the App Services blade, select + Create.
-
On the Create Web App blade, on the Basics tab, perform the following actions, and then select the Container tab:
Setting Action Subscription drop-down list Retain the default value Resource group section Select Create new, enter ApiService, and then select OK Name text box Enter httpapi [yourname] Secure unique default hostname Disabled Publish section Select Container Operating System section Select Linux Region drop-down list Select the same Azure region as your resource group location Linux Plan section Select Create new, enter the value ApiPlan in the Name text box, and then select OK Pricing plan section Select Explore pricing plans, on the Select App Service Pricing Plan page, select Basic B1, and then select Select -
On the Container tab, perform the following actions, and then select Review + create:
Setting Action Image Source Select Other container registries Access Type Select Public Registry server URL https://index.docker.ioImage and tag text box Enter kennethreitz/httpbin:latest -
On the Review + create tab, review the options that you selected during the previous steps.
-
Select Create to create the web app by using your specified configuration.
Note: Wait for the creation task to complete before you proceed with this lab.
Task 3: Test the httpbin web application
-
In the Azure portal, use the Search resources, services, and docs text box to search for App Services and, in the list of results, select App Services.
-
On the App Services blade, select the newly created web app.
-
On the blade displaying the newly created app properties, select Browse.
Note: There may be a 2-3 minute delay before the web page renders. If a 504 Gateway timeout occurs, Refresh your browser.
-
Within the web application, perform the following actions:
a. Select Response formats.
b. Select GET /html.
c. Select Try it out.
The following screenshot displays the Try it out section of the web application.
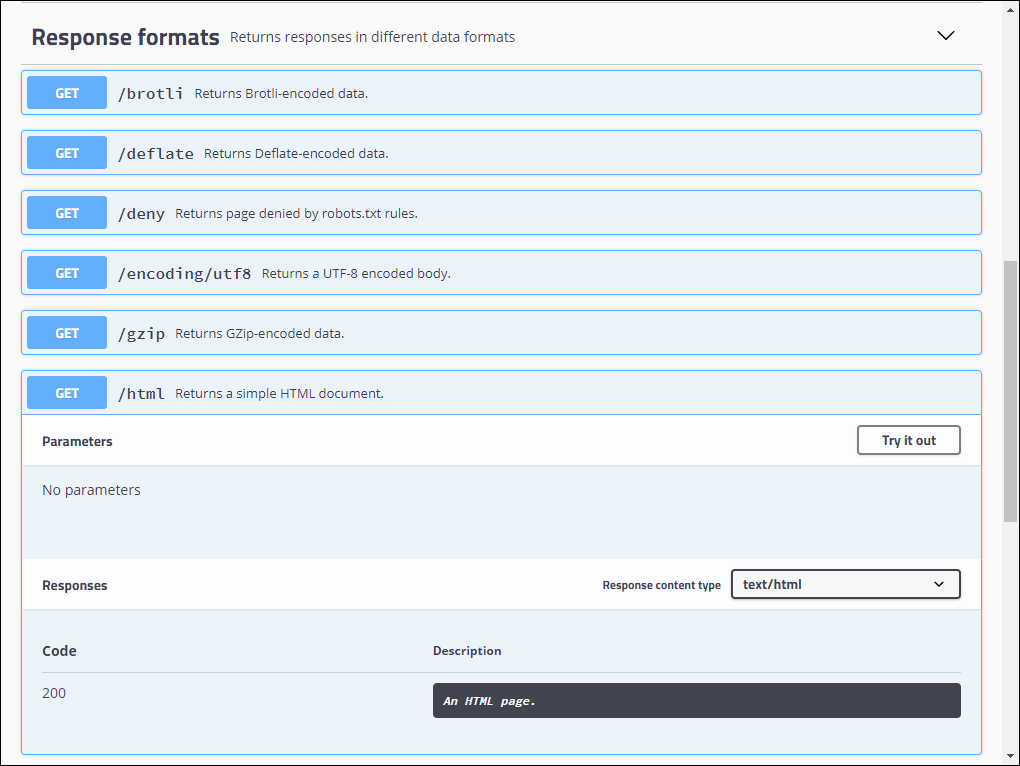
d. Select Execute.
e. Review the value of the Response body and Response headers text boxes.
f. Review the value of the Request URL text box.
-
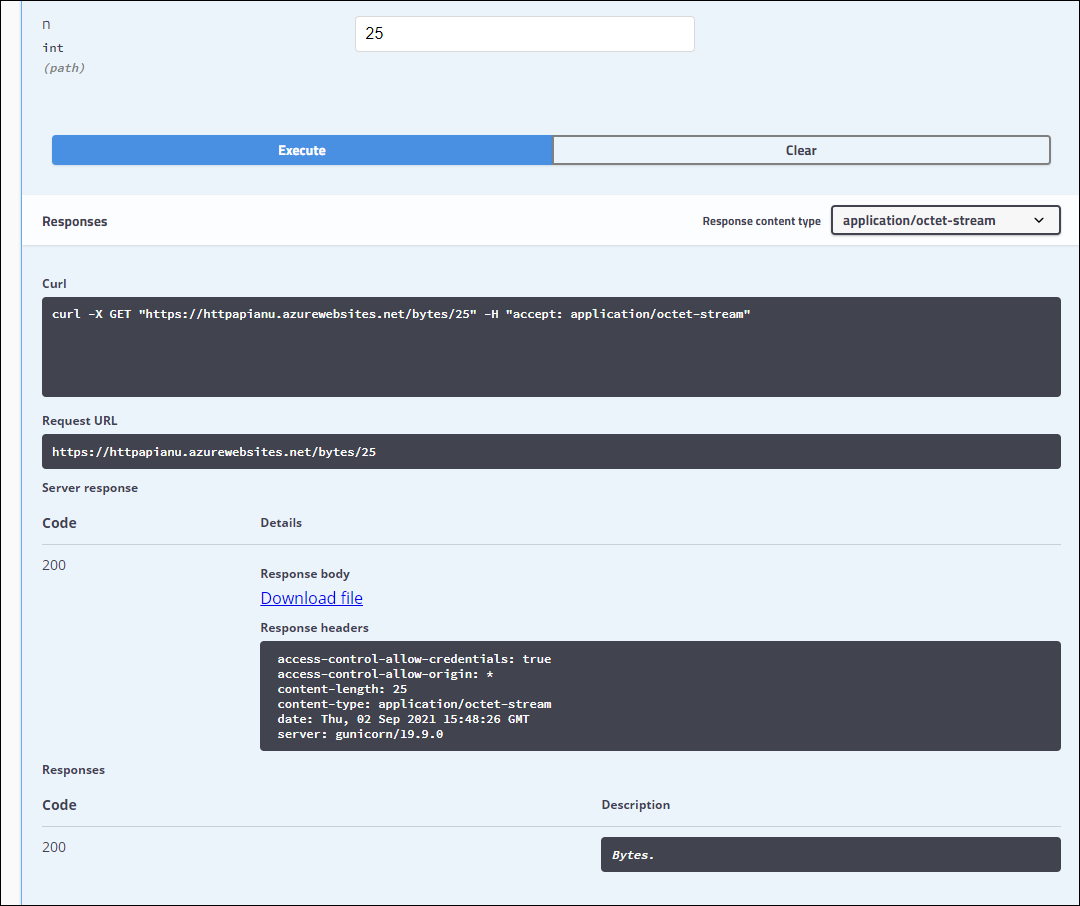
Within the web application, perform the following actions:
a. Select Dynamic data.
b. Select GET /bytes/{n}.
c. Select Try it out.
d. In the n text box, enter 25.
e. Select Execute.
f. Review the value of the Response body and Response headers text boxes.
g. Select Download file, and after the file downloads, open it in Notepad, review its content, and then close it.
Note: The file contains a sequence of randomly generated bytes.
The following screenshot displays the dynamic data section of the web application.
-
Within the web application, perform the following actions:
a. Select Status codes.
b. Select GET /status/{codes}.
c. Select Try it out.
d. In the codes text box, enter 404.
e. Select Execute.
f. Review the Server response and note that it includes Error: NOT FOUND entry.
-
Close the browser window that displays the web application.
-
Switch back to the browser window that displays the httpapi[yourname] web app.
-
On the App Service Overview blade, in the Essentials, record the value of the Default domain link. You’ll use this value later in the lab to send requests to the corresponding API.
Review
In this exercise, you created a new Azure web app by using a container image sourced from Docker Hub.
Exercise 2: Build an API proxy tier by using Azure API Management
Task 1: Create an API Management resource
-
In the Azure portal, use the Search resources, services, and docs text box to search for API Management services and, in the list of results, select API Management services.
-
On the API Management services blade, select + Create.
-
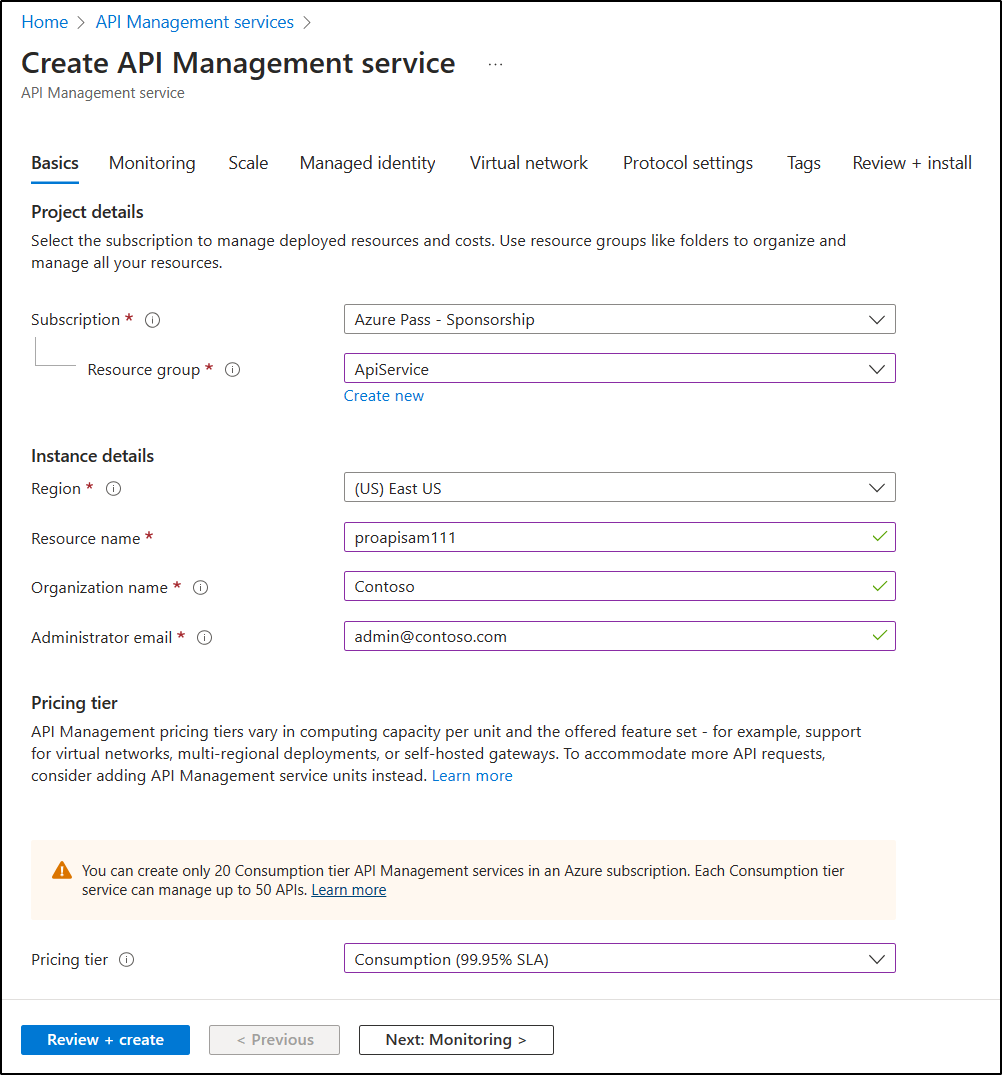
On the Create API Management service blade, perform the following actions, and then select Review + create:
Setting Action Subscription drop-down list Retain the default value. Resource group section Select the ApiService group that you created earlier in the lab Region list Select the same region you chose in the previous exercise Resource name text box Enter proapi [yourname] Organization name text box Enter Contoso Administrator email text box Enter admin@contoso.comPricing tier drop-down list Consumption (99.95% SLA) The following screenshot displays the configured settings of Create API Management blade of the web application.
-
On the Review + create tab, review the option that you specified in the previous step, and then select Create.
Note: Wait for the creation task to complete before you continue with this lab.
-
On the Deployment Overview blade, select Go to resource.
Task 2: Define a new API
-
On the API Management Service blade, in the APIs section, select APIs.
-
In the Define a new API section, select HTTP.
-
In the Create an HTTP API window, perform the following actions and select Create:
Setting Action Display name text box Enter HTTPBin API Name text box Enter httpbin-api Web service URL text box Enter the URL for the web app that you copied earlier in this lab. Note: Make sure that the URL starts with the https:// prefix API URL suffix text box Leave it empty The following screenshot displays the configured settings of Create a blank API window of the web application.
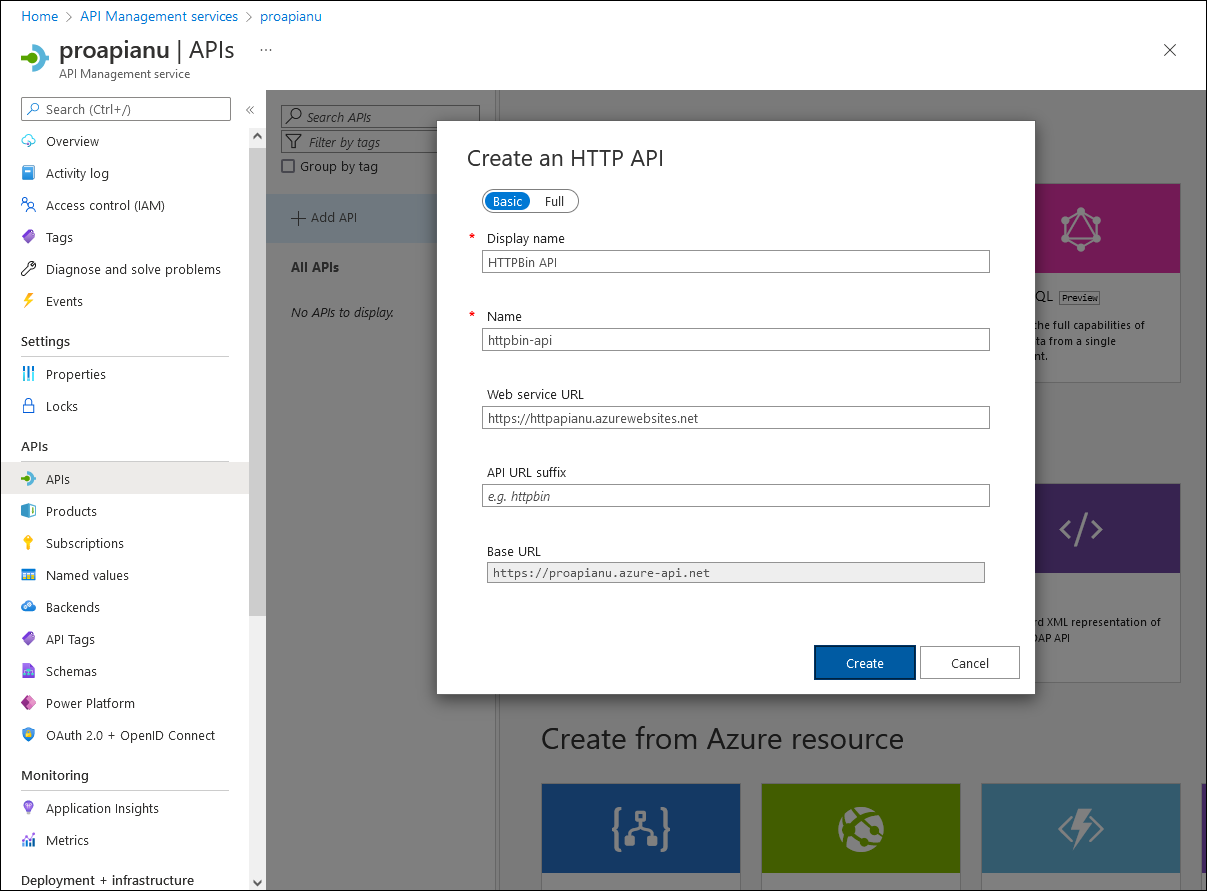
Note: Wait for the new API to finish being created.
-
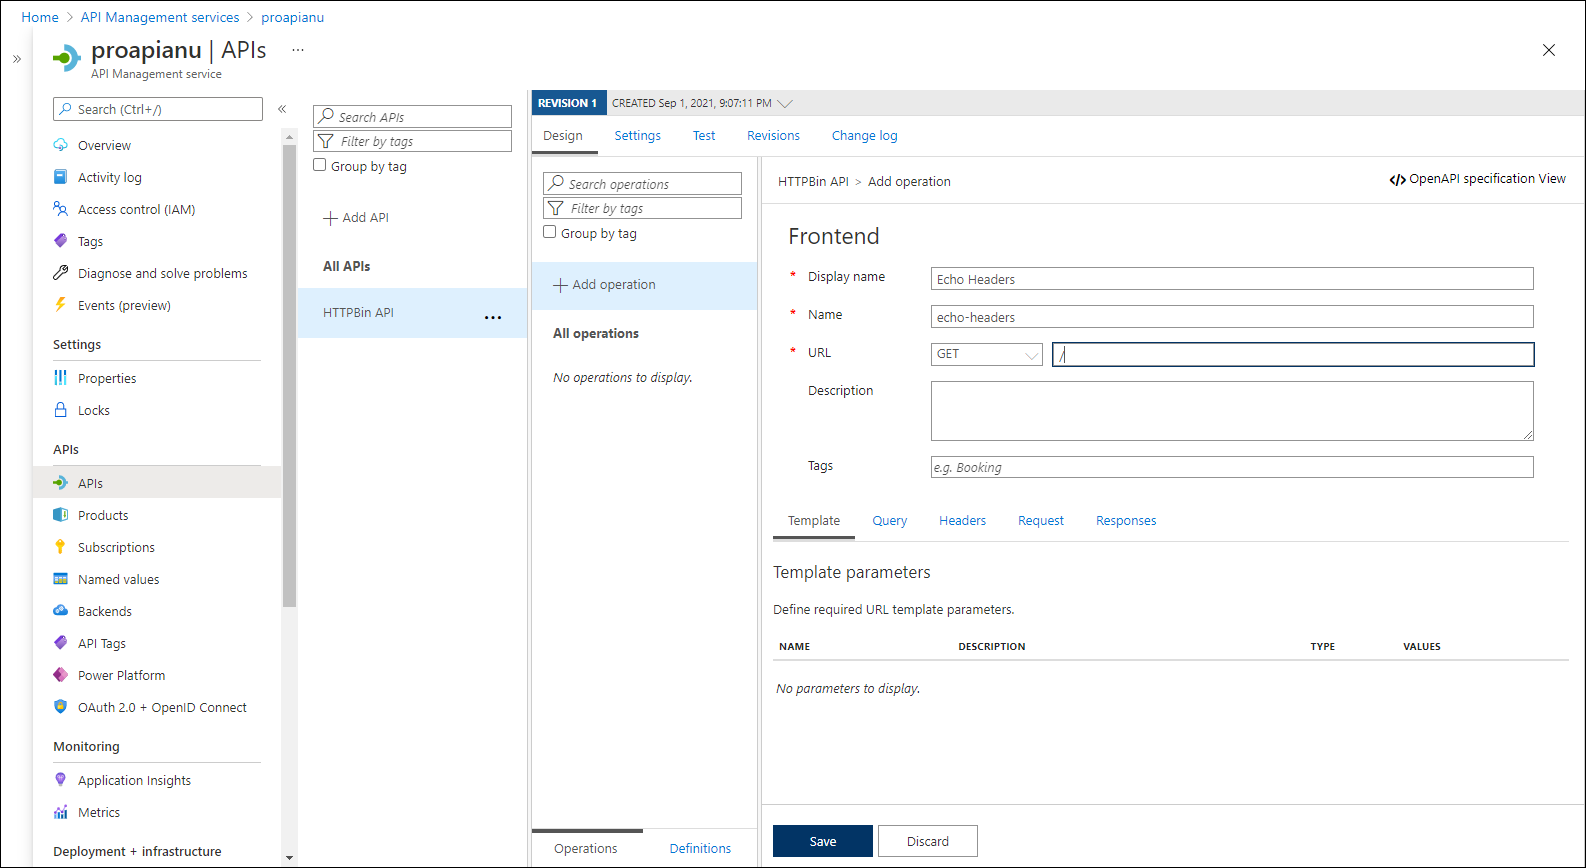
On the Design tab, select + Add operation.
-
In the Add operation section, perform the following actions, and then select Save:
Setting Action Display name text box Enter Echo Headers Name text box Verify that its value is set to echo-headers URL list Select GET URL text box Enter / The following screenshot displays the configured settings of the Add operation section.
-
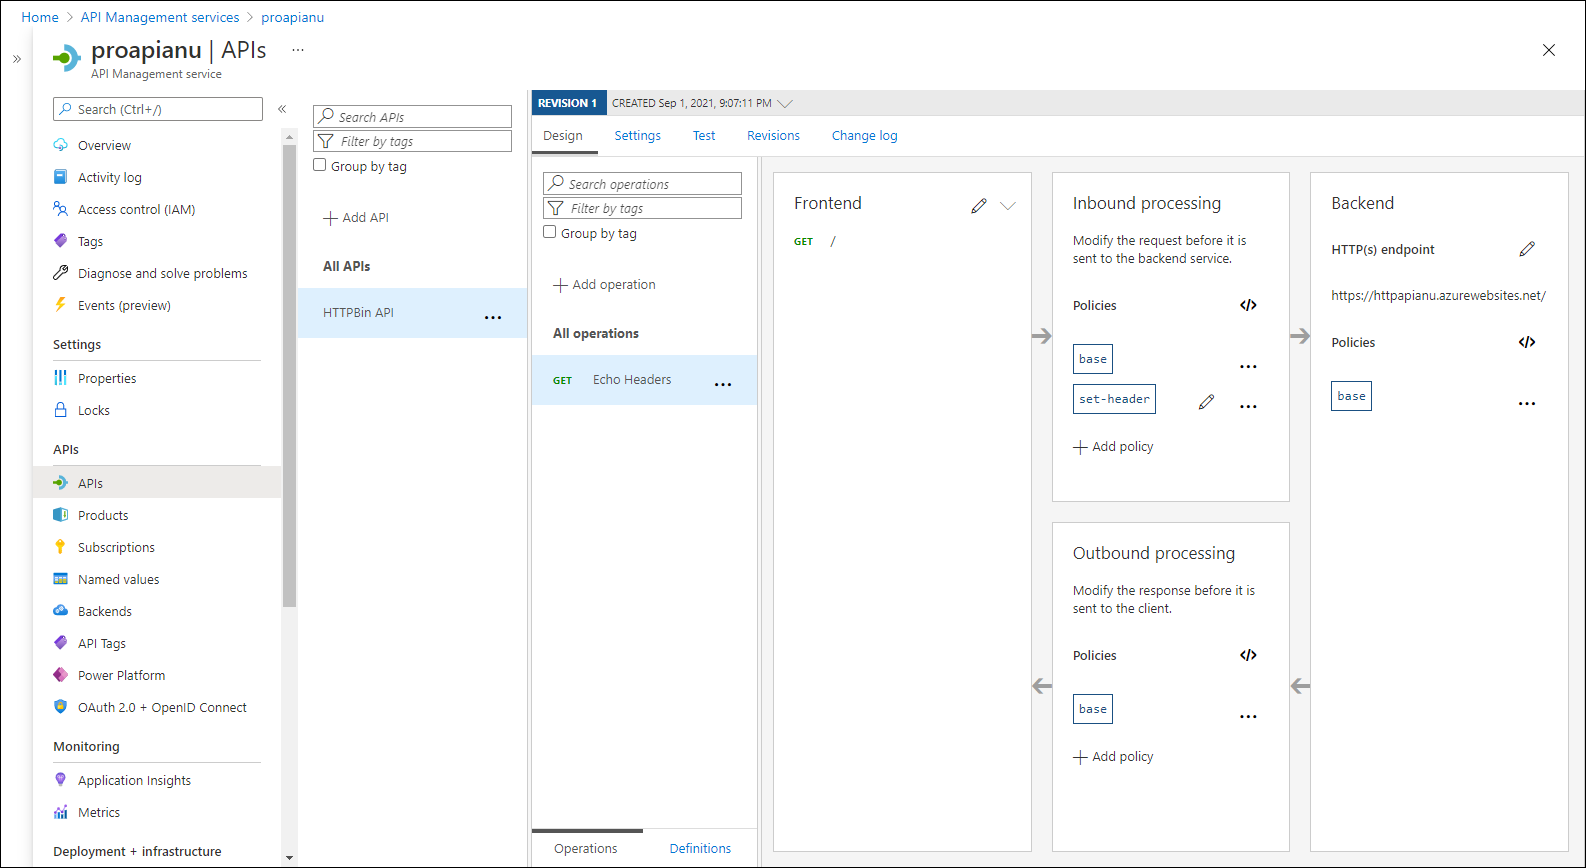
Back on the Design tab, in the list of operations, select Echo Headers.
-
In the Design section, on the Inbound processing tile select + Add policy.
-
In the Add inbound policy section, select the Set headers tile.
-
In the Set Headers section, perform the following actions, and then select Save:
Setting Action Name text box Enter source Value text box Select the list, select Add Value, and then enter azure-api-mgmt Action list Select append The following screenshot displays the configured settings of the Design section.
-
Back on the Design tab, in the list of operations, select Echo Headers.
-
In the Design section for Echo Headers, on the Backend tile, select the pencil icon.
-
In the Backend section, perform the following actions, and then select Save:
Setting Action Service URL section Select the Override check box Service URL text box Append the value /headers to its current value. Note: For example, if the current value is https://httpapi[yourname].azurewebsites.net, the new value will behttps://httpapi[yourname].azurewebsites.net/headers -
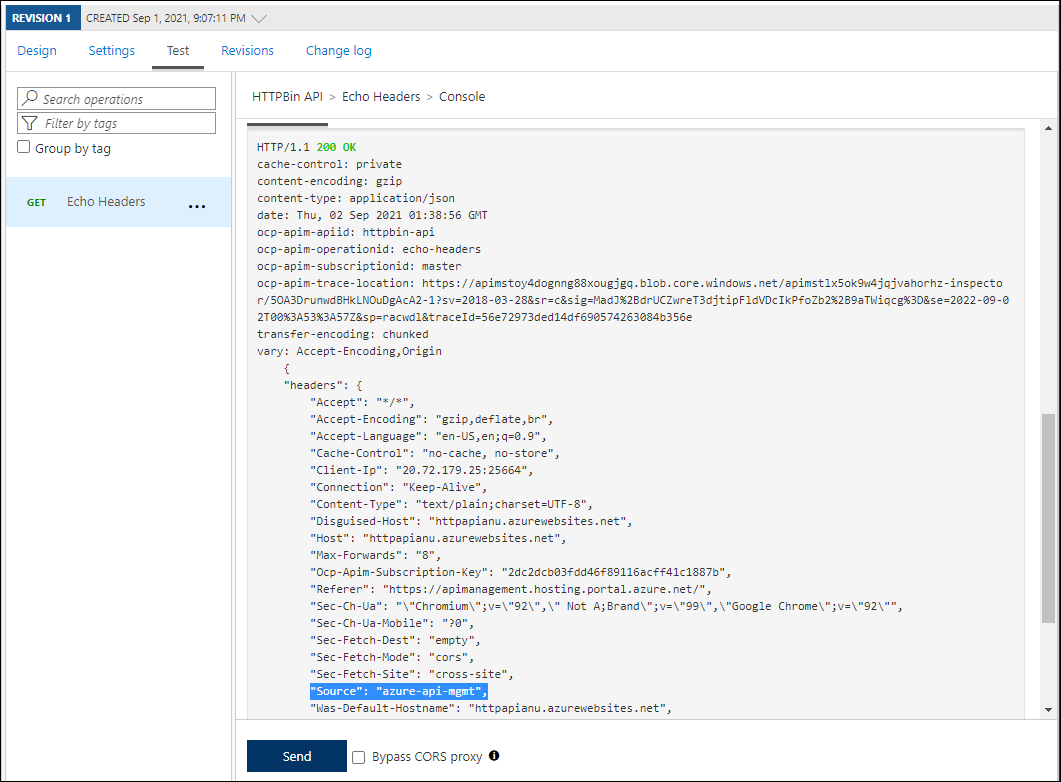
Back on the Design tab, in the list of operations, select Echo Headers, and then select the Test tab.
-
In the Echo Headers section, select Send.
The following screenshot displays the configured settings of the Echo Headers section.

-
Review the results of the API request.
Note: Verify that there are many headers sent as part of your request that are echoed in the response. They should include the new Source header that you created as part of this task.
The following screenshot displays the response to the Echo Headers request.
-
Select the Design tab to return to the list of operations.
Task 3: Manipulate an API response
-
On the Design tab, select + Add operation.
-
In the Add operation section, perform the following actions, and then select Save:
Setting Action Display name text box Enter Get Legacy Data Name text box Verify that its value is set to get-legacy-data URL list Verify that its value is set to GET URL text box Enter /xml -
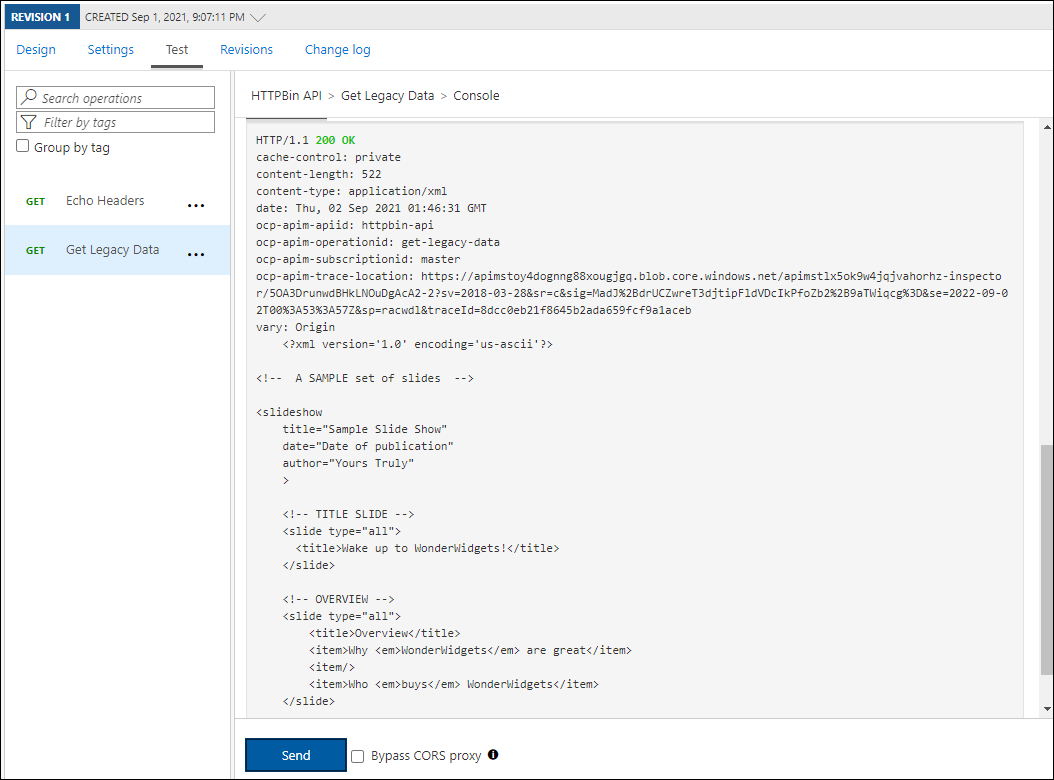
Back on the Design tab, in the list of operations, select Get Legacy Data.
-
Select the Test tab, and then select Send.
-
Review the results of the API request.
Note: At this point, the results should be in XML format.
The following screenshot displays the results of the API request.
-
Select the Design tab, and then select Get Legacy Data.
-
On the Design pane, in the Outbound processing section, select Add policy.
The following screenshot displays the Outbound processing section.
-
In the Add outbound policy section, select the Other policies tile.
-
In the policy code editor, find the following block of XML content:
<outbound> <base /> </outbound> -
Replace that block of XML with the following XML:
<outbound> <base /> <xml-to-json kind="direct" apply="always" consider-accept-header="false" /> </outbound> -
In the policy code editor, select Save.
-
Back on the Design tab, in the list of operations, select Get Legacy Data, and then select Test.
-
In the Get Legacy Data section, select Send.
-
Review the results of the API request.
Note: The new results are in JavaScript Object Notation (JSON) format.
-
Within the HTTP response section, perform the following actions:
-
Select Trace.
-
If prompted, select Enable tracing for one hour.
-
Select the Trace tab, review the content in the Backend and Outbound text boxes, and note that they include details of the corresponding API operations with their timing information.
-
Task 4: Manipulate an API request
-
On the Design tab, select + Add operation.
-
In the Add operation section, perform the following actions, and then select Save:
Setting Action Display name text box Enter Modify Status Code Name text box Verify that its value is set to modify-status-code URL list Select GET URL text box Enter /status/404 -
Back on the Design tab, in the list of operations, select Modify Status Code.
-
In the Design section, on the Inbound processing tile, select + Add policy.
-
In the Add inbound policy section, select the Rewrite URL tile.
-
In the Rewrite URL section, perform the following actions:
a. In the Backend text box, enter /status/200.
b. Select Save.
-
Back on the Design tab, in the list of operations, select Modify Status Code, and then select the Test tab.
-
In the Modify Status Code section, select Send.
-
Review the results of the API request.
Note: Verify that the request returned the HTTP/1.1 200 OK response.
Review
In this exercise, you built a proxy tier between your App Service resource and any developers who wish to make queries against its API.