Lab 07: Access resource secrets more securely across services
Microsoft Azure user interface
Given the dynamic nature of Microsoft cloud tools, you might experience Azure UI changes that occur after this training content’s development. As a result, the lab instructions and lab steps might not align correctly.
Microsoft updates this training course when the community brings needed changes to our attention. However, because cloud updates occur frequently, you might encounter UI changes before this training content updates. If this occurs, adapt to the changes, and then work through them in the labs as needed.
Instructions
Before you start
Sign in to the lab environment
Sign in to your Windows 11 virtual machine (VM) by using the following credentials:
- Username:
Admin - Password:
Pa55w.rd
Note: Your instructor will provide instructions to connect to the virtual lab environment.
Review the installed applications
Find the taskbar on your Windows 11 desktop. The taskbar contains the icons for the applications that you’ll use in this lab, including:
- Microsoft Edge
- File Explorer
- Terminal
- Visual Studio Code
Lab Scenario
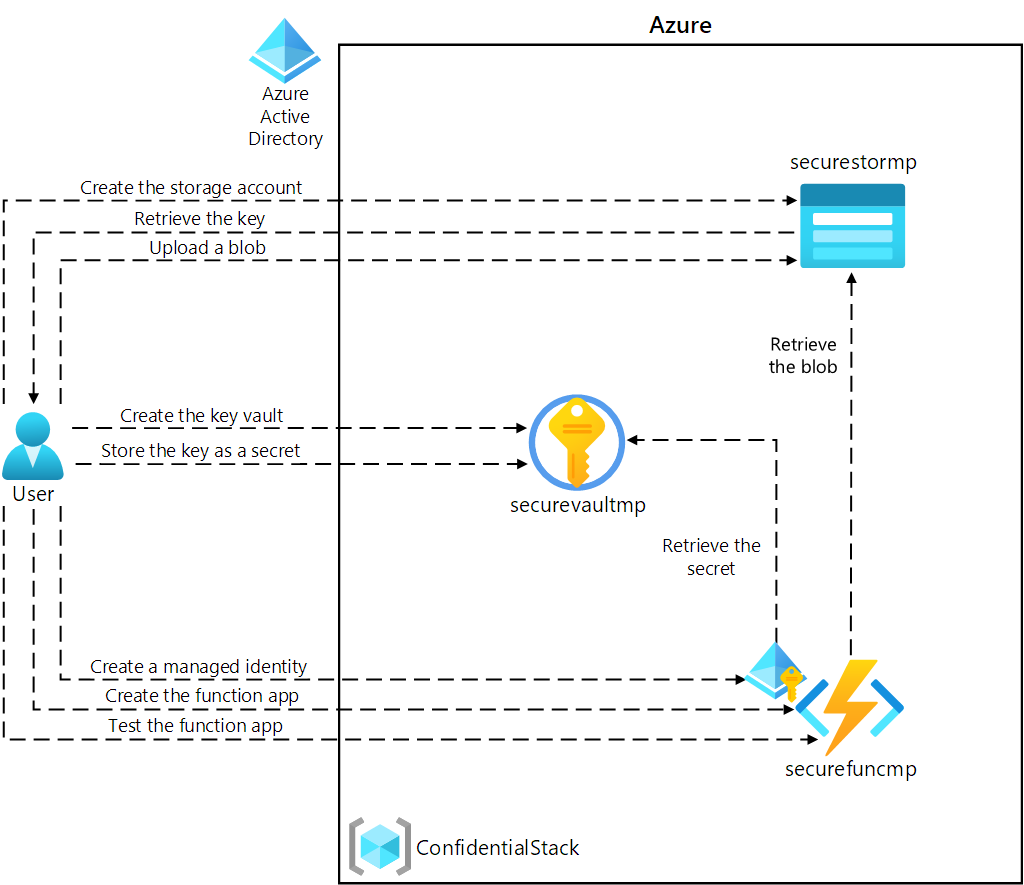
In this lab, you will create a storage account and an Azure Function app that will access the storage account. To demonstrate the secure storage of connection string information, you will provision a Key Vault resource and manage the appropriate secrets to store the connection string information. You will also manage the service identity to gain secure access to the connection string information for the storage account.
Architecture diagram
Exercise 1: Create Azure resources
Task 1: Open the Azure portal
-
On the taskbar, select the Microsoft Edge icon.
-
In the open browser window, browse to the Azure portal at
https://portal.azure.com, and then sign in with the account you’ll be using for this lab.Note: If this is your first time signing in to the Azure portal, you’ll be offered a tour of the portal. Select Get Started to skip the tour and begin using the portal.
Task 2: Create a Storage account
-
In the Azure portal, use the Search resources, services, and docs text box to search for Storage Accounts, and then in the list of results, select Storage accounts.
-
On the Storage accounts blade, select + Create.
-
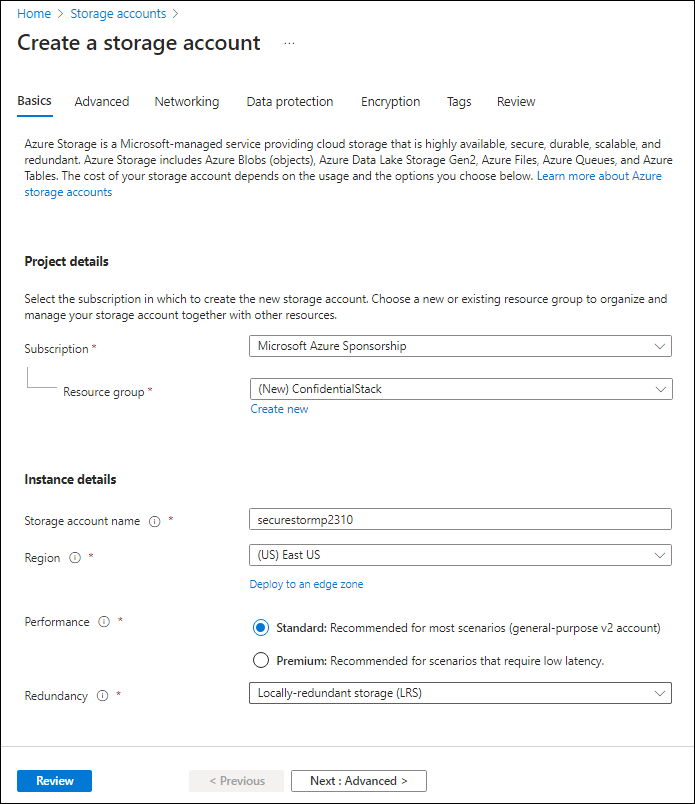
On the Create a storage account blade, on the Basics tab, perform the following actions, and select Review:
Setting Action Subscription drop-down list Retain the default value Resource group section Select Create new, enter ConfidentialStack, and then select OK Storage account name text box Enter securestor[yourname] Region drop-down list Select (US) East US Primary service No changes Performance section Select the Standard option Redundancy drop-down list Select Locally-redundant storage (LRS) The following screenshot displays the configured settings on the Create a storage account blade.
-
On the Review tab, review the options that you selected during the previous steps.
-
Select Create to create the storage account by using your specified configuration.
Note: Wait for the creation task to complete before you move forward with this lab.
-
On the Deployment Overview blade, select Go to resource.
-
On the Storage account blade, in the Security + networking section, select the Access keys link.
-
In the Access keys section, select Show keys.
-
On the Access keys blade, review any one of the Connection strings (using Show button), and then record the value of either Connection string boxes in Notepad. The Keys are platform managed encryption keys and are not used for this lab.
Note: It doesn’t matter which connection string you choose. They are interchangeable.
Task 3: Create an Azure Key Vault
-
In the Azure portal, use the Search resources, services, and docs text box to search for Key vaults, and then in the list of results, select Key vaults.
-
On the Key vaults blade, select Create.
-
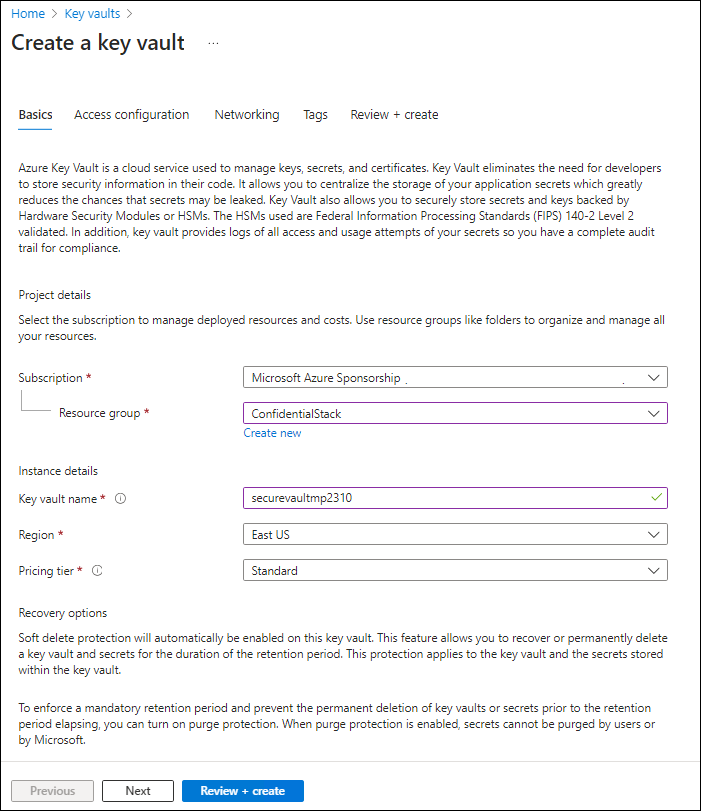
On the Create key vault blade, on the Basics tab, perform the following actions, and then select Next to go to the Access Configuration tab:
Setting Action Subscription drop-down list Retain the default value Resource group drop-down list Select ConfidentialStack in the list Key vault name text box Enter securevault[yourname] Region drop-down list Select East US Pricing tier drop-down list Select Standard The following screenshot displays the configured settings on the Create key vault blade.
-
On the Access Configuration tab, change the permission model to Vault access policy and then select Review + create.
-
On the Review + create tab, review the options that you selected during the previous steps.
-
Select Create to create the key vault by using your specified configuration.
Note: Wait for the creation task to complete before you move forward with this lab.
Task 4: Create a Function app
-
In the Azure portal, use the Search resources, services, and docs text box to search for Function App, and then in the list of results, select Function App.
-
On the Function App blade, select Create.
-
On the Select a hosting option page, ensure Consumption is select, and then click Select.
-
On the Create Function App (Consumption) blade, on the Basics tab, perform the following actions, and then select Next: Storage:
Setting Action Subscription drop-down list Retain the default value Resource group drop-down list Select ConfidentialStack Function App name text box Enter securefunc[yourname] Runtime stack drop-down list Select .NET Version drop-down list Select 8 (LTS), isolated worker model Region drop-down list Select the East US region Operating System section Select Linux The following screenshot displays the configured settings in the Create Function App blade.

-
On the Storage tab, perform the following actions, and then select Review + create:
Setting Action Storage account drop-down list Select the securestor[yourname] storage account -
On the Review + create tab, review the options that you selected during the previous steps.
-
Select Create to create the function app by using your specified configuration.
Note: Wait for the creation task to complete before you move forward with this lab.
Review
In this exercise, you created all the resources that you’ll use in this lab.
Exercise 2: Configure secrets and identities
Task 1: Configure a system-assigned managed service identity
-
On the Azure portal’s navigation pane, select the Resource groups link.
-
On the Resource groups blade, select the ConfidentialStack resource group.
-
On the ConfidentialStack blade, select the securefunc[yourname] function app.
Note: There will be two resources, a function app and application insights resource, with the same name. Make sure you select the function app resource.
-
On the Function App blade, select the Identity option from the Settings section.
-
On the Identity pane, on the System assigned tab, set the Status to On, and then select Save.
-
Select Yes to confirm the setting.
Note: Wait for the system-assigned managed identity to be created before you move forward with this lab.
Task 2: Create a Key Vault secret
-
On the Azure portal’s navigation pane, select the Resource groups link.
-
On the Resource groups blade, select the ConfidentialStack resource group.
-
On the ConfidentialStack blade, select the securevault[yourname] key vault.
-
On the Key Vault blade, select the Secrets link in the Objects section.
-
On the Secrets pane, select + Generate/Import.
-
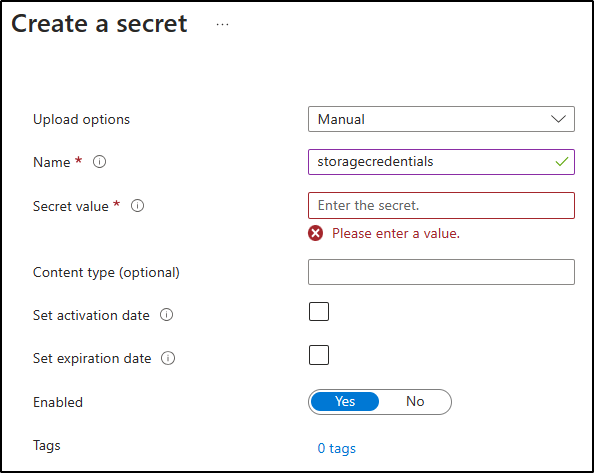
On the Create a secret blade, perform the following actions, and then select Create:
Setting Action Upload options drop-down list Select Manual Name text box Enter storagecredentials Secret Value text box Enter the storage account connection string that you recorded previously in this lab Content type text box Leave blank Set activation date check box Not selected Set expiration date check box Not selected Enabled option Select Yes The following screenshot displays the configured settings on the Create a secret blade.
Note: Wait for the secret to be created before you move forward with this lab.
-
Return to the Secrets pane, and then select the storagecredentials item in the list.
-
On the Versions pane, select the latest version of the storagecredentials secret.
-
On the Secret Version pane, perform the following actions:
-
Select Show secret value to find the value of the secret.
-
Record the value of the Secret Identifier text box because you’ll use this later in the lab.
Note: You’re recording the value of the Secret Identifier text box, not the Secret Value text box.
-
Task 3: Configure a Key Vault access policy
-
On the Azure portal’s navigation pane, select the Resource groups link.
-
On the Resource groups blade, select the ConfidentialStack resource group.
-
On the ConfidentialStack blade, select the securevault[yourname] key vault.
-
On the Key vault blade, select the Access policies link in the Overview section.
-
On the Access policies pane, select + Create.
-
On the Create an access policy blade, in the Permissons section, make the following selections:
Setting Action Configure from a template drop-down list Leave blank Key permissions checkboxes 0 selected Secret permissions checkboxes Select the GET permission Certificate permissions checkboxes 0 selected -
Select the Principal section and make the following selections:
Setting Action Select principal link Find and then select the service principal named securefunc[yourname]. The system-assigned managed identity you created previously in this lab will have the same name as the Azure Function resource -
Select Review + create and select Create.
Note: Wait for your changes to the access policies to save before you continue with this lab.
Task 4: Create a Key Vault-derived application setting
-
On the Azure portal’s navigation pane, select the Resource groups link.
-
On the Resource groups blade, select the ConfidentialStack resource group.
-
On the ConfidentialStack blade, select the securefunc[yourname] function app.
-
On the Function App blade, in the Settings section, select the Environment variables link.
-
In the App settings tab, select + Add. Enter the following information in the Add/Edit application setting pop-up dialog:
Setting Action Name text box Enter StorageConnectionString Value text box Construct a value by using the following syntax: @Microsoft.KeyVault(SecretUri=<Secret Identifier>), where the<Secret Identifier>placeholder represents the secret identifier you recorded earlier in this exercise.Deployment slot setting check box Retain the default value Note: For example, if your secret identifier is
https://securevaultstudent.vault.azure.net/secrets/storagecredentials/17b41386df3e4191b92f089f5efb4cbf, the resulting value would be@Microsoft.KeyVault(SecretUri=https://securevaultstudent.vault.azure.net/secrets/storagecredentials/17b41386df3e4191b92f089f5efb4cbf). -
Select Apply to close the pop-up dialog and return to the App settings section.
-
At the bottom of the App settings section, select Apply.
Note: You may receive a warning that your app may restart when updating app settings. Select Confirm. Wait for your application settings to save before you continue with the lab.
Review
In this exercise, you created a system-assigned managed service identity for your function app, and then gave that identity the appropriate permissions to get the value of a secret in your key vault. Finally, you created a secret that you referenced within your function app’s configuration settings.
Exercise 3: Build an Azure Functions app
Task 1: Initialize a function project
-
On the taskbar, select the Terminal icon.
-
Run the following command to change the current directory to the Allfiles (F):\Allfiles\Labs\07\Starter\func empty directory:
cd F:\Allfiles\Labs\07\Starter\funcNote: In Windows Explorer remove the Read-only attribute from F:\Allfiles\Labs\07\Starter\func.gitignore file.
-
Run the following command to use the Azure Functions Core Tools to create a new local Functions project in the current directory using the dotnet runtime:
func init --worker-runtime dotnet-isolated --target-framework net8.0 --forceNote: You can review the documentation to [create a new project][azure-functions-core-tools-new-project] using the Azure Functions Core Tools.
-
Run the following command to build the .NET 8 project:
dotnet build
Task 2: Create an HTTP-triggered function
-
Run the following command to use the Azure Functions Core Tools to create a new function named FileParser using the HTTP trigger template:
func new --template "HTTP trigger" --name "FileParser"Note: You can review the documentation to [create a new function][azure-functions-core-tools-new-function] using the Azure Functions Core Tools.
-
Close the currently running Terminal application.
Task 3: Configure and read an application setting
-
On the Start screen, select the Visual Studio Code tile.
-
On the File menu, select Open Folder.
-
In the File Explorer window that opens, browse to Allfiles (F):\Allfiles\Labs\07\Starter\func, and then select Select Folder.
-
On the Explorer pane of the Visual Studio Code window, open the local.settings.json file.
-
Note the current value of the Values object:
"Values": { "AzureWebJobsStorage": "UseDevelopmentStorage=true", "FUNCTIONS_WORKER_RUNTIME": "dotnet-isolated" } -
Update the value of the Values object by adding a new setting named StorageConnectionString, and then assigning it a string value of [TEST VALUE]:
"Values": { "AzureWebJobsStorage": "UseDevelopmentStorage=true", "FUNCTIONS_WORKER_RUNTIME": "dotnet-isolated", "StorageConnectionString": "[TEST VALUE]" } -
The local.settings.json file should now include:
{ "IsEncrypted": false, "Values": { "AzureWebJobsStorage": "UseDevelopmentStorage=true", "FUNCTIONS_WORKER_RUNTIME": "dotnet-isolated", "StorageConnectionString": "[TEST VALUE]" } } -
Select Save to save your changes to the local.settings.json file.
-
On the Explorer pane of the Visual Studio Code window, open the FileParser.cs file.
-
In the code editor, replace the content of the auto-generated code of the function FileParser starting with line 18 with the following code:
[Function("FileParser")] public HttpResponseData Run([HttpTrigger(AuthorizationLevel.Function, "get", "post")] HttpRequestData req) { _logger.LogInformation("C# HTTP trigger function processed a request."); var response = req.CreateResponse(HttpStatusCode.OK); response.Headers.Add("Content-Type", "text/plain; charset=utf-8"); string connectionString = Environment.GetEnvironmentVariable("StorageConnectionString"); response.WriteString(connectionString); return response; } -
Ignore the warnings regarding null values.
-
Review the resulting code, which should consist of the following content (this code returns the value of the StorageConnectionString environment variable):
using System.Net; using Microsoft.Azure.Functions.Worker; using Microsoft.Azure.Functions.Worker.Http; using Microsoft.Extensions.Logging; namespace func { public class FileParser { private readonly ILogger _logger; public FileParser(ILoggerFactory loggerFactory) { _logger = loggerFactory.CreateLogger<FileParser>(); } [Function("FileParser")] public HttpResponseData Run([HttpTrigger(AuthorizationLevel.Function, "get", "post")] HttpRequestData req) { _logger.LogInformation("C# HTTP trigger function processed a request."); var response = req.CreateResponse(HttpStatusCode.OK); response.Headers.Add("Content-Type", "text/plain; charset=utf-8"); string connectionString = Environment.GetEnvironmentVariable("StorageConnectionString"); response.WriteString(connectionString); return response; } } } -
Select Save to save your changes to the FileParser.cs file.
Task 4: Validate the local function
-
On the taskbar, select the Terminal icon.
-
Run the following command to change the current directory to the Allfiles (F):\Allfiles\Labs\07\Starter\func empty directory:
cd F:\Allfiles\Labs\07\Starter\func -
Run the following command to run the function app project:
func start --buildNote: You can review the documentation to [start the function app project locally][azure-functions-core-tools-start-function] using the Azure Functions Core Tools.
-
On the lab computer, start Command Prompt.
-
Run the following command to run test the GET REST API call against
http://localhost:7071/api/FileParser:curl -X GET -i http://localhost:7071/api/FileParser -
Observe the [TEST VALUE] value of the StorageConnectionString being returned as the result of the HTTP request:
HTTP/1.1 200 OK Content-Type: text/plain; charset=utf-8 Date: Tue, 01 Sep 2020 23:35:39 GMT Server: Kestrel Transfer-Encoding: chunked [TEST VALUE] -
Close all currently running instances of the Terminal application, and the Command Prompt application.
Task 5: Deploy the function using the Azure Functions Core Tools
-
On the taskbar, select the Terminal icon.
-
Run the following command to change the current directory to the Allfiles (F):\Allfiles\Labs\07\Starter\func empty directory:
cd F:\Allfiles\Labs\07\Starter\func -
Run the following command to sign in to the Azure Command-Line Interface (CLI):
az login -
In the Microsoft Edge browser window, enter the credentials of the account you use to access your Azure subscription, and then select Sign in.
-
Return to the currently open Terminal window. Wait for the sign-in process to finish.
-
Run the following command to publish the function app project (replace the
<function-app-name>placeholder with the name of the function app you created earlier in this lab):func azure functionapp publish <function-app-name> --dotnet-version 8.0Note: As an example, if your Function App name is securefuncstudent, your command would be
func azure functionapp publish securefuncstudent --force. You can review the documentation to [publish the local function app project][azure-functions-core-tools-publish-azure] using the Azure Functions Core Tools. -
Wait for the deployment to finalize before you move forward with the lab.
-
Close the currently running Terminal application.
Task 6: Test the Key Vault-derived application setting
-
On the taskbar, select the Microsoft Edge icon, and then select the tab that contains the Azure portal.
-
On the Azure portal’s navigation pane, select the Resource groups link.
-
On the Resource groups blade, select the ConfidentialStack resource group.
-
On the ConfidentialStack blade, select the securefunc[yourname] function app.
-
On the Function App blade, select the Overview option.
-
On the Functions tab on the bottom of the Overview page, select the existing FileParser function.
-
On the Function blade, select the Code + Test option in the Developer section.
-
In the function editor, select Test/Run.
-
In the automatically displayed pane, in the HTTP method list, select GET.
-
Select Run to test the function.
-
Review the results of the test run. The result should be your Azure Storage connection string.
Review
In this exercise, you used a service identity to read the value of a secret stored in Key Vault and returned that value as the result of a function app.
Exercise 4: Access Azure Blob Storage data
Task 1: Upload a sample storage blob
-
On the Azure portal’s navigation pane, select the Resource groups link.
-
On the Resource groups blade, select the ConfidentialStack resource group.
-
On the ConfidentialStack blade, select the securestor[yourname] storage account.
-
On the Storage account blade, select the Containers link in the Data storage section.
-
In the Containers section, select + Container.
-
In the New container pop-up window, perform the following actions, and then select Create:
Setting Action Name text box Enter drop -
Return to the Containers section, and then navigate into the newly created drop container.
-
On the Container blade, select Upload.
-
In the Upload blob window, perform the following actions, and then select Upload:
Setting Action Files section Select Browse for files or use the drag and drop feature File Explorer window Browse to Allfiles (F):\Allfiles\Labs\07\Starter, select the records.json file, and then select Open Overwrite if files already exist check box Ensure that this check box is selected Note: Wait for the blob to upload before you continue with this lab.
-
Return to the Container blade, and then select the records.json blob in the list of blobs.
-
On the Blob blade, find the blob metadata, and then copy the URL for the blob.
-
On the taskbar, activate the shortcut menu for the Microsoft Edge icon, and then select New window.
-
In the new browser window, refer to the URL that you copied for the blob.
-
An error message indicating that public access is not permitted should now display.
Note: This is expected as anonymous access for our blobs is not enabled.
Task 2: Pull and configure the Azure SDK for .NET
-
On the taskbar, select the Terminal icon.
-
Run the following command to change the current directory to the Allfiles (F):\Allfiles\Labs\07\Starter\func empty directory:
cd F:\Allfiles\Labs\07\Starter\func -
Run the following command to add version 12.18.0 of the Azure.Storage.Blobs package from NuGet:
dotnet add package Azure.Storage.Blobs --version 12.18.0Note: The Azure.Storage.Blobs NuGet package references the subset of the Azure SDK for .NET required to write code for Azure Blob Storage.
-
Close the currently running Terminal application.
-
On the Start screen, select the Visual Studio Code tile.
-
On the File menu, select Open Folder.
-
In the File Explorer window that opens, browse to Allfiles (F):\Allfiles\Labs\07\Starter\func, and then select Select Folder.
-
On the Explorer pane of the Visual Studio Code window, open the FileParser.cs file.
-
Add using directives for the Azure.Storage.Blobs and Azure.Storage.Blobs.Models namespaces:
using Azure.Storage.Blobs; using Azure.Storage.Blobs.Models; -
Replace the content of the current FileParser method starting with line 19 with the following code:
[Function("FileParser")] public HttpResponseData Run([HttpTrigger(AuthorizationLevel.Function, "get", "post")] HttpRequestData req) { _logger.LogInformation("C# HTTP trigger function processed a request."); var response = req.CreateResponse(HttpStatusCode.OK); string connectionString = Environment.GetEnvironmentVariable("StorageConnectionString"); /* Create a new instance of the BlobClient class by passing in your connectionString variable, a "drop" string value, and a "records.json" string value to the constructor */ BlobClient blob = new BlobClient(connectionString, "drop", "records.json"); // Download the content of the referenced blob BlobDownloadResult downloadResult = blob.DownloadContent(); // Retrieve the value of the downloaded blob and convert it to string response.WriteString(downloadResult.Content.ToString()); //return the response return response; } -
Ignore the warning regarding null values.
-
Review the resulting code, which should consist of the following content (this code returns the content of the blob downloaded from the storage account designated by the StorageConnectionString environment variable):
namespace func { public class FileParser { private readonly ILogger _logger; public FileParser(ILoggerFactory loggerFactory) { _logger = loggerFactory.CreateLogger<FileParser>(); } [Function("FileParser")] public HttpResponseData Run([HttpTrigger(AuthorizationLevel.Function, "get", "post")] HttpRequestData req) { _logger.LogInformation("C# HTTP trigger function processed a request."); var response = req.CreateResponse(HttpStatusCode.OK); string connectionString = Environment.GetEnvironmentVariable("StorageConnectionString"); /* Create a new instance of the BlobClient class by passing in your connectionString variable, a "drop" string value, and a "records.json" string value to the constructor */ BlobClient blob = new BlobClient(connectionString, "drop", "records.json"); // Download the content of the referenced blob BlobDownloadResult downloadResult = blob.DownloadContent(); // Retrieve the value of the downloaded blob and convert it to string response.WriteString(downloadResult.Content.ToString()); //return the response return response; } } } -
Select Save to save your changes to the FileParser.cs file.
Task 3: Deploy and validate the Azure Functions app
-
On the taskbar, select the Terminal icon.
-
Run the following command to change the current directory to the Allfiles (F):\Allfiles\Labs\07\Starter\func empty directory:
cd F:\Allfiles\Labs\07\Starter\func -
Run the following command to sign in to the Azure CLI:
az login -
In the Microsoft Edge browser window, enter the email address and password for your Microsoft account, and then select Sign in.
-
Return to the currently open Terminal window. Wait for the sign-in process to finish.
-
Run the following command to publish the function app project again (replace the
<function-app-name>placeholder with the name of the function app you used earlier in this lab):func azure functionapp publish <function-app-name> --dotnet-version 8.0Note: As an example, if your Function App name is securefuncstudent, your command would be
func azure functionapp publish securefuncstudent. You can review the documentation to [publish the local function app project][azure-functions-core-tools-publish-azure] using the Azure Functions Core Tools. -
Wait for the deployment to finalize before you move forward with the lab.
-
Close the currently running Terminal application.
-
On the taskbar, select the Microsoft Edge icon, and then refer to the Azure portal.
-
On the Azure portal’s navigation pane, select the Resource groups link.
-
On the Resource groups blade, select the ConfidentialStack resource group.
-
On the ConfidentialStack blade, select the securefunc[yourname] function app.
-
On the Function App blade, select the Overview option.
-
On the Functions tab of the Overview page, select the existing FileParser function.
-
On the Function blade, select the Code + Test option in the Developer section.
-
In the function editor, select Test/Run.
-
In the automatically displayed pane, in the HTTP method list, select GET.
-
Select Run to test the function.
-
Review the results of the test run. The output will contain the content of the $/drop/records.json blob stored in your Azure Storage account.
Review
In this exercise, you used C# code to access a storage account, and then downloaded the contents of a blob.