Lab 06: Authenticate by using OpenID Connect, MSAL, and .NET SDKs
Microsoft Azure user interface
Given the dynamic nature of Microsoft cloud tools, you might experience Azure UI changes that occur after the development of this training content. As a result, the lab instructions and lab steps might not align correctly.
Microsoft updates this training course when the community alerts us to needed changes. However, cloud updates occur frequently, so you might encounter UI changes before this training content updates. If this occurs, adapt to the changes, and then work through them in the labs as needed.
Instructions
Before you start
Sign in to the lab environment
Sign in to your Windows 11 virtual machine (VM) by using the following credentials:
- Username:
Admin - Password:
Pa55w.rd
Note: Your instructor will provide instructions to connect to the virtual lab environment.
Review the installed applications
Find the taskbar on your Windows 11 desktop. The taskbar contains the icons for the applications that you’ll use in this lab, including:
- Microsoft Edge
- Visual Studio Code
Lab Scenario
In this lab, you will register an application in Microsoft Entra ID, add a user, and then test the user’s access to the application to validate that Entra ID can secure it.
Architecture diagram

Exercise 1: Configure a single-tenant Entra ID environment
Task 1: Open the Azure portal
-
On the taskbar, select the Microsoft Edge icon.
-
In the open browser window, browse to the Azure portal at
https://portal.azure.com, and then sign in with the account you’ll use for this lab.Note: If this is your first time signing in to the Azure portal, you’ll be offered a tour of the portal. Select Get Started to skip the tour and begin using the portal.
Task 2: Register an application in Entra ID Directory
-
In the Azure portal, use the Search resources, services, and docs text box to search for Entra ID and, in the list of results, select Microsoft Entra ID.
Note: This redirects your browser session to the blade of the Microsoft Entra ID tenant associated with your Azure subscription.
-
On the Microsoft Entra ID blade, select App registrations in the Manage section.
-
In the App registrations section, select + New registration.
-
In the Register an application section, perform the following actions, and then select Register:
Setting Action Name text box Enter webappoidc Supported account types list Select Accounts in this organizational directory only (Default Directory only - Single tenant) Note: The name of the tenant might differ depending on your Azure subscription.
The following screenshot displays the configured settings in the Register an application section.

Task 3: Record unique identifiers
-
On the webappoidc application registration blade, select Overview.
-
In the Overview section, find and record the value of the Application (client) ID text box. You’ll use this value later in the lab.
-
In the Overview section, find and record the value of the Directory (tenant) ID text box. You’ll use this value later in the lab.
Task 4: Configure the application authentication settings
-
On the webappoidc application registration blade, select Authentication in the Manage section.
-
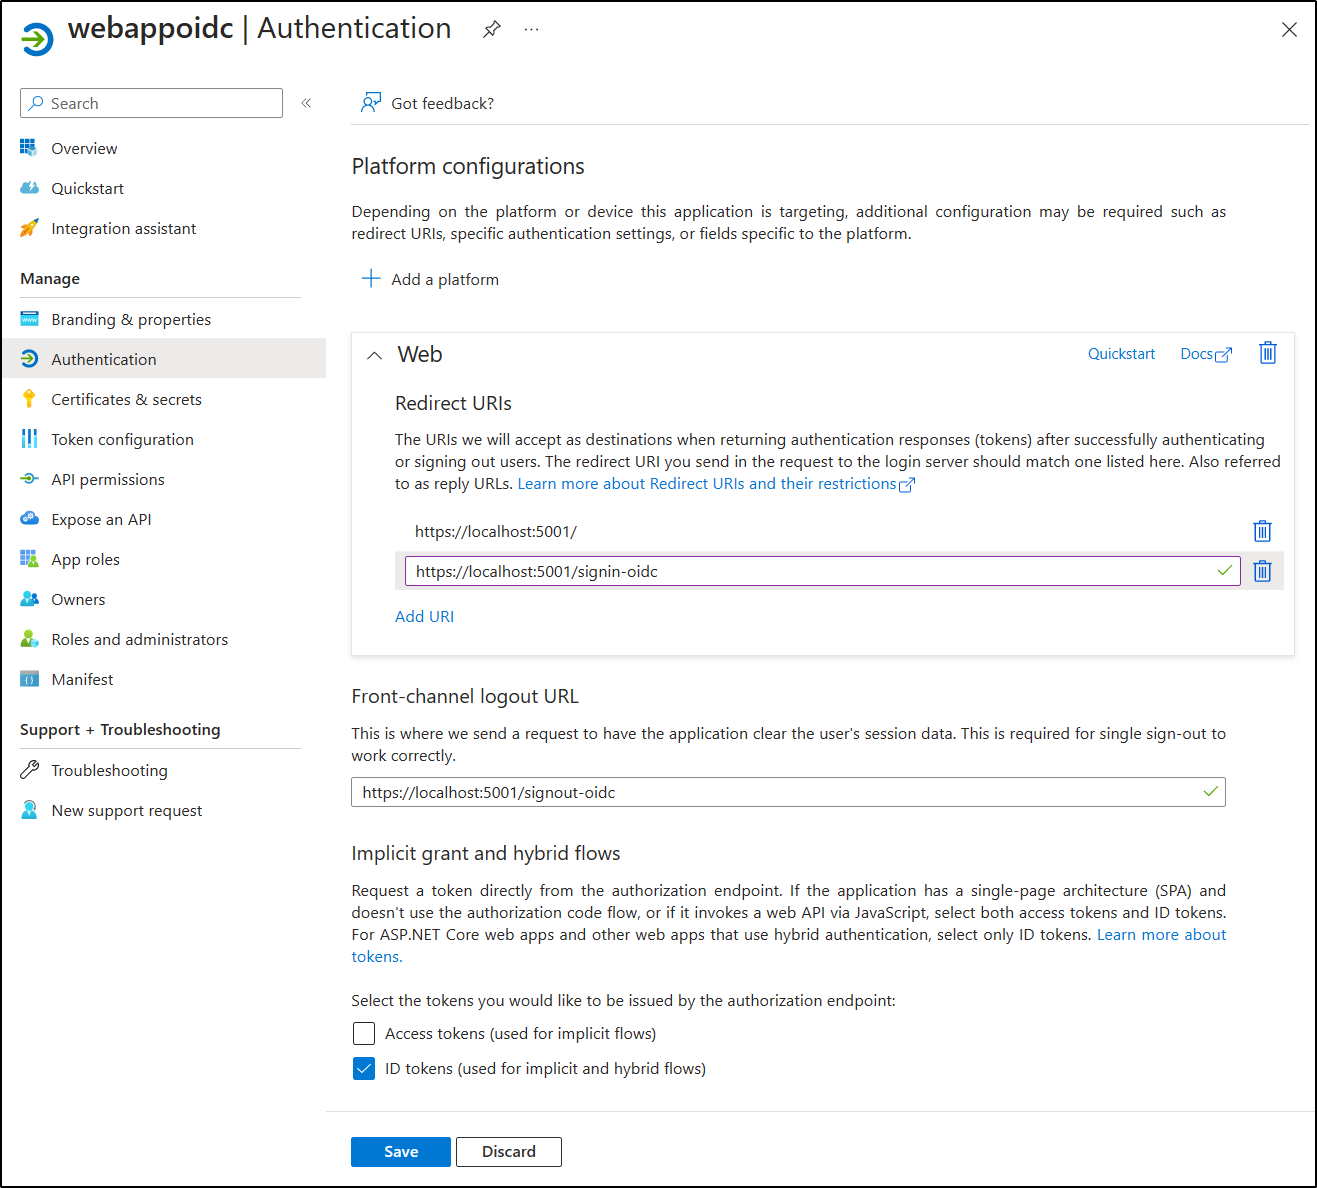
In the Authentication section, perform the following actions, and select Configure:
Setting Action Platform configurations section Select + Add a platform Configure platforms blade Select Web Redirect URIs text box Enter https://localhost:5001/Front-channel logout URL text box Enter https://localhost:5001/signout-oidc -
Back in the Platform configurations section, select Add URI, and then enter
https://localhost:5001/signin-oidc. -
In the Implicit grant and hybrid flows section, select ID tokens (used for implicit and hybrid flows).
-
Select Save.
The following screenshot displays the configured settings on the Authentication blade.
Task 5: Create a Microsoft Entra ID user
-
In the Azure portal, select the Cloud Shell icon
 to open a the Cloud Shell. If Cloud Shell defaults to a Bash session, select Switch to PowerShell in the Cloud Shell menu and then select Confirm.
Note: The Cloud Shell icon is represented by a greater than sign (>) and underscore character (_).
If this is the first time you’re starting Cloud Shell you will be presented with a Getting started prompt. Select No storage account required, then select Apply.
-
In the Cloud Shell pane, run the following command to sign in to the Microsoft Entra tenant associated with your Azure subscription:
Connect-AzureAD -
Run the following command to retrieve and display the primary Domain Name System (DNS) domain name of the Microsoft Entra tenant:
$aadDomainName = ((Get-AzureAdTenantDetail).VerifiedDomains)[0].Name $aadDomainNameNote: Record the value of the DNS domain name. You’ll use this value later in the lab.
-
Run the following commands to create Microsoft Entra ID users that you’ll use to test Microsoft Entra ID authentication:
$passwordProfile = New-Object -TypeName Microsoft.Open.AzureAD.Model.PasswordProfile $passwordProfile.Password = 'Pa55w.rd1234' $passwordProfile.ForceChangePasswordNextLogin = $false New-AzureADUser -AccountEnabled $true -DisplayName 'aad_lab_user1' -PasswordProfile $passwordProfile -MailNickName 'aad_lab_user1' -UserPrincipalName "aad_lab_user1@$aadDomainName" -
Run the following command to identify the user principal name (UPN) of the newly created Microsoft Entra ID user:
(Get-AzureADUser -Filter "MailNickName eq 'aad_lab_user1'").UserPrincipalNameNote: Record the UPN. You’ll use this value later in the lab.
-
Close the Cloud Shell pane.
Review
In this exercise, you registered a single-tenant Azure AD application and created an Azure AD user account.
Exercise 2: Create a single-tenant ASP.NET web app
Task 1: Create an ASP.NET web app project
-
On the lab computer, start Command Prompt.
-
From the command prompt, run the following commands to create and set the current directory to Allfiles (F):\Allfiles\Labs\06\Starter\OIDCClient:
F: cd F:\Allfiles\Labs\06\Starter\OIDCClient -
Run the following commands to create a new .NET Core web app based on the Model View Controller (MVC) template (replace the placeholders
<application_ID>,<tenant_ID>, and<domain_Name>with the corresponding values you recorded earlier in this lab):dotnet new mvc --auth SingleOrg --client-id <application_ID> --tenant-id <tenant_ID> --domain <domain_Name> rmdir .\obj /S /QNote: If you received an error in the terminal, it is possible you’re using PowerShell. It that case remove the
/S /Qflags and rerun the command. -
Run the following command to start Visual Studio Code.
code .If you have been prompted Do you trust the authors of all files in this folder?, select Yes, I trust the authors.
-
In the Visual Studio Code Explorer pane, review the autogenerated folder structure that represents an MVC web app.
-
Navigate to the Properties folder, open the launchSettings.json file, and then apply the following changes:
Section Property Value iisSettings sslPort 44321 https applicationUrl https://localhost:5001Note: The port numbers must match the value you specified when creating the Microsoft Entra ID app registration.
-
Save and close the file.
-
In the Visual Studio Code Explorer pane, select OIDCClient.csproj.
-
Ensure that the value of
<TargetFramework>element is set to net8.0. -
Ensure that version of the
Microsoft.AspNetCore.Authentication.JwtBearerandMicrosoft.AspNetCore.Authentication.OpenIdConnectNuGet packages is set to 8.0.0. -
Verify that the content of the OIDCClient.csproj file resembles the following listing (the value of the
UserSecretsIdwill differ) and save the changes.<Project Sdk="Microsoft.NET.Sdk.Web"> <PropertyGroup> <TargetFramework>net8.0</TargetFramework> <Nullable>enable</Nullable> <ImplicitUsings>enable</ImplicitUsings> <UserSecretsId>aspnet-OIDCClient-5249f5b2-6266-4a13-b8b4-e79c6443aabc</UserSecretsId> </PropertyGroup> <ItemGroup> <PackageReference Include="Microsoft.AspNetCore.Authentication.JwtBearer" Version="8.0.0-rc.2.23480.2" NoWarn="NU1605" /> <PackageReference Include="Microsoft.AspNetCore.Authentication.OpenIdConnect" Version="8.0.0-rc.2.23480.2" NoWarn="NU1605" /> <PackageReference Include="Microsoft.Identity.Web" Version="2.13.0" /> <PackageReference Include="Microsoft.Identity.Web.UI" Version="2.13.0" /> <PackageReference Include="Microsoft.Identity.Web.DownstreamApi" Version="2.13.0" /> </ItemGroup> </Project> -
Close the OIDCClient.csproj file.
-
Navigate to the Views\Shared folder, and then open the _LoginPartial.cshtml file.
-
Verify that the
asp-areaattribute in each span element referencesMicrosoftIdentity, as in the following line:<a class="nav-link text-dark" asp-area="MicrosoftIdentity" asp-controller="Account" asp-action="SignOut">Sign out</a> -
Close the file without making any changes.
-
Open the file appsettings.json in the root folder and review the content of the AzureAd object, including the following elements:
Element Value Instancehttps://login.microsoftonline.com/DomainPrimary DNS domain of the Azure AD tenant associated with your Azure subscription TenantIdGUID of the Azure AD tenant ClientIdApplication (client) ID of the application you registered in the Azure AD tenant CallbackPath/signin-oidc -
Close the file without making any changes.
-
In the Visual Studio Code Explorer pane, select Program.cs.
-
Verify that the file contains the following using directives:
using Microsoft.AspNetCore.Authentication.OpenIdConnect; using Microsoft.Identity.Web; using Microsoft.Identity.Web.UI; -
Verify that the file contains the following lines that add the relevant authentication services to the container:
// Add services to the container. builder.Services.AddAuthentication(OpenIdConnectDefaults.AuthenticationScheme) .AddMicrosoftIdentityWebApp(builder.Configuration.GetSection("AzureAd")); -
Verify that the file contains the following lines that add a controller and Razor pages for the accounts management:
builder.Services.AddRazorPages() .AddMicrosoftIdentityUI(); -
Save and close the file.
Task 2: Test the single-tenant web app in a single-tenant scenario
-
In the Visual Studio Code window, from its top menu bar, go to Terminal menu and select New Terminal.
-
In the Terminal panel, the current path of current working directory should be F:\Allfiles\Labs\06\Starter\OIDCClient. Run the following commands to build the .NET web app:
dotnet buildNote: If there are any build errors, review the files in the Allfiles (F):\Allfiles\Labs\06\Solution\OIDCClient folder. Ignore any warning messages.
-
Run the following command to generate a self-signed certificate and configure the local computer to trust it:
dotnet dev-certs https --trust -
If prompted to install the autogenerated certificate, select Yes.
-
From the terminal prompt, run the following command to run the .NET web app:
dotnet run -
Start the Microsoft Edge browser in the InPrivate mode, and then navigate to the
https://localhost:5001URL. -
If presented with the Your connection isn’t private message, select Advanced, and then select the Continue to localhost (unsafe) link.
-
In the open browser window, when prompted, authenticate by using the UPN of the aad_lab_user1 Microsoft Entra ID account you created earlier in this lab with Pa55w.rd1234 as its password.
Note: If you are prompted with a Help us protect your account window, select Skip for now.
Note: If you are presented with the message Need admin approval, then you will need to use a Microsoft Entra ID with elevated privileges instead to complete the remainder of this task. To do so, select the link Have an admin account? Sign in with that account, sign in with an admin account, and proceed to the next step.
-
The browser window will automatically open the Permissions requested webpage.
-
Review the requested permissions, which include View your basic profile and Maintain access to data you have given it access to.
-
Select Accept.
-
Review the Welcome home page of the target site displayed by the browser and verify that the UPN of the aad_user1 Microsoft Entra ID account appears in the browser window.
-
On the Welcome page, select Sign out.
-
When prompted to select the account to sign out, select the aad_lab_user1 Microsoft Entra ID account. You’ll be automatically redirected to the Signed out page.
-
Close the Microsoft Edge browser.
Review
In this exercise, you implemented a single-tenant web app and tested it in a single-tenant Microsoft Entra environment.