Lab 05: Deploy compute workloads by using images and containers
Microsoft Azure user interface
Given the dynamic nature of Microsoft cloud tools, you might experience Azure UI changes that occur after this training content’s development. As a result, the lab instructions and lab steps might not align correctly.
Microsoft updates this training course when the community alerts us to needed changes. However, cloud updates occur frequently, so you might encounter UI changes before this training content updates. If this occurs, adapt to the changes, and then work through them in the labs as needed.
Instructions
Before you start
Sign in to the lab environment
Sign in to your Windows 11 virtual machine (VM) by using the following credentials:
- Username:
Admin - Password:
Pa55w.rd
Note: Your instructor will provide instructions to connect to the virtual lab environment.
Review the installed applications
Find the taskbar on your Windows 11 desktop. The taskbar contains the icons for the applications that you’ll use in this lab, including:
- Microsoft Edge
- File Explorer
Lab Scenario
In this lab, you will explore how to create and deploy containers to the Azure Container Registry using a .NET application and docker files. And also deploy a containerized solution to Azure Container Apps.
Architecture diagram
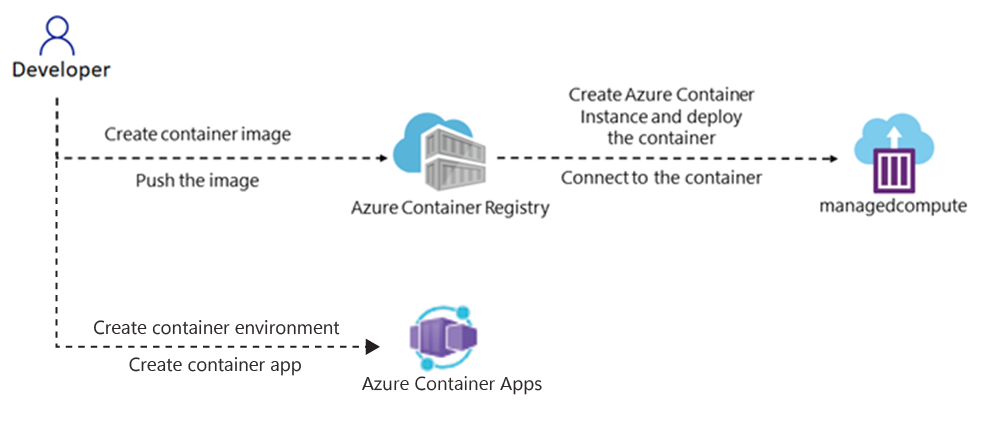
Exercise 1: Create a Docker container image and deploy it to Azure Container Registry
Task 1: Open the Azure portal
-
On the taskbar, select the Microsoft Edge icon.
-
In the open browser window, navigate to the Azure portal at
https://portal.azure.com, and then sign in with the account you’ll be using for this lab.Note: If this is your first time signing in to the Azure portal, you’ll be offered a tour of the portal. If you prefer to skip the tour, select Get Started to begin using the portal.
Task 2: Create a resource group
-
On the Azure portal’s navigation pane, use the Search resources, services, and docs text box to search for Resource group, and then in the list of results, select Resource groups.
-
On the Resource groups blade, select Create.
-
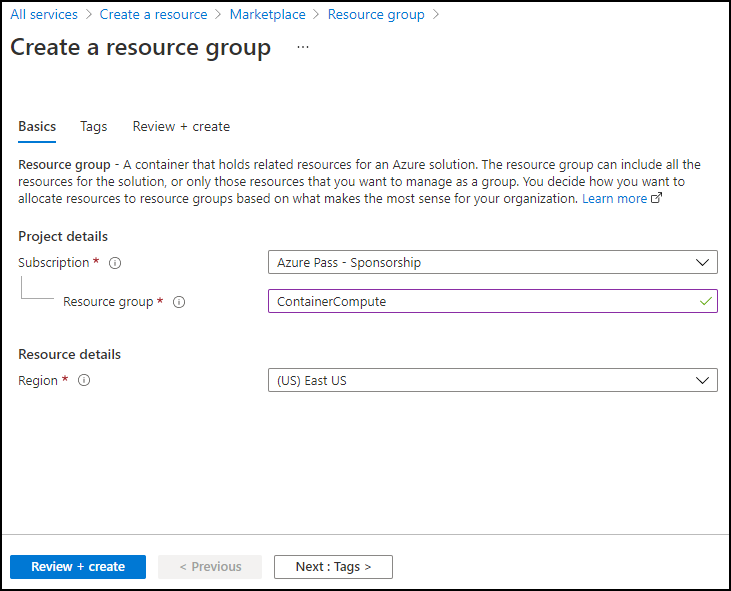
On the Create a resource group blade, on the Basics tab, perform the following actions, and then select Review + create:
Setting Action Subscription drop-down list Retain the default value Resource group text box Enter ContainerCompute Region drop-down list Select (US) East US The following screenshot displays the configured settings on the Create a resource group blade.
-
On the Review + create tab, review the options that you selected during the previous steps.
-
Select Create to create the resource group by using your specified configuration.
Note: Wait for the creation task to complete before moving forward with this lab.
Task 3: Initiate the source project
-
On the taskbar, select the Terminal icon.
-
Run the following command to change the current directory to the Allfiles (F):\Allfiles\Labs\05\Starter directory:
cd F:\Allfiles\Labs\05\Starter -
Run the following command to create a new .NET console application in the current directory using .NET 8.0:
dotnet new console --output . --name ipcheck --framework net8.0 -
Run the following command to create a new file in the current directory named Dockerfile:
New-Item -ItemType File Dockerfile -
Run the following command to open the current directory in Visual Studio Code:
code .
Task 4: Create and test a .NET application
-
On the Explorer pane of the Visual Studio Code window, open the Program.cs file.
-
Delete the entire contents of the Program.cs file.
-
Copy and paste the following code into the Program.cs file:
// Check if network is available if (System.Net.NetworkInformation.NetworkInterface.GetIsNetworkAvailable()) { System.Console.WriteLine("Current IP Addresses:"); // Get host entry for current hostname string hostname = System.Net.Dns.GetHostName(); System.Net.IPHostEntry host = System.Net.Dns.GetHostEntry(hostname); // Iterate over each IP address and render their values foreach(System.Net.IPAddress address in host.AddressList) { System.Console.WriteLine($"\t{address}"); } } else { System.Console.WriteLine("No Network Connection"); } -
Save the Program.cs file.
-
Delete the Starter.sln file.
Note: This will eliminate the need to explicitly reference the .csproj file when using dotnet commands.
-
Switch to the Terminal application.
-
Run the following command to execute the application:
dotnet run -
Review the results. At least one IP address should be listed, representing the IP address assigned to your computer.
-
Switch back to the Visual Studio Code window and, from the Explorer pane, open the Dockerfile file.
-
Copy and paste the following code into the Dockerfile file:
# Start using the .NET 8.0 SDK container image FROM mcr.microsoft.com/dotnet/sdk:8.0 AS build # Change current working directory WORKDIR /app # Copy existing files from host machine COPY . ./ # Publish application to the "out" folder RUN dotnet publish --configuration Release --output out # Start container by running application DLL ENTRYPOINT ["dotnet", "out/ipcheck.dll"] -
Save the Dockerfile file.
Note: Next, you will create an archive containing all of the project file. This will simplify upload the project files into Cloud Shell.
-
Switch to the Terminal application.
-
Run the following command to create the archive:
Compress-Archive -Path .\* -DestinationPath .\lab05.zip
Task 5: Create a Container Registry resource
-
Switch to the browser window displaying the Azure portal.
-
In the Azure portal, select the Cloud Shell icon
 to open a the Cloud Shell. If Cloud Shell defaults to a PowerShell session, select Switch to Bash in the Cloud Shell menu and then select Confirm.
Note: The Cloud Shell icon is represented by a greater than sign (>) and underscore character (_).
If this is the first time you’re starting Cloud Shell you will be presented with a Getting started prompt. Select No storage account required, then select Apply.
-
In the Cloud Shell pane, select Manage files and, in the drop-down menu, select Upload.
-
In the Open dialog box, navigate to the Allfiles (F):\Allfiles\Labs\05\Starter empty directory, select lab05.zip, and then select Open.
Note: This will upload the file to the /~ directory within the Cloud Shell session.
-
At the Cloud Shell command prompt in the portal, run the following command to create a new directory named ipcheck in the ~ directory:
mkdir ~/ipcheck -
Run the following command to extract the content of the uploaded archive to the newly created directory ~/ipcheck:
unzip ~/lab05.zip -d ~/ipcheck -
Run the following command to set the read and execute permissions on the entire extracted content in the ~/ipcheck directory:
chmod -R +xr ~/ipcheck -
Run the following command to change the current directory to ~/ipcheck:
cd ~/ipcheck -
At the Cloud Shell command prompt in the portal, run the following command to create a variable with a unique value for the Container Registry resource:
registryName=conregistry$RANDOM -
At the Cloud Shell command prompt in the portal, run the following command to verify the name created in the previous step is available:
az acr check-name --name $registryNameIf the results show the name is available, continue to the next step. If the name is not available then re-run the command in the previous step and verify availability again.
-
At the Cloud Shell command prompt in the portal, run the following command to create a Container Registry resource:
az acr create --resource-group ContainerCompute --name $registryName --sku BasicNote: Wait for the creation task to complete before you continue with this lab.
Task 6: Store Container Registry metadata
-
At the Cloud Shell command prompt in the portal, run the following command to get a list of all container registries in your subscription:
az acr list --resource-group ContainerCompute -
Run the following command, ensuring you see the name of your registry as output. If you see no output other than ‘[]’, wait a minute and try running the command again.
az acr list --resource-group ContainerCompute --query "max_by([], &creationDate).name" --output tsv -
Run the following command:
acrName=$(az acr list --resource-group ContainerCompute --query "max_by([], &creationDate).name" --output tsv) -
Run the following command:
echo $acrName
Task 7: Deploy a Docker container image to Container Registry
-
Run the following command to change the active directory from ~/ to ~/ipcheck:
cd ~/ipcheck -
Run the following command to get the contents of the current directory:
dir -
Run the following command to upload the source code to your container registry and build the container image as a Container Registry task:
az acr build --registry $acrName --image ipcheck:latest .Note: Wait for the build task to complete before moving forward with this lab.
-
Close the Cloud Shell pane in the portal.
Task 8: Validate your container image in Container Registry
-
On the Azure portal’s navigation pane, select the Resource groups link.
-
From the Resource groups blade, select the ContainerCompute resource group that you created previously in this lab.
-
From the ContainerCompute blade, select the container registry that you created previously in this lab.
-
From the Container Registry blade, in the Services section, select the Repositories link.
-
In the Repositories section, select the ipcheck container image repository, and then select the latest tag.
-
Review the metadata for the version of your container image with the latest tag.
Note: You can also select the Run ID link to find metadata about the build task.
Review
In this exercise, you created a .NET console application to display a machine’s current IP address. You then added the Dockerfile file to the application so that it could be converted into a Docker container image. Finally, you deployed the container image to Container Registry.
Exercise 2: Deploy an Azure container instance
Task 1: Enable the admin user in Container Registry
-
In the ContainerCompute resource group, select the container registry that you created previously in this lab, and then select the Access keys blade.
-
Toggle the switch in the admin user section to enable the admin user for this container registry.
Task 2: Automatically deploy a container image to an Azure container instance
-
On the Container Registry blade, in the Services section, select the Repositories link.
-
In the Repositories section, select the repository containing the ipcheck container image.
-
On the ipcheck pane, select the ellipsis menu associated with the latest tag entry, and then select Run instance.
-
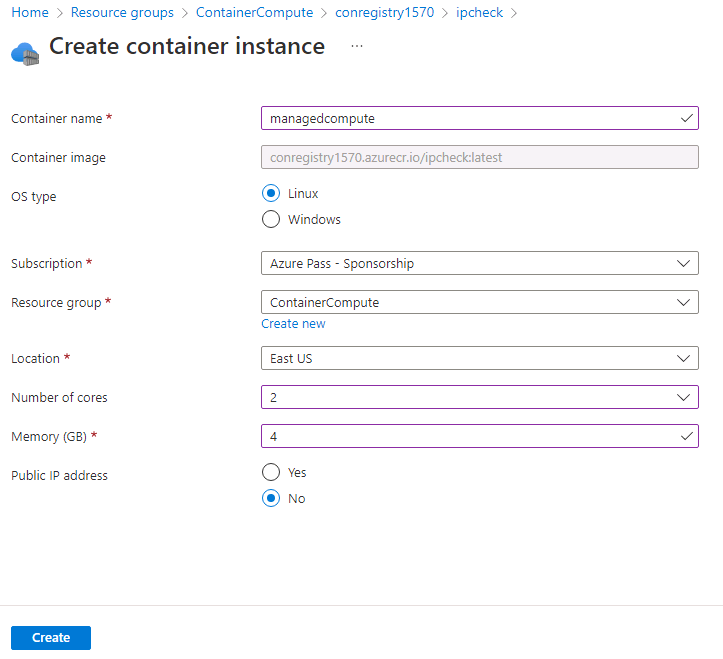
On the Create container instance blade, perform the following actions, and then select Create:
Setting Action Container name text box Enter managedcompute Container image text box Retain the default value OS type section Select Linux Subscription text box Retain the default value Resource group drop-down list Select ContainerCompute Location drop-down list Select East US Number of cores drop-down list Select 2 Memory (GB) text box Enter 4 Public IP address section Select No The following screenshot displays the configured settings on the Create container instance blade.
Note: Wait for the container instance to be created before you continue with this lab.
Task 3: Manually deploy a container image to Container Instances
-
On the Azure portal’s navigation pane, select the Create a resource link.
-
On the Create a resource blade, in the Search services and marketplace text box, enter container instances, and then select Enter.
-
On the Marketplace search results blade, select the Container Instances result.
-
On the Container Instances blade, select Create.
-
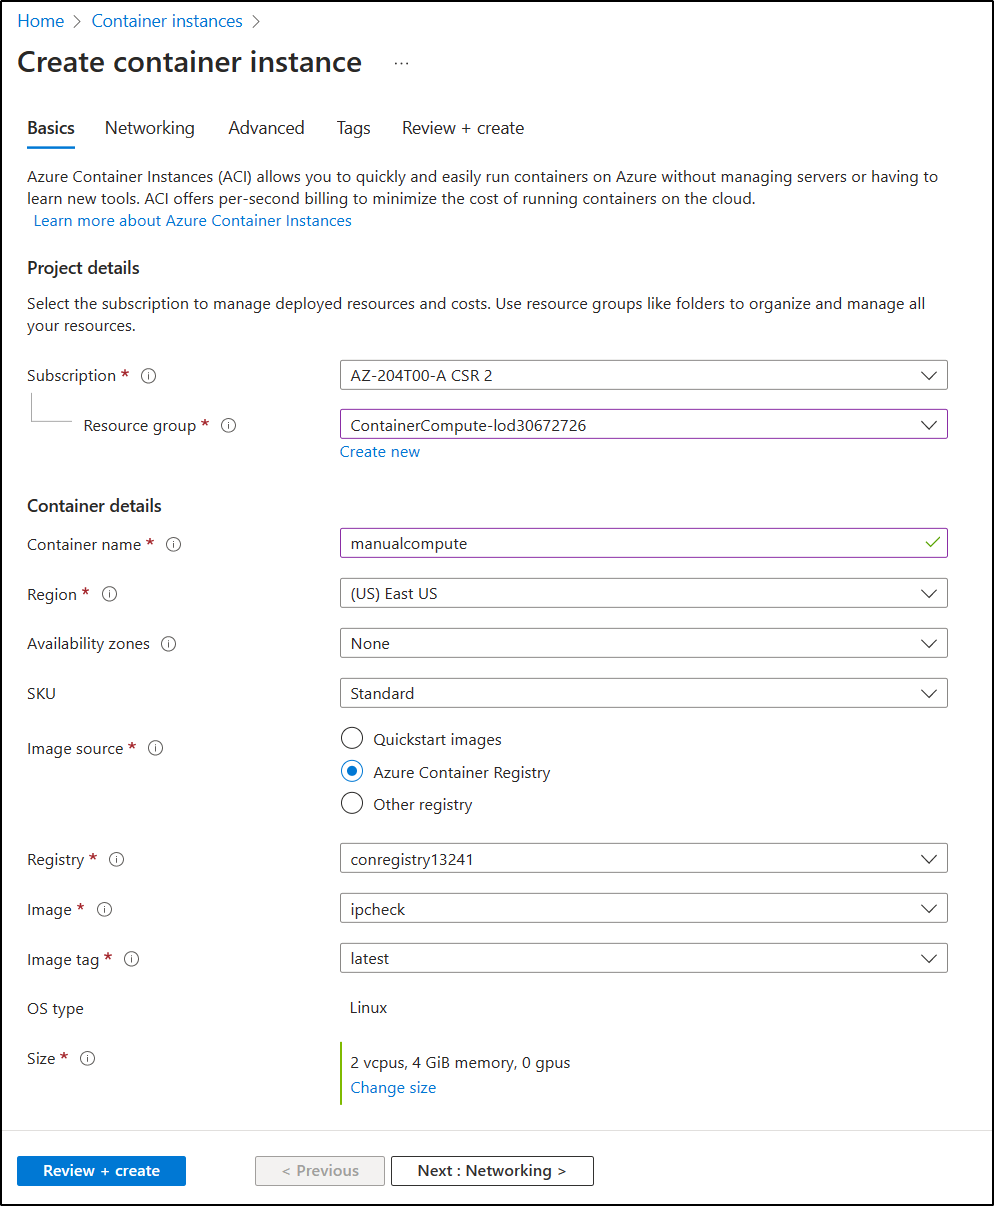
On the Create Container Instance blade, on the Basics tab, perform the following actions, and then select Review + create:
Setting Action Subscription drop-down list Retain the default value Resource group drop-down list Select ContainerCompute Container name text box Enter manualcompute Region drop-down list Select (US) East US Image source section Select Azure Container Registry Registry drop-down list Select the Azure Container Registry resource that you created previously in this lab Image drop-down list Select ipcheck Image tag drop-down list Select latest Size : cores Enter 2 Size : Memory (GiB) Enter 4 The following screenshot displays the configured settings on the Create container instance blade.
-
From the Review + create tab, review the selected options.
-
Select Create to create the container instance by using your specified configuration.
Note: Wait for the container instance to be created before you continue with this lab.
Task 4: Validate that the container instance ran successfully
-
On the Azure portal’s navigation pane, select the Resource groups link.
-
On the Resource groups blade, select the ContainerCompute resource group that you created previously in this lab.
-
On the ContainerCompute blade, select the manualcompute container instance that you created previously in this lab.
-
On the Container Instances blade, in the Settings section, select the Containers link.
-
In the Containers section, review the list of Events.
-
Select the Logs tab, and then review the text logs from the container instance.
Note: You can also optionally find the Events and Logs from the managedcompute container instance.
Note: It is possible that manualcompute and managedcompute will not contain any events at this point.
Note: After the application finishes running, the container terminates because it has completed its work. For the manually created container instance, you indicated that a successful exit was acceptable, so the container ran once. The automatically created instance didn’t offer this option, and it assumes the container should always be running, so you’ll notice repeated restarts of the container.
Review
In this exercise, you used multiple methods to deploy a container image to an Azure container instance. By using the manual method, you were able to customize the deployment further and to run task-based applications as part of a container run.
Exercise 3: Create a secure Container Apps environment and deploy container app.
Task 1: Prepare your environment
-
Sign in to the Azure portal.
-
Select the Cloud Shell icon, select the Bash environment.
-
In the Cloud Shell command prompt in the portal, run the following command to install the Azure Container Apps extension for the CLI:
az extension add --name containerapp --upgrade -
Run the following command to register the Microsoft.App namespace:
az provider register --namespace Microsoft.AppNote: Azure Container Apps resources have migrated from the Microsoft.Web namespace to the Microsoft.App namespace.
-
Run the following command to Register the Microsoft.OperationalInsights provider for the Azure Monitor Log Analytics workspace if you haven’t used it before:
az provider register --namespace Microsoft.OperationalInsightsNote: Registering the Microsoft.App namespace and Microsoft.OperationalInsights can each take a few minutes to complete.
-
Set environment variables used later in this exercise.
  myRG=ContainerCompute
  myAppContEnv=az204-env-$RANDOM
With the CLI upgraded and environment variables created, you can create a Container Apps environment and deploy your container app.
Task 2: Create an environment
An environment in Azure Container Apps creates a secure boundary around a group of container apps. Container Apps deployed to the same environment are deployed in the same virtual network and write logs to the same Log Analytics workspace.
-
In the Cloud Shell command prompt in the portal, run the following command to create an environment by using the
az containerapp envcreate command:az containerapp env create \ --name $myAppContEnv \ --resource-group $myRG \ --location eastus
Task 3: Create a container app
After the container app environment finishes deployment, you deploy a container image to Azure Container Apps.
-
In the Cloud Shell command prompt in the portal, run the following command to deploy a sample app container image by using the
az containerapp createcommand:az containerapp create \ --name my-container-app \ --resource-group $myRG \ --environment $myAppContEnv \ --image mcr.microsoft.com/azuredocs/containerapps-helloworld:latest \ --target-port 80 \ --ingress 'external' \ --query properties.configuration.ingress.fqdnBy setting
--ingresstoexternal, you make the container app available to public requests. The command returns a link to access your app. -
Select the link returned by the
az containerapp createcommand to verify the container app is running.
Review
In this exercise, you deployed a container within a secured container app environment.