Lab 04: Construct a polyglot data solution
Microsoft Azure user interface
Given the dynamic nature of Microsoft cloud tools, you might experience Azure UI changes that occur after the development of this training content. As a result, the lab instructions and lab steps might not align correctly.
Microsoft updates this training course when the community alerts us to needed changes. However, cloud updates occur frequently, so you might encounter UI changes before this training content updates. If this occurs, adapt to the changes, and then work through them in the labs as needed.
Instructions
Before you start
Sign in to the lab environment
Sign in to your Windows 11 virtual machine (VM) by using the following credentials:
- Username:
Admin - Password:
Pa55w.rd
Note: Your instructor will provide instructions to connect to the virtual lab environment.
Review the installed applications
Find the taskbar on your Windows 11 desktop. The taskbar contains the icons for the applications that you’ll use in this lab, including:
- Microsoft Edge
- File Explorer
- Visual Studio Code
Lab Scenario
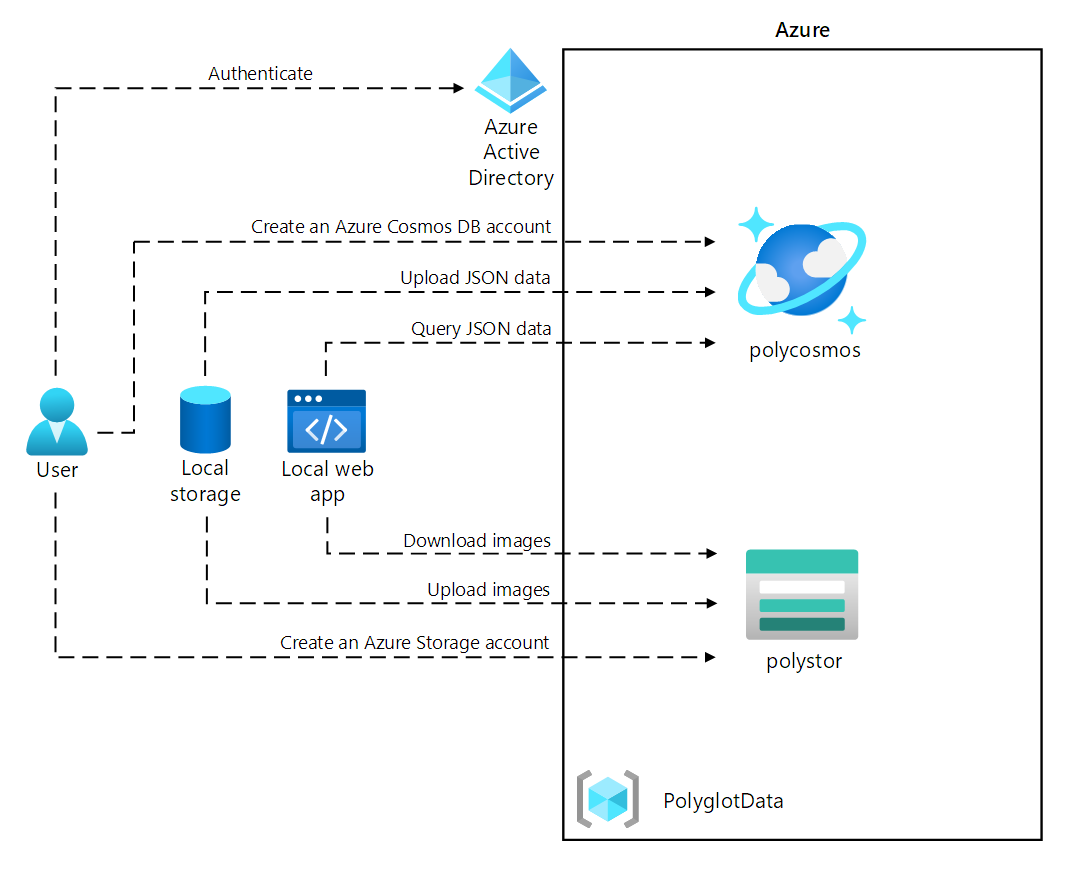
In this lab, you will create an Azure Cosmos DB resource and a storage account resource. Using C# and .NET, you will access the Cosmos DB resource and upload data into it.
Additionally, as Contoso may want to access the data in Cosmos DB through a user-friendly interface, you will implement a .NET solution that accesses and displays the data from Cosmos DB in a web browser.
Architecture diagram
Exercise 1: Creating data store resources in Azure
Task 1: Open the Azure portal
-
On the taskbar, select the Microsoft Edge icon.
-
In the open browser window, browse to the Azure portal at
https://portal.azure.com, and then sign in with the account you will be using for this lab.Note: If this is your first time signing in to the Azure portal, you’ll be offered a tour of the portal. Select Get Started to skip the tour and begin using the portal.
Task 2: Create an Azure Cosmos DB account resource
-
In the Azure portal, use the Search resources, services, and docs text box to search for Azure Cosmos DB and then in the list of results, select Azure Cosmos DB.
-
On the Azure Cosmos DB blade, select + Create.
-
On the Create an Azure Cosmos DB account blade, select Create in the Azure Cosmos DB for NoSQL box.
-
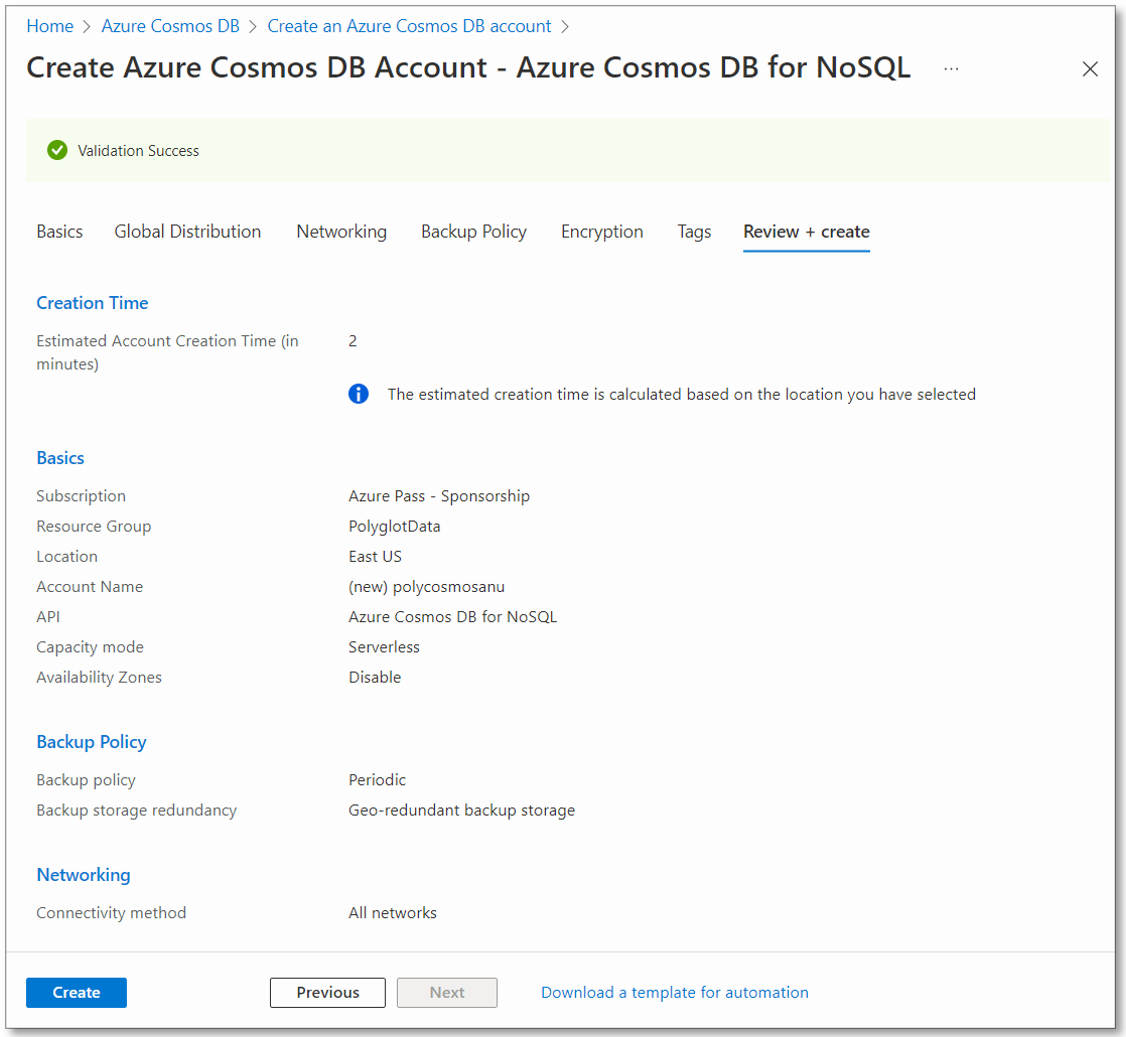
On the Basics tab of the Create Azure Cosmos DB Account - Azure Cosmos DB for NoSQL page, perform the following actions, and then select Review + create:
Setting Action Subscription list Retain defaults Resource group section Select Create new Name text box Enter Polyglotdata and select OK AccountName text box Enter polycosmos[yourname] Location drop-down list Select an Azure region that is closest to the location of your lab computer and where you can create a Cosmos DB account Capacity mode section Select Serverless The following screenshot displays the configured settings on the Create Azure Cosmos DB Account - Azure Cosmos DB for NoSQL page.
-
On the Review + create tab of the Create Azure Cosmos DB Account - Azure Cosmos DB for NoSQL page, review the options that you selected during the previous steps.
-
Select Create to create the Azure Cosmos DB account by using your specified configuration.
Note: Wait for the creation task to complete before you move forward with this lab.
-
Select Go to resource.
-
On the Azure Cosmos DB account blade, find the Settings section, and then select the Keys link.
-
In the Keys pane, on the Read-write Keys tab, record the values of the URI, PRIMARY KEY, and PRIMARY CONNECTION STRING text boxes into Notepad. You’ll use these values later in this lab.
Note: You will need to use the eye icon for Primary Key and Primary Connection String in order to be able to copy them into the clipboard.
Task 3: Create an Azure Storage account resource
-
In the Azure portal, use the Search resources, services, and docs text box to search for Storage accounts and, in the list of results, select Storage accounts.
-
On the Storage accounts blade, select + Create.
-
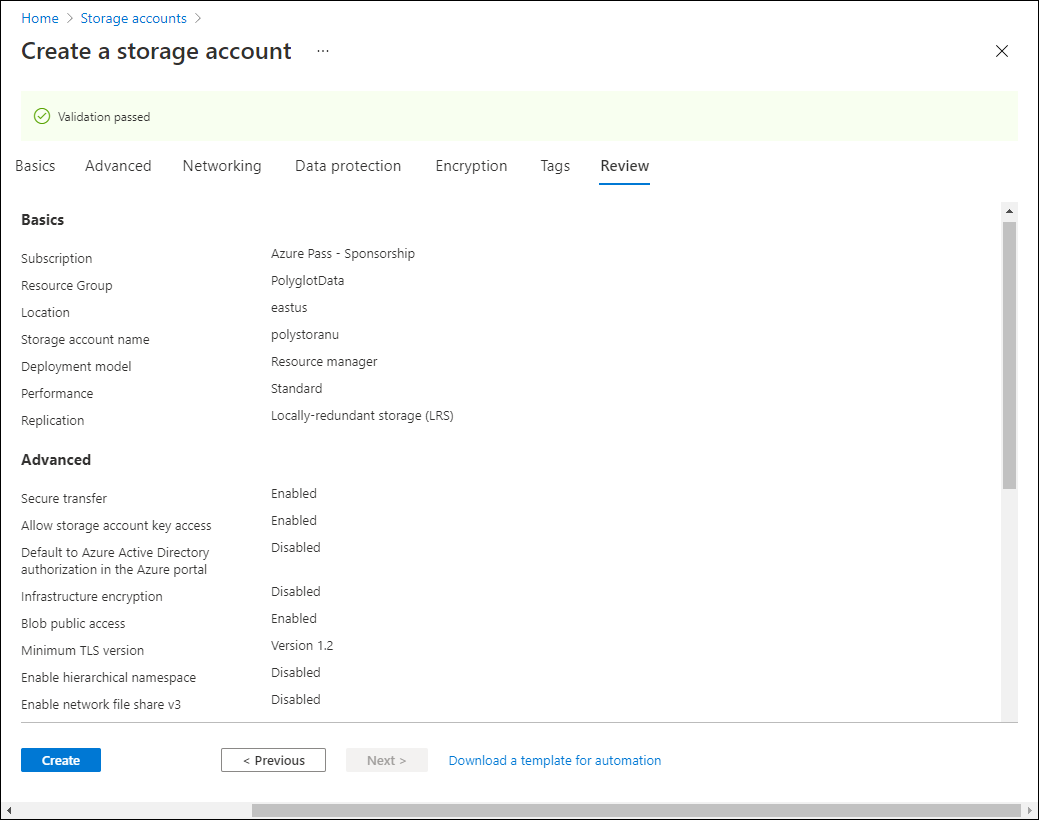
On the Basics tab of the Create a storage account blade, perform the following actions, and then select Review:
Setting Action Subscription list Retain defaults Resource group section Select PolyglotData Storage account name text box Enter polystor[yourname] Region drop-down list Select the same region where you created the Cosmos DB account earlier in this exercise Primary service No changes Performance section Select Standard Redundancy drop-down list Select Locally-redundant storage (LRS) The following screenshot displays the configured settings on the Create a storage account blade.
-
On the Review tab of the Create a storage account blade, review the options that you selected during the previous steps.
-
Select Create to create the storage account by using your specified configuration.
Note: Wait for the creation task to complete before you proceed with this lab.
Review
In this exercise, you created the Azure resources that you’ll need for the polyglot data solution you’ll implement in this lab. The Azure resources you created include an Azure Cosmos DB account and an Azure Storage account.
Exercise 2: Review and upload data
Task 1: Upload images to Azure Blob Storage
-
In the Azure portal’s navigation pane, navigate back to the Storage accounts blade, and then select the polystor[yourname] storage account that you created in this lab’s previous exercise.
-
On the polystor[yourname] storage account blade, select the Containers link in the Data storage section.
-
In the Containers section, select + Container.
-
In the New container pop-up window, perform the following actions, and then select Create:
Setting Action Name text box Enter images -
Back in the Containers section, navigate into the newly created images container.
-
Find the Settings section on the Container blade, and then select the Properties link.
-
In the Properties pane, note and record the value in the URL text box into Notepad. You’ll use this value later in this lab.
-
Click on Shared access tokens next and generate an access token with the default settings by clicking Generate SAS token and URL. Record the value of the Blob SAS token into Notepad, you will need this later.
Note: You should now have 5 values in Notepad. The URI, Pimary Key and Primary Connection String for your Cosmos DB account. Then the URL and SAS Token for your Blob container.
- Find and select the Overview link on the blade.
-
On the blade, select Upload.
-
In the Upload blob pop-up, perform the following actions:
a. In the Files section, select Browse for files or use the drag and drop feature.
b. In the File Explorer window, browse to Allfiles (F):\Allfiles\Labs\04\Starter\Images, select all 42 individual .jpg image files, and then select Open.
c. Ensure that Overwrite if files already exist is selected, and then select Upload.
Note: Wait for all blobs to upload before you continue with this lab.
Task 2: Review JSON data
-
From the lab computer, start Visual Studio Code.
-
From the File menu, select Open File, browse to Allfiles (F):\Allfiles\Labs\04\Starter\AdventureWorks\AdventureWorks.Upload, select models.json, and then select Open.
-
Review the format of the models.json file and note that it contains an array of JSON objects, with a nested array of objects that are part of the Products property.
Note: This will determine the classes you’ll define to deserialize the JSON file’s contents before uploading it to a Cosmos DB collection.
-
Within the models.json file, note that one of the properties is named Category.
Note: You’ll use the Category property to define partitioning of the target Cosmos DB collection.
-
Close Visual Studio Code.
Task 3: Create a Cosmos DB database and collection, and perform a JSON data upload
-
On the Start screen, select the Visual Studio Code tile.
-
From the File menu, select Open Folder.
-
In the File Explorer window that opens, browse to Allfiles (F):\Allfiles\Labs\04\Starter\AdventureWorks, and then select Select Folder.
-
In the Visual Studio Code window, on the Menu Bar, select Terminal and then select New Terminal.
-
In the terminal, verify that the current directory is set to AdventureWorks (or change it to that if it’s not), and then run the following command to switch your terminal context to the AdventureWorks.Upload folder:
cd .\AdventureWorks.Upload\Note: Before you perform the next step, open Windows Explorer and remove the Read-only attribute from the file Allfiles (F):\Allfiles\Labs\04\Starter\AdventureWorks\AdventureWorks.Upload\AdventureWorks.Upload.csproj
-
From the terminal prompt, run the following command to add the Azure Cosmos DB .NET client library to the currently opened project:
Note: Before proceeding with the following command, kindly ensure that you are presently positioned at this path: (F):\Allfiles\Labs\04\Starter\AdventureWorks\AdventureWorks.Upload\
dotnet add package Microsoft.Azure.Cosmos --version 3.28.0Note: The dotnet add package command will add the Microsoft.Azure.Cosmos package from NuGet. For more information, refer to Microsoft.Azure.Cosmos.
-
Observe the results of the build printed in the terminal. The build should complete successfully with no errors or warning messages.
-
In the Explorer pane of the Visual Studio Code window, expand the AdventureWorks.Upload project.
-
Open the Program.cs file.
-
In the Program.cs file, review the using directives and note that they include Microsoft.Azure.Cosmos, System.IO;, System.Text.Json, System.Threading.Tasks, and System.Collections.Generic. This enables asynchronous upload of JSON items from a local file on your lab computer to a collection in a Cosmos DB database.
-
In the Program.cs file, on line 14, set the value of EndpointUrl by replacing the empty string with the URI property of the Cosmos DB account that you recorded earlier in this lab. Ensure that the value is enclosed in double quotes. This is the first value you recorded in Notepad.
-
On line 15, set the value of AuthorizationKey by replacing the empty string with the PRIMARY KEY property of the Cosmos DB account that you recorded earlier in this lab. Ensure that the value is enclosed in double quotes. This is the second value you recorded in Notepad.
-
On line 18, set the value of PartitionKey by replacing the empty string with “/Category”.
Note: You need to select the two quotation characters so you overwrite them.
-
On line 19, set the value of JsonFilePath by replacing the empty string with “F:\\Allfiles\\Labs\\04\\Starter\\AdventureWorks\\AdventureWorks.Upload\\models.json”.
Note: You need to select the two quotation characters so you overwrite them.
-
Within the try block, note the invocation of the CreateDatabaseIfNotExistsAsync method of the CosmosClient class. This will create a database if one doesn’t already exist.
-
Note the invocation of the DefineContainer method of the Database class. This will create a container that will host the JSON items if one doesn’t already exist.
Note: The DefineContainer method includes a cost-minimizing option whereby you can modify the default indexing policy (which automatically indexes all attributes).
-
Note the using statement that relies on a StreamReader object to read JSON items from a text file and deserializes them into objects of the Model class defined further in the Program.cs file.
-
Note the foreach loop that iterates over the collection of deserialized objects and asynchronously inserts each of them into the target collection.
-
Review the Model and Product classes that reflect the format of the objects stored in the JSON-formatted file you reviewed earlier in this lab.
-
Save and close the Program.cs file.
Note: Select Overwrite if you received a prompt that the file is read-only.
-
In terminal, run the following command to restore any missing NuGet packages and build the project in the folder:
dotnet buildNote: The dotnet build command will automatically restore any missing NuGet packages prior to building all projects in the folder.
-
From the terminal prompt, run the following command to run the .NET Core console application:
dotnet runNote: The dotnet run command will automatically build any changes to the project and then start the web application without a debugger attached. The command will output the messages indicating the data load’s progress, including the number of items inserted into the target collection and the duration of the insert operation.
-
Observe the results of running the command printed in the terminal. The run should complete successfully, displaying the message about there being 119 items inserted into the target Cosmos DB collection.
-
Select Kill Terminal (the Recycle Bin icon) to close the terminal pane and any associated processes.
Task 4: Validate JSON data upload
-
On your lab computer, switch to the Microsoft Edge browser window displaying the Azure portal.
-
In the Azure portal, select the Search resources, services, and docs text box, in the Recent resources list, select the polycosmos[yourname] Azure Cosmos DB account that you created earlier in this lab.
-
On the Azure Cosmos DB account blade, find and select the Data Explorer link on the blade.
-
In the Data Explorer pane, expand the Retail database node.
-
Expand the Online container node, and then select New SQL Query.
Note: The label for this option might be hidden. You can display labels by hovering over the icons in the Data Explorer pane.
-
On the query tab, enter the following text:
SELECT * FROM models -
Select Execute Query, and then observe the list of JSON items returned by the query.
-
Back in the query editor, replace the existing text with the following text:
SELECT VALUE COUNT(1) FROM models -
Select Execute Query, and then observe the result of the COUNT aggregate operation. It should output 119, which matches the number of items inserted.
-
Switch back to the Visual Studio Code window.
Review
In this exercise, you used the .NET SDK for Azure Cosmos DB to insert data into Azure Cosmos DB. The web application that you implement next will use this data.
Exercise 3: Configure a .NET web application
Task 1: Update references to data stores and build the web application
-
In the Explorer pane of the Visual Studio Code window, expand the AdventureWorks.Web project.
-
Open the appsettings.json file.
-
In the JSON object on line 3, find the ConnectionStrings.AdventureWorksCosmosContext path. Note that the current value is empty:
"ConnectionStrings": { "AdventureWorksCosmosContext": "", }, -
Update the value of the AdventureWorksCosmosContext property by setting its value to the PRIMARY CONNECTION STRING of the Azure Cosmos DB account that you recorded earlier in this lab. This is the third value you recorded in Notepad.
-
In the JSON object on line 6, find the Settings.BlobContainerUrl property. Note that the current value is empty:
"Settings": { "BlobContainerUrl": "", "BlobSASToken": "" } -
Update the BlobContainerUrl and BlobSASToken properties by setting their value to the URL property of the Azure Storage blob container named images and the blob SAS token value that you recorded earlier in this lab accordingly. These were the fourth and fifth values you recorded in Notepad.
-
Save the appsettings.json file and close it.
Note: Select Overwrite if you received a prompt that the file is read-only.
-
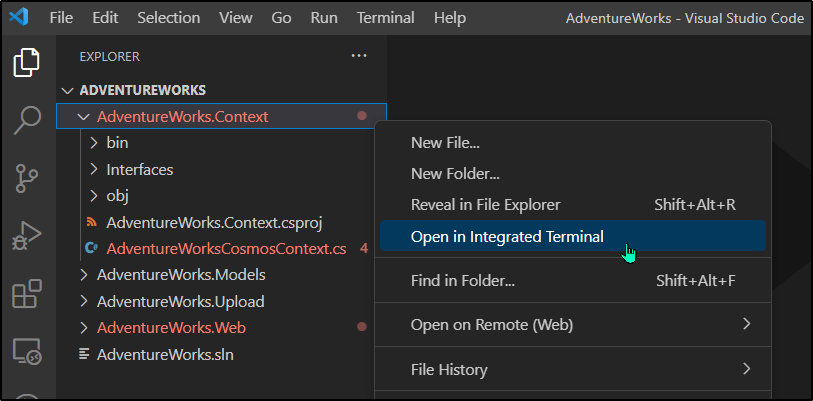
In the Visual Studio Code window, right click on AdventureWorks.Context folder in the explorer pane, and then select Open in Integrated Terminal.
Note:Before you perform the next step, open Windows Explorer and remove the Read-only attribute from the file Allfiles (F):\Allfiles\Labs\04\Starter\AdventureWorks\AdventureWorks.Context\AdventureWorks.Context.csproj
-
From the terminal prompt, verify that the current directory is set to AdventureWorks.Context (or change it to that if it’s not), and then run the following command to import Microsoft.Azure.Cosmos from NuGet:
Note: Before proceeding with the following command, kindly ensure that you are presently positioned at this path: (F):\Allfiles\Labs\04\Starter\AdventureWorks\AdventureWorks.Context\
dotnet add package Microsoft.Azure.Cosmos --version 3.28.0 -
From the terminal prompt, run the following command to build the AdventureWorks.Context project:
dotnet build -
Observe the results of the build printed in the terminal. The build should complete successfully with no errors or warning messages.
Task 2: Configure connectivity to Azure Cosmos DB
-
In the Explorer pane of the Visual Studio Code window, expand the AdventureWorks.Context project.
-
From the shortcut menu of the AdventureWorks.Context folder node, select New File.
-
At the new file prompt, enter AdventureWorksCosmosContext.cs.
-
From the code editor tab for the AdventureWorksCosmosContext.cs file, add the following code:
using AdventureWorks.Models; using Microsoft.Azure.Cosmos; using Microsoft.Azure.Cosmos.Linq; using System; using System.Collections.Generic; using System.Linq; using System.Threading.Tasks; namespace AdventureWorks.Context { /* AdventureWorksCosmosContext class will implement the IAdventureWorksProductContext interface */ public class AdventureWorksCosmosContext : IAdventureWorksProductContext { /* Create a new read-only Container variable named _container */ private readonly Container _container; public AdventureWorksCosmosContext(string connectionString, string database = "Retail", string container = "Online") { /* Create a new instance of the CosmosClient class, and then obtain both a Database and Container instance from the client */ _container = new CosmosClient(connectionString) .GetDatabase(database) .GetContainer(container); } public async Task<Model> FindModelAsync(Guid id) { /* Create a LINQ query, transform it into an iterator, iterate over the result set, and then return the single item in the result set */ var iterator = _container.GetItemLinqQueryable<Model>() .Where(m => m.id == id).ToFeedIterator<Model>(); List<Model> matches = new List<Model>(); while (iterator.HasMoreResults) { var next = await iterator.ReadNextAsync(); matches.AddRange(next); } return matches.SingleOrDefault(); } public async Task<List<Model>> GetModelsAsync() { /* Run an SQL query, get the query result iterator, iterate over the result set, and then return the union of all results */ string query = $@"SELECT * FROM items"; var iterator = _container.GetItemQueryIterator<Model>(query); List<Model> matches = new List<Model>(); while (iterator.HasMoreResults) { var next = await iterator.ReadNextAsync(); matches.AddRange(next); } return matches; } public async Task<Product> FindProductAsync(Guid id) { /* Run an SQL query, get the query result iterator, iterate over the result set, and then return the single item in the result set */ string query = $@"SELECT VALUE products FROM models JOIN products in models.Products WHERE products.id = '{id}'"; var iterator = _container.GetItemQueryIterator<Product>(query); List<Product> matches = new List<Product>(); while (iterator.HasMoreResults) { var next = await iterator.ReadNextAsync(); matches.AddRange(next); } return matches.SingleOrDefault(); } } } - Save and close the AdventureWorksCosmosContext.cs file.
-
From the terminal prompt, with the current directory set to AdventureWorks.Context, run the following command to build the .NET web application:
dotnet buildNote: If there are any build errors, review the AdventureWorksCosmosContext.cs file in the Allfiles > (F):\Allfiles\Labs\04\Solution\AdventureWorks\AdventureWorks.Context folder.
Task 3: Review the .NET application startup logic
-
In the Explorer pane of the Visual Studio Code window, expand the AdventureWorks.Web project.
-
Open the Startup.cs file.
-
In the Startup class, note the existing ConfigureProductService method:
public void ConfigureProductService(IServiceCollection services) { services.AddScoped<IAdventureWorksProductContext, AdventureWorksCosmosContext>(provider => new AdventureWorksCosmosContext( _configuration.GetConnectionString(nameof(AdventureWorksCosmosContext)) ) ); }Note: The product service uses Cosmos DB as its database.
-
Close the Startup.cs file without making any modifications.
Task 4: Validate that the .NET application successfully connects to data stores
-
In Visual Studio Code, from the terminal prompt, run the following command to switch your terminal context to the AdventureWorks.Web folder:
cd ..\AdventureWorks.Web\ -
From the terminal prompt, run the following command to run the ASP.NET web application:
Note: Before proceeding with the following command, kindly ensure that you are presently positioned at this path: (F):\Allfiles\Labs\04\Starter\AdventureWorks\AdventureWorks.Web\
dotnet runNote: The dotnet run command will automatically build any changes to the project and then start the web application without a debugger attached. The command will output the URL of the running application and any assigned ports.
-
On the taskbar, select the Microsoft Edge icon.
-
In the open browser window, browse to the currently running web application (http://localhost:5000).
-
In the web application, observe the list of models displayed from the front page.
-
Find the Touring-1000 model, and then select View Details.
-
On the Touring-1000 product detail page, review the listing of options.
-
Close the browser window displaying your web application.
-
Switch to the Visual Studio Code window, and then select Kill Terminal (the Recycle Bin icon) to close the currently open terminal and any associated processes.
Review
In this exercise, you wrote C# code to query an Azure Cosmos DB collection by using the .NET SDK.