Lab 03: Retrieve Azure Storage resources and metadata by using the Azure Storage SDK for .NET
Microsoft Azure user interface
Given the dynamic nature of Microsoft cloud tools, you might experience Azure user interface (UI) changes that occur after the development of this training content. As a result, the lab instructions and lab steps might not align correctly.
Microsoft updates this training course when the community alerts us to needed changes. However, cloud updates occur frequently, so you might encounter UI changes before this training content updates. If this occurs, adapt to the changes, and then work through them in the labs as needed.
Instructions
Before you start
Sign in to the lab environment
Sign in to your Windows 11 virtual machine (VM) by using the following credentials:
- Username:
Admin - Password:
Pa55w.rd
Note: Your instructor will provide instructions to connect to the virtual lab environment.
Review the installed applications
Find the taskbar on your Windows 11 desktop. The taskbar contains the icons for the applications that you’ll use in this lab, including:
- Microsoft Edge
- File Explorer
Lab Scenario
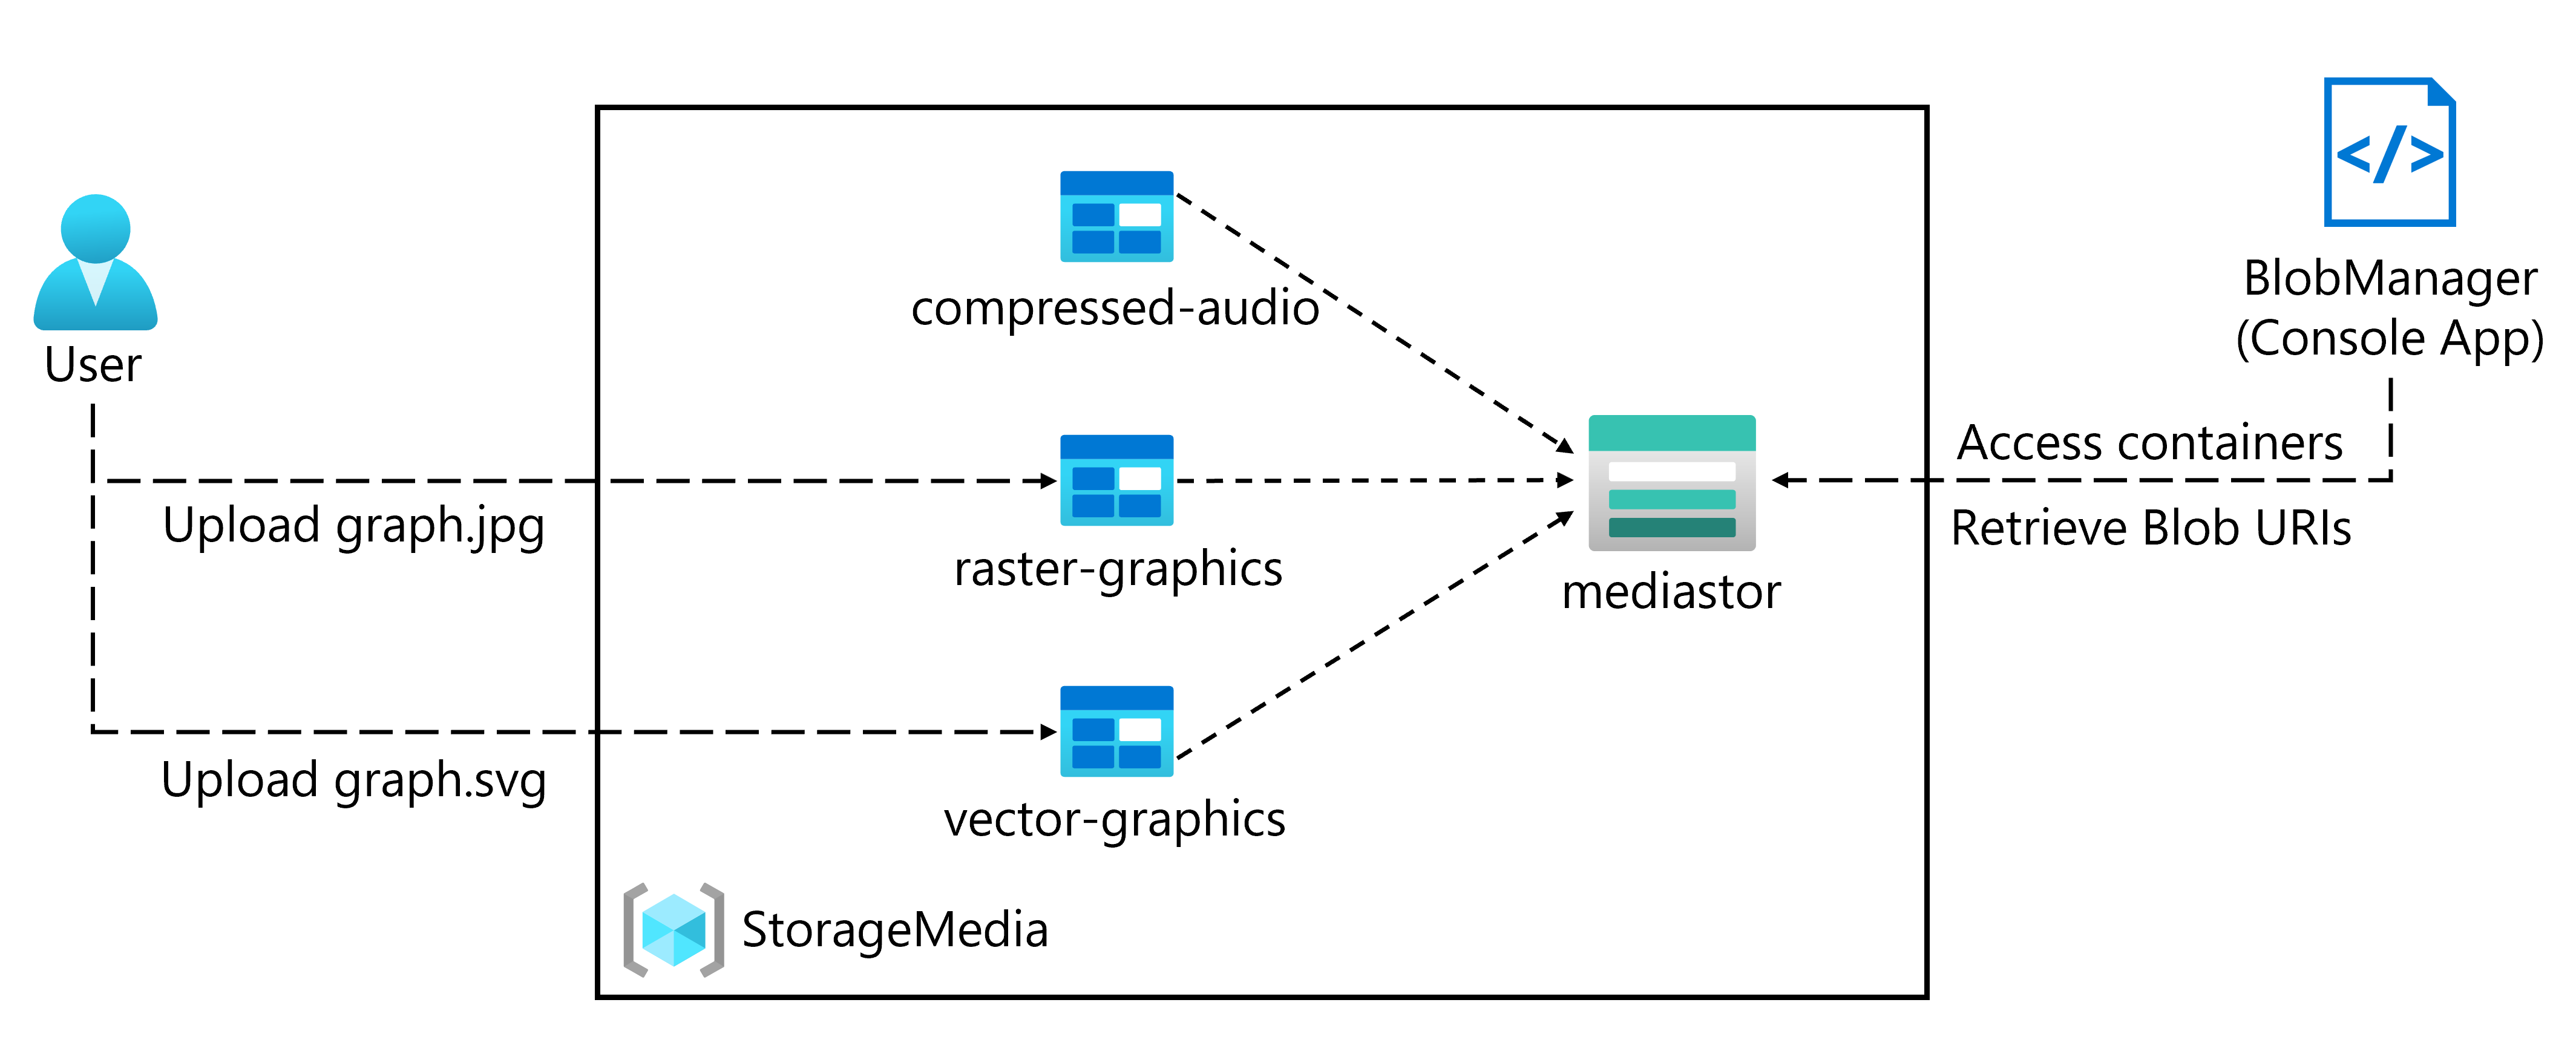
In this lab, you will learn how to use the Azure Storage SDK to access Azure Storage containers within a C# application. You will also learn how to access metadata and expose URI information to gain access to the contents of the containers in the storage account.
View this video by right-clicking this video link and select ‘Open link in a new tab / new window’.

Architecture diagram
Exercise 1: Create Azure resources
Task 1: Open the Azure portal
-
On the taskbar, select the Microsoft Edge icon.
-
In the browser window, browse to the Azure portal at
https://portal.azure.com, and then sign in with the account you’ll be using for this lab.Note: If this is your first time signing in to the Azure portal, you’ll be offered a tour of the portal. Select Get Started to skip the tour and begin using the portal.
Task 2: Create a Storage account
-
In the Azure portal, use the Search resources, services, and docs text box to search for Storage Accounts, and then in the list of results, select Storage Accounts.
-
On the Storage accounts blade, select + Create.
-
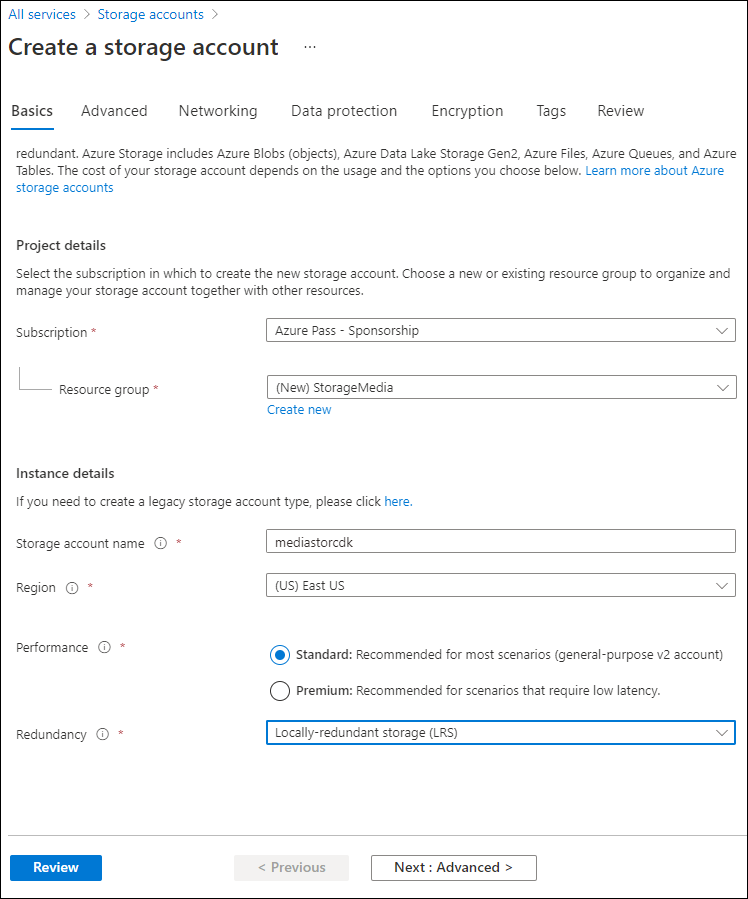
On the Create a storage account blade, on the Basics tab, perform the following actions, and then select Next: Advanced:
Setting Action Subscription drop-down list Retain the default value Resource group section Select Create new, enter StorageMedia, and then select OK Storage account name text box Enter mediastor[yourname] Region drop-down list Select (US) East US Primary service No changes Performance section Select the Standard option Redundancy drop-down list select Locally-redundant storage (LRS) The following screenshot displays the configured settings on the Create a storage account blade.
-
On the Advanced tab, ensure Allow enabling anonymous access on individual containers is checked. Check the setting if it is not enabled, and then select Review.
-
On the Review tab, review the options that you selected during the previous steps.
-
Select Create to create the storage account by using your specified configuration.
Note: Wait for the creation task to complete before you move forward with this lab.
-
Select Go to resource.
-
On the Storage account blade, in the Settings section, select the Endpoints link.
-
In the Endpoints section, copy the value of the Blob Service text box to the clipboard.
Note: You’ll use this endpoint value later in the lab.
-
Open Notepad, and then paste the copied blob service value to Notepad.
-
On the Storage account blade, in the Security + networking section, select Access keys.
-
Copy the Storage account name value to the clipboard and then paste it into Notepad.
-
On the Access keys blade, select Show for either one of the Key text boxes. It does not matter which you use, they are interchangeable.
-
Review any one of the keys, and then copy the value of either of the Key boxes to the clipboard and then paste it into Notepad.
Note: You’ll use all these values later in this lab.
Review
In this exercise, you created a new Storage account to use throughout the remainder of the lab.
Exercise 2: Upload a blob into a container
Task 1: Create storage account containers
-
On the Storage account blade, select the Containers link in the Data storage section.
-
In the Containers section, select + Container.
-
In the New container pop-up window, perform the following actions, and then select Create:
Setting Action Name text box Enter raster-graphics Public access level drop-down list Select Private (no anonymous access) -
In the Containers section, select + Container.
-
In the New container pop-up window, perform the following actions and then select Create:
Setting Action Name text box Enter compressed-audio Public access level drop-down list Select Private (no anonymous access) -
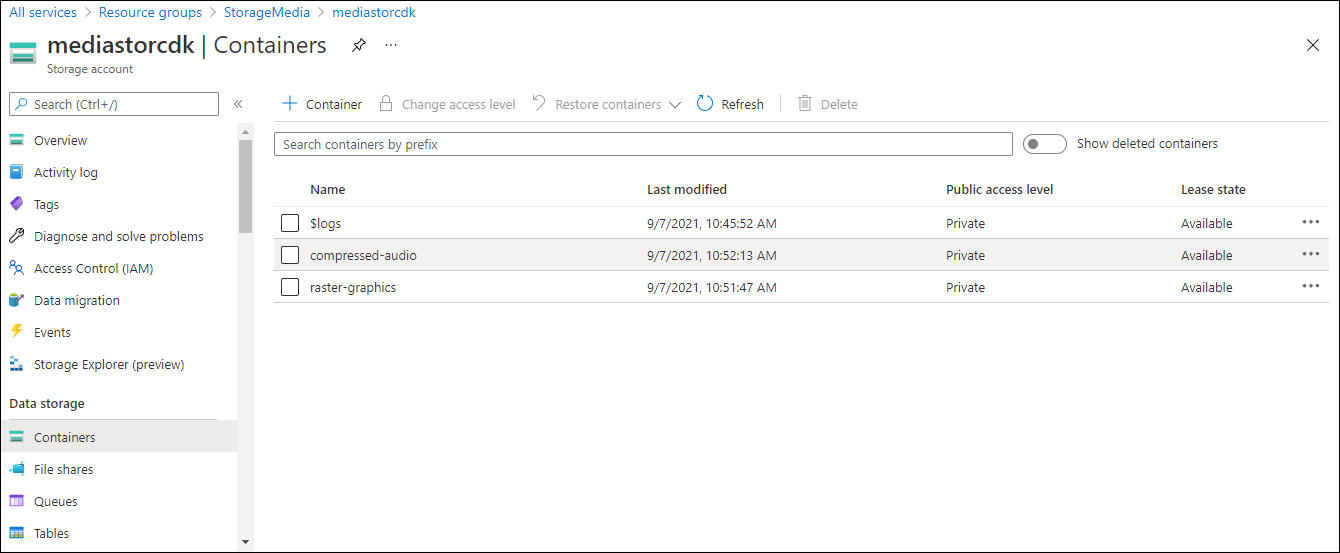
In the Containers section, observe the updated list of containers.
The following screenshot displays the configured settings on the Create a storage account blade.
Task 2: Upload a storage account blob
-
In the Containers section, select the recently created raster-graphics container.
-
On the Container blade, select Upload.
-
In the Upload blob window, perform the following actions, and then select Upload:
| Setting | Action |
|---|---|
| Files section | Select Browse for files or use the drag and drop feature |
| File Explorer window | Browse to Allfiles (F):\Allfiles\Labs\03\Starter\Images, select the graph.jpg file, and then select Open |
| Overwrite if files already exist check box | Ensure that the check box is selected |
Note: Wait for the blob to upload before you continue with this lab.
Review
In this exercise, you created placeholder containers in the Storage account, and then populated one of the containers with a blob.
Exercise 3: Access containers by using the .NET SDK
Task 1: Create .NET project
-
On the Start screen, select the Visual Studio Code tile.
-
On the File menu, select Open Folder, browse to Allfiles (F):\Allfiles\Labs\03\Starter\BlobManager, and then select Select Folder.
-
In the Visual Studio Code window, on the Menu Bar, select Terminal and then select New Terminal.
-
In the terminal, run the following command to create a new .NET project named BlobManager in the current folder:
dotnet new console --framework net8.0 --name BlobManager --output .Note: The dotnet new command will create a new console project in a folder with the same name as the project.
-
In the terminal, run the following command to import version 12.18.0 of Azure.Storage.Blobs from NuGet:
dotnet add package Azure.Storage.Blobs --version 12.18.0Note: The dotnet add package command will add the Azure.Storage.Blobs package from NuGet. For more information, refer to Azure.Storage.Blobs.
-
In the terminal, run the following command to build the .NET web application:
dotnet build -
Select Kill Terminal or the Recycle Bin icon to close the currently open terminal and any associated processes.
Task 2: Modify the Program class to access Storage
-
On the Explorer pane of the Visual Studio Code window, open the Program.cs file.
-
On the code editor tab for the Program.cs file, delete all the code in the existing file.
-
Add the following code:
using Azure.Storage; using Azure.Storage.Blobs; using Azure.Storage.Blobs.Models; using System; using System.Threading.Tasks; public class Program { //Update the blobServiceEndpoint value that you recorded previously in this lab. private const string blobServiceEndpoint = "<primary-blob-service-endpoint>"; //Update the storageAccountName value that you recorded previously in this lab. private const string storageAccountName = "<storage-account-name>"; //Update the storageAccountKey value that you recorded previously in this lab. private const string storageAccountKey = "<key>"; //The following code to create a new asynchronous Main method public static async Task Main(string[] args) { } } -
Update the blobServiceEndpoint string constant by setting its value to the Primary Blob Service Endpoint of the storage account that you recorded previously in this lab.
-
Update the storageAccountName string constant by setting its value to the Storage account name of the storage account that you recorded previously in this lab.
-
Update the storageAccountKey string constant by setting its value to the Key of the storage account that you recorded previously in this lab.
Task 3: Connect to the Azure Storage blob service endpoint
-
In the Main method, add the following code:
public static async Task Main(string[] args) { //The following line of code to create a new instance of the StorageSharedKeyCredential class by using the storageAccountName and storageAccountKey constants as constructor parameters StorageSharedKeyCredential accountCredentials = new StorageSharedKeyCredential(storageAccountName, storageAccountKey); //The following line of code to create a new instance of the BlobServiceClient class by using the blobServiceEndpoint constant and the accountCredentials variable as constructor parameters BlobServiceClient serviceClient = new BlobServiceClient(new Uri(blobServiceEndpoint), accountCredentials); //The following line of code to invoke the GetAccountInfoAsync method of the BlobServiceClient class to retrieve account metadata from the service AccountInfo info = await serviceClient.GetAccountInfoAsync(); //Render a welcome message await Console.Out.WriteLineAsync($"Connected to Azure Storage Account"); //Render the storage account's name await Console.Out.WriteLineAsync($"Account name:\t{storageAccountName}"); //Render the type of storage account await Console.Out.WriteLineAsync($"Account kind:\t{info?.AccountKind}"); //Render the currently selected stock keeping unit (SKU) for the storage account await Console.Out.WriteLineAsync($"Account sku:\t{info?.SkuName}"); } -
Save the Program.cs file.
-
In the Visual Studio Code window, on the Menu Bar, select Terminal and then select New Terminal.
-
In the terminal, run the following command to run the .NET web application:
dotnet runNote: If there are any build errors, review the Program.cs file in the Allfiles (F):\Allfiles\Labs\03\Solution\BlobManager folder.
-
Observe the output from the currently running console application. The output contains metadata for the storage account that was retrieved from the service.
-
Select Kill Terminal or the Recycle Bin icon to close the currently open terminal and any associated processes.
Task 4: Enumerate the existing containers
-
In the Program class, enter the following code to create a new private static method named EnumerateContainersAsync, that’s asynchronous and has a single BlobServiceClient parameter type:
private static async Task EnumerateContainersAsync(BlobServiceClient client) { /*Create an asynchronous foreach loop that iterates over the results of an invocation of the GetBlobContainersAsync method of the BlobServiceClient class. */ await foreach (BlobContainerItem container in client.GetBlobContainersAsync()) { //Print the name of each container await Console.Out.WriteLineAsync($"Container:\t{container.Name}"); } } -
In the Main method, enter the following code at the end of the method to invoke the EnumerateContainersAsync method, passing in the serviceClient variable as a parameter:
await EnumerateContainersAsync(serviceClient); - Observe the Program.cs file, which should now include:
using Azure.Storage; using Azure.Storage.Blobs; using Azure.Storage.Blobs.Models; using System; using System.Threading.Tasks; public class Program { private const string blobServiceEndpoint = "your blobServiceEndpoint"; private const string storageAccountName = "your storageAccountName"; private const string storageAccountKey = "your storageAccountKey"; public static async Task Main(string[] args) { StorageSharedKeyCredential accountCredentials = new StorageSharedKeyCredential(storageAccountName, storageAccountKey); BlobServiceClient serviceClient = new BlobServiceClient(new Uri(blobServiceEndpoint), accountCredentials); AccountInfo info = await serviceClient.GetAccountInfoAsync(); await Console.Out.WriteLineAsync($"Connected to Azure Storage Account"); await Console.Out.WriteLineAsync($"Account name:\t{storageAccountName}"); await Console.Out.WriteLineAsync($"Account kind:\t{info?.AccountKind}"); await Console.Out.WriteLineAsync($"Account sku:\t{info?.SkuName}"); /* To invoke the EnumerateContainersAsync method, passing in the serviceClient variable as a parameter */ await EnumerateContainersAsync(serviceClient); } private static async Task EnumerateContainersAsync(BlobServiceClient client) { await foreach (BlobContainerItem container in client.GetBlobContainersAsync()) { await Console.Out.WriteLineAsync($"Container:\t{container.Name}"); } } } -
Save the Program.cs file.
-
In the Visual Studio Code window, on the Menu Bar, select Terminal and then select New Terminal.
-
In the terminal, run the following command to run the .NET web application:
dotnet runNote: If there are any build errors, review the Program.cs file in the Allfiles (F):\Allfiles\Labs\03\Solution\BlobManager folder.
-
Observe the output from the currently running console application. The updated output includes a list of every existing container in the account.
- Select Kill Terminal or the Recycle Bin icon to close the currently open terminal and any associated processes.
Review
In this exercise, you accessed existing containers by using the Azure Storage SDK.
Exercise 4: Retrieve blob Uniform Resource Identifiers (URIs) by using the .NET SDK
Task 1: Enumerate the blobs in an existing container by using the SDK
-
In the Program class, enter the following code to create a new private static method named EnumerateBlobsAsync that’s asynchronous and has two parameter types, BlobServiceClient and string:
private static async Task EnumerateBlobsAsync(BlobServiceClient client, string containerName) { /* Get a new instance of the BlobContainerClient class by using the GetBlobContainerClient method of the BlobServiceClient class, passing in the containerName parameter */ BlobContainerClient container = client.GetBlobContainerClient(containerName); /* Render the name of the container that will be enumerated */ await Console.Out.WriteLineAsync($"Searching:\t{container.Name}"); /* Create an asynchronous foreach loop that iterates over the results of an invocation of the GetBlobsAsync method of the BlobContainerClient class */ await foreach (BlobItem blob in container.GetBlobsAsync()) { //Print the name of each blob await Console.Out.WriteLineAsync($"Existing Blob:\t{blob.Name}"); } } -
In the Main method, enter the following code at the end of the method to create a variable named existingContainerName with a value of raster-graphics:
string existingContainerName = "raster-graphics"; -
In the Main method, enter the following code at the end of the method to invoke the EnumerateBlobsAsync method, passing in the serviceClient and existingContainerName variables as parameters:
await EnumerateBlobsAsync(serviceClient, existingContainerName); - Observe the Program.cs file, which should now include:
using Azure.Storage; using Azure.Storage.Blobs; using Azure.Storage.Blobs.Models; using System; using System.Threading.Tasks; public class Program { private const string blobServiceEndpoint = "your blobServiceEndpoint"; private const string storageAccountName = "your storageAccountName"; private const string storageAccountKey = "your storageAccountKey"; public static async Task Main(string[] args) { StorageSharedKeyCredential accountCredentials = new StorageSharedKeyCredential(storageAccountName, storageAccountKey); BlobServiceClient serviceClient = new BlobServiceClient(new Uri(blobServiceEndpoint), accountCredentials); AccountInfo info = await serviceClient.GetAccountInfoAsync(); await Console.Out.WriteLineAsync($"Connected to Azure Storage Account"); await Console.Out.WriteLineAsync($"Account name:\t{storageAccountName}"); await Console.Out.WriteLineAsync($"Account kind:\t{info?.AccountKind}"); await Console.Out.WriteLineAsync($"Account sku:\t{info?.SkuName}"); await EnumerateContainersAsync(serviceClient); string existingContainerName = "raster-graphics"; await EnumerateBlobsAsync(serviceClient, existingContainerName); } private static async Task EnumerateContainersAsync(BlobServiceClient client) { await foreach (BlobContainerItem container in client.GetBlobContainersAsync()) { await Console.Out.WriteLineAsync($"Container:\t{container.Name}"); } } private static async Task EnumerateBlobsAsync(BlobServiceClient client, string containerName) { BlobContainerClient container = client.GetBlobContainerClient(containerName); await Console.Out.WriteLineAsync($"Searching:\t{container.Name}"); await foreach (BlobItem blob in container.GetBlobsAsync()) { await Console.Out.WriteLineAsync($"Existing Blob:\t{blob.Name}"); } } } -
Save the Program.cs file.
-
In the Visual Studio Code window, on the Menu Bar, select Terminal and then select New Terminal.
-
In the terminal, run the following command to run the .NET web application:
dotnet runNote: If there are any build errors, review the Program.cs file in the Allfiles (F):\Allfiles\Labs\03\Solution\BlobManager folder.
-
Review the output from the currently running console application. The updated output includes metadata about the existing container and blobs.
- Select Kill Terminal or the Recycle Bin icon to close the currently open terminal and any associated processes.
Task 2: Create a new container by using the SDK
-
In the Program class, enter the following code to create a new private static method named GetContainerAsync that’s asynchronous and has two parameter types, BlobServiceClient and string:
private static async Task<BlobContainerClient> GetContainerAsync(BlobServiceClient client, string containerName) { /* Get a new instance of the BlobContainerClient class by using the GetBlobContainerClient method of the BlobServiceClient class, passing in the containerName parameter */ BlobContainerClient container = client.GetBlobContainerClient(containerName); /* Invoke the CreateIfNotExistsAsync method of the BlobContainerClient class */ await container.CreateIfNotExistsAsync(PublicAccessType.Blob); /* Render the name of the container that was potentially created */ await Console.Out.WriteLineAsync($"New Container:\t{container.Name}"); /* Return the container as the result of the GetContainerAsync */ return container; } -
In the Main method, enter the following code at the end of the method to create a variable named newContainerName with a value of vector-graphics:
string newContainerName = "vector-graphics"; -
In the Main method, enter the following code at the end of the method to invoke the GetContainerAsync method, to pass the serviceClient and newContainerName variables as parameters, and to store the result in a variable named containerClient of type BlobContainerClient:
BlobContainerClient containerClient = await GetContainerAsync(serviceClient, newContainerName); - Review the Program.cs file, which should now include:
using Azure.Storage; using Azure.Storage.Blobs; using Azure.Storage.Blobs.Models; using System; using System.Threading.Tasks; public class Program { private const string blobServiceEndpoint = "your blobServiceEndpoint"; private const string storageAccountName = "your storageAccountName"; private const string storageAccountKey = "your storageAccountKey"; public static async Task Main(string[] args) { StorageSharedKeyCredential accountCredentials = new StorageSharedKeyCredential(storageAccountName, storageAccountKey); BlobServiceClient serviceClient = new BlobServiceClient(new Uri(blobServiceEndpoint), accountCredentials); AccountInfo info = await serviceClient.GetAccountInfoAsync(); await Console.Out.WriteLineAsync($"Connected to Azure Storage Account"); await Console.Out.WriteLineAsync($"Account name:\t{storageAccountName}"); await Console.Out.WriteLineAsync($"Account kind:\t{info?.AccountKind}"); await Console.Out.WriteLineAsync($"Account sku:\t{info?.SkuName}"); await EnumerateContainersAsync(serviceClient); string existingContainerName = "raster-graphics"; await EnumerateBlobsAsync(serviceClient, existingContainerName); string newContainerName = "vector-graphics"; BlobContainerClient containerClient = await GetContainerAsync(serviceClient, newContainerName); } private static async Task EnumerateContainersAsync(BlobServiceClient client) { await foreach (BlobContainerItem container in client.GetBlobContainersAsync()) { await Console.Out.WriteLineAsync($"Container:\t{container.Name}"); } } private static async Task EnumerateBlobsAsync(BlobServiceClient client, string containerName) { BlobContainerClient container = client.GetBlobContainerClient(containerName); await Console.Out.WriteLineAsync($"Searching:\t{container.Name}"); await foreach (BlobItem blob in container.GetBlobsAsync()) { await Console.Out.WriteLineAsync($"Existing Blob:\t{blob.Name}"); } } private static async Task<BlobContainerClient> GetContainerAsync(BlobServiceClient client, string containerName) { BlobContainerClient container = client.GetBlobContainerClient(containerName); await container.CreateIfNotExistsAsync(PublicAccessType.Blob); await Console.Out.WriteLineAsync($"New Container:\t{container.Name}"); return container; } } -
Save the Program.cs file.
-
In the Visual Studio Code window, on the Menu Bar, select Terminal and then select New Terminal.
-
In the terminal, run the following command to run the .NET web application:
dotnet runNote: If there are any build errors, review the Program.cs file in the Allfiles (F):\Allfiles\Labs\03\Solution\BlobManager folder.
-
Observe the output from the currently running console application. The updated output includes metadata about the existing container and blobs.
- Select Kill Terminal or the Recycle Bin icon to close the currently open terminal and any associated processes.
Task 3: Upload a new blob by using the portal
-
On the Azure portal’s navigation pane, select the Resource groups link.
-
On the Resource groups blade, select the StorageMedia resource group that you created previously in this lab.
-
On the StorageMedia blade, select the mediastor[yourname] storage account that you created previously in this lab.
-
On the Storage account blade, select the Containers link in the Data storage section.
-
In the Containers section, select the newly created vector-graphics container. You might need to refresh the page to observe the new container.
-
On the Container blade, select Upload.
-
In the Upload blob window, perform the following actions, and then select Upload:
Setting Action Files section Select Browse for files or use the drag and drop feature File Explorer window Allfiles (F):\Allfiles\Labs\03\Starter\Images, select the graph.svg file, and then select Open Overwrite if files already exist check box Ensure that the check box is selected Note: Wait for the blob to upload before you continue with this lab.
Task 4: Access blob URI by using the SDK
-
Switch to the Visual Studio Code window.
-
In the Program class, enter the following code to create a new private static method named GetBlobAsync that’s asynchronous and has two parameter types, BlobContainerClient and string:
private static async Task<BlobClient> GetBlobAsync(BlobContainerClient client, string blobName) { BlobClient blob = client.GetBlobClient(blobName); bool exists = await blob.ExistsAsync(); if (!exists) { await Console.Out.WriteLineAsync($"Blob {blob.Name} not found!"); } else await Console.Out.WriteLineAsync($"Blob Found, URI:\t{blob.Uri}"); return blob; } -
In the Main method, enter the following code at the end of the method to create a variable named uploadedBlobName with a value of graph.svg:
string uploadedBlobName = "graph.svg"; -
In the Main method, enter the following code at the end of the method to invoke the GetBlobAsync method, passing in the containerClient and uploadedBlobName variables as parameters, and to store the result in a variable named blobClient of type BlobClient:
BlobClient blobClient = await GetBlobAsync(containerClient, uploadedBlobName); -
In the Main method, enter the following code at the end of the method to render the Uri property of the blobClient variable:
await Console.Out.WriteLineAsync($"Blob Url:\t{blobClient.Uri}"); - Observe the Program.cs file, which should now include:
using Azure.Storage; using Azure.Storage.Blobs; using Azure.Storage.Blobs.Models; using System; using System.Threading.Tasks; public class Program { private const string blobServiceEndpoint = "your blobServiceEndpoint"; private const string storageAccountName = "your storageAccountName"; private const string storageAccountKey = "your storageAccountKey"; public static async Task Main(string[] args) { StorageSharedKeyCredential accountCredentials = new StorageSharedKeyCredential(storageAccountName, storageAccountKey); BlobServiceClient serviceClient = new BlobServiceClient(new Uri(blobServiceEndpoint), accountCredentials); AccountInfo info = await serviceClient.GetAccountInfoAsync(); await Console.Out.WriteLineAsync($"Connected to Azure Storage Account"); await Console.Out.WriteLineAsync($"Account name:\t{storageAccountName}"); await Console.Out.WriteLineAsync($"Account kind:\t{info?.AccountKind}"); await Console.Out.WriteLineAsync($"Account sku:\t{info?.SkuName}"); await EnumerateContainersAsync(serviceClient); string existingContainerName = "raster-graphics"; await EnumerateBlobsAsync(serviceClient, existingContainerName); string newContainerName = "vector-graphics"; BlobContainerClient containerClient = await GetContainerAsync(serviceClient, newContainerName); string uploadedBlobName = "graph.svg"; BlobClient blobClient = await GetBlobAsync(containerClient, uploadedBlobName); await Console.Out.WriteLineAsync($"Blob Url:\t{blobClient.Uri}"); } private static async Task EnumerateContainersAsync(BlobServiceClient client) { await foreach (BlobContainerItem container in client.GetBlobContainersAsync()) { await Console.Out.WriteLineAsync($"Container:\t{container.Name}"); } } private static async Task EnumerateBlobsAsync(BlobServiceClient client, string containerName) { BlobContainerClient container = client.GetBlobContainerClient(containerName); await Console.Out.WriteLineAsync($"Searching:\t{container.Name}"); await foreach (BlobItem blob in container.GetBlobsAsync()) { await Console.Out.WriteLineAsync($"Existing Blob:\t{blob.Name}"); } } private static async Task<BlobContainerClient> GetContainerAsync(BlobServiceClient client, string containerName) { BlobContainerClient container = client.GetBlobContainerClient(containerName); await container.CreateIfNotExistsAsync(PublicAccessType.Blob); await Console.Out.WriteLineAsync($"New Container:\t{container.Name}"); return container; } private static async Task<BlobClient> GetBlobAsync(BlobContainerClient client, string blobName) { BlobClient blob = client.GetBlobClient(blobName); bool exists = await blob.ExistsAsync(); if (!exists) { await Console.Out.WriteLineAsync($"Blob {blob.Name} not found!"); } else await Console.Out.WriteLineAsync($"Blob Found, URI:\t{blob.Uri}"); return blob; } } -
Save the Program.cs file.
-
In the Visual Studio Code window, on the Menu Bar, select Terminal and then select New Terminal.
-
In the terminal, run the following command to run the .NET web application:
dotnet runNote: If there are any build errors, review the Program.cs file in the Allfiles (F):\Allfiles\Labs\03\Solution\BlobManager folder.
-
Observe the output from the currently running console application. The updated output includes the final URL to access the blob online. Record the value of this URL to use later in the lab.
Note: The URL will likely be similar to the following string:
https://mediastor*[yourname]*.blob.core.windows.net/vector-graphics/graph.svg - Select Kill Terminal or the Recycle Bin icon to close the currently open terminal and any associated processes.
Task 5: Test the URI by using a browser
-
On the taskbar, activate the shortcut menu for the Microsoft Edge icon, and then select New window.
-
In the new browser window, refer to the URL that you previously copied in this lab for the blob.
-
You should now notice the Scalable Vector Graphics (SVG) file in your browser window.
Review
In this exercise, you created containers and managed blobs by using the Storage SDK.