Lab 02: Implement task processing logic by using Azure Functions
Microsoft Azure user interface
Given the dynamic nature of Microsoft cloud tools, you might experience Azure UI changes that occur after the development of this training content. As a result, the lab instructions and lab steps might not align correctly.
Microsoft updates this training course when the community alerts us to needed changes. However, cloud updates occur frequently, so you might encounter UI changes before this training content updates. If this occurs, adapt to the changes, and then work through them in the labs as needed.
Instructions
Before you start
Sign in to the lab environment
Sign in to your Windows 11 virtual machine (VM) by using the following credentials:
- Username:
Admin - Password:
Pa55w.rd
Note: Your instructor will provide instructions to connect to the virtual lab environment.
Review the installed applications
Find the taskbar on your Windows 11 desktop. The taskbar contains the icons for the applications that you’ll use in this lab, including:
- Microsoft Edge
- File Explorer
- Terminal
- Visual Studio Code
Lab Scenario
In this lab, you will demonstrate the ability to create a simple Azure function that echoes text that is entered and sent to the function by using HTTP POST commands. This will illustrate how the function can be triggered over HTTP.
Additionally, you will demonstrate how to execute an Azure function by setting it to execute on a fixed schedule. The function will write a message to a log each time the schedule is triggered.
Finally, you will demonstrate how an Azure function can connect to other Azure resources, such as a storage account. The function will connect to a storage account that you create and return the contents of a file that is stored in the Azure storage account.
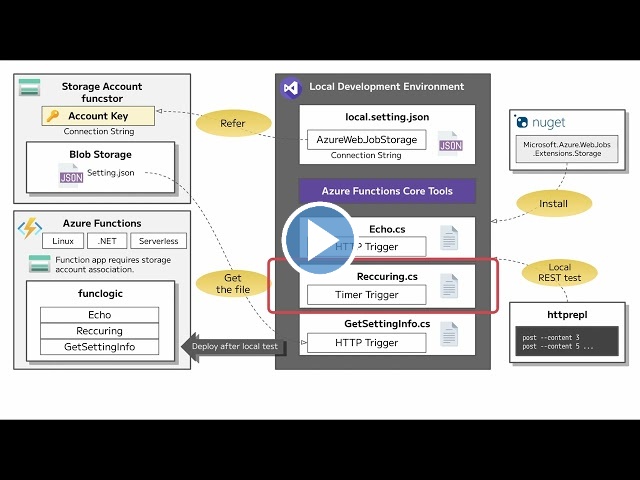
View this video by right-clicking this video link and select ‘Open link in a new tab / new window’.
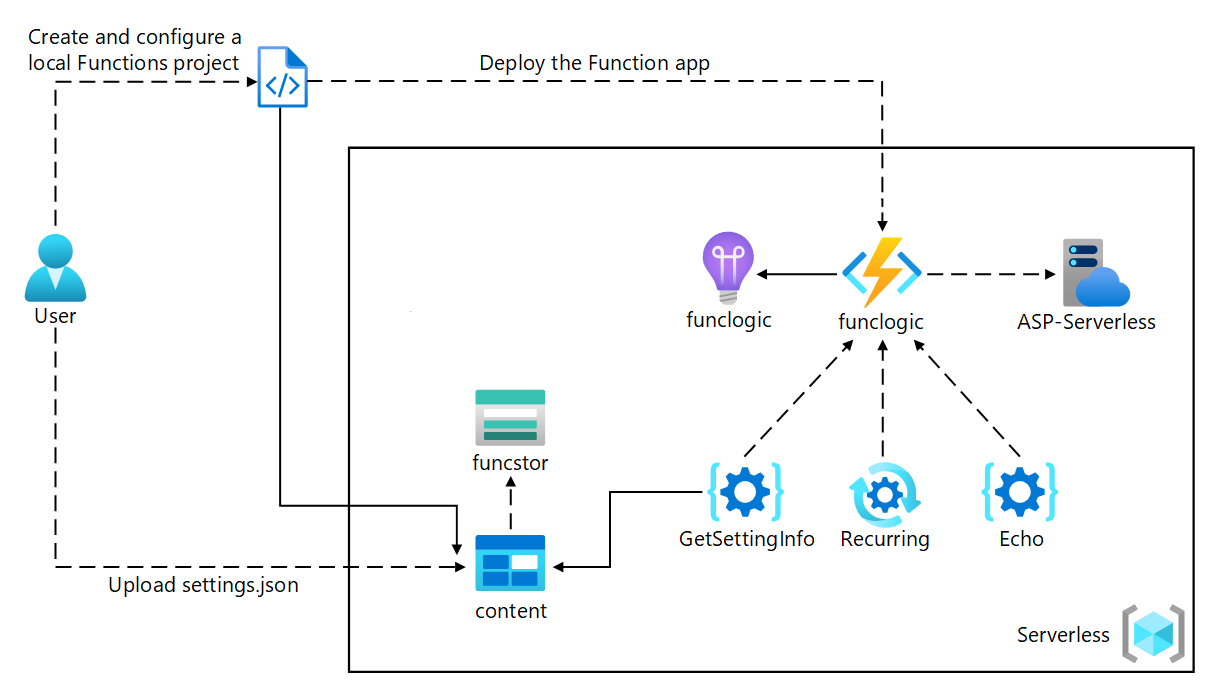
Architecture diagram
Exercise 1: Create Azure resources
Task 1: Open the Azure portal
- On the taskbar, select the Microsoft Edge icon.
-
In the browser window, browse to the Azure portal at
https://portal.azure.com, and then sign in with the account you’ll be using for this lab.Note: If this is your first time signing in to the Azure portal, you’ll be offered a tour of the portal. If you prefer to skip the tour, select Get Started to begin using the portal.
Task 2: Create an Azure Storage account
-
In the Azure portal, use the Search resources, services, and docs text box to search for Storage Accounts, and then, in the list of results, select Storage Accounts.
-
On the Storage accounts blade, select + Create.
-
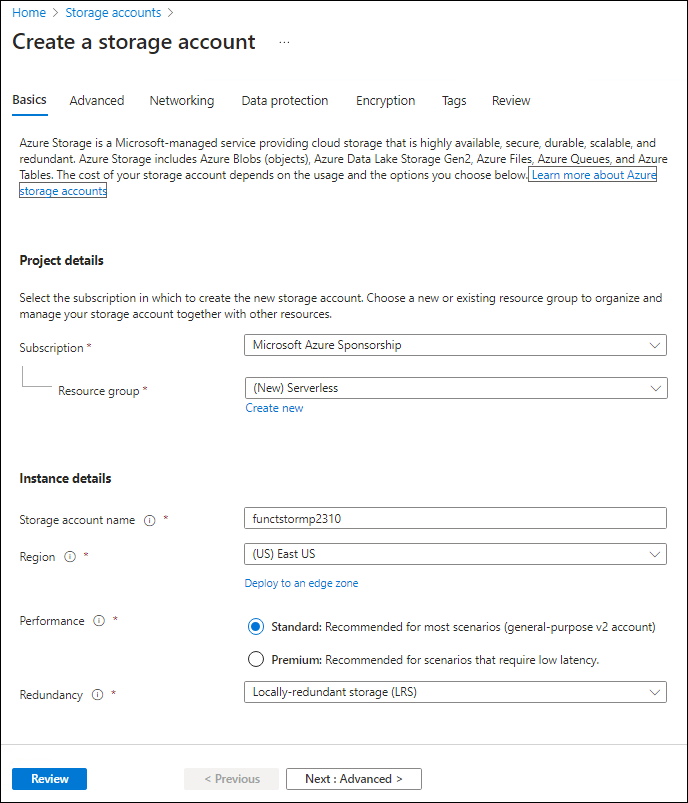
On the Create a storage account blade, on the Basics tab, perform the following actions, and then select Review:
Setting Action Subscription drop-down list Retain the default value Resource group section Select Create new, enter Serverless, and then select OK Storage account name text box Enter funcstor[yourname] Region drop-down list Select (US) East US Primary service No changes Performance section Select the Standard option Redundancy drop-down list Select Locally-redundant storage (LRS) The following screenshot displays the configured settings in the Create a storage account blade.
-
On the Review tab, review the options that you selected during the previous steps.
-
Select Create to create the storage account by using your specified configuration.
Note: Wait for the creation task to complete before you proceed with this lab.
-
On the Overview blade, select the Go to resource button to navigate to the blade of the newly created storage account.
-
On the Storage account blade, in the Security + networking section, select Access keys.
-
On the Access keys blade, select Show keys.
-
On the Access keys blade, review any one of the Connection string\s (using Show button), and then record the value of either Connection string boxes in Notepad. The Key\s are platform managed encryption keys and are not used for this lab.
Note: It doesn’t matter which connection string you choose. They are interchangeable.
-
Open Notepad, and then paste the copied connection string value to Notepad. You’ll use this value later in this lab.
Task 3: Create a function app
-
On the Azure portal’s navigation pane, select the Create a resource link.
-
On the Create a resource blade, in the Search services and marketplace text box, enter Function, and then select Enter.
-
On the Marketplace search results blade, select the Function App result.
-
On the Function App blade, select Create.
-
On the Create Function App blade, ensure Consumption is the selected hosting plan, and then click Select.
-
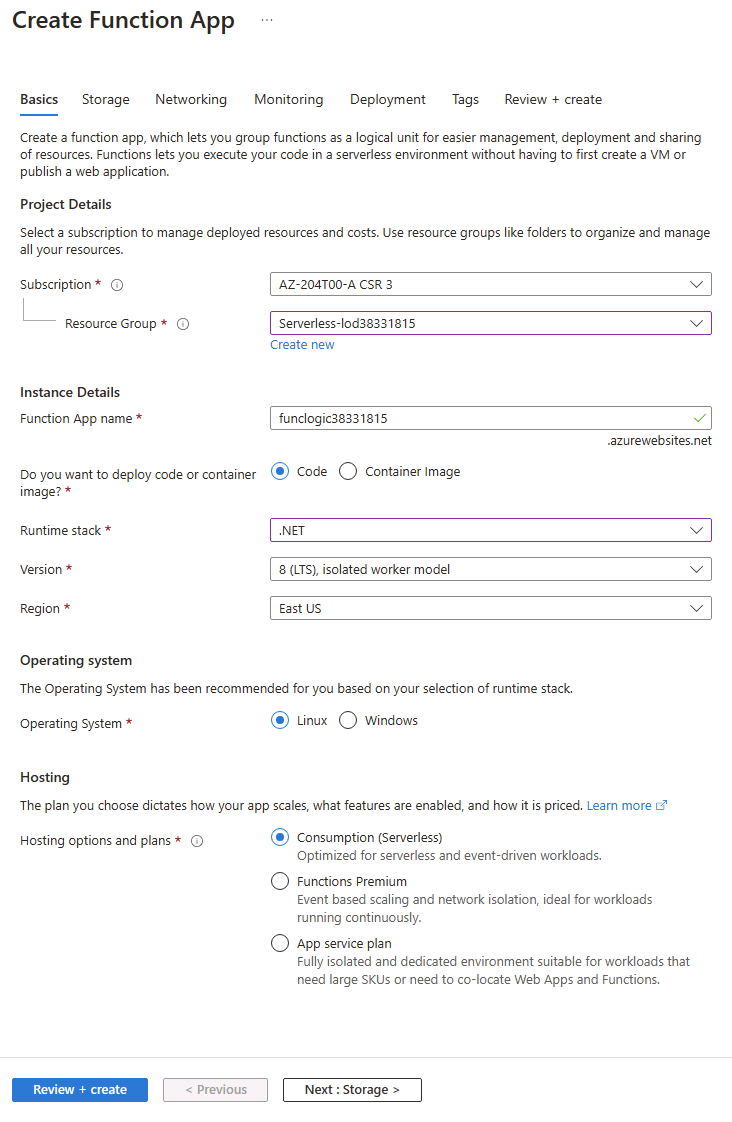
On the Create Function App (Consumption) blade, on the Basics tab, perform the following actions, and then select Next: Storage:
Setting Action Subscription drop-down list Retain the default value Resource group section Select Serverless Function App name text box Enter funclogic[yourname] Runtime stack drop-down list Select .NET Version drop-down list Select **8 (LTS), isolated worker model ** Region drop-down list Select the East US region Operating System option Select Linux The following screenshot displays the configured settings in the Create Function App blade.
-
On the Storage tab, perform the following actions, and then select Review + create:
Setting Action Storage account drop-down list Select the funcstor[yourname] storage account -
On the Review + create tab, review the options that you selected during the previous steps.
-
Select Create to create the function app by using your specified configuration.
Note: Wait for the creation task to complete before you move forward with this lab.
Review
In this exercise, you created all the resources that you’ll use in this lab.
Exercise 2: Configure a local Azure Functions project
Task 1: Initialize a function project
-
On the taskbar, select the Terminal icon.
-
Run the following command to change the current directory to the Allfiles (F):\Allfiles\Labs\02\Starter\func empty directory:
cd F:\Allfiles\Labs\02\Starter\funcNote: In Windows Explorer remove the Read-only attribute from F:\Allfiles\Labs\02\Starter\func\.gitignore file.
-
Run the following command to use the Azure Functions Core Tools to create a new local Azure Functions project in the current directory using the dotnet-isolated runtime:
func init --worker-runtime dotnet-isolated --target-framework net8.0 --forceNote: You can review the documentation to [create a new project][azure-functions-core-tools-new-project] using the Azure Functions Core Tools.
-
Close the Terminal application.
Task 2: Configure a connection string
- On the Start screen, select the Visual Studio Code tile.
- On the File menu, select Open Folder.
- In the File Explorer window that opens, browse to Allfiles (F):\Allfiles\Labs\02\Starter\func, and then select Select Folder.
- On the Explorer pane of the Visual Studio Code window, open the local.settings.json file.
-
Observe the current value of the AzureWebJobsStorage setting:
"AzureWebJobsStorage": "UseDevelopmentStorage=true", - Change the value of the AzureWebJobsStorage element to the connection string of the storage account that you recorded earlier in this lab.
- Save the local.settings.json file.
Task 3: Build and validate a project
- On the taskbar, select the Terminal icon.
-
Run the following command to change the current directory to the Allfiles (F):\Allfiles\Labs\02\Starter\func directory:
cd F:\Allfiles\Labs\02\Starter\func -
Run the following command to build the .NET project:
dotnet build
Review
In this exercise, you created a local project that you’ll use for Azure Functions development.
Exercise 3: Create a function that’s triggered by an HTTP request
Task 1: Create an HTTP-triggered function
- On the taskbar, select the Terminal icon.
-
Run the following command to change the current directory to the Allfiles (F):\Allfiles\Labs\02\Starter\func directory:
cd F:\Allfiles\Labs\02\Starter\func -
Run the following command to use the Azure Functions Core Tools to create a new function named Echo using the HTTP trigger template:
func new --template "HTTP trigger" --name "Echo"Note: You can review the documentation to [create a new function][azure-functions-core-tools-new-function] using the Azure Functions Core Tools.
- Close the currently running Terminal application.
Task 2: Write HTTP-triggered function code
- On the Start screen, select the Visual Studio Code tile.
- On the File menu, select Open Folder.
- In the File Explorer window that opens, browse to Allfiles (F):\Allfiles\Labs\02\Starter\func, and then select Select Folder.
-
On the Explorer pane of the Visual Studio Code window, open the Echo.cs file.
-
Delete all the content within the Echo.cs file, and add the following code. It defines an HTTP-triggered function called “Echo” which takes in a POST request and returns the request body. The ILogger interface is also used for logging information. This function can be used to test HTTP requests and responses.
using System.Net; using Microsoft.Azure.Functions.Worker; using Microsoft.Azure.Functions.Worker.Http; using Microsoft.Extensions.Logging; namespace func { public class Echo { private readonly ILogger _logger; public Echo(ILoggerFactory loggerFactory) { _logger = loggerFactory.CreateLogger<Echo>(); } [Function("Echo")] public HttpResponseData Run([HttpTrigger(AuthorizationLevel.Function, "get", "post")] HttpRequestData req) { _logger.LogInformation("C# HTTP trigger function processed a request."); var response = req.CreateResponse(HttpStatusCode.OK); response.Headers.Add("Content-Type", "text/plain; charset=utf-8"); StreamReader reader = new StreamReader(req.Body); string requestBody = reader.ReadToEnd(); response.WriteString(requestBody); return response; } } } - Select Save to save your changes to the Echo.cs file.
Task 3: Test the HTTP-triggered function by using curl
- On the taskbar, select the Terminal icon.
-
Run the following command to change the current directory to the Allfiles (F):\Allfiles\Labs\02\Starter\func directory:
cd F:\Allfiles\Labs\02\Starter\func -
Run the following command to run the function app project:
func start --buildNote: You can review the documentation to start the function app project locally using the Azure Functions Core Tools.
-
On the lab computer, start Command Prompt.
-
Run the following command to run test the POST REST API call against
http://localhost:7071/api/echowith HTTP request body set to a numeric value of 3:curl -X POST -i http://localhost:7071/api/echo -d 3 -
Run the following command to test the POST REST API call against
http://localhost:7071/api/echowith HTTP request body set to a numeric value of 5:curl -X POST -i http://localhost:7071/api/echo -d 5 -
Run the following command to test the POST REST API call against
http://localhost:7071/api/echowith HTTP request body set to a string value of Hello:curl -X POST -i http://localhost:7071/api/echo -d "Hello" -
Run the following command to test the POST REST API call against
http://localhost:7071/api/echowith HTTP request body set to a JavaScript Object Notation (JSON) value of {“msg”: “Successful”}:curl -X POST -i http://localhost:7071/api/echo -d "{"msg": "Successful"}" - Close all currently running instances of the Terminal application, and the Command Prompt application.
Review
In this exercise, you created a basic function that echoes the content sent through an HTTP POST request.
Exercise 4: Create a function that triggers on a schedule
Task 1: Create a schedule-triggered function
- On the taskbar, select the Terminal icon.
-
Run the following command to change the current directory to the Allfiles (F):\Allfiles\Labs\02\Starter\func directory:
cd F:\Allfiles\Labs\02\Starter\func -
Within the terminal, run the following command to use the Azure Functions Core Tools to create a new function named Recurring, using the Timer trigger template:
func new --template "Timer trigger" --name "Recurring"Note: You can review the documentation to [create a new function][azure-functions-core-tools-new-function] using the Azure Functions Core Tools.
- Close the currently running Terminal application.
Task 2: Observe function code
- On the Start screen, select the Visual Studio Code tile.
- On the File menu, select Open Folder.
- In the File Explorer window that opens, browse to Allfiles (F):\Allfiles\Labs\02\Starter\func, and then select Select Folder.
- On the Explorer pane of the Visual Studio Code window, open the Recurring.cs file.
-
In the code editor, observe the implementation:
using System; using Microsoft.Azure.Functions.Worker; using Microsoft.Extensions.Logging; namespace func { public class Recurring { private readonly ILogger _logger; public Recurring(ILoggerFactory loggerFactory) { _logger = loggerFactory.CreateLogger<Recurring>(); } [Function("Recurring")] public void Run([TimerTrigger("0 */5 * * * *")] TimerInfo myTimer) { _logger.LogInformation($"C# Timer trigger function executed at: {DateTime.Now}"); if (myTimer.ScheduleStatus is not null) { _logger.LogInformation($"Next timer schedule at: {myTimer.ScheduleStatus.Next}"); } } } } - In line 17, replace
"0 */5 * * * *"with"0 */1 * * * *"to set the recurring frequency interval to 1 minute rather than 5 minutes and save the change.
Task 3: Observe function runs
- On the taskbar, select the Terminal icon.
-
Run the following command to change the current directory to the Allfiles (F):\Allfiles\Labs\02\Starter\func directory:
cd F:\Allfiles\Labs\02\Starter\func -
Within the terminal, run the following command to run the function app project:
func start --buildNote: You can review the documentation to [start the function app project locally][azure-functions-core-tools-start-function] using the Azure Functions Core Tools.
- Observe the function run that occurs about every one minute. Each function run should render a simple message to the log.
- Close the currently running Terminal application.
- Close the Visual Studio Code window.
Review
In this exercise, you created a function that runs automatically based on a fixed schedule.
Exercise 5: Create a function that integrates with other services
Task 1: Upload sample content to Azure Blob Storage
- On the Azure portal’s navigation pane, select the Resource groups link.
- On the Resource groups blade, select the Serverless resource group that you created previously in this lab.
- On the Serverless blade, select the funcstor[yourname] storage account that you created previously in this lab.
- On the Storage account blade, select the Containers link in the Data storage section.
- In the Containers section, select + Container.
-
In the New container pop-up window, perform the following actions, and then select Create:
Setting Action Name text box Enter content - Return to the Containers section, and then select the recently created content container.
- On the Container blade, select Upload.
-
In the Upload blob window, perform the following actions, and then select Upload:
Setting Action Files section Select Browse for files or use the drag and drop feature File Explorer window Browse to Allfiles (F):\Allfiles\Labs\02\Starter, select the settings.json file, and then select Open Overwrite if files already exist check box Ensure that this check box is selected Note: Wait for the blob to upload before you continue with this lab.
Task 2: Create an HTTP-triggered function
- On the taskbar, select the Terminal icon.
-
Run the following command to change the current directory to the Allfiles (F):\Allfiles\Labs\02\Starter\func directory:
cd F:\Allfiles\Labs\02\Starter\func -
Within the terminal, run the following command to use the Azure Functions Core Tools to create a new function named GetSettingInfo, using the HTTP trigger template:
func new --template "HTTP trigger" --name "GetSettingInfo"Note: You can review the documentation to [create a new function][azure-functions-core-tools-new-function] using the Azure Functions Core Tools.
- Close the currently running Terminal application.
Task 3: Register Azure Storage Blob extensions
- On the taskbar, select the Terminal icon.
-
Run the following command to change the current directory to the Allfiles (F):\Allfiles\Labs\02\Starter\func directory:
cd F:\Allfiles\Labs\02\Starter\func -
Within the terminal, run the following command to register the Microsoft.Azure.Functions.Worker.Extensions.Storage extension:
dotnet add package Microsoft.Azure.Functions.Worker.Extensions.Storage --version 6.2.0
Task 4: Write HTTP-triggered function code with blob input
- On the Start screen, select the Visual Studio Code tile.
- On the File menu, select Open Folder.
- In the File Explorer window that opens, browse to Allfiles (F):\Allfiles\Labs\02\Starter\func, and then select Select Folder.
- On the Explorer pane of the Visual Studio Code window, open the GetSettingInfo.cs file.
-
Replace the content of the auto-generated code of the function GetSettingInfo starting with line 17 with the following code:
[Function("GetSettingInfo")] public HttpResponseData Run([HttpTrigger(AuthorizationLevel.Function, "get", "post")] HttpRequestData req, [BlobInput("content/settings.json", Connection = "AzureWebJobsStorage")] string blobContent ) { _logger.LogInformation("C# HTTP trigger function processed a request."); _logger.LogInformation($"{blobContent}"); var response = req.CreateResponse(HttpStatusCode.OK); response.Headers.Add("Content-Type", "text/plain; charset=utf-8"); response.WriteString($"{blobContent}"); return response; } -
Review the resulting code, which should consist of the following content (this code returns the contents of a JSON file in an Azure Blob Storage container in response to an HTTP GET request):
using System.Net; using Microsoft.Azure.Functions.Worker; using Microsoft.Azure.Functions.Worker.Http; using Microsoft.Extensions.Logging; namespace func { public class GetSettingInfo { private readonly ILogger _logger; public GetSettingInfo(ILoggerFactory loggerFactory) { _logger = loggerFactory.CreateLogger<GetSettingInfo>(); } [Function("GetSettingInfo")] public HttpResponseData Run([HttpTrigger(AuthorizationLevel.Function, "get", "post")] HttpRequestData req, [BlobInput("content/settings.json", Connection = "AzureWebJobsStorage")] string blobContent ) { _logger.LogInformation("C# HTTP trigger function processed a request."); _logger.LogInformation($"{blobContent}"); var response = req.CreateResponse(HttpStatusCode.OK); response.Headers.Add("Content-Type", "text/plain; charset=utf-8"); response.WriteString($"{blobContent}"); return response; } } } - Select Save to save your changes to the GetSettingInfo.cs file.
Task 5: Test the function by using curl
- On the taskbar, select the Terminal icon.
-
Within the terminal, run the following command to run the function app project:
func start --buildNote: You can review the documentation to [start the function app project locally][azure-functions-core-tools-start-function] using the Azure Functions Core Tools.
-
On the lab computer, start Command Prompt.
-
Run the following command to test the GET REST API call against
http://localhost:7071/api/GetSettingInfo:curl -X GET -i http://localhost:7071/api/GetSettingInfo -
Observe the JSON content of the response from the function app, which should now include:
{ "version": "0.2.4", "root": "/usr/libexec/mews_principal/", "device": { "id": "21e46d2b2b926cba031a23c6919" }, "notifications": { "email": "joseph.price@contoso.com", "phone": "(425) 555-0162 x4151" } } - Close all currently running instances of the Terminal application, and the Command Prompt application.
Review
In this exercise, you created a function that returns the content of a JSON file from a storage account.
Exercise 6: Deploy a local function project to an Azure Functions app
Task 1: Deploy using the Azure Functions Core Tools
- On the taskbar, select the Terminal icon.
-
Run the following command to change the current directory to the Allfiles (F):\Allfiles\Labs\02\Starter\func directory:
cd F:\Allfiles\Labs\02\Starter\func -
From command prompt, run the following command to login to the Azure Command-Line Interface (CLI):
az login - In the Microsoft Edge browser window, enter the name and password of the Microsoft or Azure Active Directory account you are using in this lab, and then select Sign in.
- Return to the currently open Terminal window. Wait for the sign-in process to finish.
-
Within the terminal, run the following command to publish the function app project (replace the
<function-app-name>placeholder with the name of the function app you created earlier in this lab):func azure functionapp publish <function-app-name> --dotnet-version 8.0Note: For example, if your Function App name is funclogicstudent, your command would be
func azure functionapp publish funclogicstudent. You can review the documentation to [publish the local function app project][azure-functions-core-tools-publish-azure] using the Azure Functions Core Tools. - Wait for the deployment to finalize before you move forward with the lab.
- Close the currently running Terminal application.
Task 2: Validate deployment
- On the taskbar, select the Microsoft Edge icon, and select the tab that displays the Azure portal.
- On the Azure portal’s navigation pane, select the Resource groups link.
- On the Resource groups blade, select the Serverless resource group that you created previously in this lab.
- On the Serverless blade, select the funclogic[yourname] function app that you created previously in this lab.
- On the Overview blade in Function App, select the Functions pane.
- On the Functions pane, select the existing GetSettingInfo function.
- In the Function blade, select the Code + Test option in the Developer section.
- In the function editor, select Test/Run.
- In the automatically displayed pane, in the HTTP method drop-down list, select GET.
- Select Run to test the function.
-
In the HTTP response content, review the results of the test run. The JSON content should now include the following code:
{
    "version": "0.2.4",
    "root": "/usr/libexec/mews_principal/",
    "device": {
        "id": "21e46d2b2b926cba031a23c6919"
    },
    "notifications": {
        "email": "joseph.price@contoso.com",
        "phone": "(425) 555-0162 x4151"
    }
}
Review
In this exercise, you deployed a local function project to Azure Functions and validated that the functions work in Azure.