實驗室 10:使用 Azure 服務匯流排佇列,以非同步方式處理訊息
Microsoft Azure 使用者介面
基於 Microsoft 雲端工具的動態性質,您可能會遇到在本訓練內容開發後變更的 Azure UI。 因此,實驗指示可能無法正確對應實驗步驟。
當社群提醒 Microsoft 需要做修改時,我們會更新此訓練課程。 然而,雲端更新經常發生,所以您可能會在此訓練內容更新前遇到 UI 的變更。 如果發生這種情況,請適應變更,然後視需要在實驗中調整。
指示
在您開始使用 Intune 之前
登入實驗室環境
使用下列認證登入您的 Windows 11 虛擬機器 (VM):
- 使用者名稱:
Admin - 密碼:
Pa55w.rd
注意:您的講師會提供連線至虛擬實驗室環境的指示。
檢閱已安裝的應用程式
尋找 Windows 11 桌面上的工作列。 工作列包含此次實驗中會用到的應用程式圖示,包括:
- Microsoft Edge
- Visual Studio Code
實驗情境
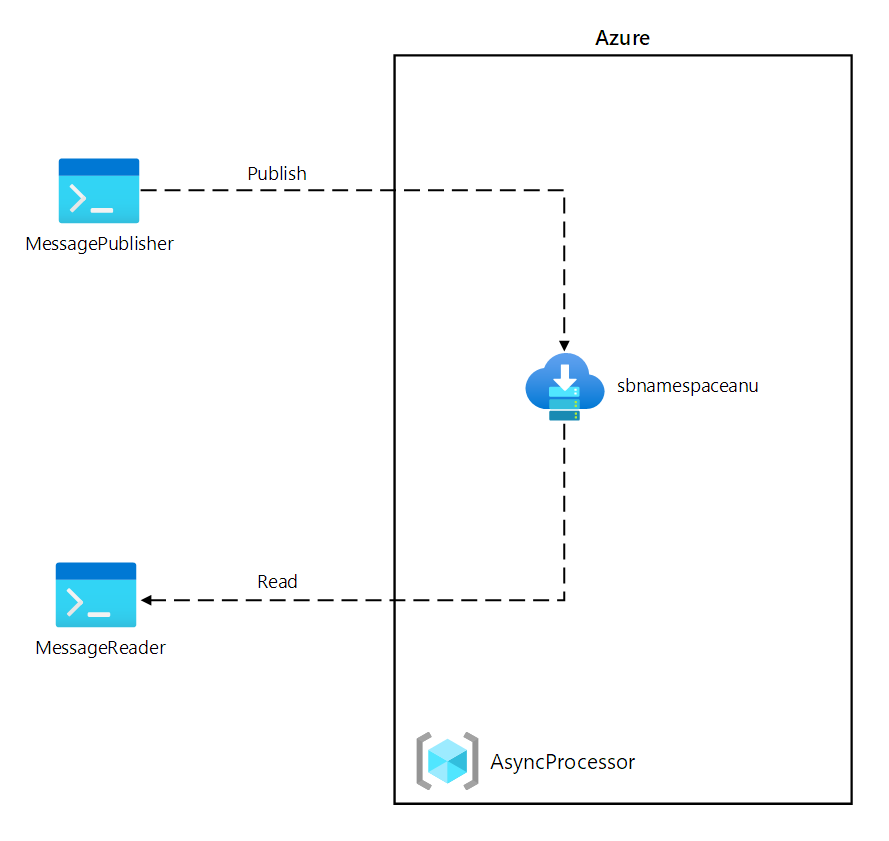
在本實驗中,您將運用 Azure 服務匯流排佇列來建立此案例的概念證明。 為了示範系統的運作方式,您會建立將訊息發佈至系統的 .NET 專案,以及將讀取佇列中訊息的第二個 .NET 應用程式。 第一個應用程式會模擬來自感應器的資料,而第二個應用程式會模擬將讀取佇列中訊息以進行處理的系統。
架構圖
練習 1:建立 Azure 資源
工作 1:開啟 Azure 入口網站
-
在工作列上,選取 Microsoft Edge 圖示。
-
在瀏覽器視窗中,瀏覽至 Azure 入口網站 (
https://portal.azure.com),然後登入您在此實驗要用的帳戶。注意:如果這是您第一次登入 Azure 入口網站,系統會提供入口網站的導覽。 選取 [開始使用] 跳過導覽,並開始使用入口網站。
工作 2:建立 Azure 服務匯流排佇列
-
在 Azure 入口網站中,使用 [搜尋資源、服務和文件] 文字輸入框,搜尋服務匯流排,然後在結果清單中選取 [服務匯流排]。
-
在 [服務匯流排] 窗格上,選取 [+ 建立]。
-
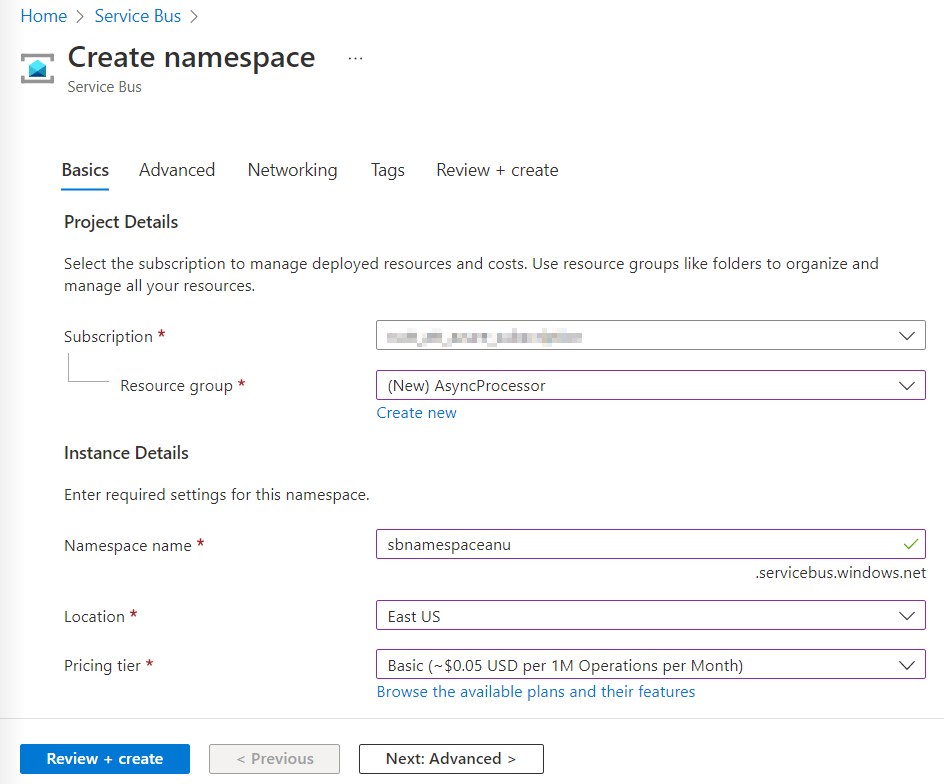
在 [建立命名空間] 窗格的 [基本] 索引標籤上,執行下列動作,然後選取 [檢閱 + 建立]:
設定 動作 [訂閱] 下拉式清單 保留預設值 [資源群組] 區段 選取 [新建],輸入 AsyncProcessor,然後選取 [確定] [命名空間名稱] 文字輸入框 輸入 sbnamespace [您的名稱] [區域] 下拉式清單 選取可以部署 Azure 服務匯流排的任何 Azure 區域 [定價層] 下拉式清單 選取 [基本] 下列螢幕擷取畫面顯示 [建立命名空間] 窗格的 [基本] 索引標籤上的設定。
-
在 [檢閱 + 建立] 索引標籤上,檢閱在先前步驟中選取的選項。
-
選取 [建立] 使用指定的設定,建立 [服務匯流排] 命名空間。
注意:等候建立工作完成,再繼續進行實驗。
-
在 [部署] 窗格上,選取 [移至資源] 按鈕,瀏覽至新建立的 [服務匯流排] 命名空間。
-
在[服務匯流排] ** 命名空間刀鋒視窗的 [設定] 區段中,選取 [共用存取原則]。
-
在原則清單中,選取 [RootManageSharedAccessKey]。
-
在 [主要連接字串] 項目旁的 [SAS 原則:RootManageSharedAccessKey] 窗格上,選取 [複製至剪貼簿] 按鈕,並記錄複製的值。 您會在稍後的實驗中用到此值。
注意:您選擇兩個可用金鑰的任何一個都不會有影響。 它們是可互換的。
-
在 [服務匯流排] ** **命名空間刀鋒視窗的 [實體] 區段中,選取 [佇列],然後選取 [+ 佇列]。
-
在 [建立佇列] 窗格上,檢閱可用的設定,在 [名稱] 文字輸入框中,輸入 messagequeue,然後選取 [建立]。
-
選取 [messagequeue],即可顯示服務匯流排佇列的屬性。
-
保持瀏覽器視窗開啟。 您會在稍後的實驗中用到此視窗。
檢閱
在此練習中,您已建立 Azure 服務匯流排命名空間及服務匯流排佇列,您將在本實驗的其餘部分中使用。
練習 2:建立 .NET Core 專案以發佈訊息至服務匯流排佇列
工作 1:建立 .NET Core 專案
-
從實驗用的電腦啟動 Visual Studio Code。
-
在 Visual Studio Code 的 [檔案] 功能表中,選取 [開啟資料夾]。
-
在 [開啟資料夾] 視窗中,瀏覽至 Allfiles (F):\Allfiles\Labs\10\Starter\MessagePublisher,然後選取 [選取資料夾]。
-
在 [Visual Studio Code] 視窗的 [功能表列] 上選取 [終端],然後選取 [新增終端]。
-
在終端提示執行下列命令,在目前的資料夾中,建立名為 MessagePublisher 的新 .NET 專案:
dotnet new console --framework net8.0 --name MessagePublisher --output .注意:dotnet new 命令會在與專案同名的資料夾中,建立新的主控台專案。
-
執行下列命令,從 NuGet 匯入 7.17.3 版的 Azure.Messaging.ServiceBus 套件:
dotnet add package Azure.Messaging.ServiceBus --version 7.17.3注意:dotnet add package 命令會從 NuGet 新增 Azure.Messaging.ServiceBus 封裝。 如需詳細資訊,請移至 Azure.Messaging.ServiceBus。
-
在終端提示執行下列命令,組建 .NET Core 主控台應用程式:
dotnet build -
選取 [終止終端] (資源回收筒圖示),關閉終端窗格和任何相關的程序。
工作 2:發佈訊息至 Azure 服務匯流排佇列
-
在 [Visual Studio Code] ** 視窗的 [Explorer] 窗格中,開啟 **Program.cs 檔案。
-
在 Program.cs 檔案的 [程式碼編輯器] 索引標籤上,刪除現有檔案中所有的程式碼。
-
新增下列程式碼:
using System; using System.Threading.Tasks; using Azure.Messaging.ServiceBus; namespace MessagePublisher { public class Program { /* The `<serviceBus-connection-string>` placeholder represents the connection string to the target Azure Service Bus namespace */ private const string serviceBusConnectionString = "<serviceBus-connection-string>"; /* To create a string constant named "queueName" with a value of "messagequeue", matching the name of the Service Bus queue.*/ private const string queueName = "messagequeue"; /* Stores the number of messages to be sent to the target queue */ private const int numOfMessages = 3; /* To create a Service Bus client that will own the connection to the target queue */ static ServiceBusClient client = default!; /* To create a Service Bus sender that will be used to publish messages to the target queue */ static ServiceBusSender sender = default!; public static async Task Main(string[] args) { /* To initialize "client" of type "ServiceBusClient" that will provide connectivity to the Service Bus namespace and "sender" that will be responsible for sending messages */ client = new ServiceBusClient(serviceBusConnectionString); sender = client.CreateSender(queueName); /* To create a "ServiceBusMessageBatch" object that will allow you to combine multiple messages into a batch by using the "TryAddMessage" method */ using ServiceBusMessageBatch messageBatch = await sender.CreateMessageBatchAsync(); /* To add messages to a batch and throw an exception if a message size exceeds the limits supported by the batch */ for (int i = 1; i <= numOfMessages; i++) { if (!messageBatch.TryAddMessage(new ServiceBusMessage($"Message {i}"))) { throw new Exception($"The message {i} is too large to fit in the batch."); } } try { /* To create a try block, with "sender" asynchronously publishing messages in the batch to the target queue */ await sender.SendMessagesAsync(messageBatch); Console.WriteLine($"A batch of {numOfMessages} messages has been published to the queue."); } finally { /* To create a finally block that asynchronously disposes of the "sender" and "client" objects, releasing any network and unmanaged resources */ await sender.DisposeAsync(); await client.DisposeAsync(); } } } }注意:透過將 serviceBusConnectionString 字串常數的值設定為服務匯流排命名空間的 「主要連接字串」 來更新它,並驗證 queueName 常數是否設定為 messagequeue,與您在本練習前面所建立的服務匯流排佇列的名稱相符
注意:服務匯流排用戶端可以安全快取,並作為應用程式的存留期的 singleton 使用。 這被視為是定期發佈和讀取訊息時的最佳做法之一。
-
儲存 Program.cs 檔案。
-
在終端提示執行下列命令,啟動 .NET Core 主控台應用程式:
dotnet run注意:如果您遇到任何錯誤,請檢閱 Allfiles (F):\Allfiles\Labs\10\Solution\MessagePublisher 資料夾中的 Program.cs 檔案。
-
確認顯示在終端的主控台訊息是否指出已發佈三則訊息的批次至佇列。
-
選取 [終止終端] (資源回收筒圖示),關閉終端窗格和任何相關的程序。
-
切換至顯示 Azure 入口網站中服務匯流排佇列 messagequeue 的 Microsoft Edge 瀏覽器。
-
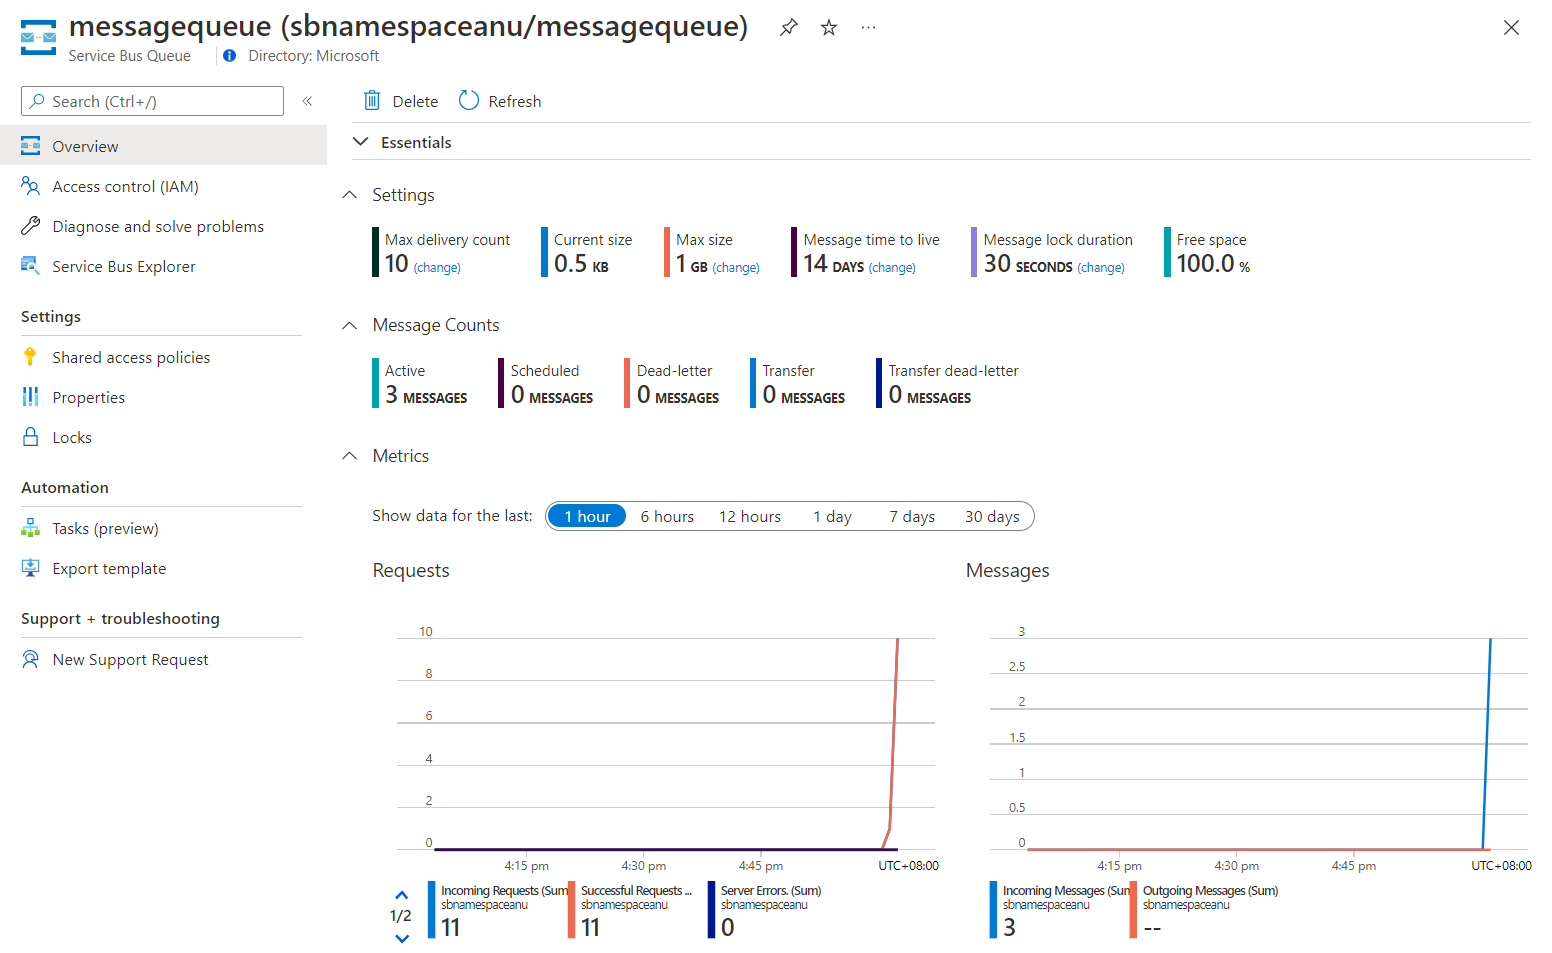
檢閱 [基本] 窗格,並注意佇列包含了三則有效訊息。
下列螢幕擷取畫面顯示服務匯流排佇列計量和訊息計數。
-
選取 [服務匯流排總管]**。
-
選取 [查看模式]** 索引標籤標頭後,在 [佇列]** 索引標籤上,選取 [從開始查看]** 按鈕。
-
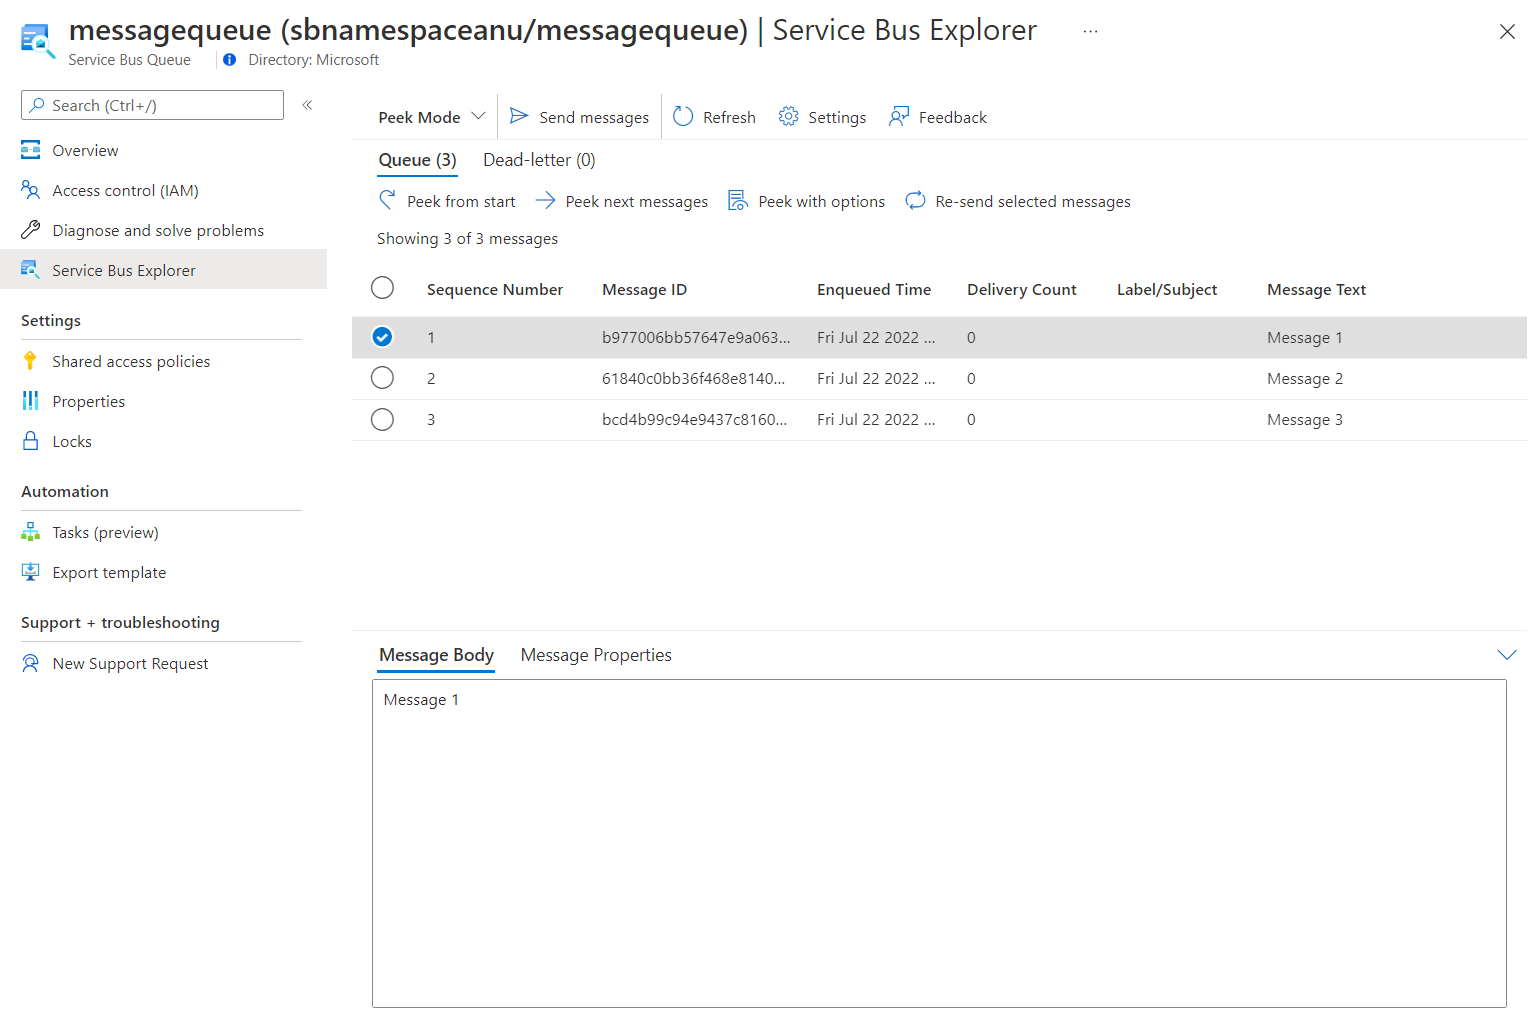
確認佇列包含三則訊息。
-
選取第一則訊息,並在 [訊息] 窗格中檢閱訊息的內容。
下列螢幕擷取畫面顯示第一則訊息的內容。
-
關閉 [訊息] 窗格。
檢閱
在此練習中,您已設定發佈訊息至 Azure 服務匯流排佇列的 .NET 專案。
練習 3:建立 .NET Core 專案以從服務匯流排佇列讀取訊息
工作 1:建立 .NET 專案
-
從實驗用的電腦啟動 Visual Studio Code。
-
在 Visual Studio Code 的 [檔案] 功能表中,選取 [開啟資料夾]。
-
在 [開啟資料夾] 視窗中,瀏覽至 Allfiles (F):\Allfiles\Labs\10\Starter\MessageReader,然後選取 [選取資料夾]。
-
在 [Visual Studio Code] 視窗的 [功能表列] 上選取 [終端],然後選取 [新增終端]。
-
在終端提示執行下列命令,在目前的資料夾中,建立名為 MessageReader 的新 .NET 專案:
dotnet new console --framework net8.0 --name MessageReader --output . -
執行下列命令,從 NuGet 匯入 7.17.3 版的 Azure.Messaging.ServiceBus 套件:
dotnet add package Azure.Messaging.ServiceBus --version 7.17.3 -
在終端提示執行下列命令,組建 .NET Core 主控台應用程式:
dotnet build -
選取 [終止終端] (資源回收筒圖示),關閉終端窗格和任何相關的程序。
工作 2:從 Azure 服務匯流排佇列讀取訊息
-
在 [Visual Studio Code] ** 視窗的 [Explorer] 窗格中,開啟 **Program.cs 檔案。
-
在 Program.cs 檔案的 [程式碼編輯器] 索引標籤上,刪除現有檔案中所有的程式碼。
-
新增下列程式碼:
using System; using System.Threading.Tasks; using Azure.Messaging.ServiceBus; namespace MessageReader { class Program { /* The `<serviceBus-connection-string>` placeholder represents the connection string to the target Azure Service Bus namespace */ static string serviceBusConnectionString = "<serviceBus-connection-string>"; /* To create a string constant named "queueName" with a value of "messagequeue", matching the name of the Service Bus queue.*/ static string queueName = "messagequeue"; static ServiceBusClient client= default!; /* Create a ServiceBusProcessor that will be used to process messages from the queue */ static ServiceBusProcessor processor = default!; static async Task MessageHandler(ProcessMessageEventArgs args) { /* To create a static async "MessageHandler" task that displays the body of messages in the queue as they are being processed and deletes them after the processing completes */ string body = args.Message.Body.ToString(); Console.WriteLine($"Received: {body}"); await args.CompleteMessageAsync(args.Message); } static Task ErrorHandler(ProcessErrorEventArgs args) { /* To create a static async "ErrorHandler" task that manages any exceptions encountered during message processing */ Console.WriteLine(args.Exception.ToString()); return Task.CompletedTask; } static async Task Main() { /* To initialize "client" of type "ServiceBusClient" that will provide connectivity to the Service Bus namespace and "processor" that will be responsible for processing of messages */ client = new ServiceBusClient(serviceBusConnectionString); processor = client.CreateProcessor(queueName, new ServiceBusProcessorOptions()); try { /* To create a try block, which first implements a message and error processing handler, initiates message processing, and stops processing following a user input */ processor.ProcessMessageAsync += MessageHandler; processor.ProcessErrorAsync += ErrorHandler; await processor.StartProcessingAsync(); Console.WriteLine("Wait for a minute and then press any key to end the processing"); Console.ReadKey(); Console.WriteLine("\nStopping the receiver..."); await processor.StopProcessingAsync(); Console.WriteLine("Stopped receiving messages"); } finally { /* To create a finally block that asynchronously disposes of the "processor" and "client" objects, releasing any network and unmanaged resources */ await processor.DisposeAsync(); await client.DisposeAsync(); } } } }注意:將 serviceBusConnectionString 字串常數的值設定為您稍早在本實驗中記錄的 [服務匯流排] 命名空間的 [主要連接字串]。
-
儲存 Program.cs 檔案。
-
在終端提示執行下列命令,啟動 .NET Core 主控台應用程式:
dotnet run注意:如果您遇到任何錯誤,請檢閱 Allfiles (F):\Allfiles\Labs\10\Solution\MessageReader 資料夾中的 Program.cs 檔案。
-
確認顯示在終端的主控台訊息是否指出已收到佇列中的三則訊息。
-
在終端提示按下任何按鍵,停止接收器並終止應用程式執行。
-
選取 [終止終端] (資源回收筒圖示),關閉終端窗格和任何相關的程序。
-
切換回顯示 Azure 入口網站中服務匯流排佇列 messagequeue 的 Microsoft Edge 瀏覽器。
-
在 [Service Bus Explorer] (預覽) 刀鋒視窗上,選取 [從頭查看],並注意佇列中的有效訊息數目已變更為 0。
檢閱
在此練習中,您會使用 .NET 程式庫,從 Azure 服務匯流排佇列,讀取並刪除訊息。